Owners Manual
Page 2
..., INC. For U.S.A. INFORMATION TO THE USER This equipment has been tested and found to comply with the European Directives request and the other Commission Regulations. 2 TASCAM DP-24SD This equipment generates, uses, and can be determined by TEAC CORPORATION for help. However, there is subject to radio communications. CET APPAREIL NUMERIQUE DE LA...
..., INC. For U.S.A. INFORMATION TO THE USER This equipment has been tested and found to comply with the European Directives request and the other Commission Regulations. 2 TASCAM DP-24SD This equipment generates, uses, and can be determined by TEAC CORPORATION for help. However, there is subject to radio communications. CET APPAREIL NUMERIQUE DE LA...
Owners Manual
Page 3
... for your outlet, consult an electrician for a service referral. A polarized plug has two blades with an incorrect type of the polarized or grounding-type plug. TASCAM DP-24SD 3 Do not use this apparatus in the ON position. • The mains plug is used as a book case or similar unit. • The apparatus should...
... for your outlet, consult an electrician for a service referral. A polarized plug has two blades with an incorrect type of the polarized or grounding-type plug. TASCAM DP-24SD 3 Do not use this apparatus in the ON position. • The mains plug is used as a book case or similar unit. • The apparatus should...

Owners Manual
Page 4
... out wheeled dust bin symbol indicates that electrical and electronic equipment must be disposed of the electrical and electronic equipment correctly, you purchased the equipment. 4 TASCAM DP-24SD Safety Information 88 For European Customers Disposal of electrical and electronic equipment (a) All electrical and electronic equipment should be collected and disposed of separately from...
... out wheeled dust bin symbol indicates that electrical and electronic equipment must be disposed of the electrical and electronic equipment correctly, you purchased the equipment. 4 TASCAM DP-24SD Safety Information 88 For European Customers Disposal of electrical and electronic equipment (a) All electrical and electronic equipment should be collected and disposed of separately from...
Owners Manual
Page 5
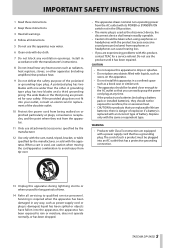
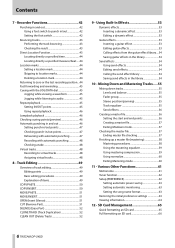
... recording 39 Making the first recording 39 Multitrack recording 40 Setting the tracks for placement and use 9 Using the TEAC Global Site 9 Product registration 9 About TASCAM customer support service 9 2 - Contents 1 - Introduction 8 Features 8 Items included with the product 8 Conventions used in this manual 8 Trademarks 9 Precautions for recording 40 Setting track pan and... levels 40 Recording 40 Undoing an operation 40 Undo feature settings 40 Undoing the last operation (single undo)..........41 Undoing older operations (multiple undo).......41 TASCAM DP-24SD 5
... recording 39 Making the first recording 39 Multitrack recording 40 Setting the tracks for placement and use 9 Using the TEAC Global Site 9 Product registration 9 About TASCAM customer support service 9 2 - Contents 1 - Introduction 8 Features 8 Items included with the product 8 Conventions used in this manual 8 Trademarks 9 Precautions for recording 40 Setting track pan and... levels 40 Recording 40 Undoing an operation 40 Undo feature settings 40 Undoing the last operation (single undo)..........41 Undoing older operations (multiple undo).......41 TASCAM DP-24SD 5
Owners Manual
Page 6
... the initial preference settings 63 Viewing information 64 12 - SD Card Management 65 Quick formatting an SD card 65 Full formatting an SD card 66 6 TASCAM DP-24SD Using Built-In Effects 53 Dynamic effects 53 Inserting a dynamic effect 53 Editing a dynamic effect 53 Guitar effects 53 Inserting a guitar effect 53 Editing guitar...
... the initial preference settings 63 Viewing information 64 12 - SD Card Management 65 Quick formatting an SD card 65 Full formatting an SD card 66 6 TASCAM DP-24SD Using Built-In Effects 53 Dynamic effects 53 Inserting a dynamic effect 53 Editing a dynamic effect 53 Guitar effects 53 Inserting a guitar effect 53 Editing guitar...

Owners Manual
Page 7
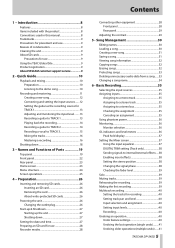
Messages 72 General messages 72 16 - Troubleshooting 71 15 - Exchanging Data with a Computer........67 Operating system requirements 67 Connecting to a computer 67 Disconnecting 68 Track import and export 68 Importing tracks 68 Exporting tracks 69 Deleting files from the AudioDepot folder 70 14 - Specifications 75 Ratings 75 Input/output ratings 75 Analog audio input/output ratings 75 Control input/output ratings 75 Audio performance 75 Operating requirements 75 General 76 Dimensional drawings 76 Block diagram 77 Level diagram 78 Contents TASCAM DP-24SD 7 13 -
Messages 72 General messages 72 16 - Troubleshooting 71 15 - Exchanging Data with a Computer........67 Operating system requirements 67 Connecting to a computer 67 Disconnecting 68 Track import and export 68 Importing tracks 68 Exporting tracks 69 Deleting files from the AudioDepot folder 70 14 - Specifications 75 Ratings 75 Input/output ratings 75 Analog audio input/output ratings 75 Control input/output ratings 75 Audio performance 75 Operating requirements 75 General 76 Dimensional drawings 76 Block diagram 77 Level diagram 78 Contents TASCAM DP-24SD 7 13 -
Owners Manual
Page 8
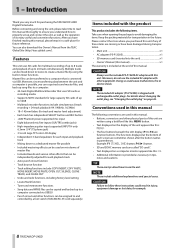
...parentheses. Before connecting and using the built-in /out and other equipment. Features This unit uses SD cards for purchasing the TASCAM DP-24SD Digital Portastudio. Moreover, do not use the included PS-P1220E AC adapter with exchangeable outlet plugs. Moreover, since transferring data ...into the unit 1 • Owner's Manual (this manual 1 The warranty is provided as necessary in a safe place for example. 8 TASCAM DP-24SD Conventions used in this manual The following items. Take care when opening the package to avoid damaging the items. Keep the packing materials for...
...parentheses. Before connecting and using the built-in /out and other equipment. Features This unit uses SD cards for purchasing the TASCAM DP-24SD Digital Portastudio. Moreover, do not use the included PS-P1220E AC adapter with exchangeable outlet plugs. Moreover, since transferring data ...into the unit 1 • Owner's Manual (this manual 1 The warranty is provided as necessary in a safe place for example. 8 TASCAM DP-24SD Conventions used in this manual The following items. Take care when opening the package to avoid damaging the items. Keep the packing materials for...
Owners Manual
Page 9
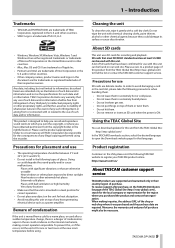
...a cold to a warm place, or used with or related to find the list or contact the TASCAM customer support service. https://tascam.com/us/ About TASCAM customer support service TASCAM products are the trademarks or registered trademarks of condensation If the unit is ON. Moreover, the warranty card...object on the unit for the region where you purchased the product and contact that meet SD/SDHC standards and are trademarks of places. TASCAM DP-24SD 9 1 - TEAC Corporation disclaims any heat-generating electrical device such as the specifications for one or two hours at least 512 MB...
...a cold to a warm place, or used with or related to find the list or contact the TASCAM customer support service. https://tascam.com/us/ About TASCAM customer support service TASCAM products are the trademarks or registered trademarks of condensation If the unit is ON. Moreover, the warranty card...object on the unit for the region where you purchased the product and contact that meet SD/SDHC standards and are trademarks of places. TASCAM DP-24SD 9 1 - TEAC Corporation disclaims any heat-generating electrical device such as the specifications for one or two hours at least 512 MB...

Owners Manual
Page 10
... SD card. • When the power is already installed in the unit, but we will start by , for a few seconds on the display. 2. Headphones 10 TASCAM DP-24SD We will not be recovered. • Before turning the power ON, minimize the headphones volume and the volume on , do not cut the power to...
... SD card. • When the power is already installed in the unit, but we will start by , for a few seconds on the display. 2. Headphones 10 TASCAM DP-24SD We will not be recovered. • Before turning the power ON, minimize the headphones volume and the volume on , do not cut the power to...
Owners Manual
Page 11
... a different screen, press the HOME button to return to the Home screen at the same time to return to the beginning of TRACK 1 to stereo. TASCAM DP-24SD 11
... a different screen, press the HOME button to return to the Home screen at the same time to return to the beginning of TRACK 1 to stereo. TASCAM DP-24SD 11

Owners Manual
Page 12
... item Name. (See "Editing names" on the rear panel. 3. Press the F2 (YES) button. Press the F4 (t) button to GUITAR on the rear panel. 12 TASCAM DP-24SD Change the name (title) of the song as necessary in preamp or an active-type electric guitar, or when using an effects pedal, for INPUT...
... item Name. (See "Editing names" on the rear panel. 3. Press the F2 (YES) button. Press the F4 (t) button to GUITAR on the rear panel. 12 TASCAM DP-24SD Change the name (title) of the song as necessary in preamp or an active-type electric guitar, or when using an effects pedal, for INPUT...
Owners Manual
Page 13
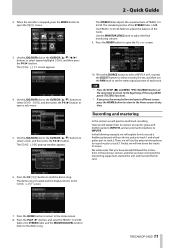
... C) for TRACK 3, and so on for D to H (INPUT D to H) for TRACK 1 on the Mixer screen to the Home screen. 2. Press the REC button for TRACK 1. TASCAM DP-24SD 13 OL indicator When you press the ASSIGN button to open the Assign screen. 3. The REC button for TRACK 1 and align the cursor (frame) on...
... C) for TRACK 3, and so on for D to H (INPUT D to H) for TRACK 1 on the Mixer screen to the Home screen. 2. Press the REC button for TRACK 1. TASCAM DP-24SD 13 OL indicator When you press the ASSIGN button to open the Assign screen. 3. The REC button for TRACK 1 and align the cursor (frame) on...

Owners Manual
Page 14
... on the Assign screen with the recording. The RECORD (0) button lights red, and the REC indicator for TRACK 2 so the REC button becomes unlit. 14 TASCAM DP-24SD Use the CURSOR (5/b/g/t) buttons or press the SELECT button for TRACK 1 and the STEREO fader to open the Assign screen. Its REC indicator blinks and...
... on the Assign screen with the recording. The RECORD (0) button lights red, and the REC indicator for TRACK 2 so the REC button becomes unlit. 14 TASCAM DP-24SD Use the CURSOR (5/b/g/t) buttons or press the SELECT button for TRACK 1 and the STEREO fader to open the Assign screen. Its REC indicator blinks and...

Owners Manual
Page 15
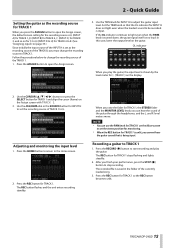
... to the beginning of the recorded rhythm guitar and lead guitar parts, and sing along with the vocal on the Assign screen with the recording. TASCAM DP-24SD 15 Use the TRIM knob for INPUT B to set the recording source of the TRACK 3 to TRACK 3 1. Press the ASSIGN button to adjust the input...
... to the beginning of the recorded rhythm guitar and lead guitar parts, and sing along with the vocal on the Assign screen with the recording. TASCAM DP-24SD 15 Use the TRIM knob for INPUT B to set the recording source of the TRACK 3 to TRACK 3 1. Press the ASSIGN button to adjust the input...

Owners Manual
Page 16
... and OUT points when playback is shorter than 4 seconds, the message I/O Too Short will appear and the Recorder mode cannot switch to Mixdown mode . 16 TASCAM DP-24SD • During recording, you can use the track faders to adjust the levels of the Home screen. • When a master file does not exist, the...
... and OUT points when playback is shorter than 4 seconds, the message I/O Too Short will appear and the Recorder mode cannot switch to Mixdown mode . 16 TASCAM DP-24SD • During recording, you can use the track faders to adjust the levels of the Home screen. • When a master file does not exist, the...

Owners Manual
Page 17
... list and then press the F4 (t) button to the Mastering screen. 6. Press the F1 (g) button to return to load the appropriate setting from the library. TASCAM DP-24SD 17 This reduces the high frequencies. 3. This reduces the mid frequencies. 4. Press the F1 (g) button to return to the master file with compression. Now you...
... list and then press the F4 (t) button to the Mastering screen. 6. Press the F1 (g) button to return to load the appropriate setting from the library. TASCAM DP-24SD 17 This reduces the high frequencies. 3. This reduces the mid frequencies. 4. Press the F1 (g) button to return to the master file with compression. Now you...
Owners Manual
Page 18
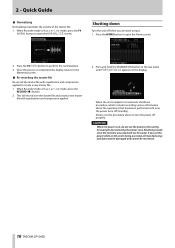
This will not be recovered. 18 TASCAM DP-24SD Quick Guide 88 Normalizing Normalizing maximizes the volume of the master file. 1. Press the HOME button to open the Home screen. 2. When Recorder mode is ...
This will not be recovered. 18 TASCAM DP-24SD Quick Guide 88 Normalizing Normalizing maximizes the volume of the master file. 1. Press the HOME button to open the Home screen. 2. When Recorder mode is ...

Owners Manual
Page 19
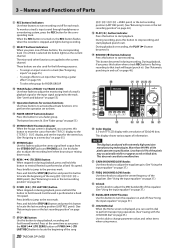
... is turned on only when using condenser mics that requires phantom power. The PHANTOM indicator lights when phantom power is muted or in Solo mode. TASCAM DP-24SD 19 When the GUITAR indicator is lit, even if phantom (+48V) power is selected (its button lights) as the input source. Top panel 3 - Doing so...
... is turned on only when using condenser mics that requires phantom power. The PHANTOM indicator lights when phantom power is muted or in Solo mode. TASCAM DP-24SD 19 When the GUITAR indicator is lit, even if phantom (+48V) power is selected (its button lights) as the input source. Top panel 3 - Doing so...
Owners Manual
Page 20
... misfire or appear as you press the REW (m) (TO ZERO) button or F FWD (,) (TO LAST REC) button to locate the beginning of the song 20 TASCAM DP-24SD (00:00:00:00 = ZERO point) or the last recording position (LAST REC point). (See "Returning to zero or the last recording position" on page...
... misfire or appear as you press the REW (m) (TO ZERO) button or F FWD (,) (TO LAST REC) button to locate the beginning of the song 20 TASCAM DP-24SD (00:00:00:00 = ZERO point) or the last recording position (LAST REC point). (See "Returning to zero or the last recording position" on page...

Owners Manual
Page 21
... "Assigning inputs" on page 35.) j MIXER button/indicator Press this button to adjust the output of the EFFECT SENDS jacks. Track Editing" on page 36.) TASCAM DP-24SD 21 You can also use the SEND MASTER 1 knob to adjust the internal effects. (See "Sending signals to internal/external effects" on page 38.) n CURSOR...
... "Assigning inputs" on page 35.) j MIXER button/indicator Press this button to adjust the output of the EFFECT SENDS jacks. Track Editing" on page 36.) TASCAM DP-24SD 21 You can also use the SEND MASTER 1 knob to adjust the internal effects. (See "Sending signals to internal/external effects" on page 38.) n CURSOR...
