Owners Manual
Page 1
The unit will be labeled as "CD-A580 v2" when necessary to differentiate the original CD-A580 (discontinued). D01310420E CD-A580 (CD-A580 / CD-A580 v2) CD Player / Cassette Deck OWNER'S MANUAL Some specifications have a "V2" inscribed on USB flash drives will be changed. The version 2 model will have been changed starting with production in July 2022, and the names and folder structure of files stored on the unit's front panel (page 13).
The unit will be labeled as "CD-A580 v2" when necessary to differentiate the original CD-A580 (discontinued). D01310420E CD-A580 (CD-A580 / CD-A580 v2) CD Player / Cassette Deck OWNER'S MANUAL Some specifications have a "V2" inscribed on USB flash drives will be changed. The version 2 model will have been changed starting with production in July 2022, and the names and folder structure of files stored on the unit's front panel (page 13).

Owners Manual
Page 5
... function 36 Troubleshooting 37 MP3 playback order 39 Maintenance 39 Specifications 40 Playback Recording LINE IN LINE IN CD/CD-R/CD-RW (Audio CD/MP3 disc) e "Listening to a CD" on page 18 Cassette tape e "Listening to a cassette tape" on page 24 MP3 files on a USB flash drive e "Listening to get the best ...this TEAC product. Read this manual carefully to files on a USB flash drive" on page 26 Record on a USB flash drive from a CD, a cassette tape or an external source e "Recording on a USB flash drive" on page 28 Record on page 34 Timer-controlled playback Timer-controlled recording ...
... function 36 Troubleshooting 37 MP3 playback order 39 Maintenance 39 Specifications 40 Playback Recording LINE IN LINE IN CD/CD-R/CD-RW (Audio CD/MP3 disc) e "Listening to a CD" on page 18 Cassette tape e "Listening to a cassette tape" on page 24 MP3 files on a USB flash drive e "Listening to get the best ...this TEAC product. Read this manual carefully to files on a USB flash drive" on page 26 Record on a USB flash drive from a CD, a cassette tape or an external source e "Recording on a USB flash drive" on page 28 Record on page 34 Timer-controlled playback Timer-controlled recording ...

Owners Manual
Page 8
... played by using chemicals such as to the disc's plastic surface. Types of a CD-R or CD-RW disc, read the precautions supplied with the disc or contact the disc manufacturer. Tape types There are extremely thin and stretch easily. Cassette tapes that allow recording for longer than 90 minutes sometimes get caught in...
... played by using chemicals such as to the disc's plastic surface. Types of a CD-R or CD-RW disc, read the precautions supplied with the disc or contact the disc manufacturer. Tape types There are extremely thin and stretch easily. Cassette tapes that allow recording for longer than 90 minutes sometimes get caught in...

Owners Manual
Page 9
...but this unit. oo This unit cannot copy or move files. oo Max. Recording This unit can record sound from a CD to USB flash drives in the cassette shell. Compatibility oo Only USB flash drive can be used based on the detection holes in MP3 format. See the TEAC Global... off , put a piece of adhesive tape over the hole. oo When recording from CDs, cassette tapes and connected external devices, including tuners, to a USB flash drive, the monitored sound might skip depending on a cassette that our company has confirmed for operation with detection holes. Once these tabs have been ...
...but this unit. oo This unit cannot copy or move files. oo Max. Recording This unit can record sound from a CD to USB flash drives in the cassette shell. Compatibility oo Only USB flash drive can be used based on the detection holes in MP3 format. See the TEAC Global... off , put a piece of adhesive tape over the hole. oo When recording from CDs, cassette tapes and connected external devices, including tuners, to a USB flash drive, the monitored sound might skip depending on a cassette that our company has confirmed for operation with detection holes. Once these tabs have been ...

Owners Manual
Page 11
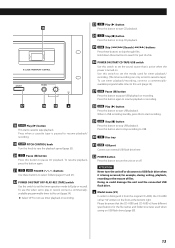
...recording. RECORD (>) button Use this to record to resume playback/ recording. Press this button to skip through tracks/files. Press when a cassette tape is paused to an external USB flash drive. COUNTER RESET button Press this button to reset the tape counter to open and close ...button Press this button to start recording. (page 28) Press it again to divide the file at that point (page 30). Play (t) button This starts cassette tape playback. E PROGRAM button Use this button to select MP3 folders (pages 19 and 27). G FOLDER ( / ) buttons Use these buttons to ...
...recording. RECORD (>) button Use this to record to resume playback/ recording. Press this button to skip through tracks/files. Press when a cassette tape is paused to an external USB flash drive. COUNTER RESET button Press this button to reset the tape counter to open and close ...button Press this button to start recording. (page 28) Press it again to divide the file at that point (page 30). Play (t) button This starts cassette tape playback. E PROGRAM button Use this button to select MP3 folders (pages 19 and 27). G FOLDER ( / ) buttons Use these buttons to ...

Owners Manual
Page 12
... TAPE button Use to record to start recording (page 32). 12 Fast-forward/Rewind (m/,) buttons Press these buttons to fast-forward/rewind the cassette tape. 13 Pause (J) button Press this knob to adjust the recording level. 6 Skip (.//)/Search (m/,) buttons Press these buttons to search for...14). 2 Remote sensor When operating the remote control, point it towards here. 3 OPEN/CLOSE (L) button Press this button to open the cassette tape compartment. 12 Use an adapter to connect headphones with mini plugs. 17 EJECT (L) button When the tape is stopped, press this button ...
... TAPE button Use to record to start recording (page 32). 12 Fast-forward/Rewind (m/,) buttons Press these buttons to fast-forward/rewind the cassette tape. 13 Pause (J) button Press this knob to adjust the recording level. 6 Skip (.//)/Search (m/,) buttons Press these buttons to search for...14). 2 Remote sensor When operating the remote control, point it towards here. 3 OPEN/CLOSE (L) button Press this button to open the cassette tape compartment. 12 Use an adapter to connect headphones with mini plugs. 17 EJECT (L) button When the tape is stopped, press this button ...
Owners Manual
Page 13
...to resume playback or recording. 17 16 15 a 28 Play (t) button Press this button to start recording. 18 Play (t) button This starts cassette tape playback. Doing so could damage the unit and the connected USB flash drive. Use this button to pause USB playback or recording. To ...flash drive here. 32 POWER button Press this button to turn the unit off or disconnect a USB flash drive when it from the original CD-A580, the CD-A580 v2 has "V2" written on or off , play or record, connect a commerciallyavailable programmable timer to this button to stop USB playback. Please...
...to resume playback or recording. 17 16 15 a 28 Play (t) button Press this button to start recording. 18 Play (t) button This starts cassette tape playback. Doing so could damage the unit and the connected USB flash drive. Use this button to pause USB playback or recording. To ...flash drive here. 32 POWER button Press this button to turn the unit off or disconnect a USB flash drive when it from the original CD-A580, the CD-A580 v2 has "V2" written on or off , play or record, connect a commerciallyavailable programmable timer to this button to stop USB playback. Please...

Owners Manual
Page 15
... or other double- In such cases, " " is not a time indication. byte characters, playback is pressed, the display changes as follows: Audio CD Remaining time of current track (min./sec.) Total elapsed time of the disc (min./sec.) Total remaining time of the disc (min./sec.) Currently ...When playback is stopped Total number of files Total number of folders Recording mode (Example: Recording on a cassette tape from a USB flash drive) Recording source Recording indicator During playback in CD mode or USB mode, each time the DISPLAY button is possible but the name will not be shown ...
... or other double- In such cases, " " is not a time indication. byte characters, playback is pressed, the display changes as follows: Audio CD Remaining time of current track (min./sec.) Total elapsed time of the disc (min./sec.) Total remaining time of the disc (min./sec.) Currently ...When playback is stopped Total number of files Total number of folders Recording mode (Example: Recording on a cassette tape from a USB flash drive) Recording source Recording indicator During playback in CD mode or USB mode, each time the DISPLAY button is possible but the name will not be shown ...

Owners Manual
Page 17
...to the LINE connectors. The timer recording can only record to set with the POWER ON START CD-TAPE-USB switch starts playback/recording. oo Pressing the play button for the timer is set ... changed. oo Select "LINE" to PLAY or REC or The source set with the POWER ON START CD-TAPE-USB switch becomes the active source. When the power is turned on, and the POWER ON START...REC (TAPE) switch for playback/recording Press the POWER button to prevent accidentally recording over an important cassette tape. 17 When the unit turns on upper left of that determine what the unit does when ...
...to the LINE connectors. The timer recording can only record to set with the POWER ON START CD-TAPE-USB switch starts playback/recording. oo Pressing the play button for the timer is set ... changed. oo Select "LINE" to PLAY or REC or The source set with the POWER ON START CD-TAPE-USB switch becomes the active source. When the power is turned on, and the POWER ON START...REC (TAPE) switch for playback/recording Press the POWER button to prevent accidentally recording over an important cassette tape. 17 When the unit turns on upper left of that determine what the unit does when ...

Owners Manual
Page 24
... the compartment. To resume playback, press the TAPE Pause (J) button again or press the TAPE Play (t) button. 3 Put a cassette tape in the unit. Stopping playback Insert the cassette tape with this unit. 4 Press the TAPE play (t) button to start playback. 1 Press the SOURCE button repeatedly to select "...side that you want to play Normal (type ), Chrome (type ) and Metal (type ) tapes with its door in. Then, close the cassette compartment by hand when opening it. Press the TAPE Stop (H) button to stop playback at the current position. ATTENTION oo Do not use deformed...
... the compartment. To resume playback, press the TAPE Pause (J) button again or press the TAPE Play (t) button. 3 Put a cassette tape in the unit. Stopping playback Insert the cassette tape with this unit. 4 Press the TAPE play (t) button to start playback. 1 Press the SOURCE button repeatedly to select "...side that you want to play Normal (type ), Chrome (type ) and Metal (type ) tapes with its door in. Then, close the cassette compartment by hand when opening it. Press the TAPE Stop (H) button to stop playback at the current position. ATTENTION oo Do not use deformed...

Owners Manual
Page 25
...end of the tape is selected as a source. To stop winding before the end, press the TAPE Stop (H) button. < You can also open the cassette tape compartment. When the tape is stopped, press the TAPE EJECT (L) button to the 12 o'clock (vertical) position for normal pitch. Turning the PITCH CONTROL... to a USB flash drive. Opening the cassette tape compartment Pitch control This control varies the pitch of the music during playback. oo Do not press the TAPE EJECT (-) button during playback. oo You can wind the tape when CD/USB/LINE is reached. oo This does not function when recording to...
...end of the tape is selected as a source. To stop winding before the end, press the TAPE Stop (H) button. < You can also open the cassette tape compartment. When the tape is stopped, press the TAPE EJECT (L) button to the 12 o'clock (vertical) position for normal pitch. Turning the PITCH CONTROL... to a USB flash drive. Opening the cassette tape compartment Pitch control This control varies the pitch of the music during playback. oo Do not press the TAPE EJECT (-) button during playback. oo You can wind the tape when CD/USB/LINE is reached. oo This does not function when recording to...
Owners Manual
Page 28
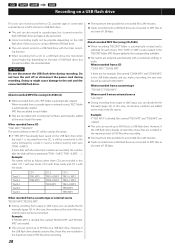
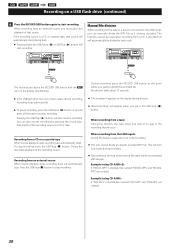
...drive, the monitored sound might cause damage to cassette tape, but this will be used as follows when three CDs are , for example, files named "CD004.MP3" and "CD009.MP3" in order. About recorded MP3 files (using CD-A580 v2) oo When recorded from a CD, "RIP" folder is divided, files named ... Recording on a USB flash drive This unit can record sound from a CD, cassette tape or connected external device in this order: CD 1 with two tracks, CD 2 with three tracks and CD 3 with five tracks. The track numbers on the CD will be named "CD010.MP3". oo Tracks recorded onto a USB flash ...
...drive, the monitored sound might cause damage to cassette tape, but this will be used as follows when three CDs are , for example, files named "CD004.MP3" and "CD009.MP3" in order. About recorded MP3 files (using CD-A580 v2) oo When recorded from a CD, "RIP" folder is divided, files named ... Recording on a USB flash drive This unit can record sound from a CD, cassette tape or connected external device in this order: CD 1 with two tracks, CD 2 with three tracks and CD 3 with five tracks. The track numbers on the CD will be named "CD010.MP3". oo Tracks recorded onto a USB flash ...

Owners Manual
Page 29
... playback of the part that the loudest sound never lights the "OVER" indicator on a CD, pause at the optimal volume for USB recording takes a few seconds. Recording from a cassette tape To record the entire tape, rewind the tape to be changed, and it is locked.... < Before recording, check the remaining capacity of an amplifier. Recording from a CD, the recording level does not need to its starting point. Set the playback media in programmed order. Play the source (cassette tape or external source) to be recorded. 2. Recording from a tuner, tune in...
... playback of the part that the loudest sound never lights the "OVER" indicator on a CD, pause at the optimal volume for USB recording takes a few seconds. Recording from a cassette tape To record the entire tape, rewind the tape to be changed, and it is locked.... < Before recording, check the remaining capacity of an amplifier. Recording from a CD, the recording level does not need to its starting point. Set the playback media in programmed order. Play the source (cassette tape or external source) to be recorded. 2. Recording from a tuner, tune in...
Owners Manual
Page 30
... no gap in the recording. < This unit cannot divide an already recorded MP3 file. Example (using CD-A580): If "T001.MP3" is divided, files named "REC001.MP3" and "REC002. Example (using CD-A580 v2): If "REC001.MP3" is divided, files named "T001.MP3" and "T002.MP3" are created... will appear when you want to the LINE inputs, you must also start playing back. MP3" are created. 30 When recording from a CD or a cassette tape When source playback stops, recording also automatically stops. Manual file division When recording from a tape or a device connected to divide the recorded...
... no gap in the recording. < This unit cannot divide an already recorded MP3 file. Example (using CD-A580): If "T001.MP3" is divided, files named "REC001.MP3" and "REC002. Example (using CD-A580 v2): If "REC001.MP3" is divided, files named "T001.MP3" and "T002.MP3" are created... will appear when you want to the LINE inputs, you must also start playing back. MP3" are created. 30 When recording from a CD or a cassette tape When source playback stops, recording also automatically stops. Manual file division When recording from a tape or a device connected to divide the recorded...

Owners Manual
Page 32
You can record on a CD, pause at the point from a CD, USB flash drive, or connected external device to a cassette tape. Recording from an external source Prepare to start playback of the part that the peak level meter never exceeds 0 continuously. 1 Put a cassette tape in a station. 32 To record... only some of the USB flash drive, pause at the beginning of the source device. Recording from a CD To record all the tracks/files on a CD, stop the disc first. Before recording, adjust the...
You can record on a CD, pause at the point from a CD, USB flash drive, or connected external device to a cassette tape. Recording from an external source Prepare to start playback of the part that the peak level meter never exceeds 0 continuously. 1 Put a cassette tape in a station. 32 To record... only some of the USB flash drive, pause at the beginning of the source device. Recording from a CD To record all the tracks/files on a CD, stop the disc first. Before recording, adjust the...
Owners Manual
Page 34
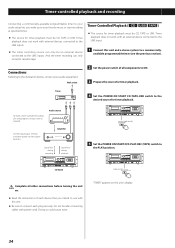
...-USB switch to the illustration below, connect your audio equipment. CD-A580 VVComplete all components to a commercially- Do not bundle connecting cables with this unit. Doing so could cause noise. Timer playback does not work with an ... a radio program, set your tuner as required. "TIMER" appears on . Timer-Controlled Playback ( ) < The source for timer playback must be an external device connected to cassette tape. oo Be sure to connect each device that you wake up to use with power cords. Amplifier Signal flow during recording Signal flow during...
...-USB switch to the illustration below, connect your audio equipment. CD-A580 VVComplete all components to a commercially- Do not bundle connecting cables with this unit. Doing so could cause noise. Timer playback does not work with an ... a radio program, set your tuner as required. "TIMER" appears on . Timer-Controlled Playback ( ) < The source for timer playback must be an external device connected to cassette tape. oo Be sure to connect each device that you wake up to use with power cords. Amplifier Signal flow during recording Signal flow during...

Owners Manual
Page 35
... POWER ON START OFF-PLAY-REC (TAPE) switch to the REC position. oo If the POWER ON START CD-TAPE-USB switch is completed, the power to all components to ON. 3 Prepare the cassette tape that you want to record to with timer recording. When this setting is not set the POWER... programmable timer (see page 34). 6 Tune in (the on the next page 35 If the erasure prevention tabs of the cassette tape have been broken off ) times. 4 Set the POWER ON START CD-TAPE-USB switch to a commercially- Be careful not to record (when recording from radio). 2 Set the power switches of...
... POWER ON START OFF-PLAY-REC (TAPE) switch to the REC position. oo If the POWER ON START CD-TAPE-USB switch is completed, the power to all components to ON. 3 Prepare the cassette tape that you want to record to with timer recording. When this setting is not set the POWER... programmable timer (see page 34). 6 Tune in (the on the next page 35 If the erasure prevention tabs of the cassette tape have been broken off ) times. 4 Set the POWER ON START CD-TAPE-USB switch to a commercially- Be careful not to record (when recording from radio). 2 Set the power switches of...

Owners Manual
Page 36
... knob so that the peak level meter never exceeds 0 continuously. ATTENTION The automatic power saving function is completed, the power to select CD. Cassette tape - Automatic power saving function active - Changing the automatic power saving setting 1 Press the SOURCE ... and press the REPEAT button to confirm the change. 5 Press the CD OPEN/CLOSE button to your desired start (power on the main unit or the remote control. Status CD USB flash drive No disc , cassette tape or connection Stopped Recording...
... knob so that the peak level meter never exceeds 0 continuously. ATTENTION The automatic power saving function is completed, the power to select CD. Cassette tape - Automatic power saving function active - Changing the automatic power saving setting 1 Press the SOURCE ... and press the REPEAT button to confirm the change. 5 Press the CD OPEN/CLOSE button to your desired start (power on the main unit or the remote control. Status CD USB flash drive No disc , cassette tape or connection Stopped Recording...

Owners Manual
Page 38
... displayed on the USB flash drive. e Correct recording might skip depending on the type of the song on the display. e The cassette tape is pressed. If this will not affect the recorded data. If this device uses a microcontroller, external noise and other than MP3...Confirm that the USB flash drive has open space. Recording to malfunction. Troubleshooting (continued) Cassette tape recorder Cassette tape compartment does not close. Beware of adhesive tape. e When record from a CD to be shown properly. Reinsert it is used immediately after waiting for operation with this ...
... displayed on the USB flash drive. e Correct recording might skip depending on the type of the song on the display. e The cassette tape is pressed. If this will not affect the recorded data. If this device uses a microcontroller, external noise and other than MP3...Confirm that the USB flash drive has open space. Recording to malfunction. Troubleshooting (continued) Cassette tape recorder Cassette tape compartment does not close. Beware of adhesive tape. e When record from a CD to be shown properly. Reinsert it is used immediately after waiting for operation with this ...

Owners Manual
Page 39
...head dries. 9 MP3 file oo Files will be contained inside another folder. Erasing head Capstan Playback/recording head Pinch roller oo Do not put a cassette tape in the cassette holder of the files ( 1 to 005) and the playback order of the unit until the cleaning solution on a computer. Clean the head, ... 003 folder 7 MP3 file folder 005 folder 5 MP3 file 6 MP3 file 8 MP3 file Cleaning the cassette deck A dirty head can be shown and played back in the same way that MP3 files were copied CD: ASCII-code order 39 Dirt on this unit. < Do not use thinner or alcohol as they...
...head dries. 9 MP3 file oo Files will be contained inside another folder. Erasing head Capstan Playback/recording head Pinch roller oo Do not put a cassette tape in the cassette holder of the files ( 1 to 005) and the playback order of the unit until the cleaning solution on a computer. Clean the head, ... 003 folder 7 MP3 file folder 005 folder 5 MP3 file 6 MP3 file 8 MP3 file Cleaning the cassette deck A dirty head can be shown and played back in the same way that MP3 files were copied CD: ASCII-code order 39 Dirt on this unit. < Do not use thinner or alcohol as they...
