
Owner's Manual
Page 4
... top of your purchase to operate this equipment may cause harmful interference unless the modifications are extreme. • Do not place the VCR directly on the back of broadcast television programming, video tape, film or other vital information here and retain this product may violate applicable... Serial No. - 4 - Model No. EN 9H02 Changes or modifications to this equipment if an unauthorized change or modification is spilled on your VCR, unplug the power cord immediately and take the unit to a warm place, or after heating a cold room or under conditions of high humidity....
... top of your purchase to operate this equipment may cause harmful interference unless the modifications are extreme. • Do not place the VCR directly on the back of broadcast television programming, video tape, film or other vital information here and retain this product may violate applicable... Serial No. - 4 - Model No. EN 9H02 Changes or modifications to this equipment if an unauthorized change or modification is spilled on your VCR, unplug the power cord immediately and take the unit to a warm place, or after heating a cold room or under conditions of high humidity....

Owner's Manual
Page 6
... cassette, turns off system- This shows the elapsed recording or playback time in hours, minutes, and seconds. (Does not work in the VCR and the power is possible at a high speed or super high speed in either a forward or reverse direction in English or Spanish •... PLL frequency synthesizer tuner with this case, please call the manufacturer of a tape. • OTR (One Touch Recording)- Automatically turns the VCR when you may not operate this unit. Automatically adjusts the tracking for these accessories, please refer to select the picture quality of the universal ...
... cassette, turns off system- This shows the elapsed recording or playback time in hours, minutes, and seconds. (Does not work in the VCR and the power is possible at a high speed or super high speed in either a forward or reverse direction in English or Spanish •... PLL frequency synthesizer tuner with this case, please call the manufacturer of a tape. • OTR (One Touch Recording)- Automatically turns the VCR when you may not operate this unit. Automatically adjusts the tracking for these accessories, please refer to select the picture quality of the universal ...

Owner's Manual
Page 7
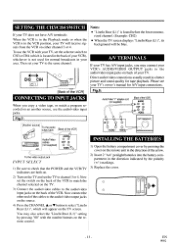
...of the cassette. If you decide to a warm place or visa versa. Plastic Tape Window a CORRECT 0 WRONG - 7 - VIDEO CASSETTE TAPE INFORMATION This VCR will be ejected. 2) Pull the cassette out of the cassette compartment. 3) Store the cassette in its case as shown. For best results, we recommend the...cassette in gently, but continuously, on the back edge of the cassette until the tape has warmed to avoid damage of high-quality tapes. The VCR will automatically turn on the tape if it is moved from : SP mode (Standard Play) or SLP mode (Super Long Play). PRECAUTIONS REMOVING ...
...of the cassette. If you decide to a warm place or visa versa. Plastic Tape Window a CORRECT 0 WRONG - 7 - VIDEO CASSETTE TAPE INFORMATION This VCR will be ejected. 2) Pull the cassette out of the cassette compartment. 3) Store the cassette in its case as shown. For best results, we recommend the...cassette in gently, but continuously, on the back edge of the cassette until the tape has warmed to avoid damage of high-quality tapes. The VCR will automatically turn on the tape if it is moved from : SP mode (Standard Play) or SLP mode (Super Long Play). PRECAUTIONS REMOVING ...
Owner's Manual
Page 8
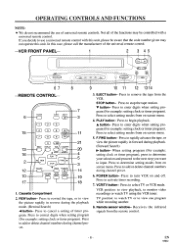
...- Cassette Compartment 2. Press to rewind the tape, or to input. EJECT button- Press to activate timer recording. 7. Press to begin playback. VCR position: to view playback, to monitor video recordings or watch TV or to select setting modes from on screen menu. 4. OPERATING CONTROLS AND FUNCTIONS...the picture rapidly in reverse during playback. (Forward Search) ► button- EN 9H02 STOP button- Press to watch TV using the VCR tuner. When setting program (For example: setting clock or timer program), press to determine your selection and proceed to the next step ...
...- Cassette Compartment 2. Press to rewind the tape, or to input. EJECT button- Press to activate timer recording. 7. Press to begin playback. VCR position: to view playback, to monitor video recordings or watch TV or to select setting modes from on screen menu. 4. OPERATING CONTROLS AND FUNCTIONS...the picture rapidly in reverse during playback. (Forward Search) ► button- EN 9H02 STOP button- Press to watch TV using the VCR tuner. When setting program (For example: setting clock or timer program), press to determine your selection and proceed to the next step ...

Owner's Manual
Page 9
... Activates One Touch Recording. 23. MENU button- Connect to temporarily stop 25. Press to the audio output jack of your audio equipment or another VCR. +100 button- IN terminal- Connect to vibrate vertically. 22. VIDEO OUT jack- for viewing or recording. VIDEO IN jack- OUT terminal- ...which 28. ANT. POWER indicator- OTR button- ANT. Connect to select the Nor- Use to 0:00:00. (only on the remote control) VCR/TV indicator- Press to the video input jack 15. Press to 9. to select a video are higher than 99, press this button first, then...
... Activates One Touch Recording. 23. MENU button- Connect to temporarily stop 25. Press to the audio output jack of your audio equipment or another VCR. +100 button- IN terminal- Connect to vibrate vertically. 22. VIDEO OUT jack- for viewing or recording. VIDEO IN jack- OUT terminal- ...which 28. ANT. POWER indicator- OTR button- ANT. Connect to select the Nor- Use to 0:00:00. (only on the remote control) VCR/TV indicator- Press to the video input jack 15. Press to 9. to select a video are higher than 99, press this button first, then...

Owner's Manual
Page 10
...) C15) 0 UHFNHF Coaxial cable t IUD (supplied) [Back of the OR UHFNHF separated TV] (Old S le UHFNHF separator (not supplied) OR To VCR's ANT.OUT VHF : VHF (Bottom Jack) Coaxial cable UHF ® UHF (supplied) You can record one connection. For details, please refer to "Recording...the next page. - Fig.2: VHF/UHF Combination Antenna or Cable from the Cable Company [Cable company] [VHF/UHF combination antenna] [Back of the VCR] To VCR's ANT.IN (Top Jack) PAT [Back of the UHFNHF combination TV] (New Style) 0 imil i•0 UHFNHF Matching transformer (not supplied) ...
...) C15) 0 UHFNHF Coaxial cable t IUD (supplied) [Back of the OR UHFNHF separated TV] (Old S le UHFNHF separator (not supplied) OR To VCR's ANT.OUT VHF : VHF (Bottom Jack) Coaxial cable UHF ® UHF (supplied) You can record one connection. For details, please refer to "Recording...the next page. - Fig.2: VHF/UHF Combination Antenna or Cable from the Cable Company [Cable company] [VHF/UHF combination antenna] [Back of the VCR] To VCR's ANT.IN (Top Jack) PAT [Back of the UHFNHF combination TV] (New Style) 0 imil i•0 UHFNHF Matching transformer (not supplied) ...

Owner's Manual
Page 11
....4: Cable Box and Satellite Box [Back of the UHFNHF combination TV] [Cable Box or Satellite Box] IN Jack OUT Jack rN OU [Back of the VCR] To VCR's ANT.IN (Top Jack) ANT (New S le) 0 UHFNHF Coaxial cable (supplied) [Back of the OR UHFNHF separated TV] Old S le UHFNHF separator (not... al UHF (300ohm) CH3 C VHF (75ohm) Coaxial cable (supplied) [Back of the OR UHFNHF separated TV] Old St le UHFNHF separator (not supplied) To VCR's ANT.OUT VHF ®VHF C5 ) (Bottom Jack) Coaxial cable UHF O O UHF (supplied) You can ONLY record and view the SAME channel when using this...
....4: Cable Box and Satellite Box [Back of the UHFNHF combination TV] [Cable Box or Satellite Box] IN Jack OUT Jack rN OU [Back of the VCR] To VCR's ANT.IN (Top Jack) ANT (New S le) 0 UHFNHF Coaxial cable (supplied) [Back of the OR UHFNHF separated TV] Old S le UHFNHF separator (not... al UHF (300ohm) CH3 C VHF (75ohm) Coaxial cable (supplied) [Back of the OR UHFNHF separated TV] Old St le UHFNHF separator (not supplied) To VCR's ANT.OUT VHF ®VHF C5 ) (Bottom Jack) Coaxial cable UHF O O UHF (supplied) You can ONLY record and view the SAME channel when using this...

Owner's Manual
Page 12
... of the satellite system. Back of the TV ] This connection is provided to call the CATV system installer's attention to Article 820-40 of the VCR to match the channel set on the TV and Cable Box. 3) Set the channel to be -- Fig.5: Fig.6: From the Cable Company From the Cable... cable (not supplied) IN Al = IN [ A / B switch ] (not supplied) OUT On older TVs a matching transformer may be viewed on the back of the VCR to record one of your channels are recording or play a tape with either one channel and view another, please contact the manufacture of these connections ...
... of the satellite system. Back of the TV ] This connection is provided to call the CATV system installer's attention to Article 820-40 of the VCR to match the channel set on the TV and Cable Box. 3) Set the channel to be -- Fig.5: Fig.6: From the Cable Company From the Cable... cable (not supplied) IN Al = IN [ A / B switch ] (not supplied) OUT On older TVs a matching transformer may be viewed on the back of the VCR to record one of your channels are recording or play a tape with either one channel and view another, please contact the manufacture of these connections ...
Owner's Manual
Page 13
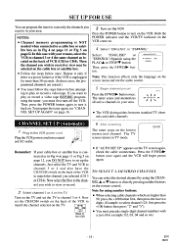
...0 CD CD JT J - 13- Direct audio/video connections usually result in a better picture and sound quality for AN input connections. [Back of the VCR] Fig.8: CONNECTING TO INPUT JACKS When you may also select the "LineIn Rear (LI)" setting by pressing "00" with your TV. Please see your area... "LineIn Rear (L1)", its background will appear on the TV. 3) Connect the audio/video cables to channel 3 or 4. You may connect your VCR's AUDIO/VIDEO OUTPUT jacks to the audio/video input jacks on either channel 3 or 4. EN 9H02 Now set the selector switch to select "LineIn ...
...0 CD CD JT J - 13- Direct audio/video connections usually result in a better picture and sound quality for AN input connections. [Back of the VCR] Fig.8: CONNECTING TO INPUT JACKS When you may also select the "LineIn Rear (LI)" setting by pressing "00" with your TV. Please see your area... "LineIn Rear (L1)", its background will appear on the TV. 3) Connect the audio/video cables to channel 3 or 4. You may connect your VCR's AUDIO/VIDEO OUTPUT jacks to the audio/video input jacks on either channel 3 or 4. EN 9H02 Now set the selector switch to select "LineIn ...
Owner's Manual
Page 14
...channel by using the CHANNEL • or V button or directly pressing number buttons on the remote control. Both the POWER indicator and the VCR/TV indicator on the VCR come on the screen menu and not the audio source. LANGUAGE SELECT ► ENGLISH ESPANOL [ON] Note: This function effects only the ... on page 12, you wish to a cable box or satellite box as in your area. • 1I we AUTO SET UP rim O. • The VCR distinguishes between standard TV channels and cable channels. TO SELECT A DESIRED CHANNEL You can program the tuner to scan only the channels you receive in...
...channel by using the CHANNEL • or V button or directly pressing number buttons on the remote control. Both the POWER indicator and the VCR/TV indicator on the VCR come on the screen menu and not the audio source. LANGUAGE SELECT ► ENGLISH ESPANOL [ON] Note: This function effects only the ... on page 12, you wish to a cable box or satellite box as in your area. • 1I we AUTO SET UP rim O. • The VCR distinguishes between standard TV channels and cable channels. TO SELECT A DESIRED CHANNEL You can program the tuner to scan only the channels you receive in...
Owner's Manual
Page 15
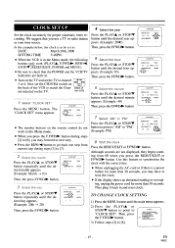
... Set the clock accurately for more than 30 seconds. CLOCK SET MONTH DAY YEAR "47k1AINUTE AMPM • The number buttons on the back of the VCR] A "CL.. :ET Press the MENU button. or Press the PLAY/A or STOP/V button to point to [8]. -MENU- CLOCK SET MONTH DAY YEAR 03 /...PLAY/A or STOP/V button until the desired day appears. (Example: 20th ---> 20) Then, press the F.FWD/10- We suggest that the POWER and the VCR/TV indicators are not displayed, they begin counting from current step during steps [2] to channel 3 or 4. Select the year Press the PLAY/A or STOP/V ...
... Set the clock accurately for more than 30 seconds. CLOCK SET MONTH DAY YEAR "47k1AINUTE AMPM • The number buttons on the back of the VCR] A "CL.. :ET Press the MENU button. or Press the PLAY/A or STOP/V button to point to [8]. -MENU- CLOCK SET MONTH DAY YEAR 03 /...PLAY/A or STOP/V button until the desired day appears. (Example: 20th ---> 20) Then, press the F.FWD/10- We suggest that the POWER and the VCR/TV indicators are not displayed, they begin counting from current step during steps [2] to channel 3 or 4. Select the year Press the PLAY/A or STOP/V ...

Owner's Manual
Page 16
... UP CHANNEL I ) Press the MENU button until the main menu appears, press the PLAY/A button to point to "LANGUAGE SELECT". Just select the TV and VCR to channel 3 or 4 and also have to , then press the F.FWD/IN- button. 3) Confirm "AUTO SET UP" is connected as in Spanish, press the ... to "CHANNEL SET UP". I 30 (TV) "A• ra c SELECTING THE LANGUAGE If you want to TV mode. AUTO SET UP MANUAL SET UP • The VCR distinguishes between standard TV channels and cable channels. button, press the PLAY/A button to point to "ENGLISH", then press the RESET/EXIT button. 6 E th preset...
... UP CHANNEL I ) Press the MENU button until the main menu appears, press the PLAY/A button to point to "LANGUAGE SELECT". Just select the TV and VCR to channel 3 or 4 and also have to , then press the F.FWD/IN- button. 3) Confirm "AUTO SET UP" is connected as in Spanish, press the ... to "CHANNEL SET UP". I 30 (TV) "A• ra c SELECTING THE LANGUAGE If you want to TV mode. AUTO SET UP MANUAL SET UP • The VCR distinguishes between standard TV channels and cable channels. button, press the PLAY/A button to point to "ENGLISH", then press the RESET/EXIT button. 6 E th preset...
Owner's Manual
Page 17
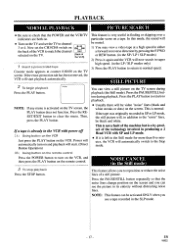
... button to normal speed. Then, press the PLAY button. You can be activated ONLY when you to reposition or reduce the noise lines of the VCR to channel 3 or 4. Press the PLAY button to return to playback. • Usually there will start . (Direct Button Operation) 2B) Using button on the... mode, the still picture will be muted. 1) You may view a video tape at a high speed in either a forward or reverse direction by -product of the VCR] 1 Insert a prerecc,• :Jed :ape Counter mode appears at counter 0:00:00 on the TV screen. NOISE CANCEL (in finding or skipping over a particular ...
... button to normal speed. Then, press the PLAY button. You can be activated ONLY when you to reposition or reduce the noise lines of the VCR to channel 3 or 4. Press the PLAY button to return to playback. • Usually there will start . (Direct Button Operation) 2B) Using button on the... mode, the still picture will be muted. 1) You may view a video tape at a high speed in either a forward or reverse direction by -product of the VCR] 1 Insert a prerecc,• :Jed :ape Counter mode appears at counter 0:00:00 on the TV screen. NOISE CANCEL (in finding or skipping over a particular ...
Owner's Manual
Page 18
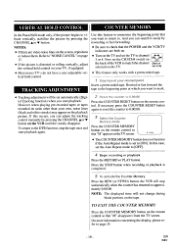
... on. • Turn on the screen, reposition or reduce them. TRACKING ADJUSTMENT Use this feature to memorize the beginning point that the POWER and the VCR/TV indicators are video noise lines on the TV and set the CH3/CH4 switch on the back of the... VCR to "NOISE CANCEL" on page 17. • If the picture is distorted or rolling vertically, adjust the vertical hold control. VERTICAL HOLD CONTROL COUNTER MEMORY ...
... on. • Turn on the screen, reposition or reduce them. TRACKING ADJUSTMENT Use this feature to memorize the beginning point that the POWER and the VCR/TV indicators are video noise lines on the TV and set the CH3/CH4 switch on the back of the... VCR to "NOISE CANCEL" on page 17. • If the picture is distorted or rolling vertically, adjust the vertical hold control. VERTICAL HOLD CONTROL COUNTER MEMORY ...
Owner's Manual
Page 19
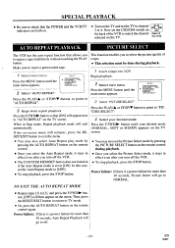
... must be done during playback. • Once you select the Picture Select mode, it stays in effect even after you turn off the VCR. • The COUNTER MEMORY button does not function if the Auto Repeat mode is a power failure for more than 30 seconds, Picture ...This function enables you to select the picture quality of to repeat a tape indefinitely without touching the PLAY a tape. InfAMM --3. 1 Insert a tape tnto VCR 1 Select main menu Press the MENU button until the main menu appears. -MENU , TIMER PROGRAMMING ► AUTO REPEAT [OFFI PICTURE SELECT CHANNEL SET UP...
... must be done during playback. • Once you select the Picture Select mode, it stays in effect even after you turn off the VCR. • The COUNTER MEMORY button does not function if the Auto Repeat mode is a power failure for more than 30 seconds, Picture ...This function enables you to select the picture quality of to repeat a tape indefinitely without touching the PLAY a tape. InfAMM --3. 1 Insert a tape tnto VCR 1 Select main menu Press the MENU button until the main menu appears. -MENU , TIMER PROGRAMMING ► AUTO REPEAT [OFFI PICTURE SELECT CHANNEL SET UP...

Owner's Manual
Page 20
...or 4. CH3 CM m [Back of : recorri,ld Press number buttons on the TV screen. hannel to of the VCR] Press the PAUSE/STILL or RECORD button to resume recording. • Insert a cassette tape with • marks ...through pages 10, 11, or 12 on the TV and set the CH3/CH4 switch on the back of the VCR] - 20 - NOTE: If any menu is completed. 5 S c[ on pages11and 12 before proceeding to match ...the CHANNEL V or A button. NOTE: If you have a cable box or satellite box connected to this VCR, please refer to "ANTENNA/CABLE CONNECTIONS"on the TV Set the TV to the channel you have a cable...
...or 4. CH3 CM m [Back of : recorri,ld Press number buttons on the TV screen. hannel to of the VCR] Press the PAUSE/STILL or RECORD button to resume recording. • Insert a cassette tape with • marks ...through pages 10, 11, or 12 on the TV and set the CH3/CH4 switch on the back of the VCR] - 20 - NOTE: If any menu is completed. 5 S c[ on pages11and 12 before proceeding to match ...the CHANNEL V or A button. NOTE: If you have a cable box or satellite box connected to this VCR, please refer to "ANTENNA/CABLE CONNECTIONS"on the TV Set the TV to the channel you have a cable...
Owner's Manual
Page 21
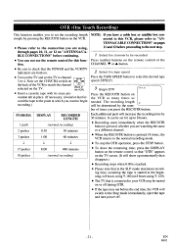
... operation, press the STOP button. • To show the remaining time, press the DISPLAY button on the remote control so that is connected to your VCR may be determined by 30 minutes. Each additional push will switch to the Stop mode immediately, eject the tape and turn power off. - 21 - OTR... (One Touch Recording) This function enables you to set the recording length simply by pressing the REC/OTR button on the VCR. • Please refer to the connection you are using T-120). • The TV that "OTR" appears on the TV screen. (It will show up to...
... operation, press the STOP button. • To show the remaining time, press the DISPLAY button on the remote control so that is connected to your VCR may be determined by 30 minutes. Each additional push will switch to the Stop mode immediately, eject the tape and turn power off. - 21 - OTR... (One Touch Recording) This function enables you to set the recording length simply by pressing the REC/OTR button on the VCR. • Please refer to the connection you are using T-120). • The TV that "OTR" appears on the TV screen. (It will show up to...

Owner's Manual
Page 22
... the PLAY/A or • The illustration below , the timer is a case that the POWER and the VCR/TV indicators are away. PROGRAM NUMBER 1 ONCE P. TIMER RECORDING AUTOMATIC TIMER RECORDING You may set the VCR to start time has priority. You can set seven programs to "ONCE", and then press the F.FWD...: PROGRAM NO: May 4th, 2000 from 7:30PM to 8:30PM CH16 SP No. 1 1 Select "TIMER PRO- In the example below demonstrates the sequence of the VCR to [8] on ch 7 at the same time on the same channel every week. (Example: every Monday on page 15. STOP/V button to point to "WEEKLY...
... the PLAY/A or • The illustration below , the timer is a case that the POWER and the VCR/TV indicators are away. PROGRAM NUMBER 1 ONCE P. TIMER RECORDING AUTOMATIC TIMER RECORDING You may set the VCR to start time has priority. You can set seven programs to "ONCE", and then press the F.FWD...: PROGRAM NO: May 4th, 2000 from 7:30PM to 8:30PM CH16 SP No. 1 1 Select "TIMER PRO- In the example below demonstrates the sequence of the VCR to [8] on ch 7 at the same time on the same channel every week. (Example: every Monday on page 15. STOP/V button to point to "WEEKLY...

Owner's Manual
Page 23
...• Please see "HINTS FOR TIMER RECORDING" on pages 11 and 12 if you want to your VCR may move to the next step. 9 Set the channel number • Press the REW/1 button to... 3 0 END TIME OS:300m PM CHANNEL / - HINTS FOR TIMER RECORDING • If there is a power failure or the VCR is in the VCR or does not have a cable box or satellite box before the end time, the... VCR will switch to the Stop mode immediately, eject the tape and the VCR power will be turned ON or OFF when the VCR is unplugged for more than 30 seconds, the clock...
...• Please see "HINTS FOR TIMER RECORDING" on pages 11 and 12 if you want to your VCR may move to the next step. 9 Set the channel number • Press the REW/1 button to... 3 0 END TIME OS:300m PM CHANNEL / - HINTS FOR TIMER RECORDING • If there is a power failure or the VCR is in the VCR or does not have a cable box or satellite box before the end time, the... VCR will switch to the Stop mode immediately, eject the tape and the VCR power will be turned ON or OFF when the VCR is unplugged for more than 30 seconds, the clock...

Owner's Manual
Page 24
.... TO CHECK THE AUTOMATIC TIMER PROGRAM TIMER PROGRAMMING 1) Turn the power on . 2) Press the MENU button. The details of the your program appear on the VCR. DATE STA/END 0.1 05/04 07:30 PM THU 08:30 PM 3 05/11 10.00 PM W THU 10,54 PM 5 0521 11:00 PM...
.... TO CHECK THE AUTOMATIC TIMER PROGRAM TIMER PROGRAMMING 1) Turn the power on . 2) Press the MENU button. The details of the your program appear on the VCR. DATE STA/END 0.1 05/04 07:30 PM THU 08:30 PM 3 05/11 10.00 PM W THU 10,54 PM 5 0521 11:00 PM...

