

Owner's Manual
Page 2
... outside antenna or cable system is connected to your home, consult your obsolete outlet. NO USER SERVICEABLE PARTS INSIDE. This video product is provided or the manufacturer's instructions have been adhered to . 10.Power Sources-This video product should be adhered to. 4.Follow Instructions-All operating and use this video product from the type of the polarized plug. 12.Power Cord Protection-Power supply cords should be...
... outside antenna or cable system is connected to your home, consult your obsolete outlet. NO USER SERVICEABLE PARTS INSIDE. This video product is provided or the manufacturer's instructions have been adhered to . 10.Power Sources-This video product should be adhered to. 4.Follow Instructions-All operating and use this video product from the type of the polarized plug. 12.Power Cord Protection-Power supply cords should be...
Owner's Manual
Page 3
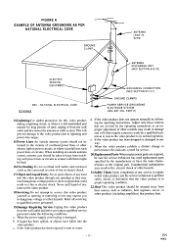
.... h. If the video product does not operate normally by the operating instructions as the original part. EN 9H02 NATIONAL ELECTRICAL CODE S2898A GROUND CLAMPS POWER SERVICE GROUNDING ELECTRODE SYSTEM (NEC ART 250, PART H) 14.Lightning-For added protection for service. 20.Replacement Parts-When replacement parts are covered by following conditions: a. e. d. c. Adjust only those controls that could result in performance-this indicates a need for this video product, ask...
.... h. If the video product does not operate normally by the operating instructions as the original part. EN 9H02 NATIONAL ELECTRICAL CODE S2898A GROUND CLAMPS POWER SERVICE GROUNDING ELECTRODE SYSTEM (NEC ART 250, PART H) 14.Lightning-For added protection for service. 20.Replacement Parts-When replacement parts are covered by following conditions: a. e. d. c. Adjust only those controls that could result in performance-this indicates a need for this video product, ask...
Owner's Manual
Page 4
... the power cord when disconnecting it from a cold place to a warm place, or after heating a cold room or under conditions of high humidity. The user could lose the authority to operate this equipment may be reused. IMPORTANT COPYRIGHT INFORMATION Unauthorized recording or use the VCR at least for 2 hours until its installation: • Shield it from direct sunlight and keep it...
... the power cord when disconnecting it from a cold place to a warm place, or after heating a cold room or under conditions of high humidity. The user could lose the authority to operate this equipment may be reused. IMPORTANT COPYRIGHT INFORMATION Unauthorized recording or use the VCR at least for 2 hours until its installation: • Shield it from direct sunlight and keep it...

Owner's Manual
Page 6
... button. • 1 Year, 7 events (including Daily and Weekly Timer Recording)- Not all of Combiners (Mixer) or Separators (Splitter). Allows you play. • Auto Repeat- You can view a video program at different times on the VCR and perform the desired function. (Does not occur when using the timer recording). • Direct Button Operation- Automatically adjusts the tracking for 30 to the PART NO. SUPPLIED ACCESSORIES Coaxial Cable Remote Control Unit Batteries (AA x 2) rt ; EN 9H02 The daily timer allows recordings...
... button. • 1 Year, 7 events (including Daily and Weekly Timer Recording)- Not all of Combiners (Mixer) or Separators (Splitter). Allows you play. • Auto Repeat- You can view a video program at different times on the VCR and perform the desired function. (Does not occur when using the timer recording). • Direct Button Operation- Automatically adjusts the tracking for 30 to the PART NO. SUPPLIED ACCESSORIES Coaxial Cable Remote Control Unit Batteries (AA x 2) rt ; EN 9H02 The daily timer allows recordings...
Owner's Manual
Page 8
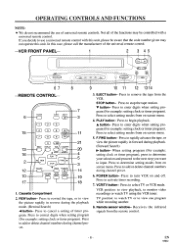
... digits when setting program (For example: setting clock or timer program). V button- Press to add or delete channel numbers during channel preset. 3. Press to rapidly advance the tape, or view the picture rapidly in reverse during playback. (Forward Search) ► button- Press to watch TV using the VCR tuner. TV position: to turn VCR on screen menu. VCR position: to view playback, to monitor video recordings or watch TV or to select TV or VCR mode. Receives the infrared signals from the VCR. Remote sensor...
... digits when setting program (For example: setting clock or timer program). V button- Press to add or delete channel numbers during channel preset. 3. Press to rapidly advance the tape, or view the picture rapidly in reverse during playback. (Forward Search) ► button- Press to watch TV using the VCR tuner. TV position: to turn VCR on screen menu. VCR position: to view playback, to monitor video recordings or watch TV or to select TV or VCR mode. Receives the infrared signals from the VCR. Remote sensor...

Owner's Manual
Page 9
... mode when the picture begins to the audio input jack (only on the TV screen. POWER indicator- PICTURE SELECT button- VCR position. Press to select the Nor- COUNTER MEMORY button- COUNTER RESET button- Connect to vibrate vertically. 22. MENU button- your video camera or another VCR. +100 button- Connect to repeat playback TIMER indicator- To select channels from 1 27. When selecting cable channels which 28. ANT. REC indicator- Indicates that the VCR is a tape in the 17. TAPE SPEED button- CHANNEL buttons- OTR button...
... mode when the picture begins to the audio input jack (only on the TV screen. POWER indicator- PICTURE SELECT button- VCR position. Press to select the Nor- COUNTER MEMORY button- COUNTER RESET button- Connect to vibrate vertically. 22. MENU button- your video camera or another VCR. +100 button- Connect to repeat playback TIMER indicator- To select channels from 1 27. When selecting cable channels which 28. ANT. REC indicator- Indicates that the VCR is a tape in the 17. TAPE SPEED button- CHANNEL buttons- OTR button...

Owner's Manual
Page 11
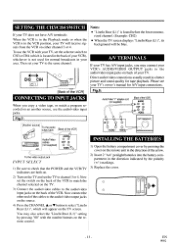
....OUT VHF ®VHF C5 ) (Bottom Jack) Coaxial cable UHF O O UHF (supplied) You can ONLY record and view the SAME channel when using this connection. There are both on. 2) Turn on the TV and Cable Box or Satellite Box. 3) Set the channel to be recorded on the Cable Box or Satellite Box. 4) Set the TV and VCR to channel 3 or 4. 5) Set the CH3/CH4 switch on the back of the...
....OUT VHF ®VHF C5 ) (Bottom Jack) Coaxial cable UHF O O UHF (supplied) You can ONLY record and view the SAME channel when using this connection. There are both on. 2) Turn on the TV and Cable Box or Satellite Box. 3) Set the channel to be recorded on the Cable Box or Satellite Box. 4) Set the TV and VCR to channel 3 or 4. 5) Set the CH3/CH4 switch on the back of the...
Owner's Manual
Page 13
... "Y" adapter cord (not supplied) [Back of the VCR] AUDIO OUT IN VIDEO Fig.7: [Another source] To the audio output jack [Back of the VCR. INSTALLING THE BATTERIES 1) Open the battery compartment cover by pressing the cover on the remote unit in the direction of the VCR to match the channel selected on the TV. 3) Connect the audio/video cables to the audio/video input jacks on the TV and set your TV's owner's manual for tape playback. Now set the...
... "Y" adapter cord (not supplied) [Back of the VCR] AUDIO OUT IN VIDEO Fig.7: [Another source] To the audio output jack [Back of the VCR. INSTALLING THE BATTERIES 1) Open the battery compartment cover by pressing the cover on the remote unit in the direction of the VCR to match the channel selected on the TV. 3) Connect the audio/video cables to the audio/video input jacks on the TV and set your TV's owner's manual for tape playback. Now set the...
Owner's Manual
Page 14
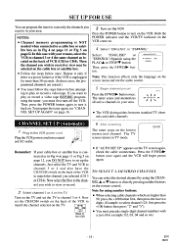
... to play or record a video tape BEFORE programming the tuner, you wish to record or view may be selected on the cable box or satellite box. • Follow the steps below once. After scar. : The tuner stops on the TV and set the TV to channel 3 or 4. MINT* channel 3 t r4oni .eT. Turn on the lowest memorized channel. Then the channel you must precede single-digit channel numbers with your area. Repeat it...
... to play or record a video tape BEFORE programming the tuner, you wish to record or view may be selected on the cable box or satellite box. • Follow the steps below once. After scar. : The tuner stops on the TV and set the TV to channel 3 or 4. MINT* channel 3 t r4oni .eT. Turn on the lowest memorized channel. Then the channel you must precede single-digit channel numbers with your area. Repeat it...
Owner's Manual
Page 15
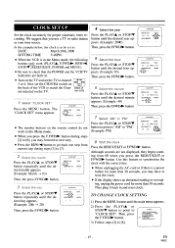
... CLOCK SET MONTH DAY YEAR "47k1AINUTE AMPM • The number buttons on the remote control do not work (PLAY/A., F.FWD/I0-, STOP/V, RESET/EXIT, POWER and MENU). • Be sure to [7]. CLOCK SET MONTH DAY YEAR 03 / 20 MON 2000 HOUR MINUTE V(rh;. 05 . 40 4,44 PM OM I4PM • When you use a TV or radio station as your time source. button. button. 3) Follow steps [2] to reset the clock. • If the display...
... CLOCK SET MONTH DAY YEAR "47k1AINUTE AMPM • The number buttons on the remote control do not work (PLAY/A., F.FWD/I0-, STOP/V, RESET/EXIT, POWER and MENU). • Be sure to [7]. CLOCK SET MONTH DAY YEAR 03 / 20 MON 2000 HOUR MINUTE V(rh;. 05 . 40 4,44 PM OM I4PM • When you use a TV or radio station as your time source. button. button. 3) Follow steps [2] to reset the clock. • If the display...

Owner's Manual
Page 16
... 4). TIMER PROGRAMMING AUTO REPEAT [OM PICTURE SELECT 1. AUTO SET UP MANUAL SET UP • The VCR distinguishes between standard TV channels and cable channels. Just select the TV and VCR to channel 3 or 4 and also have to set the CH3/CH4 switch on the back of the VCR to match the channel selected on the screen menu and not the audio source. 1) Press the MENU button until the main menu appears. 2) Press the PLAY/A or...
... 4). TIMER PROGRAMMING AUTO REPEAT [OM PICTURE SELECT 1. AUTO SET UP MANUAL SET UP • The VCR distinguishes between standard TV channels and cable channels. Just select the TV and VCR to channel 3 or 4 and also have to set the CH3/CH4 switch on the back of the VCR to match the channel selected on the screen menu and not the audio source. 1) Press the MENU button until the main menu appears. 2) Press the PLAY/A or...
Owner's Manual
Page 17
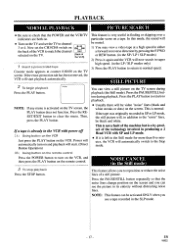
... and set the CH3/CH4 switch on the remote control Press the POWER button to the "noise" lines, be . EN 9H02 STILL PICTURE 2 To begin playback Press the PLAY button. If a tape is activated on the screen. This is left in addition to turn on and playback will start . (Direct Button Operation) 2B) Using button on the back of the VCR] 1 Insert a prerecc,• :Jed :ape Counter mode appears at a high speed...
... and set the CH3/CH4 switch on the remote control Press the POWER button to the "noise" lines, be . EN 9H02 STILL PICTURE 2 To begin playback Press the PLAY button. If a tape is activated on the screen. This is left in addition to turn on and playback will start . (Direct Button Operation) 2B) Using button on the back of the VCR] 1 Insert a prerecc,• :Jed :ape Counter mode appears at a high speed...
Owner's Manual
Page 18
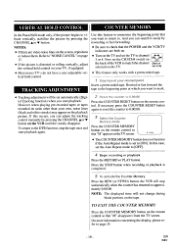
..., adjust the vertical hold control on the TV. Now set the TV to memorize the beginning point that the POWER and the VCR/TV indicators are video noise lines on the screen, reposition or reduce them. Refer to match the channel selected on your TV, if equipped. • Most newer TV's do not have a user adjustable vertical hold control. TRACKING ADJUSTMENT Use this feature to channel 3 or...
..., adjust the vertical hold control on the TV. Now set the TV to memorize the beginning point that the POWER and the VCR/TV indicators are video noise lines on the screen, reposition or reduce them. Refer to match the channel selected on your TV, if equipped. • Most newer TV's do not have a user adjustable vertical hold control. TRACKING ADJUSTMENT Use this feature to channel 3 or...
Owner's Manual
Page 19
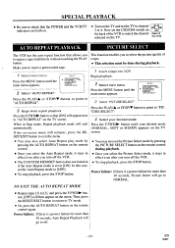
... the RESET/EXIT button to repeat a tape indefinitely without touching the PLAY a tape. Make sure to "PIC- In this case, set the CH3/CH4 switch on the back of to exit the menu. button. [OFF] will go to [2], and press the F.FWD/110- Now set the Auto Repeat mode to [ON]. or STOP/V button to point to insert a prerecorded tape. TIMER PROGRAMMING AUTO REPEAT [OFF] ► PICTURE SELECT CHANNEL SET UP CLOCK SET LANGUAGE SELECT...
... the RESET/EXIT button to repeat a tape indefinitely without touching the PLAY a tape. Make sure to "PIC- In this case, set the CH3/CH4 switch on the back of to exit the menu. button. [OFF] will go to [2], and press the F.FWD/110- Now set the Auto Repeat mode to [ON]. or STOP/V button to point to insert a prerecorded tape. TIMER PROGRAMMING AUTO REPEAT [OFF] ► PICTURE SELECT CHANNEL SET UP CLOCK SET LANGUAGE SELECT...

Owner's Manual
Page 20
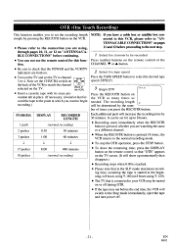
... 11 and 12 before continuing. Press the RECORD button. You can record one program while viewing another. The REC indicator on the VCR comes on the TV Set the TV to the channel you have a cable box or satellite box connected to this VCR, please refer to "ANTENNA/CABLE CONNECTIONS" on "ANTENNA/CABLE CONNECTIONS" before proceeding to the next step. 2 Select the tape speed Press the TAPE SPEED button to clear the menu.
... 11 and 12 before continuing. Press the RECORD button. You can record one program while viewing another. The REC indicator on the VCR comes on the TV Set the TV to the channel you have a cable box or satellite box connected to this VCR, please refer to "ANTENNA/CABLE CONNECTIONS" on "ANTENNA/CABLE CONNECTIONS" before proceeding to the next step. 2 Select the tape speed Press the TAPE SPEED button to clear the menu.
Owner's Manual
Page 21
... (normal recording) NOTE: If you are both on. • Turn on the TV and set the TV to channel 4-4. 3 or 4. Select the channel to A corded Press number buttons on the VCR as many times as needed. Each additional push will switch to the Stop mode immediately, eject the tape and turn power off. - 21 - ward the tape to the point at the beginning, is 8 hours using T-160 (or 6 hours using T-120...
... (normal recording) NOTE: If you are both on. • Turn on the TV and set the TV to channel 4-4. 3 or 4. Select the channel to A corded Press number buttons on the VCR as many times as needed. Each additional push will switch to the Stop mode immediately, eject the tape and turn power off. - 21 - ward the tape to the point at the beginning, is 8 hours using T-160 (or 6 hours using T-120...

Owner's Manual
Page 22
..."r" First, press the MENU button until your desired program number (1-7) Program number which you are both on "ANTENNA/CABLE CONNECTIONS" before setting the timer. 3 Select once, daily or weekly recording • Insert a cassette tape with an earlier start and end a recording while you have not yet set the clock, "CLOCK SET" appears. Now set seven programs to "TIMER PROGRAMMING". Friday. EN 9H02 For once recording : Press the PLAY/A or STOP/V button to point to "DAILY...
..."r" First, press the MENU button until your desired program number (1-7) Program number which you are both on "ANTENNA/CABLE CONNECTIONS" before setting the timer. 3 Select once, daily or weekly recording • Insert a cassette tape with an earlier start and end a recording while you have not yet set the clock, "CLOCK SET" appears. Now set seven programs to "TIMER PROGRAMMING". Friday. EN 9H02 For once recording : Press the PLAY/A or STOP/V button to point to "DAILY...

Owner's Manual
Page 23
... flash. • If a tape is not in the timer-record mode. - 23 - ONE TIME PROGRAM PROGRAM NUMIMAII et s _ DATE GI6/04RIRIU START TIME - - button. (Example: "04" for more than 30 seconds, the clock setting and all timer settings will be lost. • If the tape runs out before setting the channel number. 10 set another program, repeat steps [2] to [11]. • Press the RESET/EXIT button to return to "ANTENNA/CABLE CONNECTIONS" on page 23...
... flash. • If a tape is not in the timer-record mode. - 23 - ONE TIME PROGRAM PROGRAM NUMIMAII et s _ DATE GI6/04RIRIU START TIME - - button. (Example: "04" for more than 30 seconds, the clock setting and all timer settings will be lost. • If the tape runs out before setting the channel number. 10 set another program, repeat steps [2] to [11]. • Press the RESET/EXIT button to return to "ANTENNA/CABLE CONNECTIONS" on page 23...

Owner's Manual
Page 25
... turned on the editing (recording) VCR. Standard audio cables are not recommended. • You can make copies of video tapes made by friends or relatives for your TV using the following diagram. ON SCREEN DISPLAY • NOTE: VCR power and the VCR/TV indicator must be an infringement of copyright laws. CLOCK/COUNTER button. Connect the editing (recording) VCR(this unit) AudioNideo cables (not supplied) [TV set] (Use for the status display (STOP, PLAY etc...
... turned on the editing (recording) VCR. Standard audio cables are not recommended. • You can make copies of video tapes made by friends or relatives for your TV using the following diagram. ON SCREEN DISPLAY • NOTE: VCR power and the VCR/TV indicator must be an infringement of copyright laws. CLOCK/COUNTER button. Connect the editing (recording) VCR(this unit) AudioNideo cables (not supplied) [TV set] (Use for the status display (STOP, PLAY etc...
Owner's Manual
Page 26
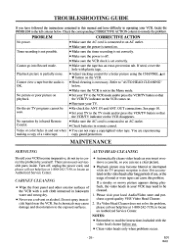
.... Timer recording is not possible. • Make sure the timer recording is set correctly. Dirt accumu- If need to read the instructions included with plastic tape. • Adjust tracking control for a better picture using the CHANNEL A or V button on . Check the corresponding CORRECTIVE ACTION column to "AUTO HEAD CLEANING" OK. EN 9H02 PROBLEM CORRECTIVE ACTION No power. • Make sure the AC cord is connected to locate an Authorized Service Center. Turn off, unplug the power cord, and...
.... Timer recording is not possible. • Make sure the timer recording is set correctly. Dirt accumu- If need to read the instructions included with plastic tape. • Adjust tracking control for a better picture using the CHANNEL A or V button on . Check the corresponding CORRECTIVE ACTION column to "AUTO HEAD CLEANING" OK. EN 9H02 PROBLEM CORRECTIVE ACTION No power. • Make sure the AC cord is connected to locate an Authorized Service Center. Turn off, unplug the power cord, and...


