
Owner's Manual
Page 1
OWNER'S MANUAL VIDEO CASSETTE RECORDER 6480 Sqmphonic =( I DO 0 0 0 0 0 0 O c TABLE OF CONTENTS IMPORTANT SAFEGUARDS 2 PRECAUTIONS 4 FEATURES 5 SUPPLIED ACCESSORIES 5 OPERATING CONTROLS AND FUNCTIONS 6 REMOTE CONTROL OPERATION 8 HOW TO USE THE REMOTE CONTROL 8 INSTALLING THE BATTERIES 9 CABLE CONNECTIONS 10 COMBINATION VHF/UHF ANTENNA, CATV COAXIAL CABLE 10 SEPARATE VHF (75-OHM) / UHF (300-OHM) ANTENNA 11 SEPARATE...
OWNER'S MANUAL VIDEO CASSETTE RECORDER 6480 Sqmphonic =( I DO 0 0 0 0 0 0 O c TABLE OF CONTENTS IMPORTANT SAFEGUARDS 2 PRECAUTIONS 4 FEATURES 5 SUPPLIED ACCESSORIES 5 OPERATING CONTROLS AND FUNCTIONS 6 REMOTE CONTROL OPERATION 8 HOW TO USE THE REMOTE CONTROL 8 INSTALLING THE BATTERIES 9 CABLE CONNECTIONS 10 COMBINATION VHF/UHF ANTENNA, CATV COAXIAL CABLE 10 SEPARATE VHF (75-OHM) / UHF (300-OHM) ANTENNA 11 SEPARATE...
Owner's Manual
Page 5
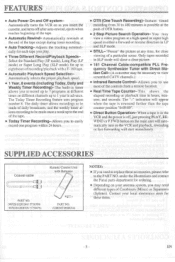
...recorded in timer allows you to easily record one program within 24 hours. • OTR (One Touch Recording)-Instant timed recording from a remote location. • Real Time Tape Counter-This shows the elapsed recording or playback time in LP and SLP mode. • STILL-...push of daily broadcasts, and the weekly timer allows recording to be necessary to view scrambled CATV channels.) • Infrared Remote Control- SUPPLIED ACCESSORIES Coaxial cable (QUI Remote Control Unit with Direct Station Call- (A converter may be made of OTR button. • 2 Step Picture Search Operation...
...recorded in timer allows you to easily record one program within 24 hours. • OTR (One Touch Recording)-Instant timed recording from a remote location. • Real Time Tape Counter-This shows the elapsed recording or playback time in LP and SLP mode. • STILL-...push of daily broadcasts, and the weekly timer allows recording to be necessary to view scrambled CATV channels.) • Infrared Remote Control- SUPPLIED ACCESSORIES Coaxial cable (QUI Remote Control Unit with Direct Station Call- (A converter may be made of OTR button. • 2 Step Picture Search Operation...

Owner's Manual
Page 6
... playback speed. 5 F.FWD button- Press to set Today Timer Recording. 15 Digital Display-Displays the clock, timer recording, counter and channel etc. 16 REMOTE SENSOR window- TRACKING function- Press to select the signal source that your TV will receive. Receives the infrared control signals from VCR. 4 REWIND button-Press.... 13 START buttons- VCR position: to view playback, to select the channel for viewing or recording. Press to remove tape from the handheld remote control unit. - 6 - Press to monitor video recordings or watch TV or to temporarily stop tape motion.
... playback speed. 5 F.FWD button- Press to set Today Timer Recording. 15 Digital Display-Displays the clock, timer recording, counter and channel etc. 16 REMOTE SENSOR window- TRACKING function- Press to select the signal source that your TV will receive. Receives the infrared control signals from VCR. 4 REWIND button-Press.... 13 START buttons- VCR position: to view playback, to select the channel for viewing or recording. Press to remove tape from the handheld remote control unit. - 6 - Press to monitor video recordings or watch TV or to temporarily stop tape motion.
Owner's Manual
Page 8
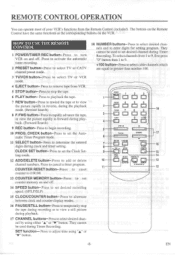
...REC button-Press to turn VCR on the VCR. They cannot be used during the playback mode. (Rewind Search) 8 F.FWD button- HOW TO USE THE REMOTE, CONTROL 1 POWER/TIMER REC button- Press to set the Automatic Timer Program mode. 11 SELECT button-Press to select desired channel by using "A" or "V"... REC SPEED CLOCK, COWER 9- 4 15 PRIX 14 OM SELECT AD DELETE F ll 13 CLOCK SET RESET 1102,0RY 11 12 -8- The buttons on the Remote Control have the same functions as the corresponding buttons on and off . 14 SPEED button-Press to set desired recording speed. (SP/LP/SLP) 15...
...REC button-Press to turn VCR on the VCR. They cannot be used during the playback mode. (Rewind Search) 8 F.FWD button- HOW TO USE THE REMOTE, CONTROL 1 POWER/TIMER REC button- Press to set the Automatic Timer Program mode. 11 SELECT button-Press to select desired channel by using "A" or "V"... REC SPEED CLOCK, COWER 9- 4 15 PRIX 14 OM SELECT AD DELETE F ll 13 CLOCK SET RESET 1102,0RY 11 12 -8- The buttons on the Remote Control have the same functions as the corresponding buttons on and off . 14 SPEED button-Press to set desired recording speed. (SP/LP/SLP) 15...
Owner's Manual
Page 9
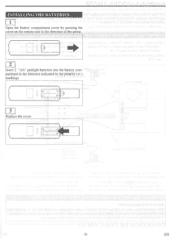
I NSTAL I NG THE BATTER! EN ES 1 Open the battery compartment cover by pressing the cover on the remote unit in the direction of the arrow. 2 Insert 2 "AA" penlight batteries into the battery compartment in the direction indicated by the polarity (+1-) markings. 3 Replace the cover. -9-
I NSTAL I NG THE BATTER! EN ES 1 Open the battery compartment cover by pressing the cover on the remote unit in the direction of the arrow. 2 Insert 2 "AA" penlight batteries into the battery compartment in the direction indicated by the polarity (+1-) markings. 3 Replace the cover. -9-
Owner's Manual
Page 12
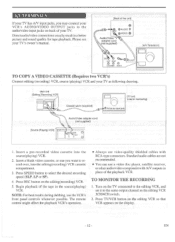
... TO COPY A VIDEO CASSETTE (Requires two VCR's) Connect editing (recording) VCR, source (playing) VCR and your TV as the editing VCR 3CH/4CH switch. 2. The remote control might affect the playback VCR's operation. • Always use a video disc player, satellite receiver, or other audio/video component with RCA-type connectors. Press...
... TO COPY A VIDEO CASSETTE (Requires two VCR's) Connect editing (recording) VCR, source (playing) VCR and your TV as the editing VCR 3CH/4CH switch. 2. The remote control might affect the playback VCR's operation. • Always use a video disc player, satellite receiver, or other audio/video component with RCA-type connectors. Press...
Owner's Manual
Page 14
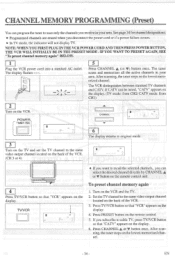
... power cord into a standard AC outlet. Press CHANNEL A or V button once. If CATV can select the desired channel directly by CHANNEL A or V button on the remote control unit. 4 Press TV/VCR button so that "VCR" appears on the lowest memorized channel. - 14- TVNCR I S. ning, the tuner stops on the display.... are erased when you can be tuned, "CATV" appears on the display. (TV mode: from CH2/ CATV mode: from CH 1) 2 Turn on the remote control. 5. After scan- NOTE: WHEN YOU FIRST PLUG IN THE VCR POWER CORD AND THEN PRESS POWER BUTTON, THE VCR WILL INITIALLY BE IN THE...
... power cord into a standard AC outlet. Press CHANNEL A or V button once. If CATV can select the desired channel directly by CHANNEL A or V button on the remote control unit. 4 Press TV/VCR button so that "VCR" appears on the lowest memorized channel. - 14- TVNCR I S. ning, the tuner stops on the display.... are erased when you can be tuned, "CATV" appears on the display. (TV mode: from CH2/ CATV mode: from CH 1) 2 Turn on the remote control. 5. After scan- NOTE: WHEN YOU FIRST PLUG IN THE VCR POWER CORD AND THEN PRESS POWER BUTTON, THE VCR WILL INITIALLY BE IN THE...
Owner's Manual
Page 15
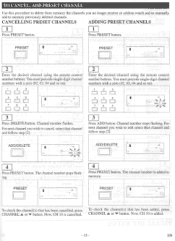
...Press PRESET button. PRESET I SP •_ _ Cm 10 PRESET I vaz SP - - - PRESET I SP 10 CM 2 Enter the desired channel using the remote control number buttons. Now, CH 10 is added to memory. Now, CH 10 is cancelled. The channel number stops flashing. 4 Press PRESET button. CM 10... step [2]. 3 Press ADD button. ADD/DELETE I 7 8 SP IL:=11 LA Ka P- `. 10 L2 Enter the desired channel using the remote control number buttons. Channel number stops flashing. SP 10 To check the channel(s) that has been cancelled, press To check the channel(s) that has ...
...Press PRESET button. PRESET I SP •_ _ Cm 10 PRESET I vaz SP - - - PRESET I SP 10 CM 2 Enter the desired channel using the remote control number buttons. Now, CH 10 is added to memory. Now, CH 10 is cancelled. The channel number stops flashing. 4 Press PRESET button. CM 10... step [2]. 3 Press ADD button. ADD/DELETE I 7 8 SP IL:=11 LA Ka P- `. 10 L2 Enter the desired channel using the remote control number buttons. Channel number stops flashing. SP 10 To check the channel(s) that has been cancelled, press To check the channel(s) that has ...
Owner's Manual
Page 16
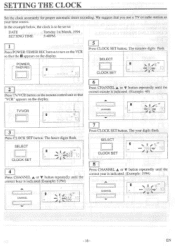
... turn on the VCR so that you use a TV or radio station as your time source. sg L.00zr 10 2 Press TV/VCR button on the remote control unit so that "VCR" appears on the display. SELECT CLOCK SET - The year digits flash. SELECT CLOCK SET •41449. We suggest that the...
... turn on the VCR so that you use a TV or radio station as your time source. sg L.00zr 10 2 Press TV/VCR button on the remote control unit so that "VCR" appears on the display. SELECT CLOCK SET - The year digits flash. SELECT CLOCK SET •41449. We suggest that the...
Owner's Manual
Page 19
..., the timer is being set to record: Date Setting Time Channel Tape Speed Friday 6th May, 1994 from the display. 7 Press TVNCR button on the remote control unit so that "VCR" appears on the display. • Clock must be turned on. • Turn on the TV and set to the same... video output channel located on the back of your recording, Press TVNCR button on the remote control unit to select TV so that "VCR" disappears from 7:30PM to 8:30PM CH16 SLP • VCR power must be set the TV channel to...
..., the timer is being set to record: Date Setting Time Channel Tape Speed Friday 6th May, 1994 from the display. 7 Press TVNCR button on the remote control unit so that "VCR" appears on the display. • Clock must be turned on. • Turn on the TV and set to the same... video output channel located on the back of your recording, Press TVNCR button on the remote control unit to select TV so that "VCR" disappears from 7:30PM to 8:30PM CH16 SLP • VCR power must be set the TV channel to...
Owner's Manual
Page 23
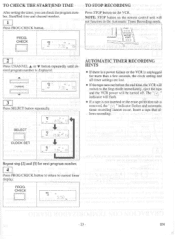
PROG. 1CHECK EMEI a sox, AP 7:30 „ 16 TO STOP RECORDING Press STOP button on the remote control unit will flash. • If a tape is not inserted or the erase-protection tab is removed, the " E " indicator flashes and automatic timer recording cannot ...
PROG. 1CHECK EMEI a sox, AP 7:30 „ 16 TO STOP RECORDING Press STOP button on the remote control unit will flash. • If a tape is not inserted or the erase-protection tab is removed, the " E " indicator flashes and automatic timer recording cannot ...
Owner's Manual
Page 24
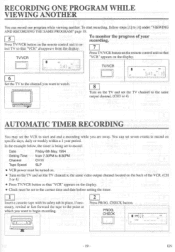
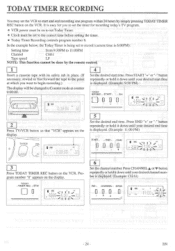
... the desired start time. EN TODAY TIMER RECORDING You may set the VCR to start and end recording one program within 24 hours by the remote control 1 4 Insert a cassette tape with its safety tab in place. (If necessary, rewind or fast forward the tape to the point at counter 0:00:00...
... the desired start time. EN TODAY TIMER RECORDING You may set the VCR to start and end recording one program within 24 hours by the remote control 1 4 Insert a cassette tape with its safety tab in place. (If necessary, rewind or fast forward the tape to the point at counter 0:00:00...
Owner's Manual
Page 26
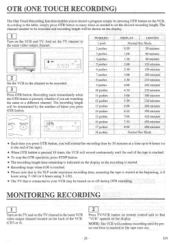
...). • The TV that "VCR" appears on the VCR. T Press TVNCR button on or off during OTR recording. NOTE: The VCR will be turned on remote control unit so that is reached or the tape runs out. - 26 - And set the desired recording length. The recording length will record continuously until...
...). • The TV that "VCR" appears on the VCR. T Press TVNCR button on or off during OTR recording. NOTE: The VCR will be turned on remote control unit so that is reached or the tape runs out. - 26 - And set the desired recording length. The recording length will record continuously until...
Owner's Manual
Page 27
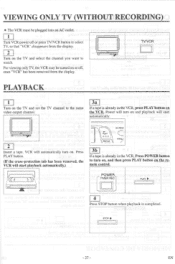
... PLAY button on the VCR. If a tape is already in the VCR, Press POWER button to turn on, and then press PLAY button on the remote control. Press PLAY button. (If the erase-protection tab has been removed, the VCR will turn on. For viewing only TV, the VCR may be...
... PLAY button on the VCR. If a tape is already in the VCR, Press POWER button to turn on, and then press PLAY button on the remote control. Press PLAY button. (If the erase-protection tab has been removed, the VCR will turn on. For viewing only TV, the VCR may be...
Owner's Manual
Page 29
... simply press PLAY button. NOTE: The VCR will automatically switch to study details of a tape is reached during playback, the picture will "freeze" on the remote control will turn off . The buttons on the screen. This feature is left in the Pause mode for more than your TV. • Some newer...
... simply press PLAY button. NOTE: The VCR will automatically switch to study details of a tape is reached during playback, the picture will "freeze" on the remote control will turn off . The buttons on the screen. This feature is left in the Pause mode for more than your TV. • Some newer...
Owner's Manual
Page 30
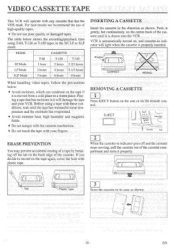
... has the VHS mark. For best results we recommend the use of the cassette. The table below : • Avoid moisture, which can condense on the remote control. ERASE PREVENTION You may prevent accidental erasing of a tape by breaking off and the cassette stops moving, pull the cassette out of the cassette...
... has the VHS mark. For best results we recommend the use of the cassette. The table below : • Avoid moisture, which can condense on the remote control. ERASE PREVENTION You may prevent accidental erasing of a tape by breaking off and the cassette stops moving, pull the cassette out of the cassette...
Owner's Manual
Page 31
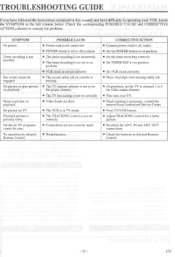
...to on playback. OUT connections. • Check the batteries in the left column below. Rec mode cannot be seen. No operation by infrared Remote Control. TROUBLESHOOTING GUIDE If you have followed the instructions contained in this manual and have difficulty in operating your TV. • Head cleaning ... and CORRECTIVE ACTION columns to channel 3 or 4 for video output channel. • Fine tune your VCR, locate the SYMPTOM in Infrared Remote Control. - 31 - SYMPTOM No power. No picture on playback. Playback picture is not set the TV to remedy the problem. IN and ANT.
...to on playback. OUT connections. • Check the batteries in the left column below. Rec mode cannot be seen. No operation by infrared Remote Control. TROUBLESHOOTING GUIDE If you have followed the instructions contained in this manual and have difficulty in operating your TV. • Head cleaning ... and CORRECTIVE ACTION columns to channel 3 or 4 for video output channel. • Fine tune your VCR, locate the SYMPTOM in Infrared Remote Control. - 31 - SYMPTOM No power. No picture on playback. Playback picture is not set the TV to remedy the problem. IN and ANT.
Owner's Manual
Page 33
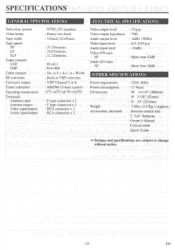
... : More than 38dB OTHER SPECIFICATIONS Power requirement Power consumption Dimensions Weight Accessories, included : 120V, 60Hz : 17 Watts : W 14-1/4" (360mm) H 3-5/8" (92mm) D 10" (252mm) : 7.01bs. (3.2 Kg.) (Approx.) : Remote control unit 2 "AA" Batteries Owner's Manual Coaxial cable Quick Guide • Designs and specifications are subject to change without notice. - 33 - SPECIFICATIONS GENERAL SPECIFICATIONS ELECTRICAL...
... : More than 38dB OTHER SPECIFICATIONS Power requirement Power consumption Dimensions Weight Accessories, included : 120V, 60Hz : 17 Watts : W 14-1/4" (360mm) H 3-5/8" (92mm) D 10" (252mm) : 7.01bs. (3.2 Kg.) (Approx.) : Remote control unit 2 "AA" Batteries Owner's Manual Coaxial cable Quick Guide • Designs and specifications are subject to change without notice. - 33 - SPECIFICATIONS GENERAL SPECIFICATIONS ELECTRICAL...
