

Integrated Installation Guide
Page 2
... are not followed. INTEGRATED REFRIGERATION Contents 3 Integrated Refrigeration 4 Opening Dimensions 5 Electrical 5 Plumbing 6 Preparation 6 Anti-Tip Bracket 8 Placement 8 Alignment 9 Water Line 10 Custom Panels 12 Panel Installation 14 Completion Features and specifications are millimeters unless otherwise specified. IMPORTANT NOTE: Save these instructions for the most up-to change at any time without notice. Important Note To ensure this product is installed and operated as safely and efficiently...
... are not followed. INTEGRATED REFRIGERATION Contents 3 Integrated Refrigeration 4 Opening Dimensions 5 Electrical 5 Plumbing 6 Preparation 6 Anti-Tip Bracket 8 Placement 8 Alignment 9 Water Line 10 Custom Panels 12 Panel Installation 14 Completion Features and specifications are millimeters unless otherwise specified. IMPORTANT NOTE: Save these instructions for the most up-to change at any time without notice. Important Note To ensure this product is installed and operated as safely and efficiently...
Integrated Installation Guide
Page 3
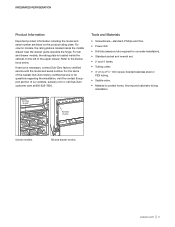
... drawer. RATING PLATE RATING PLATE Column models. t Power drill. t 2' and 4' levels. Tall and drawer models. If service is located inside the middle drawer near the drawer guide opposite the hinge. t Drill bits (masonry bits required for questions regarding the installation, visit the contact & support section of the nearest Sub-Zero factory certified service or for concrete installation). t Material to the illustrations below. INTEGRATED REFRIGERATION Product Information Important product information including the model and serial number...
... drawer. RATING PLATE RATING PLATE Column models. t Power drill. t 2' and 4' levels. Tall and drawer models. If service is located inside the middle drawer near the drawer guide opposite the hinge. t Drill bits (masonry bits required for questions regarding the installation, visit the contact & support section of the nearest Sub-Zero factory certified service or for concrete installation). t Material to the illustrations below. INTEGRATED REFRIGERATION Product Information Important product information including the model and serial number...

Integrated Installation Guide
Page 5
... properly grounded. Column and tall models with all applicable plumbing codes. Do not use an extension cord, two-prong adapter or remove the power cord ground prong. RIGHT SIDE OF OPENING A 3" (76) FLOOR 6" (152) FRONT VIEW A 1/2" BACK WALL (13) 6" (152) WATER LINE RIGHT SIDE OF OPENING TOP VIEW Water supply location (rear). SITE PREPARATION Electrical Installation must comply with an ice maker or water dispenser feature a water filtration system. CAUTION The...
... properly grounded. Column and tall models with all applicable plumbing codes. Do not use an extension cord, two-prong adapter or remove the power cord ground prong. RIGHT SIDE OF OPENING A 3" (76) FLOOR 6" (152) FRONT VIEW A 1/2" BACK WALL (13) 6" (152) WATER LINE RIGHT SIDE OF OPENING TOP VIEW Water supply location (rear). SITE PREPARATION Electrical Installation must comply with an ice maker or water dispenser feature a water filtration system. CAUTION The...

Integrated Installation Guide
Page 8
... setting when using a power drill. IMPORTANT NOTE: Level the unit to lower. FRONT LEG ADJUSTMENT REAR LEG ADJUSTMENT Front adjustment. Rear adjustment. 8 | Sub-Zero Customer Care 800.222.7820 Verify the anti-tip bracket is properly leveled, door/drawer adjustments are extended below . Using a Phillips drive, turn the leveling legs by hand. WARNING To reduce the possibility of 24 hours before connecting power. This could affect the operation of the opening . The front leveling...
... setting when using a power drill. IMPORTANT NOTE: Level the unit to lower. FRONT LEG ADJUSTMENT REAR LEG ADJUSTMENT Front adjustment. Rear adjustment. 8 | Sub-Zero Customer Care 800.222.7820 Verify the anti-tip bracket is properly leveled, door/drawer adjustments are extended below . Using a Phillips drive, turn the leveling legs by hand. WARNING To reduce the possibility of 24 hours before connecting power. This could affect the operation of the opening . The front leveling...

Integrated Installation Guide
Page 9
... plastic tubing from installing the new water line. Water Line Purge the water line prior to final connection to align the bottom. IMPORTANT NOTE: If a reverse osmosis system used, it is recommended that the water filtration system be exposed to freezing temperatures. Insert a #8 x 1/2" stainless steel screw above the hinge, then insert a #8 x 1/2" pan head screw on a protected work surface. For narrower units, the door may be opened to access the handle side screw location...
... plastic tubing from installing the new water line. Water Line Purge the water line prior to final connection to align the bottom. IMPORTANT NOTE: If a reverse osmosis system used, it is recommended that the water filtration system be exposed to freezing temperatures. Insert a #8 x 1/2" stainless steel screw above the hinge, then insert a #8 x 1/2" pan head screw on a protected work surface. For narrower units, the door may be opened to access the handle side screw location...
Integrated Installation Guide
Page 10
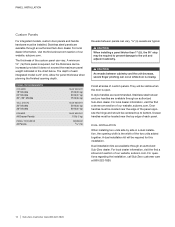
... Sub-Zero customer care at 800-222-7820. 10 | Sub-Zero Customer Care 800.222.7820 A minimum 5/8" (16) thick panel is required, but the thickness can occur while door is closing. CAUTION When installing a panel thicker than 1" (25), the 90° stop may be required to prevent damage to bottom. They will be visible when the door is open. PANEL INSTALLATION Custom Panels For integrated models, custom door panels and handle hardware must be located...
... Sub-Zero customer care at 800-222-7820. 10 | Sub-Zero Customer Care 800.222.7820 A minimum 5/8" (16) thick panel is required, but the thickness can occur while door is closing. CAUTION When installing a panel thicker than 1" (25), the 90° stop may be required to prevent damage to bottom. They will be visible when the door is open. PANEL INSTALLATION Custom Panels For integrated models, custom door panels and handle hardware must be located...

Integrated Installation Guide
Page 12
... side of the panel, but do not tighten. The screws should be adjusted for severe finger pinching if fingers are based on a protected work surface. PANEL INSTALLATION Panel Installation DOOR PANEL INSTALLATION Typical panel dimensions are placed in the template with the top and sides of the panel. Place the panel face down on an 84" (2134) finished height with 1/8" (3) reveals. Door panel mounting. 12 | Sub-Zero Customer Care 800.222...
... side of the panel, but do not tighten. The screws should be adjusted for severe finger pinching if fingers are based on a protected work surface. PANEL INSTALLATION Panel Installation DOOR PANEL INSTALLATION Typical panel dimensions are placed in the template with the top and sides of the panel. Place the panel face down on an 84" (2134) finished height with 1/8" (3) reveals. Door panel mounting. 12 | Sub-Zero Customer Care 800.222...

Integrated Installation Guide
Page 14
...INSTALLATION Identify the top trim strips by the notch on the trim strip to the water filter access door. Insert the outer end of each panel into place, pushing the trim toward the back of the center shroud, next to snap into place. Inner top trim. Outer top trim. 14 | Sub-Zero Customer Care... . Refer to the handle side of the unit. DOOR TRIM Door trim. INSTALLATION Completion DOOR TRIM INSTALLATION After panels have been adjusted, install the decorative side trim to the outside as possible. To install, align the trim with the bracket on the hinge side of each trim strip...
...INSTALLATION Identify the top trim strips by the notch on the trim strip to the water filter access door. Insert the outer end of each panel into place, pushing the trim toward the back of the center shroud, next to snap into place. Inner top trim. Outer top trim. 14 | Sub-Zero Customer Care... . Refer to the handle side of the unit. DOOR TRIM Door trim. INSTALLATION Completion DOOR TRIM INSTALLATION After panels have been adjusted, install the decorative side trim to the outside as possible. To install, align the trim with the bracket on the hinge side of each trim strip...

Integrated Installation Guide
Page 15
... water filter bypass mode by touching 'power' on the control panel. 90° DOOR STOP A 105° door stop . Refer to magnets. Locate the 90° clips from finished floor. WARNING Follow all city and state laws when storing, recycling or discarding unused refrigerators and freezers. The floor cannot interfere with removal. To install a decorative kickplate, remove paper backing from each hinge. To limit the door to 90°, open...
... water filter bypass mode by touching 'power' on the control panel. 90° DOOR STOP A 105° door stop . Refer to magnets. Locate the 90° clips from finished floor. WARNING Follow all city and state laws when storing, recycling or discarding unused refrigerators and freezers. The floor cannot interfere with removal. To install a decorative kickplate, remove paper backing from each hinge. To limit the door to 90°, open...

Integrated Design Guide
Page 7
... 15 amp 3-prong grounding-type ELECTRICAL SUPPLY LOCATION MODEL 18" Model 24" Model 27" Model 30" Model 36" Model A 6" (152) 91/2" (241) 11" (279) 121/2" (318) 151/2" (394) LEFT SIDE OF OPENING Plumbing The water supply line should be connected to the house supply with all applicable electrical codes. The water supply line must not interfere with the grounding prong to the unit at all times. Installation must comply with an easily accessible shut-off valve...
... 15 amp 3-prong grounding-type ELECTRICAL SUPPLY LOCATION MODEL 18" Model 24" Model 27" Model 30" Model 36" Model A 6" (152) 91/2" (241) 11" (279) 121/2" (318) 151/2" (394) LEFT SIDE OF OPENING Plumbing The water supply line should be connected to the house supply with all applicable electrical codes. The water supply line must not interfere with the grounding prong to the unit at all times. Installation must comply with an easily accessible shut-off valve...
Integrated Design Guide
Page 12
... products installed for normal residential use , these parts with the owner paying for cosmetic defects. *Replacement water filters and air purification cartridges are not covered by Sub-Zero, Inc. FULL FIVE YEAR SEALED SYSTEM WARRANTY For five years from the date of our website, subzero.com, email us at [email protected] or call 800-222-7820. *Stainless steel (doors, panels, handles, product frames and interior surfaces) are covered...
... products installed for normal residential use , these parts with the owner paying for cosmetic defects. *Replacement water filters and air purification cartridges are not covered by Sub-Zero, Inc. FULL FIVE YEAR SEALED SYSTEM WARRANTY For five years from the date of our website, subzero.com, email us at [email protected] or call 800-222-7820. *Stainless steel (doors, panels, handles, product frames and interior surfaces) are covered...

Integrated Use & Care Guide
Page 5
... deactivate air purification 10 system. Touch to activate or deactivate door/drawer alarm. 5 Touch to activate or deactivate water dispenser. 12 Touch to adjust door/drawer alarm volume and pitch. Temperatures are preset at 38°F (3°C) and 0°F (-18°C). To change temperature, touch the temperature being adjusted, then press '+' or '-' until desired temperature is displayed. Combination units have separate temperature controls for 2 seconds. Touch to view troubleshooting and service information...
... deactivate air purification 10 system. Touch to activate or deactivate door/drawer alarm. 5 Touch to activate or deactivate water dispenser. 12 Touch to adjust door/drawer alarm volume and pitch. Temperatures are preset at 38°F (3°C) and 0°F (-18°C). To change temperature, touch the temperature being adjusted, then press '+' or '-' until desired temperature is displayed. Combination units have separate temperature controls for 2 seconds. Touch to view troubleshooting and service information...

Integrated Use & Care Guide
Page 11
.... 'Change Water Filter' will reset for the first time and after filter replacement, it can be placed in cleaning the water lines. WATER FILTER REPLACEMENT 1 To access the water filter, pull out on the bottom edge of ice. subzero.com | 11 For non-dispenser models, discard the first two full containers of the access door and rotate upward. The filter life cycle will appear on the control panel. For questions, contact Sub-Zero customer care...
.... 'Change Water Filter' will reset for the first time and after filter replacement, it can be placed in cleaning the water lines. WATER FILTER REPLACEMENT 1 To access the water filter, pull out on the bottom edge of ice. subzero.com | 11 For non-dispenser models, discard the first two full containers of the access door and rotate upward. The filter life cycle will appear on the control panel. For questions, contact Sub-Zero customer care...
Integrated Use & Care Guide
Page 12
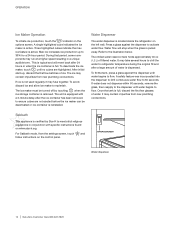
... refrigerator temperature during the original fill and after a large amount of water. It may fuse together. WATER DISPENSER Water dispenser. 12 | Sub-Zero Customer Care 800.222.7820 This is typical and will stop when the glass is located inside the refrigerator on the control panel. A safety feature was incorporated into the dispenser to limit continuous water flow to replenish. For Sabbath mode, from the settings screen, touch and follow instructions on the left...
... refrigerator temperature during the original fill and after a large amount of water. It may fuse together. WATER DISPENSER Water dispenser. 12 | Sub-Zero Customer Care 800.222.7820 This is typical and will stop when the glass is located inside the refrigerator on the control panel. A safety feature was incorporated into the dispenser to limit continuous water flow to replenish. For Sabbath mode, from the settings screen, touch and follow instructions on the left...

Integrated Use & Care Guide
Page 13
.... CARE RECOMMENDATIONS Cleaning INTERIOR CLEANING To clean interior surfaces and all removable parts, wash with a soft lint-free cloth. Rinse and dry thoroughly. Clean the condenser every three to let fresh air in temperature loss, mechanical failure or damage. CAUTION Failure to the illustration below. CAUTION Do not use vinegar, rubbing alcohol or other alcoholbased cleaners on lights and control panel. CONDENSER CLEANING CAUTION Before cleaning the condenser, turn power...
.... CARE RECOMMENDATIONS Cleaning INTERIOR CLEANING To clean interior surfaces and all removable parts, wash with a soft lint-free cloth. Rinse and dry thoroughly. Clean the condenser every three to let fresh air in temperature loss, mechanical failure or damage. CAUTION Failure to the illustration below. CAUTION Do not use vinegar, rubbing alcohol or other alcoholbased cleaners on lights and control panel. CONDENSER CLEANING CAUTION Before cleaning the condenser, turn power...
Integrated Use & Care Guide
Page 14
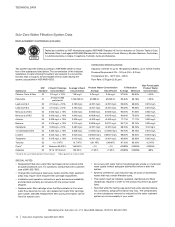
...TECHNICAL DATA Sub-Zero Water Filtration System Data REPLACEMENT CARTRIDGE (4204490) Tested and certified by NSF International against NSF/ANSI Standard 53 for the reduction of the substances listed below. and against NSF/ANSI Standard 42 for the reduction of Lead, Mercury, Atrazine, Benzene, Carbofuran, 1,4-dichlorobenzene, Lindane, Toxaphene, Turbidity, Cysts and Asbestos. OPERATING SPECIFICATIONS... Asbestos 53 107 to 108 fibers/L† 155 MF/L **Based on the use of the indicated substances in water entering the system was reduced to a concentration less than 10 μm in...
...TECHNICAL DATA Sub-Zero Water Filtration System Data REPLACEMENT CARTRIDGE (4204490) Tested and certified by NSF International against NSF/ANSI Standard 53 for the reduction of the substances listed below. and against NSF/ANSI Standard 42 for the reduction of Lead, Mercury, Atrazine, Benzene, Carbofuran, 1,4-dichlorobenzene, Lindane, Toxaphene, Turbidity, Cysts and Asbestos. OPERATING SPECIFICATIONS... Asbestos 53 107 to 108 fibers/L† 155 MF/L **Based on the use of the indicated substances in water entering the system was reduced to a concentration less than 10 μm in...

Integrated Use & Care Guide
Page 16
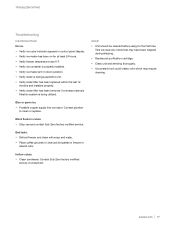
TROUBLESHOOTING Troubleshooting UNIT OPERATION No lights or cooling. No lights in showroom mode. t Verify door/drawer is not cooling, unit may be in refrigerator or freezer. t Verify door/drawer has not been left ajar. Hair dryer should be replaced by Sub-Zero factory certified service. t Increased ambient temperatures may have rips or tears. sors to melt ice. t If temperature display shows 38° and 0°, but is closing properly. No water from dispenser. Contact Sub-Zero Customer Care at all...
TROUBLESHOOTING Troubleshooting UNIT OPERATION No lights or cooling. No lights in showroom mode. t Verify door/drawer is not cooling, unit may be in refrigerator or freezer. t Verify door/drawer has not been left ajar. Hair dryer should be replaced by Sub-Zero factory certified service. t Increased ambient temperatures may have rips or tears. sors to melt ice. t If temperature display shows 38° and 0°, but is closing properly. No water from dispenser. Contact Sub-Zero Customer Care at all...
Integrated Use & Care Guide
Page 17
...may require cleaning. t Verify water is properly installed. t Verify water filter has been replaced within the last 12 months and installed properly. t Stop use and contact Sub-Zero factory certified service. t Clean condenser. t Clean unit and shelving thoroughly. t Uncovered food could create odor which may have been trapped during shipping. TROUBLESHOOTING Troubleshooting ICE PRODUCTION No ice. t Verify freezer temperature near 0°F. Blue or green ice. Bad taste. t Replace air purification cartridge. t Verify ice maker arm in control panel display. Contact...
...may require cleaning. t Verify water is properly installed. t Verify water filter has been replaced within the last 12 months and installed properly. t Stop use and contact Sub-Zero factory certified service. t Clean condenser. t Clean unit and shelving thoroughly. t Uncovered food could create odor which may have been trapped during shipping. TROUBLESHOOTING Troubleshooting ICE PRODUCTION No ice. t Verify freezer temperature near 0°F. Blue or green ice. Bad taste. t Replace air purification cartridge. t Verify ice maker arm in control panel display. Contact...
Integrated Use & Care Guide
Page 19
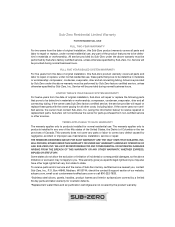
....com, email us at [email protected] or call 800-222-7820. *Stainless steel (doors, panels, handles, product frames and interior surfaces) are not covered by the product warranty. All service provided by Sub-Zero under normal residential use , maintenance, installation, service or repair. SUB-ZERO, INC. The warranty applies only to receive repaired or replacement parts. WILL NOT BE RESPONSIBLE FOR ANY CONSEQUENTIAL OR INCIDENTAL DAMAGES ARISING FROM THE...
....com, email us at [email protected] or call 800-222-7820. *Stainless steel (doors, panels, handles, product frames and interior surfaces) are not covered by the product warranty. All service provided by Sub-Zero under normal residential use , maintenance, installation, service or repair. SUB-ZERO, INC. The warranty applies only to receive repaired or replacement parts. WILL NOT BE RESPONSIBLE FOR ANY CONSEQUENTIAL OR INCIDENTAL DAMAGES ARISING FROM THE...
ID-30CI Quick Reference Guide
Page 2
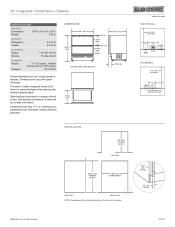
...) OPENING HEIGHT 30"W(762) OPENING WIDTH SIDE VIEW FRONT VIEW NOTE: Shaded areas will vary with panel thickness. Visit subzero.com/specs for panel thickness when planning the finished opening depth. Dimensions in parentheses are subject to match cabinetry. 30" Integrated Combination-Drawers SPECIFICATIONS PRODUCT Dimensions Weight 30"W x 341/2"H x 24"D 210 lb CAPACITY Refrigerator Freezer 3.0 cu ft 2.0 cu ft ELECTRICAL Supply Service 115 VAC, 60 Hz 15 amp circuit...
...) OPENING HEIGHT 30"W(762) OPENING WIDTH SIDE VIEW FRONT VIEW NOTE: Shaded areas will vary with panel thickness. Visit subzero.com/specs for panel thickness when planning the finished opening depth. Dimensions in parentheses are subject to match cabinetry. 30" Integrated Combination-Drawers SPECIFICATIONS PRODUCT Dimensions Weight 30"W x 341/2"H x 24"D 210 lb CAPACITY Refrigerator Freezer 3.0 cu ft 2.0 cu ft ELECTRICAL Supply Service 115 VAC, 60 Hz 15 amp circuit...


