
Instruction Manual
Page 2
... Guide to ensure your satisfaction and troublefree use of Conformity 36 Quality Certification 36 STIHl USG English Dear Customer, Thank you have any queries concerning your dealer or our sales company if you for Sharpening Circular Saw Blade 27 Sharpening Circular Saw Blade ...... 31 Maintenance Chart 32 Minimize Wear and Avoid Damage 33 Main...
... Guide to ensure your satisfaction and troublefree use of Conformity 36 Quality Certification 36 STIHl USG English Dear Customer, Thank you have any queries concerning your dealer or our sales company if you for Sharpening Circular Saw Blade 27 Sharpening Circular Saw Blade ...... 31 Maintenance Chart 32 Minimize Wear and Avoid Damage 33 Main...
Instruction Manual
Page 4
...carrying out any way. Safety Precautions English Additional safety precautions have never used this sharpener model before: Have your STIHL dealer. Minors should be observed when operating the universal sharpener. The grinding dust produced when using your specific model. Clothing must be allowed...eye injuries. Do not operate your power supply. In the interests of movement. The sparks created during sharpening may cause serious or even fatal injury. USG 3 Keep children, bystanders and animals well clear of injury. Always wear safety glasses. It is ...
...carrying out any way. Safety Precautions English Additional safety precautions have never used this sharpener model before: Have your STIHL dealer. Minors should be observed when operating the universal sharpener. The grinding dust produced when using your specific model. Clothing must be allowed...eye injuries. Do not operate your power supply. In the interests of movement. The sparks created during sharpening may cause serious or even fatal injury. USG 3 Keep children, bystanders and animals well clear of injury. Always wear safety glasses. It is ...
Instruction Manual
Page 5
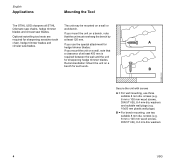
... the unit on a wall, note that the unit must overhang the bench by required for sharpening scratcher tooth at least 450 mm is required between the wall and the unit for sharpening hedge trimmer blades. Recommendation: Mount the unit on a bench for hedge trimmer blades: A ... blades. If you use the special attachment for such work. blades and circular saw blades. washers 523BA045 KN 4 USG English Applications Mounting the Tool The STIHL USG sharpens all STIHL The unit may be mounted on a bench, note Optional swivelling tool rests are that a clearance of at least ...
... the unit on a wall, note that the unit must overhang the bench by required for sharpening scratcher tooth at least 450 mm is required between the wall and the unit for sharpening hedge trimmer blades. Recommendation: Mount the unit on a bench for hedge trimmer blades: A ... blades. If you use the special attachment for such work. blades and circular saw blades. washers 523BA045 KN 4 USG English Applications Mounting the Tool The STIHL USG sharpens all STIHL The unit may be mounted on a bench, note Optional swivelling tool rests are that a clearance of at least ...
Instruction Manual
Page 10
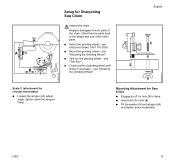
+ A1 - + -4 C - see "Mounting the Grinding Wheel". : Test run the grinding wheel - USG 9 see "Dressing the Grinding Wheel". 3 1 4 2 5 6 Mounting Attachment for Saw Chain : Engage pin (1) in hole (2) in base. : Insert bolt (3) in slot (4). : Fit the ... : Loosen the wingnut (4), adjust angle, tighten down moderately. see instruction sheet 0457 716 0000. : Mount the grinding wheel - B+2 Scale C (attachment for Sharpening Saw Chain English Inspect the chain. Grind the new parts back to the shape and size of grinding wheel and dress if necessary - Replace damaged...
+ A1 - + -4 C - see "Mounting the Grinding Wheel". : Test run the grinding wheel - USG 9 see "Dressing the Grinding Wheel". 3 1 4 2 5 6 Mounting Attachment for Saw Chain : Engage pin (1) in hole (2) in base. : Insert bolt (3) in slot (4). : Fit the ... : Loosen the wingnut (4), adjust angle, tighten down moderately. see instruction sheet 0457 716 0000. : Mount the grinding wheel - B+2 Scale C (attachment for Sharpening Saw Chain English Inspect the chain. Grind the new parts back to the shape and size of grinding wheel and dress if necessary - Replace damaged...

Instruction Manual
Page 13
with chalk. Fitting the Saw Chain : Release the clamping lever (1). : Place the chain in position, drive link tangs (2) between the rails (3) - English 2 3 1 523BA137 KN 523BA012 KN 523BA061 KN : Fit the clamping lever. The master cutter is used as the master cutter. : Use a slide caliper to find the shortest cutter and mark it, e.g. cutting edges must point to the same length as the master cutter. All other cutters are then ground to the left. 12 USG Finding the Master Cutter The shortest cutter is sharpened first.
with chalk. Fitting the Saw Chain : Release the clamping lever (1). : Place the chain in position, drive link tangs (2) between the rails (3) - English 2 3 1 523BA137 KN 523BA012 KN 523BA061 KN : Fit the clamping lever. The master cutter is used as the master cutter. : Use a slide caliper to find the shortest cutter and mark it, e.g. cutting edges must point to the same length as the master cutter. All other cutters are then ground to the left. 12 USG Finding the Master Cutter The shortest cutter is sharpened first.

Instruction Manual
Page 14
English 523BA062 KN 523BA063 KN 523BA077 KN + A 5 - + -C - + 4 B Setting the scales : Set the scales to the values specified in the instruction sheet 0457 716 0000. : Pull the master cutter back against the stop (4). : The pivot pin (5) moves backward and forward so that the stop can be properly located against the back of the cutter. : To sharpen the left-hand row of cutters: Pull the stop in the direction of the arrow. : To sharpen the right-hand row of cutters: Push the stop in the other direction. USG 13
English 523BA062 KN 523BA063 KN 523BA077 KN + A 5 - + -C - + 4 B Setting the scales : Set the scales to the values specified in the instruction sheet 0457 716 0000. : Pull the master cutter back against the stop (4). : The pivot pin (5) moves backward and forward so that the stop can be properly located against the back of the cutter. : To sharpen the left-hand row of cutters: Pull the stop in the direction of the arrow. : To sharpen the right-hand row of cutters: Push the stop in the other direction. USG 13

Instruction Manual
Page 16
...USG 15 do not sharpen in this position. : Screw the travel limiting screw (1) down as far as the stop lug (2). : Tighten down until grinding wheel touches the gullet of the cutter - Check sharpening process. Do not remove too much material. : If necessary, switch off motor and readjust. : Sharpen... the side plate by applying the wheel several times - English Sharpening Procedure 1 3 2 Wear safety glasses. hold it in...
...USG 15 do not sharpen in this position. : Screw the travel limiting screw (1) down as far as the stop lug (2). : Tighten down until grinding wheel touches the gullet of the cutter - Check sharpening process. Do not remove too much material. : If necessary, switch off motor and readjust. : Sharpen... the side plate by applying the wheel several times - English Sharpening Procedure 1 3 2 Wear safety glasses. hold it in...
Instruction Manual
Page 17
...angle is too obtuse (wide): : Use travel limiting screws with the grinding wheel. Avoid touching the drive links or tie straps with their knurled nuts. Sharpening Row of Cutters Use the setting for the master cutter to break. Pull the chain to set motor arm higher. : Lock the adjusting and travel... too acute (narrow): : Use travel limiting screw to set motor arm lower. If side plate angle is behind the next cutter but one. 16 USG Chain type Rapid-Standard Rapid-Micro Rapid-Super Picco-Micro Picco-Micro-Mini Rapid-Duro RCX, RMX, PMX Angle in the row. : Release clamping lever...
...angle is too obtuse (wide): : Use travel limiting screws with the grinding wheel. Avoid touching the drive links or tie straps with their knurled nuts. Sharpening Row of Cutters Use the setting for the master cutter to break. Pull the chain to set motor arm higher. : Lock the adjusting and travel... too acute (narrow): : Use travel limiting screw to set motor arm lower. If side plate angle is behind the next cutter but one. 16 USG Chain type Rapid-Standard Rapid-Micro Rapid-Super Picco-Micro Picco-Micro-Mini Rapid-Duro RCX, RMX, PMX Angle in the row. : Release clamping lever...

Instruction Manual
Page 18
...back of the cutter. : After sharpening first cutter in position. : Sharpen the side plate. : Repeat procedure until the back of the cutter butts against that matches the chain pitch. If the depth gauge projects beyond the filing gauge it has to be lowered. USG 17 Checking Depth Gauge Setting : ...Select the filing gauge (special accessory) that of the other row and adjust the stop if necessary. : Now sharpen the second row of the chain. : Move the stop . : Clamp the...
...back of the cutter. : After sharpening first cutter in position. : Sharpen the side plate. : Repeat procedure until the back of the cutter butts against that matches the chain pitch. If the depth gauge projects beyond the filing gauge it has to be lowered. USG 17 Checking Depth Gauge Setting : ...Select the filing gauge (special accessory) that of the other row and adjust the stop if necessary. : Now sharpen the second row of the chain. : Move the stop . : Clamp the...
Instruction Manual
Page 20
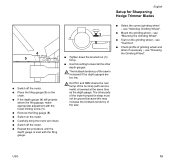
.... see "Test Run". : Check profile of the saw . : Select the correct grinding wheel - see "Mounting the Grinding Wheel". : Test run the grinding wheel - USG 19 English Setup for Sharpening Hedge Trimmer Blades 4 5 : Switch off the motor. : Repeat the procedure until the depth gauge is level with service mark) is increased if the...
.... see "Test Run". : Check profile of the saw . : Select the correct grinding wheel - see "Mounting the Grinding Wheel". : Test run the grinding wheel - USG 19 English Setup for Sharpening Hedge Trimmer Blades 4 5 : Switch off the motor. : Repeat the procedure until the depth gauge is level with service mark) is increased if the...

Instruction Manual
Page 24
hold it in this position. : Screw the travel limiting screw (1) down as far as the stop swings back. English 1 3 3 2 If stop is now correctly positioned: : Continue turning the star knob (3) clockwise until the stop lug (2). : Tighten down until the grinding wheel touches the gullet of the tooth - Adjusting sharpening depth : Swing the motor arm down the knurled nut (3) firmly. 523BA113 KN 523BA109 KN 523BA101 KN USG 23
hold it in this position. : Screw the travel limiting screw (1) down as far as the stop swings back. English 1 3 3 2 If stop is now correctly positioned: : Continue turning the star knob (3) clockwise until the stop lug (2). : Tighten down until the grinding wheel touches the gullet of the tooth - Adjusting sharpening depth : Swing the motor arm down the knurled nut (3) firmly. 523BA113 KN 523BA109 KN 523BA101 KN USG 23

Instruction Manual
Page 25
... your eyes. the cutting blade is now clamped in the row have been sharpened. The left . : Continue turning the star knob (1) until the stop swings back - Check sharpening process. English Sharpening Hedge Trimmer Blades Wear safety glasses to loosen the clamp. : Move cutting ...blade (2) one -sided and double-sided cutting blades. 24 USG Repeat the above procedure until the stop swings forward automatically....
... your eyes. the cutting blade is now clamped in the row have been sharpened. The left . : Continue turning the star knob (1) until the stop swings back - Check sharpening process. English Sharpening Hedge Trimmer Blades Wear safety glasses to loosen the clamp. : Move cutting ...blade (2) one -sided and double-sided cutting blades. 24 USG Repeat the above procedure until the stop swings forward automatically....

Instruction Manual
Page 26
cutting edges point to the rear. : Sharpen the teeth. : Take the cutting blade out of the clamp and turn it over (180°) - USG 25 cutting edges point to opposite angle. : Sharpen the teeth. English 523BA131 KN 523BA116 KN 523BA117 KN 180° 180° Sharpening Double-Sided Hedge Trimmer Blades : Sharpen the first row of the clamp and turn it 180° lengthwise - cutting edges point forwards. : Set scale C to the rear. : Take the cutting blade out of teeth -
cutting edges point to the rear. : Sharpen the teeth. : Take the cutting blade out of the clamp and turn it over (180°) - USG 25 cutting edges point to opposite angle. : Sharpen the teeth. English 523BA131 KN 523BA116 KN 523BA117 KN 180° 180° Sharpening Double-Sided Hedge Trimmer Blades : Sharpen the first row of the clamp and turn it 180° lengthwise - cutting edges point forwards. : Set scale C to the rear. : Take the cutting blade out of teeth -

Instruction Manual
Page 27
Sharpening One-Sided Hedge Trimmer Blades : Sharpen the first row of teeth - cutting edges point forwards. : Set scale C to the rear. 26 USG cutting edges point to opposite angle. : Sharpen the teeth. : Take the cutting blade out of the clamp and turn it 180° lengthwise - cutting edges point forwards. : Sharpen the teeth. 523BA118 KN 523BA119 KN 523BA120 KN English 180° 180° : Take the cutting blade out of the clamp and turn it over (180°) -
Sharpening One-Sided Hedge Trimmer Blades : Sharpen the first row of teeth - cutting edges point forwards. : Set scale C to the rear. 26 USG cutting edges point to opposite angle. : Sharpen the teeth. : Take the cutting blade out of the clamp and turn it 180° lengthwise - cutting edges point forwards. : Sharpen the teeth. 523BA118 KN 523BA119 KN 523BA120 KN English 180° 180° : Take the cutting blade out of the clamp and turn it over (180°) -
Instruction Manual
Page 28
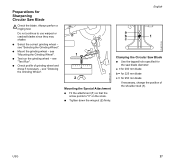
...1 c Clamping the Circular Saw Blade : Use the tapped hole specified for the saw blade diameter: a = for 200 mm blade b = for 225 mm blade c = for Sharpening Circular Saw Blade Check the blade. see "Mounting the Grinding Wheel". : Test run the grinding wheel - see "Dressing the Grinding Wheel". 1 0 2 Mounting the Special Attachment...Fit the attachment (1) so that the arrow points to use warped or cracked blades since they may shatter. : Select the correct grinding wheel - USG 27 Preparations for 250 mm blade If necessary, change the position of grinding wheel and dress if necessary -
...1 c Clamping the Circular Saw Blade : Use the tapped hole specified for the saw blade diameter: a = for 200 mm blade b = for 225 mm blade c = for Sharpening Circular Saw Blade Check the blade. see "Mounting the Grinding Wheel". : Test run the grinding wheel - see "Dressing the Grinding Wheel". 1 0 2 Mounting the Special Attachment...Fit the attachment (1) so that the arrow points to use warped or cracked blades since they may shatter. : Select the correct grinding wheel - USG 27 Preparations for 250 mm blade If necessary, change the position of grinding wheel and dress if necessary -

Instruction Manual
Page 29
... over the shoulder stud and push it must now locate against the retaining plate free from play, but it home - Marking them helps avoid accidentally sharpening a tooth on the type of saw blade: Chisel tooth, standard (1) Chisel tooth, special (2) Scratcher tooth (3) Carbide tipped blade (4) There are ...saw blades with square ground teeth (5) (scale C = 0) and bevel ground teeth (6) In the case of the blade. 28 USG 523BA123 KN 523BA124 KN 523BA125 KN English 1 5 5 2 2 6 4 1 : Position the saw blade (2) on the shoulder stud (1) so that have the same...
... over the shoulder stud and push it must now locate against the retaining plate free from play, but it home - Marking them helps avoid accidentally sharpening a tooth on the type of saw blade: Chisel tooth, standard (1) Chisel tooth, special (2) Scratcher tooth (3) Carbide tipped blade (4) There are ...saw blades with square ground teeth (5) (scale C = 0) and bevel ground teeth (6) In the case of the blade. 28 USG 523BA123 KN 523BA124 KN 523BA125 KN English 1 5 5 2 2 6 4 1 : Position the saw blade (2) on the shoulder stud (1) so that have the same...
Instruction Manual
Page 30
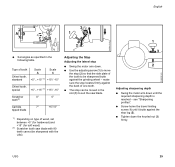
... between +5° (for hardwood) and +15° (for soft wood) 2) Scratcher tooth saw blade. 1 3 2 Adjusting sharpening depth : Swing the motor arm down until the required sharpening depth is reached - Type of tooth Chisel tooth, standard Scale A Scale C +5°...+15°1) +15°/ -15°...tooth2) Carbide 7° +5°/-5° tipped blade 1) Depending on type of one tooth. : The stop can be sharpened with 80 teeth cannot be moved in the following table. USG 29 make sure the stop : Swing the motor arm down the knurled nut (3) firmly. C : Set angles as...
... between +5° (for hardwood) and +15° (for soft wood) 2) Scratcher tooth saw blade. 1 3 2 Adjusting sharpening depth : Swing the motor arm down until the required sharpening depth is reached - Type of tooth Chisel tooth, standard Scale A Scale C +5°...+15°1) +15°/ -15°...tooth2) Carbide 7° +5°/-5° tipped blade 1) Depending on type of one tooth. : The stop can be sharpened with 80 teeth cannot be moved in the following table. USG 29 make sure the stop : Swing the motor arm down the knurled nut (3) firmly. C : Set angles as...
Instruction Manual
Page 31
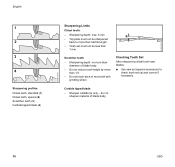
... not touch back of blade body. 30 USG do not sharpen material of next tooth with grinding wheel. Tooth set (a) and correct if necessary. 523BA128 KN 523BA136 KN English 1 2 3 4 Sharpening profiles Chisel tooth, standard (1) Chisel tooth, special (2) Scratcher tooth (3) Carbide tipped blade (4) Sharpening Limits Chisel tooth: - Sharpen carbide tip only - Do not reduce tooth height...
... not touch back of blade body. 30 USG do not sharpen material of next tooth with grinding wheel. Tooth set (a) and correct if necessary. 523BA128 KN 523BA136 KN English 1 2 3 4 Sharpening profiles Chisel tooth, standard (1) Chisel tooth, special (2) Scratcher tooth (3) Carbide tipped blade (4) Sharpening Limits Chisel tooth: - Sharpen carbide tip only - Do not reduce tooth height...

Instruction Manual
Page 32
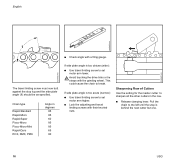
... the same setting. If necessary, use adjusting screw (2) to correct position of teeth - all the teeth in the second row. English USG 31 Sharpening the First Tooth : Push the saw blade counterclockwise to the angle for the opposite row of stop (1) with bevel ground teeth: : ... ground. Saw blade without bevel ground teeth (scale C = 0°): : Rotate the saw blade clockwise against the stop . 523BA129 KN Sharpening Remaining Teeth The sharpening process now depends on how the teeth are left hand. : With the motor running, carefully swing the motor arm down. : Only remove...
... the same setting. If necessary, use adjusting screw (2) to correct position of teeth - all the teeth in the second row. English USG 31 Sharpening the First Tooth : Push the saw blade counterclockwise to the angle for the opposite row of stop (1) with bevel ground teeth: : ... ground. Saw blade without bevel ground teeth (scale C = 0°): : Rotate the saw blade clockwise against the stop . 523BA129 KN Sharpening Remaining Teeth The sharpening process now depends on how the teeth are left hand. : With the motor running, carefully swing the motor arm down. : Only remove...
Instruction Manual
Page 34
... unit must be performed by STIHL. - Using attachments or sharpening tools not approved by authorized STIHL servicing dealers. Maintenance Work All the operations described in the "Maintenance Chart" must be replaced in good time. Corrosion and other than original STIHL replacement parts. - Damage resulting from improper storage. - Stop USG 33 Minimize Wear and Avoid Damage...
... unit must be performed by STIHL. - Using attachments or sharpening tools not approved by authorized STIHL servicing dealers. Maintenance Work All the operations described in the "Maintenance Chart" must be replaced in good time. Corrosion and other than original STIHL replacement parts. - Damage resulting from improper storage. - Stop USG 33 Minimize Wear and Avoid Damage...
