
Instruction Manual
Page 2
... to Using this Manual 2 Safety Precautions 3 Applications 4 Mounting the Tool 4 Selecting the Grinding Wheel 6 Mounting the Grinding Wheel 7 Test Run 8 Dressing the Grinding Wheel 8 Scales 8 Setup for Sharpening Saw Chain ..... 9 Sharpening Procedure 15 Lowering Depth Gauges 17 Setup for Sharpening Hedge Trimmer Blades 19 Sharpening Hedge Trimmer Blades 24 Preparations for choosing a quality engineered STIHL product. C4. Printing inks contain vegetable oils; Printed in Germany Printed on chlorine-free paper...
... to Using this Manual 2 Safety Precautions 3 Applications 4 Mounting the Tool 4 Selecting the Grinding Wheel 6 Mounting the Grinding Wheel 7 Test Run 8 Dressing the Grinding Wheel 8 Scales 8 Setup for Sharpening Saw Chain ..... 9 Sharpening Procedure 15 Lowering Depth Gauges 17 Setup for Sharpening Hedge Trimmer Blades 19 Sharpening Hedge Trimmer Blades 24 Preparations for choosing a quality engineered STIHL product. C4. Printing inks contain vegetable oils; Printed in Germany Printed on chlorine-free paper...

Instruction Manual
Page 3
... direct reference to an illustration. The operating and handling instructions are made from those described in the illustration. English Guide to Using this Manual Pictograms All the pictograms attached to the machine are marked with an asterisk (*). If the operating characteristics or the appearance of its products. Equipment and features This instruction manual refers to time. Description of damaging the machine...
... direct reference to an illustration. The operating and handling instructions are made from those described in the illustration. English Guide to Using this Manual Pictograms All the pictograms attached to the machine are marked with an asterisk (*). If the operating characteristics or the appearance of its products. Equipment and features This instruction manual refers to time. Description of damaging the machine...
Instruction Manual
Page 4
... a trained expert show you how to operate it in good condition. Only use the grinding wheels supplied by STIHL or expressly approved by your STIHL dealer. Only use an electric sharpener. Minors should be allowed to use original STIHL replacement parts. Switch on the motor only if its operating voltage agrees with your tool for later reference. Before Starting Work Check that your sharpener is important that...
... a trained expert show you how to operate it in good condition. Only use the grinding wheels supplied by STIHL or expressly approved by your STIHL dealer. Only use an electric sharpener. Minors should be allowed to use original STIHL replacement parts. Switch on the motor only if its operating voltage agrees with your tool for later reference. Before Starting Work Check that your sharpener is important that...
Instruction Manual
Page 5
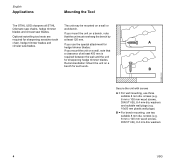
... wall plugs (e.g. 10x50 mm plastic wall plugs) B = For bench mounting, use three suitable 8 mm dia. If you use the special attachment for hedge trimmer blades: A If you mount the unit on a bench for sharpening hedge trimmer blades. blades and circular saw blades. chain, hedge trimmer blades and circular saw blades. screws (e.g. 8 mm x 100 mm wood screws, DIN 571-St), 8.4 mm dia. English Applications Mounting the Tool The STIHL USG sharpens all STIHL The...
... wall plugs (e.g. 10x50 mm plastic wall plugs) B = For bench mounting, use three suitable 8 mm dia. If you use the special attachment for hedge trimmer blades: A If you mount the unit on a bench for sharpening hedge trimmer blades. blades and circular saw blades. chain, hedge trimmer blades and circular saw blades. screws (e.g. 8 mm x 100 mm wood screws, DIN 571-St), 8.4 mm dia. English Applications Mounting the Tool The STIHL USG sharpens all STIHL The...

Instruction Manual
Page 7
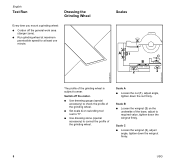
.... Oilomatic chain, pitch: 3/8", 0.404", 0.325" B . English Selecting the Grinding Wheel 523BA050 KN 523BA051 KN 523BA091 KN 13 14 12 : Place the eye shield (12) against the guard and line up the edges with a round file. : Position lamp socket in the holes and fit the nuts (14). : Tighten down the screws firmly. : Refit the guard plate. Hedge trimmer blades . Carbide tipped circular saw blades .
.... Oilomatic chain, pitch: 3/8", 0.404", 0.325" B . English Selecting the Grinding Wheel 523BA050 KN 523BA051 KN 523BA091 KN 13 14 12 : Place the eye shield (12) against the guard and line up the edges with a round file. : Position lamp socket in the holes and fit the nuts (14). : Tighten down the screws firmly. : Refit the guard plate. Hedge trimmer blades . Carbide tipped circular saw blades .
Instruction Manual
Page 9
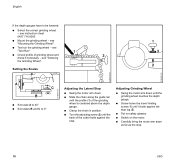
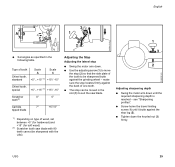
... the nut (1), adjust angle, tighten down the wingnut firmly. 523BA030 KN 523BA138 KN 8 USG English Test Run Dressing the Grinding Wheel Every time you mount a grinding wheel: : Cordon off the motor. : Use dressing gauge (special accessory) to check the profile of the grinding wheel. : Set scale C on the underside of the grinding wheel. Switch off the general work area (danger zone). : Run grinding wheel at maximum permissible speed...
... the nut (1), adjust angle, tighten down the wingnut firmly. 523BA030 KN 523BA138 KN 8 USG English Test Run Dressing the Grinding Wheel Every time you mount a grinding wheel: : Cordon off the motor. : Use dressing gauge (special accessory) to check the profile of the grinding wheel. : Set scale C on the underside of the grinding wheel. Switch off the general work area (danger zone). : Run grinding wheel at maximum permissible speed...
Instruction Manual
Page 10
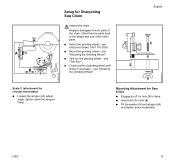
Grind the new parts back to the shape and size of the chain. see "Test Run". : Check profile of grinding wheel and dress if necessary - USG 9 see "Mounting the Grinding Wheel". : Test run the grinding wheel - see instruction sheet 0457 716 0000. : Mount the grinding wheel - see "Dressing the Grinding Wheel". 3 1 4 2 5 6 Mounting Attachment for Saw Chain : Engage pin (1) in hole (2) in base. : Insert bolt (3) in slot (4). : Fit the washer (5) and...
Grind the new parts back to the shape and size of the chain. see "Test Run". : Check profile of grinding wheel and dress if necessary - USG 9 see "Mounting the Grinding Wheel". : Test run the grinding wheel - see instruction sheet 0457 716 0000. : Mount the grinding wheel - see "Dressing the Grinding Wheel". 3 1 4 2 5 6 Mounting Attachment for Saw Chain : Engage pin (1) in hole (2) in base. : Insert bolt (3) in slot (4). : Fit the washer (5) and...

Instruction Manual
Page 11
Drive link gauge: : Use slide caliper to suit the drive link gauge. 523BA135 KN 523BA095 KN 523BA057 KN English a Determining Drive Link Gauge The clamp must be adjusted to measure dimension "a" or : note the digit (arrow) Digit 1 3 5 6 0 Drive link gauge in mm 1.1 1.3 1.5 1.6 2.0 2 1 3 3 4 4 Adjusting the Clamp : Unscrew the clamping lever (1). : Remove the thrust plate (2) and nut. : Take out the screws (3). : Take out the screws (4). 10 USG
Drive link gauge: : Use slide caliper to suit the drive link gauge. 523BA135 KN 523BA095 KN 523BA057 KN English a Determining Drive Link Gauge The clamp must be adjusted to measure dimension "a" or : note the digit (arrow) Digit 1 3 5 6 0 Drive link gauge in mm 1.1 1.3 1.5 1.6 2.0 2 1 3 3 4 4 Adjusting the Clamp : Unscrew the clamping lever (1). : Remove the thrust plate (2) and nut. : Take out the screws (3). : Take out the screws (4). 10 USG

Instruction Manual
Page 16
... depth. 523BA100 KN 523BA101 KN Adjusting Grinding Depth : Swing the motor arm down the knurled nut (3) firmly. : Swing the motor arm up again. USG 15 Check sharpening process. Do not remove too much material. : If necessary, switch off motor and readjust. : Sharpen the side plate by applying the wheel several times - Sharpening the Master Cutter : Switch on the motor. : Bring motor arm slowly downward.
... depth. 523BA100 KN 523BA101 KN Adjusting Grinding Depth : Swing the motor arm down the knurled nut (3) firmly. : Swing the motor arm up again. USG 15 Check sharpening process. Do not remove too much material. : If necessary, switch off motor and readjust. : Sharpen the side plate by applying the wheel several times - Sharpening the Master Cutter : Switch on the motor. : Bring motor arm slowly downward.
Instruction Manual
Page 17
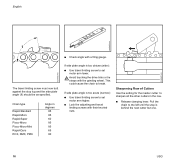
... in the row. : Release clamping lever. Pull the chain to the left until the stop is too obtuse (wide): : Use travel limiting screw to set motor arm lower. Avoid touching the drive links or tie straps with a filing gauge. English 523BA022 KN 523BA070 KN 523BA071 KN 1 : Check angle with the grinding wheel. Sharpening Row of Cutters Use the setting for the master cutter to...
... in the row. : Release clamping lever. Pull the chain to the left until the stop is too obtuse (wide): : Use travel limiting screw to set motor arm lower. Avoid touching the drive links or tie straps with a filing gauge. English 523BA022 KN 523BA070 KN 523BA071 KN 1 : Check angle with the grinding wheel. Sharpening Row of Cutters Use the setting for the master cutter to...

Instruction Manual
Page 18
... cutter butts against that matches the chain pitch. Checking Depth Gauge Setting : Select the filing gauge (special accessory) that of the other row and adjust the stop must locate properly against the back of the cutter. : After sharpening first cutter in the second row, check its length against the stop. : Clamp the chain in position. : Sharpen the side plate. : Repeat procedure...
... cutter butts against that matches the chain pitch. Checking Depth Gauge Setting : Select the filing gauge (special accessory) that of the other row and adjust the stop must locate properly against the back of the cutter. : After sharpening first cutter in the second row, check its length against the stop. : Clamp the chain in position. : Sharpen the side plate. : Repeat procedure...
Instruction Manual
Page 19
... instruction sheet 0457 716 0000 : Mount the grinding wheel - Setting the Scales 1 3 2 + A + - -C - + B : Set scale A to 40° : Set scales B and C to be lowered: : Select the correct grinding wheel - see "Test Run". 1 : Check profile of the grinding wheel is centered above the depth gauge. : Clamp the chain in position. : Turn the adjusting screw (2) until it butts against the stop . 523BA077 KN 523BA102 KN 523BA101 KN 18 USG...
... instruction sheet 0457 716 0000 : Mount the grinding wheel - Setting the Scales 1 3 2 + A + - -C - + B : Set scale A to 40° : Set scales B and C to be lowered: : Select the correct grinding wheel - see "Test Run". 1 : Check profile of the grinding wheel is centered above the depth gauge. : Clamp the chain in position. : Turn the adjusting screw (2) until it butts against the stop . 523BA077 KN 523BA102 KN 523BA101 KN 18 USG...
Instruction Manual
Page 20
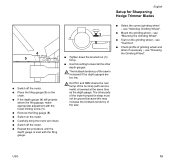
... grinding wheel - USG 19 The other depth gauges. see "Dressing the Grinding Wheel". English Setup for Sharpening Hedge Trimmer Blades 4 5 : Switch off the motor. : Place the filing gauge (5) on the chain. : If the depth gauge (4) still projects above the filing gauge, make appropriate adjustment with the travel limiting screw (1). : Remove the filing gauge (5). : Switch on the motor. : Carefully bring the motor arm down. : Switch off the motor. : Repeat the procedure until the depth gauge is level with service...
... grinding wheel - USG 19 The other depth gauges. see "Dressing the Grinding Wheel". English Setup for Sharpening Hedge Trimmer Blades 4 5 : Switch off the motor. : Place the filing gauge (5) on the chain. : If the depth gauge (4) still projects above the filing gauge, make appropriate adjustment with the travel limiting screw (1). : Remove the filing gauge (5). : Switch on the motor. : Carefully bring the motor arm down. : Switch off the motor. : Repeat the procedure until the depth gauge is level with service...
Instruction Manual
Page 30
C : Set angles as specified in the slot (3) to suit the saw blade with 80 teeth cannot be sharpened with the USG 3 1 2 Adjusting the Stop Adjusting the lateral stop : Swing the motor arm down the knurled nut (3) firmly. make sure the stop locates firmly against the grinding wheel - USG 29 English 523BA126 KN 523BA127 KN 523BA101 KN + A + - - see "Sharpening profiles". : Screw home the travel...
C : Set angles as specified in the slot (3) to suit the saw blade with 80 teeth cannot be sharpened with the USG 3 1 2 Adjusting the Stop Adjusting the lateral stop : Swing the motor arm down the knurled nut (3) firmly. make sure the stop locates firmly against the grinding wheel - USG 29 English 523BA126 KN 523BA127 KN 523BA101 KN + A + - - see "Sharpening profiles". : Screw home the travel...

Instruction Manual
Page 32
... the motor running, carefully swing the motor arm down. : Only remove sufficient material to obtain a "clean" cutting edge. Sharpening the First Tooth : Push the saw blade counterclockwise to the next tooth but one. : Sharpen all teeth with your left unchanged, do not turn the saw blade counterclockwise to the next tooth. : Sharpen all the teeth in the second row. If necessary, use adjusting screw...
... the motor running, carefully swing the motor arm down. : Only remove sufficient material to obtain a "clean" cutting edge. Sharpening the First Tooth : Push the saw blade counterclockwise to the next tooth but one. : Sharpen all teeth with your left unchanged, do not turn the saw blade counterclockwise to the next tooth. : Sharpen all the teeth in the second row. If necessary, use adjusting screw...

Instruction Manual
Page 33
... mounting Switch Power supply cord Grinding wheel Cooling air inlets Accessible screws and nuts Shield Clamp and guide rail Stop and lock 1) Have work or daily weekly monthly if problem if damaged as required English Maintenance Chart Please note that the following maintenance intervals apply for normal operating conditions. before starting work after finishing work performed by qualified electrician Visual inspection condition) Clean Check Retighten Check operation Replace 1) Check Replace 1) Check (wear) Check...
... mounting Switch Power supply cord Grinding wheel Cooling air inlets Accessible screws and nuts Shield Clamp and guide rail Stop and lock 1) Have work or daily weekly monthly if problem if damaged as required English Maintenance Chart Please note that the following maintenance intervals apply for normal operating conditions. before starting work after finishing work performed by qualified electrician Visual inspection condition) Clean Check Retighten Check operation Replace 1) Check Replace 1) Check (wear) Check...
Instruction Manual
Page 34
... USG 33 Using attachments or sharpening tools not approved by authorized STIHL servicing dealers. Clamping lever and thrust pad - Alterations or modifications to use the product with instructions and, depending on a regular basis. If these maintenance operations cannot be performed by the owner, they should be performed by continuing to the product not approved by non-observance of parts other parts, this includes: - The user...
... USG 33 Using attachments or sharpening tools not approved by authorized STIHL servicing dealers. Clamping lever and thrust pad - Alterations or modifications to use the product with instructions and, depending on a regular basis. If these maintenance operations cannot be performed by the owner, they should be performed by continuing to the product not approved by non-observance of parts other parts, this includes: - The user...
Instruction Manual
Page 35
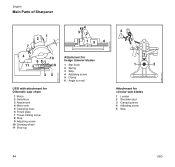
523BA133 KN 523BA132 KN 523BA134 KN English Main Parts of Sharpener 1 2 7 4 32 15 6 4 10 68 11 9 35 USG with attachment for Oilomatic saw chain 1 Motor 2 Switchbox 3 Attachment 4 Motor arm 5 Clamping lever 6 Thrust plate 7 Travel limiting screw 8 Stop 9 Adjusting screw 10 Grinding wheel 11 Stop lug Attachment for hedge trimmer blades 1 Star knob 2 Spring 3 Stop 4 Adjusting screw 5 Clamp 6 Angle iron rail 4 5 3 1 2 Attachment for circular saw blades 1 Locator 2 Shoulder stud 3 Clamping lever 4 Adjusting screw 5 Stop 34 USG
523BA133 KN 523BA132 KN 523BA134 KN English Main Parts of Sharpener 1 2 7 4 32 15 6 4 10 68 11 9 35 USG with attachment for Oilomatic saw chain 1 Motor 2 Switchbox 3 Attachment 4 Motor arm 5 Clamping lever 6 Thrust plate 7 Travel limiting screw 8 Stop 9 Adjusting screw 10 Grinding wheel 11 Stop lug Attachment for hedge trimmer blades 1 Star knob 2 Spring 3 Stop 4 Adjusting screw 5 Clamp 6 Angle iron rail 4 5 3 1 2 Attachment for circular saw blades 1 Locator 2 Shoulder stud 3 Clamping lever 4 Adjusting screw 5 Stop 34 USG
Instruction Manual
Page 36
... chain Attachment (tool rest) for hedge trimmer blades Attachment (tool rest) for circular saw chain USG 35 Other repair work may appear alone on these and other special accessories. 1) according to EN ISO 11204, measured at operator's ear while sharpening a saw blades Saw set The user of this unit should carry out only the maintenance operations described in this manual. The symbol may be identified by an authorized STIHL dealer using original STIHL replacement parts. Warranty...
... chain Attachment (tool rest) for hedge trimmer blades Attachment (tool rest) for circular saw chain USG 35 Other repair work may appear alone on these and other special accessories. 1) according to EN ISO 11204, measured at operator's ear while sharpening a saw blades Saw set The user of this unit should carry out only the maintenance operations described in this manual. The symbol may be identified by an authorized STIHL dealer using original STIHL replacement parts. Warranty...

Instruction Manual
Page 37
... strict requirements of product development, materials purchasing, production, assembly, documentation and customer service. 000BA026 36 USG English Certificate of Directives 73/23/EEC, 98/37/EG and 89/336/EEC. An independent organization has certified that the new machine described below Category: Make: Model: Serial identification: Universal sharpener STIHL USG 5203 Technical documents deposited at Waiblingen, September 1, 2003...
... strict requirements of product development, materials purchasing, production, assembly, documentation and customer service. 000BA026 36 USG English Certificate of Directives 73/23/EEC, 98/37/EG and 89/336/EEC. An independent organization has certified that the new machine described below Category: Make: Model: Serial identification: Universal sharpener STIHL USG 5203 Technical documents deposited at Waiblingen, September 1, 2003...


