
Instruction Manual
Page 2
... Conformity 36 Quality Certification 36 STIHl USG English Dear Customer, Thank you for choosing a quality engineered STIHL product. KG, 2004 0458 523 0121. © ANDREAS STIHL AG & Co. C4. ...Stihl 1 This machine has been built using modern production techniques and comprehensive quality assurance. Every effort has been made to Using this Manual 2 Safety Precautions 3 Applications 4 Mounting the Tool 4 Selecting the Grinding Wheel 6 Mounting the Grinding Wheel 7 Test Run 8 Dressing the Grinding Wheel 8 Scales 8 Setup for Sharpening Saw Chain ..... 9 Sharpening...
... Conformity 36 Quality Certification 36 STIHl USG English Dear Customer, Thank you for choosing a quality engineered STIHL product. KG, 2004 0458 523 0121. © ANDREAS STIHL AG & Co. C4. ...Stihl 1 This machine has been built using modern production techniques and comprehensive quality assurance. Every effort has been made to Using this Manual 2 Safety Precautions 3 Applications 4 Mounting the Tool 4 Selecting the Grinding Wheel 6 Mounting the Grinding Wheel 7 Test Run 8 Dressing the Grinding Wheel 8 Scales 8 Setup for Sharpening Saw Chain ..... 9 Sharpening...
Instruction Manual
Page 5
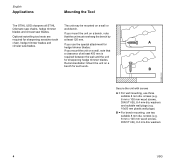
... 8 mm x 100 mm wood screws, DIN 571-St), 8.4 mm dia. washers 523BA045 KN 4 USG If you mount the unit on a wall, note that the unit must overhang the bench by required for sharpening hedge trimmer blades. B Secure the unit with screws A = For wall mounting, use two suitable 8...the wall and the unit for sharpening scratcher tooth at least 120 mm. Recommendation: Mount the unit on a bench for such work. English Applications Mounting the Tool The STIHL USG sharpens all STIHL The unit may be mounted on a wall or Oilomatic saw blades. chain, hedge trimmer blades and circular...
... 8 mm x 100 mm wood screws, DIN 571-St), 8.4 mm dia. washers 523BA045 KN 4 USG If you mount the unit on a wall, note that the unit must overhang the bench by required for sharpening hedge trimmer blades. B Secure the unit with screws A = For wall mounting, use two suitable 8...the wall and the unit for sharpening scratcher tooth at least 120 mm. Recommendation: Mount the unit on a bench for such work. English Applications Mounting the Tool The STIHL USG sharpens all STIHL The unit may be mounted on a wall or Oilomatic saw blades. chain, hedge trimmer blades and circular...
Instruction Manual
Page 10
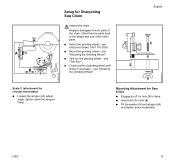
see instruction sheet 0457 716 0000. : Mount the grinding wheel - + A1 - + -4 C - B+2 Scale C (attachment for Sharpening Saw Chain English Inspect the chain. Replace damaged or worn parts of the other parts. : Select the grinding wheel - USG 9 see "Test Run". : Check profile of grinding wheel and dress if necessary - see "Mounting the Grinding Wheel". : Test run the...
see instruction sheet 0457 716 0000. : Mount the grinding wheel - + A1 - + -4 C - B+2 Scale C (attachment for Sharpening Saw Chain English Inspect the chain. Replace damaged or worn parts of the other parts. : Select the grinding wheel - USG 9 see "Test Run". : Check profile of grinding wheel and dress if necessary - see "Mounting the Grinding Wheel". : Test run the...

Instruction Manual
Page 13
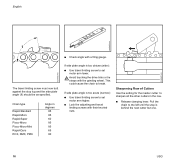
Fitting the Saw Chain : Release the clamping lever (1). : Place the chain in position, drive link tangs (2) between the rails (3) - cutting edges must point to find the shortest cutter and mark it, e.g. English 2 3 1 523BA137 KN 523BA012 KN 523BA061 KN : Fit the clamping lever. Finding the Master Cutter The shortest cutter is sharpened first. All other cutters are then ground to the same length as the master cutter. with chalk. The master cutter is used as the master cutter. : Use a slide caliper to the left. 12 USG
Fitting the Saw Chain : Release the clamping lever (1). : Place the chain in position, drive link tangs (2) between the rails (3) - cutting edges must point to find the shortest cutter and mark it, e.g. English 2 3 1 523BA137 KN 523BA012 KN 523BA061 KN : Fit the clamping lever. Finding the Master Cutter The shortest cutter is sharpened first. All other cutters are then ground to the same length as the master cutter. with chalk. The master cutter is used as the master cutter. : Use a slide caliper to the left. 12 USG
Instruction Manual
Page 17
... butt against the stop is behind the next cutter but one. 16 USG If side plate angle is too obtuse (wide): : Use travel limiting screw to set motor arm higher. : Lock the adjusting and travel limiting screw to sharpen all the other cutters in degrees 85 85 60 85 85 65 80... angle is too acute (narrow): : Use travel limiting screws with their knurled nuts. Sharpening Row of Cutters Use the setting for the master cutter to set motor arm lower. Pull the chain to break. This could cause the chain to the left until the stop lug and the side plate angle (1) should be...
... butt against the stop is behind the next cutter but one. 16 USG If side plate angle is too obtuse (wide): : Use travel limiting screw to set motor arm higher. : Lock the adjusting and travel limiting screw to sharpen all the other cutters in degrees 85 85 60 85 85 65 80... angle is too acute (narrow): : Use travel limiting screws with their knurled nuts. Sharpening Row of Cutters Use the setting for the master cutter to set motor arm lower. Pull the chain to break. This could cause the chain to the left until the stop lug and the side plate angle (1) should be...

Instruction Manual
Page 18
...564BA017 KN : Pull the chain to the right until ...chain pitch. the stop must locate properly against the back of the cutter. : After sharpening first cutter in position. : Sharpen...chain in the second row, check its length against the stop if necessary. : Now sharpen the second row of the chain. : Move the stop with the pivot pin - English Lowering Depth Gauges Sharpening... the Second Row of Cutters : Set scale B to the same sharpening angle on the other side of the chain...
...564BA017 KN : Pull the chain to the right until ...chain pitch. the stop must locate properly against the back of the cutter. : After sharpening first cutter in position. : Sharpen...chain in the second row, check its length against the stop if necessary. : Now sharpen the second row of the chain. : Move the stop with the pivot pin - English Lowering Depth Gauges Sharpening... the Second Row of Cutters : Set scale B to the same sharpening angle on the other side of the chain...
Instruction Manual
Page 20
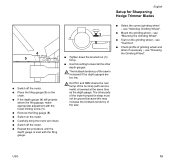
USG 19 see "Mounting the Grinding Wheel". : Test run the grinding wheel - The other parts of the saw is lowered at the same time as the depth gauge. On PM1 and RM2 chains the rear hump of the tie strap (with the filing gauge. 523BA103 KN 523BA139 KN 3 ...see "Test Run". : Check profile of the saw . : Select the correct grinding wheel - English Setup for Sharpening Hedge Trimmer Blades 4 5 : Switch off the motor. : Place the filing gauge (5) on the chain. : If the depth gauge (4) still projects above the filing gauge, make appropriate adjustment with the travel limiting ...
USG 19 see "Mounting the Grinding Wheel". : Test run the grinding wheel - The other parts of the saw is lowered at the same time as the depth gauge. On PM1 and RM2 chains the rear hump of the tie strap (with the filing gauge. 523BA103 KN 523BA139 KN 3 ...see "Test Run". : Check profile of the saw . : Select the correct grinding wheel - English Setup for Sharpening Hedge Trimmer Blades 4 5 : Switch off the motor. : Place the filing gauge (5) on the chain. : If the depth gauge (4) still projects above the filing gauge, make appropriate adjustment with the travel limiting ...
Instruction Manual
Page 35
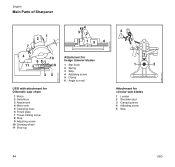
523BA133 KN 523BA132 KN 523BA134 KN English Main Parts of Sharpener 1 2 7 4 32 15 6 4 10 68 11 9 35 USG with attachment for Oilomatic saw chain 1 Motor 2 Switchbox 3 Attachment 4 Motor arm 5 Clamping lever 6 Thrust plate 7 Travel limiting screw 8 Stop 9 Adjusting screw 10 Grinding wheel 11 Stop lug Attachment for hedge trimmer blades 1 Star knob 2 Spring 3 Stop 4 Adjusting screw 5 Clamp 6 Angle iron rail 4 5 3 1 2 Attachment for circular saw blades 1 Locator 2 Shoulder stud 3 Clamping lever 4 Adjusting screw 5 Stop 34 USG
523BA133 KN 523BA132 KN 523BA134 KN English Main Parts of Sharpener 1 2 7 4 32 15 6 4 10 68 11 9 35 USG with attachment for Oilomatic saw chain 1 Motor 2 Switchbox 3 Attachment 4 Motor arm 5 Clamping lever 6 Thrust plate 7 Travel limiting screw 8 Stop 9 Adjusting screw 10 Grinding wheel 11 Stop lug Attachment for hedge trimmer blades 1 Star knob 2 Spring 3 Stop 4 Adjusting screw 5 Clamp 6 Angle iron rail 4 5 3 1 2 Attachment for circular saw blades 1 Locator 2 Shoulder stud 3 Clamping lever 4 Adjusting screw 5 Stop 34 USG
Instruction Manual
Page 36
... (tool rest) for scratcher tooth chain Attachment (tool rest) for hedge trimmer blades Attachment (tool rest) for circular saw chain USG 35 Original STlHL parts can be identified by an authorized STIHL dealer using original STIHL replacement parts. Contact your STIHL dealer for checking and correcting tooth... 11204, measured at operator's ear while sharpening a saw blades Saw set for the latest information on small parts. Warranty claims following repairs can be accepted only if the repair has been performed by the STIHL part number, the STIHl logo and the STlHL parts symbol (.
... (tool rest) for scratcher tooth chain Attachment (tool rest) for hedge trimmer blades Attachment (tool rest) for circular saw chain USG 35 Original STlHL parts can be identified by an authorized STIHL dealer using original STIHL replacement parts. Contact your STIHL dealer for checking and correcting tooth... 11204, measured at operator's ear while sharpening a saw blades Saw set for the latest information on small parts. Warranty claims following repairs can be accepted only if the repair has been performed by the STIHL part number, the STIHl logo and the STlHL parts symbol (.


