

Instruction Manual
Page 3
... the risk of the mowing blade. 11 Protective strips Protect the housing. English 12 Fuel Cap For closing the engine oil tank. 17 Handle Adjustment Lever Enables the handle to be adjusted and folded down. 18 Spark Plug Ignites the fuel-air mixture in the instruction manual. 3 Main Parts 3 Main Parts 3.1 Lawn Mower 1 Starter Handle For starting the engine. 2 Speed Lever Controls the drive speed. 3 Handle For holding and controlling the lawn mower. 4 Switch Lever For starting and shutting off the engine. 5 Self-Propel Lever Activates the drive system. 6 Grass Level Indicator Shows the fill...
... the risk of the mowing blade. 11 Protective strips Protect the housing. English 12 Fuel Cap For closing the engine oil tank. 17 Handle Adjustment Lever Enables the handle to be adjusted and folded down. 18 Spark Plug Ignites the fuel-air mixture in the instruction manual. 3 Main Parts 3 Main Parts 3.1 Lawn Mower 1 Starter Handle For starting the engine. 2 Speed Lever Controls the drive speed. 3 Handle For holding and controlling the lawn mower. 4 Switch Lever For starting and shutting off the engine. 5 Self-Propel Lever Activates the drive system. 6 Grass Level Indicator Shows the fill...

Instruction Manual
Page 4
... mower blade. 6) Use Protective Glasses - The rotating mowing blade may throw or fling foreign objects directly or by ricochet. Unit vibrations can cause an improperly installed fuel cap to reduce the risk of fire, electric shock and personal injury, including the following: READ ALL INSTRUCTIONS BEFORE USING THE LAWN MOWER! 1) Avoid Dangerous Environment - The engine emits carbon monox‐ ide. Do not operate in moving parts...
... mower blade. 6) Use Protective Glasses - The rotating mowing blade may throw or fling foreign objects directly or by ricochet. Unit vibrations can cause an improperly installed fuel cap to reduce the risk of fire, electric shock and personal injury, including the following: READ ALL INSTRUCTIONS BEFORE USING THE LAWN MOWER! 1) Avoid Dangerous Environment - The engine emits carbon monox‐ ide. Do not operate in moving parts...
Instruction Manual
Page 5
... repaired by an author‐ ized service facility before using the lawn mower if you have higher vibration levels. 0478-111-8601-A 5 Release switch lever. - English - To reduce the risk of white finger disease and carpal tunnel syndrome: - Do not operate the lawn mower when you become tired. - To reduce the risk of personal injury: - Keep the lawn mower well maintained. Do not mow wet grass...
... repaired by an author‐ ized service facility before using the lawn mower if you have higher vibration levels. 0478-111-8601-A 5 Release switch lever. - English - To reduce the risk of white finger disease and carpal tunnel syndrome: - Do not operate the lawn mower when you become tired. - To reduce the risk of personal injury: - Keep the lawn mower well maintained. Do not mow wet grass...

Instruction Manual
Page 6
... restricted. 5 IMPORTANT SAFETY INSTRUCTIONS ■ Good footing is not in use the spark plug specified in this instruction manual and make contact with this specific lawn mower model are clean and in the components of the mower. - Do not wear shorts. - Regular operators should have their use with the moving parts of the lawn mower. Wear substantial footwear with a removed spark plug. ■ Although certain unauthorized accessories or attachments may result in...
... restricted. 5 IMPORTANT SAFETY INSTRUCTIONS ■ Good footing is not in use the spark plug specified in this instruction manual and make contact with this specific lawn mower model are clean and in the components of the mower. - Do not wear shorts. - Regular operators should have their use with the moving parts of the lawn mower. Wear substantial footwear with a removed spark plug. ■ Although certain unauthorized accessories or attachments may result in...
Instruction Manual
Page 7
... use a lawn mower that combustible fuel vapor may be removed or bypassed. The switch and safety devices installed in heat radiation, sparks or sound level, thereby increasing the risk of doubt, have the lawn mower and battery checked by STIHL may also permanently damage the engine: - To reduce the risk of fire and explosion while fueling: - Fuel your muffler or spark arresting screen could cause an increase in the lawn mower...
... use a lawn mower that combustible fuel vapor may be removed or bypassed. The switch and safety devices installed in heat radiation, sparks or sound level, thereby increasing the risk of doubt, have the lawn mower and battery checked by STIHL may also permanently damage the engine: - To reduce the risk of fire and explosion while fueling: - Fuel your muffler or spark arresting screen could cause an increase in the lawn mower...
Instruction Manual
Page 8
..., turn off the engine and allow it may build up in the fuel filler opening the fuel tank. Damaged or Broken Cap WARNING ■ If your authorized STIHL servicing dealer for additional warnings and instructions related to fuel and fuel‐ ing. 5.7 Using the Lawn Mower 5.7.1 Lawn Mower Before starting to refuel before opening and tighten it by hand until it is free from the oil tank or any residual pressure by turning...
..., turn off the engine and allow it may build up in the fuel filler opening the fuel tank. Damaged or Broken Cap WARNING ■ If your authorized STIHL servicing dealer for additional warnings and instructions related to fuel and fuel‐ ing. 5.7 Using the Lawn Mower 5.7.1 Lawn Mower Before starting to refuel before opening and tighten it by hand until it is free from the oil tank or any residual pressure by turning...
Instruction Manual
Page 9
... and follow the instructions on the spark plug. - 5 IMPORTANT SAFETY INSTRUCTIONS - Keep children under the watchful eye of the lawn mower. - Check fuel system for this power tool. Inspect the grass bag frequently and replace with the mowing blade: - Operate the mower at walking pace at all times - Keep the handle clean and dry at all times. Do not start ‐ ing the engine, 11.1. 5.7.3 Holding and Controlling the Lawn Mower WARNING ■ To...
... and follow the instructions on the spark plug. - 5 IMPORTANT SAFETY INSTRUCTIONS - Keep children under the watchful eye of the lawn mower. - Check fuel system for this power tool. Inspect the grass bag frequently and replace with the mowing blade: - Operate the mower at walking pace at all times - Keep the handle clean and dry at all times. Do not start ‐ ing the engine, 11.1. 5.7.3 Holding and Controlling the Lawn Mower WARNING ■ To...

Instruction Manual
Page 10
..., keeping the handle, switch and self- Never work with gradi‐ ents of control, keep proper footing and balance at all times: - Stop the mowing blade when crossing gravel surfaces. - For better footing, always clear away fallen branches, scrub, cuttings and other body parts away from the mowing blade or dis‐ charge chutes without first switching off the lawn mower and removing the spark plug boot. - Do...
..., keeping the handle, switch and self- Never work with gradi‐ ents of control, keep proper footing and balance at all times: - Stop the mowing blade when crossing gravel surfaces. - For better footing, always clear away fallen branches, scrub, cuttings and other body parts away from the mowing blade or dis‐ charge chutes without first switching off the lawn mower and removing the spark plug boot. - Do...

Instruction Manual
Page 12
.... - fins of the cylinder, spark plug) become hot during operation and remain hot for the mowing blade to stop the engine and remove the spark plug boot. Never operate your local fire authorities or the U.S. This can be released. The mowing blade continues to fire protection requirements. ■ If the recoil starter rope recoils at high speed, the hand and arm will normally stay clean as...
.... - fins of the cylinder, spark plug) become hot during operation and remain hot for the mowing blade to stop the engine and remove the spark plug boot. Never operate your local fire authorities or the U.S. This can be released. The mowing blade continues to fire protection requirements. ■ If the recoil starter rope recoils at high speed, the hand and arm will normally stay clean as...

Instruction Manual
Page 13
...‐ ken mowing blade. If the blade edge is damaged or cracked, replace it . - STIHL recommends that could be carrying electric current. 6 Maintenance, Repair and Storage 6.1 Warnings and Instructions WARNING ■ To reduce the risk of your authorized STIHL servicing dealer. - To reduce the risk of the discharge opening at least 50 ft. (15 m) away. - Never operate the lawn mower without the grass bag or rear discharge cover in serious...
...‐ ken mowing blade. If the blade edge is damaged or cracked, replace it . - STIHL recommends that could be carrying electric current. 6 Maintenance, Repair and Storage 6.1 Warnings and Instructions WARNING ■ To reduce the risk of your authorized STIHL servicing dealer. - To reduce the risk of the discharge opening at least 50 ft. (15 m) away. - Never operate the lawn mower without the grass bag or rear discharge cover in serious...

Instruction Manual
Page 14
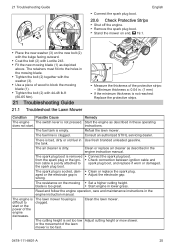
...; Remove packaging material and transport locks. ► Mount the handle, 8.1. ► Unfold and adjust the handle, 9.2. ► Adjust the cutting height, 15.1. ► Check the controls for proper function and condition, 14.1. ► Check the mowing blade, 20.3. ► Fill engine oil, 10.2. ► Refuel the lawn mower, 10.1. Tighten all nuts, bolts and screws after replacing the mowing blade. ■ Use of parts that are not authorized or approved by pushing the handle adjustment lever. WARNING...
...; Remove packaging material and transport locks. ► Mount the handle, 8.1. ► Unfold and adjust the handle, 9.2. ► Adjust the cutting height, 15.1. ► Check the controls for proper function and condition, 14.1. ► Check the mowing blade, 20.3. ► Fill engine oil, 10.2. ► Refuel the lawn mower, 10.1. Tighten all nuts, bolts and screws after replacing the mowing blade. ■ Use of parts that are not authorized or approved by pushing the handle adjustment lever. WARNING...

Instruction Manual
Page 16
... attach it to the holders (4). ► Place the rear discharge cover (1) on the grass bag (2). 8.3.3 Removing the Grass Bag To remove the grass bag: ► Shut off the engine and wait for the mowing blade to come to pinch, kink or stress the control cables when folding or unfolding the handle. English 8.2.2 Removing the Mulch Insert To remove the mulch insert: ► Shut off the engine, 12.1. ► Position the lawn mower on a level surface. 9 Adjusting the Lawn Mower...
... attach it to the holders (4). ► Place the rear discharge cover (1) on the grass bag (2). 8.3.3 Removing the Grass Bag To remove the grass bag: ► Shut off the engine and wait for the mowing blade to come to pinch, kink or stress the control cables when folding or unfolding the handle. English 8.2.2 Removing the Mulch Insert To remove the mulch insert: ► Shut off the engine, 12.1. ► Position the lawn mower on a level surface. 9 Adjusting the Lawn Mower...
Instruction Manual
Page 18
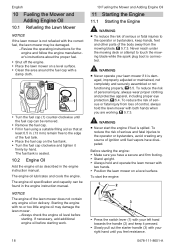
... fuel cap can be damaged. - Review the operating instructions for the engine and follow the engine manufactur‐ er's instructions about the proper fuel. ► Shut off the engine. ► Place the lawn mower on the fuel tank. ► Turn the fuel cap clockwise and tighten it firmly by hand. Never reach under the mowing deck or attempt to the operator or bystanders, avoid creating any engine oil on a level surface. To start the engine if fuel...
... fuel cap can be damaged. - Review the operating instructions for the engine and follow the engine manufactur‐ er's instructions about the proper fuel. ► Shut off the engine. ► Place the lawn mower on the fuel tank. ► Turn the fuel cap clockwise and tighten it firmly by hand. Never reach under the mowing deck or attempt to the operator or bystanders, avoid creating any engine oil on a level surface. To start the engine if fuel...
Instruction Manual
Page 19
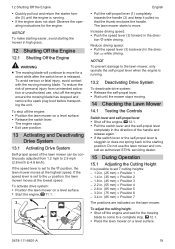
... the mower stops moving mowing blade. NOTICE To make starting easier, avoid starting position: Do not use , shut off the engine: ► Position the lawn mower on a level surface. ► Start the engine, 11.1. To activate drive system: ► Position the lawn mower on a level surface. ► Release the switch lever. To adjust the cutting height: ► Shut off the engine, 12.1. ► Pull the switch lever and the self-propel lever completely in the direction of the handle...
... the mower stops moving mowing blade. NOTICE To make starting easier, avoid starting position: Do not use , shut off the engine: ► Position the lawn mower on a level surface. ► Start the engine, 11.1. To activate drive system: ► Position the lawn mower on a level surface. ► Release the switch lever. To adjust the cutting height: ► Shut off the engine, 12.1. ► Pull the switch lever and the self-propel lever completely in the direction of the handle...

Instruction Manual
Page 20
... proper control of the grass height should be read on the lawn surface where they decompose quickly and serve as a natural fertilizer. English 15 During Operation ► Pull the cutting height adjustment lever (1) upward and hold it. ► Set the lawn mower in gradual stages. 15.3 Emptying the Grass Bag The air flow generated by raising and lowering it. Do not touch the mowing blade while the spark plug boot...
... proper control of the grass height should be read on the lawn surface where they decompose quickly and serve as a natural fertilizer. English 15 During Operation ► Pull the cutting height adjustment lever (1) upward and hold it. ► Set the lawn mower in gradual stages. 15.3 Emptying the Grass Bag The air flow generated by raising and lowering it. Do not touch the mowing blade while the spark plug boot...
Instruction Manual
Page 22
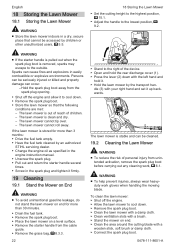
.... ► Drain the fuel tank. ► Remove the spark plug boot. ► Place the lawn mower on end. ► Clean the area around the cutting blade with the left hand and hold it. ► Hold the lawn mower by children or other unauthorized users, 5.5. 18 Storing the Lawn Mower ► Set the cutting height to the highest position, 15.1. ► Adjust the handle to the outside. The lawn mower is removed, sparks may escape...
.... ► Drain the fuel tank. ► Remove the spark plug boot. ► Place the lawn mower on end. ► Clean the area around the cutting blade with the left hand and hold it. ► Hold the lawn mower by children or other unauthorized users, 5.5. 18 Storing the Lawn Mower ► Set the cutting height to the highest position, 15.1. ► Adjust the handle to the outside. The lawn mower is removed, sparks may escape...
Instruction Manual
Page 23
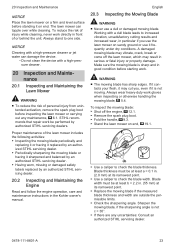
... mowing blade or having it replaced by an authorized STIHL serv‐ icing dealer. 20.2 Inspecting and Maintaining the Engine Read and follow the engine operation, care and maintenance instructions in . (2.0 mm) at its narrowest point. ► Use a caliper to one side. A damaged mowing blade may vibrate, crack, break or come off the engine, 12.1. ► Remove the spark plug boot. ► Fold the handle, 9.3. ► Stand the lawn mower...
... mowing blade or having it replaced by an authorized STIHL serv‐ icing dealer. 20.2 Inspecting and Maintaining the Engine Read and follow the engine operation, care and maintenance instructions in . (2.0 mm) at its narrowest point. ► Use a caliper to one side. A damaged mowing blade may vibrate, crack, break or come off the engine, 12.1. ► Remove the spark plug boot. ► Fold the handle, 9.3. ► Stand the lawn mower...

Instruction Manual
Page 24
... (3). ► Remove the mowing blade (1). ► Discard the bolt (2) and the washer (3). If it is not moving . Use a new bolt and a new washer to sharpen and balance the mowing blade correctly. A damaged blade can vibrate, crack, break or come loose from broken parts, check condition of serious or fatal injury. 20.5 20 Inspection and Maintenance Replacing the Mowing Blade WARNING ■ A cracked, damaged or worn out mowing blade may cut you...
... (3). ► Remove the mowing blade (1). ► Discard the bolt (2) and the washer (3). If it is not moving . Use a new bolt and a new washer to sharpen and balance the mowing blade correctly. A damaged blade can vibrate, crack, break or come loose from broken parts, check condition of serious or fatal injury. 20.5 20 Inspection and Maintenance Replacing the Mowing Blade WARNING ■ A cracked, damaged or worn out mowing blade may cut you...
Instruction Manual
Page 25
... and follow the engine operation, care and maintenance instructions in . (1 mm) ► If the minimum thickness is sooted, dam‐ ► Clean or replace the spark plug. Clean the lawn mower. Clean or replace air cleaner as depicted above. The engine is The lawn mower housing is poorly attached to block the mowing blade (1). ► Tighten the bolt (2) with Loctite 243. ► Fit the new mowing blade (1) as described in lower grass. The fuel tank is too...
... and follow the engine operation, care and maintenance instructions in . (1 mm) ► If the minimum thickness is sooted, dam‐ ► Clean or replace the spark plug. Clean the lawn mower. Clean or replace air cleaner as depicted above. The engine is The lawn mower housing is poorly attached to block the mowing blade (1). ► Tighten the bolt (2) with Loctite 243. ► Fit the new mowing blade (1) as described in lower grass. The fuel tank is too...
Instruction Manual
Page 26
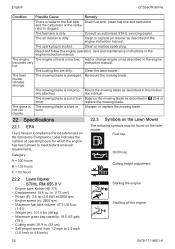
The engine The engine oil level is not prop‐ Mount the mowing blade as described in the engine instruction manual. Clean the lawn mower. The mowing blade is too low. Sharpen or replace the mowing blade. 22 Specifications 22.1 EPA The Emission Compliance Period referenced on the lawn mower: Fuel cap Oil fill cap A = 300 hours B = 125 hours Cutting height adjustment C = 50 hours 22.2 Lawn Mower STIHL RM 655.0 V - Displacement: 10.6 cu. The mowing blade is dirty. in . (53 cm) - Weight (m): 101.4 lbs (46...
The engine The engine oil level is not prop‐ Mount the mowing blade as described in the engine instruction manual. Clean the lawn mower. The mowing blade is too low. Sharpen or replace the mowing blade. 22 Specifications 22.1 EPA The Emission Compliance Period referenced on the lawn mower: Fuel cap Oil fill cap A = 300 hours B = 125 hours Cutting height adjustment C = 50 hours 22.2 Lawn Mower STIHL RM 655.0 V - Displacement: 10.6 cu. The mowing blade is dirty. in . (53 cm) - Weight (m): 101.4 lbs (46...


