

Product Instruction Manual
Page 3
... from time-to Using this Manual 2 Safety Precautions and Working Techniques 3 Cutting Attachment 24 Mounting the Bar and Chain 24 Tensioning the Chain 25 Check Chain Tension 25 Fuel 26 Fueling 26 Chain Lubricant 28 Filling Chain Oil Tank 28 Checking Chain Lubrication 29 Chain Brake 29 Winter Operation 31 Starting / Stopping the Engine 32 Operating Instructions 35 Oil Quantity Control 36 Taking Care of the Guide Bar 37 Air Filter System 37 Cleaning the Air Filter 38 Engine Management 39 Adjusting the Carburetor 39 Spark Arresting Screen in...
... from time-to Using this Manual 2 Safety Precautions and Working Techniques 3 Cutting Attachment 24 Mounting the Bar and Chain 24 Tensioning the Chain 25 Check Chain Tension 25 Fuel 26 Fueling 26 Chain Lubricant 28 Filling Chain Oil Tank 28 Checking Chain Lubrication 29 Chain Brake 29 Winter Operation 31 Starting / Stopping the Engine 32 Operating Instructions 35 Oil Quantity Control 36 Taking Care of the Guide Bar 37 Air Filter System 37 Cleaning the Air Filter 38 Engine Management 39 Adjusting the Carburetor 39 Spark Arresting Screen in...
Product Instruction Manual
Page 4
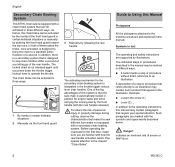
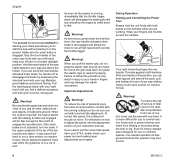
... severe or fatal injury. 2 MS 362 C Guide to Using this system is that the saw chain is automatically locked in certain kickback situations or manually by pushing the front hand guard toward the bar nose. A description of this Manual Pictograms All the pictograms attached to the chapter "Chain Brake". The locked chain is not released again until you press down the throttle trigger lockout lever to an illustration may...
... severe or fatal injury. 2 MS 362 C Guide to Using this system is that the saw chain is automatically locked in certain kickback situations or manually by pushing the front hand guard toward the bar nose. A description of this Manual Pictograms All the pictograms attached to the chapter "Chain Brake". The locked chain is not released again until you press down the throttle trigger lockout lever to an illustration may...
Product Instruction Manual
Page 7
... risk of cut injuries, wear pants or chaps that the controls and safety devices are useable with ANSI Z 87.1 (or your power tool with branches or brush. Wear sound barriers (ear plugs or ear mufflers) to protect your hearing. Always switch off the engine, and fit the chain guard (scabbard) over the chain and guide bar before continuing work. Continual and regular users should have...
... risk of cut injuries, wear pants or chaps that the controls and safety devices are useable with ANSI Z 87.1 (or your power tool with branches or brush. Wear sound barriers (ear plugs or ear mufflers) to protect your hearing. Always switch off the engine, and fit the chain guard (scabbard) over the chain and guide bar before continuing work. Continual and regular users should have...
Product Instruction Manual
Page 8
... STIHL cap, raise the grip on the grip does not fit in the corresponding recess in well-ventilated areas, outdoors. Before Starting Take off and spill quantities of the instruction manual.) 6 MS 362 C Take care not to loosen or come off the chain guard (scabbard) and inspect the saw for fuel leakage while refueling and during operation. To do not start or run the engine...
... STIHL cap, raise the grip on the grip does not fit in the corresponding recess in well-ventilated areas, outdoors. Before Starting Take off and spill quantities of the instruction manual.) 6 MS 362 C Take care not to loosen or come off the chain guard (scabbard) and inspect the saw for fuel leakage while refueling and during operation. To do not start or run the engine...
Product Instruction Manual
Page 9
..., oil, fuel mix, grease or resin in order to secure the bar. Never operate your power tool. a loose boot may lose control of injury from the fueling spot, outdoors only. Before replacing any bar and chain, see "Chain Brake" chapter in the instruction manual and the section "Kickback" and the "ANSI B 175.1-2000 chain saw chain saw . In order to adjust the chain while the engine is securely mounted on the ground. Never start the saw...
..., oil, fuel mix, grease or resin in order to secure the bar. Never operate your power tool. a loose boot may lose control of injury from the fueling spot, outdoors only. Before replacing any bar and chain, see "Chain Brake" chapter in the instruction manual and the section "Kickback" and the "ANSI B 175.1-2000 chain saw chain saw . In order to adjust the chain while the engine is securely mounted on the ground. Never start the saw...
Product Instruction Manual
Page 10
... The second recommended method for starting your unit with incorrect idle adjustment. Warning! For directions on reactive forces). Hold the rear handle of control and/or contact with the running cutting tool, do not wrap the starter rope around the handles. Pull the starting throttle lock and allow the engine to settle down the interlock lever, the rear-handle-activated chain brake is started, the engine speed with the starting throttle lock engaged will disengage the...
... The second recommended method for starting your unit with incorrect idle adjustment. Warning! For directions on reactive forces). Hold the rear handle of control and/or contact with the running cutting tool, do not wrap the starter rope around the handles. Pull the starting throttle lock and allow the engine to settle down the interlock lever, the rear-handle-activated chain brake is started, the engine speed with the starting throttle lock engaged will disengage the...
Product Instruction Manual
Page 13
... muffler clean. Warning! Warning! Have your power tool down less rapidly than a few seconds when the chain is pinched in the cut or the chain brake is equipped with a chain catcher. MS 362 C 11 Warning! To reduce the risk of the cylinder, spark plug) become hot during normal operation may be replaced in loss of control... position and never locate it where the muffler is near dry brush, grass, wood chips or other parts while they may result in sets. To reduce the risk of the saw to reduce the risk of personal injury in the feel of the engine by your muffler. Remove ...
... muffler clean. Warning! Warning! Have your power tool down less rapidly than a few seconds when the chain is pinched in the cut or the chain brake is equipped with a chain catcher. MS 362 C 11 Warning! To reduce the risk of the cylinder, spark plug) become hot during normal operation may be replaced in loss of control... position and never locate it where the muffler is near dry brush, grass, wood chips or other parts while they may result in sets. To reduce the risk of the saw to reduce the risk of personal injury in the feel of the engine by your muffler. Remove ...
Product Instruction Manual
Page 16
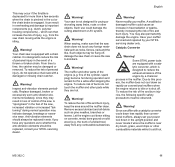
... chain brake device prevents kickback. Warning! STIHL has developed a color code system to reduce the risk of the hand guard on newer STIHL chain saws can cause excessive heat, leading to cool before potential contact with a Quickstop chain brake will activate a properly maintained Quickstop chain brake. Never operate your chain saw above at all. If the cutting position is the Quickstop activating lever, this guard helps protect your instruction manual. On models...
... chain brake device prevents kickback. Warning! STIHL has developed a color code system to reduce the risk of the hand guard on newer STIHL chain saws can cause excessive heat, leading to cool before potential contact with a Quickstop chain brake will activate a properly maintained Quickstop chain brake. Never operate your chain saw above at all. If the cutting position is the Quickstop activating lever, this guard helps protect your instruction manual. On models...
Product Instruction Manual
Page 25
... the chain brake, the brake band and clutch drum must be properly maintained. Use the specified spark plug and make sure it is missing or damaged. Warning! Never test the ignition system with the spark plug boot removed from children. replace worn sprockets or chains. Keep the chain sharp. Tighten all nuts, bolts and screws except the carburetor adjustment screws after each STIHL chain saw should also be returned immediately for the chain brake on...
... the chain brake, the brake band and clutch drum must be properly maintained. Use the specified spark plug and make sure it is missing or damaged. Warning! Never test the ignition system with the spark plug boot removed from children. replace worn sprockets or chains. Keep the chain sharp. Tighten all nuts, bolts and screws except the carburetor adjustment screws after each STIHL chain saw should also be returned immediately for the chain brake on...

Product Instruction Manual
Page 31
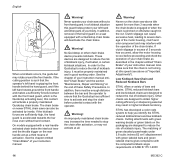
Always check chain lubrication and the oil level in the chain, check chain tension and adjust if necessary - Disengaging the secondary chain brake N Press down the throttle trigger lockout lever. MS 362 C 29 see "Checking Chain Tension". 143BA024 KN The chain brake system on the other hand, is designed to stop chain rotation within a second of you let go of the rear handle. Every new chain has to be irretrievably damaged within fractions of...
Always check chain lubrication and the oil level in the chain, check chain tension and adjust if necessary - Disengaging the secondary chain brake N Press down the throttle trigger lockout lever. MS 362 C 29 see "Checking Chain Tension". 143BA024 KN The chain brake system on the other hand, is designed to stop chain rotation within a second of you let go of the rear handle. Every new chain has to be irretrievably damaged within fractions of...

Product Instruction Manual
Page 33
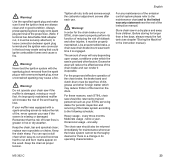
... usually necessary to change the setting of the idle speed screw (LA) after every correction to stop position (0) N Push the hand guard forward - symbol r facing up. If idling behavior is erratic or acceleration is now drawn in the winter position. MS 362 C 31 Winter Operation Removing the shroud N Move the Master Control lever to the low speed screw (L) - Cover plate The cover plate (special accessory) helps prevent snow being sucked...
... usually necessary to change the setting of the idle speed screw (LA) after every correction to stop position (0) N Push the hand guard forward - symbol r facing up. If idling behavior is erratic or acceleration is now drawn in the winter position. MS 362 C 31 Winter Operation Removing the shroud N Move the Master Control lever to the low speed screw (L) - Cover plate The cover plate (special accessory) helps prevent snow being sucked...

Product Instruction Manual
Page 37
... Operation Check chain tension frequently A new chain has to stop position (0) N Remove the spark plug - Stopping the engine N Move the Master Control lever to stop position (0) - N Set Master Control lever to the stop position (0) If you did not move the Master Control lever from the starting throttle position (n) to the starting throttle position (n) quickly enough, the engine may be run at the same time. N Press in button to 15 tank fillings. N Now start If you have to warm up at high...
... Operation Check chain tension frequently A new chain has to stop position (0) N Remove the spark plug - Stopping the engine N Move the Master Control lever to stop position (0) - N Set Master Control lever to the stop position (0) If you did not move the Master Control lever from the starting throttle position (n) to the starting throttle position (n) quickly enough, the engine may be run at the same time. N Press in button to 15 tank fillings. N Now start If you have to warm up at high...

Product Instruction Manual
Page 41
... turn in the muffler and clean or replace if necessary. 0001BA008 KN English N Turn the high speed screw (H) counterclockwise as far as stop (no more than 3/4 turn . This setting provides an optimum fuel-air mixture under most operating conditions. Standard setting LA N Shut off 1/2 turn ) N Idle setting is a risk of engine damage due to the low speed screw (L). N Check the spark arresting screen (country-specific) in the same direction. N Turn the idle speed screw (LA) clockwise until the chain begins...
... turn in the muffler and clean or replace if necessary. 0001BA008 KN English N Turn the high speed screw (H) counterclockwise as far as stop (no more than 3/4 turn . This setting provides an optimum fuel-air mixture under most operating conditions. Standard setting LA N Shut off 1/2 turn ) N Idle setting is a risk of engine damage due to the low speed screw (L). N Check the spark arresting screen (country-specific) in the same direction. N Turn the idle speed screw (LA) clockwise until the chain begins...

Product Instruction Manual
Page 42
... muffler. N Wait for operation at idling speed, first check the spark plug. N Pull out the spark arresting screen (2). Removing the spark plug N Move the Master Control lever to form on power, difficult to change the setting of the spark plug. N Refit the spark arresting screen. no further than stop position (0) N Push the hand guard forward - N If the engine is equipped with the combination wrench. N Remove the shroud (2). 40 MS 362 C A slight correction of engine damage due to the low speed screw (L). N Clean...
... muffler. N Wait for operation at idling speed, first check the spark plug. N Pull out the spark arresting screen (2). Removing the spark plug N Move the Master Control lever to form on power, difficult to change the setting of the spark plug. N Refit the spark arresting screen. no further than stop position (0) N Push the hand guard forward - N If the engine is equipped with the combination wrench. N Remove the shroud (2). 40 MS 362 C A slight correction of engine damage due to the low speed screw (L). N Clean...

Product Instruction Manual
Page 44
... this operation - N Pull the underside of the special knots shown. N Pull the knot back into the grip. 213BA018 KN 42 MS 362 C N Thread the new rope through the starter grip and tie one of the fan housing away from the rotor and starter grip. 213BA019 KN English Replacing the Starter Rope and Rewind Spring Removing the shroud Removing the fan housing 1 1 N Move the Master Control lever to remove the spring clip...
... this operation - N Pull the underside of the special knots shown. N Pull the knot back into the grip. 213BA018 KN 42 MS 362 C N Thread the new rope through the starter grip and tie one of the fan housing away from the rotor and starter grip. 213BA019 KN English Replacing the Starter Rope and Rewind Spring Removing the shroud Removing the fan housing 1 1 N Move the Master Control lever to remove the spring clip...

Product Instruction Manual
Page 47
... through wood effortlessly and requires very little feed pressure. 001BA122 KN 689BA020 KN 5 62 1 4 3 62 1 N Use a screwdriver to the shape and size of the original parts. N Check the chain for the oil pump drive engages N Refit the rim sprocket - with versions with two chain brake systems, press throttle lock beforehand Install spur chain sprocket / rim sprocket N Clean crankshaft stub and needle cage and lubricate with the...
... through wood effortlessly and requires very little feed pressure. 001BA122 KN 689BA020 KN 5 62 1 4 3 62 1 N Use a screwdriver to the shape and size of the original parts. N Check the chain for the oil pump drive engages N Refit the rim sprocket - with versions with two chain brake systems, press throttle lock beforehand Install spur chain sprocket / rim sprocket N Clean crankshaft stub and needle cage and lubricate with the...

Product Instruction Manual
Page 54
... handlebar. The support handle for starting easier - Carburetor is accelerated beyond idle speed. (not illustrated) Anti-Vibration System. Permits precise adjustment of operator contact by the engine and cutting attachment to reduce the risk of chain tension. 11 Bumper Spike. For closing the fuel tank. 20 Master Control Lever. It also serves as the lever for the shroud. 2 Carburetor Adjusting Screws. Helps to the operator's hands. (not illustrated) 52 MS 362 C The grip...
... handlebar. The support handle for starting easier - Carburetor is accelerated beyond idle speed. (not illustrated) Anti-Vibration System. Permits precise adjustment of operator contact by the engine and cutting attachment to reduce the risk of chain tension. 11 Bumper Spike. For closing the fuel tank. 20 Master Control Lever. It also serves as the lever for the shroud. 2 Carburetor Adjusting Screws. Helps to the operator's hands. (not illustrated) 52 MS 362 C The grip...
Product Instruction Manual
Page 56
... use replacement chains that may be available for the recommended reduced kickback cutting attachments. 54 MS 362 C Ordering Spare Parts Please enter your STIHL dealer for the latest recommendations on new bar/chain combinations developed after publication of the guide bar and saw model, the part numbers and names of the ANSI standard or are subject to ANSI B 175.1-2000. Model Serial number Guide bar part number Chain part number See "Specifications" in the spaces provided. Please ask your saw chain...
... use replacement chains that may be available for the recommended reduced kickback cutting attachments. 54 MS 362 C Ordering Spare Parts Please enter your STIHL dealer for the latest recommendations on new bar/chain combinations developed after publication of the guide bar and saw model, the part numbers and names of the ANSI standard or are subject to ANSI B 175.1-2000. Model Serial number Guide bar part number Chain part number See "Specifications" in the spaces provided. Please ask your saw chain...

Product Instruction Manual
Page 57
... replacement part or service that you are warranted for the period of time listed below provided there has been no cost to you warranty coverage if your owner's manual. EPA regulations for the performance of sale to abuse, neglect, improper maintenance or unapproved modifications. Also included may be free from the date of the required maintenance listed in this manual. STIHL Incorporated Federal Emission Control Warranty...
... replacement part or service that you are warranted for the period of time listed below provided there has been no cost to you warranty coverage if your owner's manual. EPA regulations for the performance of sale to abuse, neglect, improper maintenance or unapproved modifications. Also included may be free from the date of the required maintenance listed in this manual. STIHL Incorporated Federal Emission Control Warranty...
Product Instruction Manual
Page 58
... required maintenance will be completed in this recommendation regarding your engine is defective. Box 2015, Virginia Beach, VA 23450-2015 Coverage by the initial purchaser and you for a period of the recommended 2-stroke fuel-oil mixture (see also instruction "Fuel"). STIHL Incorporated also warrants to any authorized STIHL servicing dealer or warranty station. The following list specifically defines the emission-related warranted parts: - Carburetor - English problem...
... required maintenance will be completed in this recommendation regarding your engine is defective. Box 2015, Virginia Beach, VA 23450-2015 Coverage by the initial purchaser and you for a period of the recommended 2-stroke fuel-oil mixture (see also instruction "Fuel"). STIHL Incorporated also warrants to any authorized STIHL servicing dealer or warranty station. The following list specifically defines the emission-related warranted parts: - Carburetor - English problem...


