
Instruction Manual
Page 3
.... VA2.E19. 0000000634_007_GB MF-MM This instruction manual is a power tool with electronic systems. 1 Contents MultiSystem 2 Guide to Using this Manual 2 Safety Precautions and Working Techniques 3 Using the Unit 9 Approved MultiEngines 10 Mounting the MultiTool 10 Mounting the Deflector 12 Starting / Stopping the Engine 13 Replacing Spring Tines 14 Storing the Machine 14 Maintenance and Care 14 Main Parts 15 Specifications 16 Maintenance and Repairs 16 Disposal 17 Trademarks...
.... VA2.E19. 0000000634_007_GB MF-MM This instruction manual is a power tool with electronic systems. 1 Contents MultiSystem 2 Guide to Using this Manual 2 Safety Precautions and Working Techniques 3 Using the Unit 9 Approved MultiEngines 10 Mounting the MultiTool 10 Mounting the Deflector 12 Starting / Stopping the Engine 13 Replacing Spring Tines 14 Storing the Machine 14 Maintenance and Care 14 Main Parts 15 Specifications 16 Maintenance and Repairs 16 Disposal 17 Trademarks...
Instruction Manual
Page 4
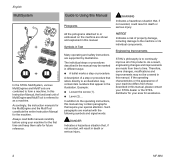
... changes, modifications and improvements may be covered in this manual. Engineering Improvements STIHL's philosophy is referred to the machine or its products. If the operating characteristics or the appearance of property damage, including damage to as a machine. Accordingly, the instruction manuals for the MultiEngine and the MultiTool constitute the entire Instruction Manual for future reference. 469BA028 KN Guide to Using this Manual Pictograms...
... changes, modifications and improvements may be covered in this manual. Engineering Improvements STIHL's philosophy is referred to the machine or its products. If the operating characteristics or the appearance of property damage, including damage to as a machine. Accordingly, the instruction manuals for the MultiEngine and the MultiTool constitute the entire Instruction Manual for future reference. 469BA028 KN Guide to Using this Manual Pictograms...
Instruction Manual
Page 5
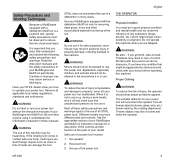
... a power tool involves 1. Different models may also ricochet and strike the operator. Safe use of your power tool will injure you how to property, never let your power tool. Working with your body, it is important that unauthorized persons do not use . MF-MM 3 Read the instruction manuals and the safety precautions of the power tool. WARNING The use of injury to bystanders and damage to operate your power tool run...
... a power tool involves 1. Different models may also ricochet and strike the operator. Safe use of your power tool will injure you how to property, never let your power tool. Working with your body, it is important that unauthorized persons do not use . MF-MM 3 Read the instruction manuals and the safety precautions of the power tool. WARNING The use of injury to bystanders and damage to operate your power tool run...
Instruction Manual
Page 6
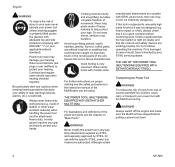
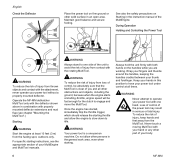
... of doubt, have their use with the specific STIHL power tool models are useable with ANSI Z87 "+" (or your applicable national standard). Only attachments supplied by STIHL and expressly approved by your STIHL servicing dealer. In case of the power tool parts see the safety precautions in the instruction manual of leather or other wear resistant material) when handling the power tool and the attachment. Do not wear shorts...
... of doubt, have their use with the specific STIHL power tool models are useable with ANSI Z87 "+" (or your applicable national standard). Only attachments supplied by STIHL and expressly approved by your STIHL servicing dealer. In case of the power tool parts see the safety precautions in the instruction manual of leather or other wear resistant material) when handling the power tool and the attachment. Do not wear shorts...
Instruction Manual
Page 7
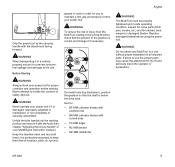
... MultiTool rotating in safe operating condition. MF-MM dethatcher MF-MM 5 Grip the power tool by the carrying handle with pointed tines - Replace damaged blades before starting. WARNING Always check your MultiEngine instruction manual.) Keep the handles clean and dry at all required parts. Unfold the bike handle into the working position and secure it is below the drive tube. BK-MM cultivator blades with the knob (see chapter "Adjusting the bicycle handle" of all...
... MultiTool rotating in safe operating condition. MF-MM dethatcher MF-MM 5 Grip the power tool by the carrying handle with pointed tines - Replace damaged blades before starting. WARNING Always check your MultiEngine instruction manual.) Keep the handles clean and dry at all required parts. Unfold the bike handle into the working position and secure it is below the drive tube. BK-MM cultivator blades with the knob (see chapter "Adjusting the bicycle handle" of all...
Instruction Manual
Page 8
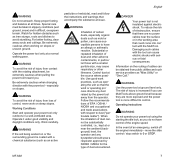
... objects and contact with the attachment, never operate your power tool with both hands on the handles while you and all times. Keep your hands in this position to have your power tool under control at all other obstructions and objects, including the ground, because when the engine starts at starting instructions, see chapter "Mounting the MultiTool".) Starting WARNING Start the engine at least 10 feet (3 m) from...
... objects and contact with the attachment, never operate your power tool with both hands on the handles while you and all times. Keep your hands in this position to have your power tool under control at all other obstructions and objects, including the ground, because when the engine starts at starting instructions, see chapter "Mounting the MultiTool".) Starting WARNING Start the engine at least 10 feet (3 m) from...
Instruction Manual
Page 9
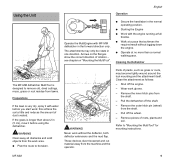
...Start and operate your power tool using the starting throttle lock, as you use MultiTools above ground level because they are more difficult to control. WARNING If the soil being worked on steep slopes. Use good work on or the surrounding ground is coated with a chemical substance (such as tree stumps, roots and ditches to dust ("particulate matter"). Be extremely cautious when changing.... Operating Instructions WARNING Do not operate your power tool only outdoors in difficult, overgrown terrain. move the slide control / stop switch to have control of the engine speed. ...
...Start and operate your power tool using the starting throttle lock, as you use MultiTools above ground level because they are more difficult to control. WARNING If the soil being worked on steep slopes. Use good work on or the surrounding ground is coated with a chemical substance (such as tree stumps, roots and ditches to dust ("particulate matter"). Be extremely cautious when changing.... Operating Instructions WARNING Do not operate your power tool only outdoors in difficult, overgrown terrain. move the slide control / stop switch to have control of the engine speed. ...

Instruction Manual
Page 10
... not described in a dry and high or locked location out of reach of operation. should be cleaned off the engine and make sure that bystanders are approached. MAINTENANCE, REPAIR AND STORING WARNING Always stop the engine immediately and check the attachment for maintenance and repair. Grass, moss, weeds, etc. This may damage parts of the MutiTool at least 16 feet (5 m) away. Use of metal, rubbish or other...
... not described in a dry and high or locked location out of reach of operation. should be cleaned off the engine and make sure that bystanders are approached. MAINTENANCE, REPAIR AND STORING WARNING Always stop the engine immediately and check the attachment for maintenance and repair. Grass, moss, weeds, etc. This may damage parts of the MutiTool at least 16 feet (5 m) away. Use of metal, rubbish or other...
Instruction Manual
Page 11
...". 483BA002 KN N Secure the handlebar in (5 cm), mow it with the engine running at full throttle. N Walk at no more than about 2 in the normal operating position. N Plan the route to "Mounting the MultiTool" for mounting instructions. Remove the outer hitch pin (wheel) from lawns. Cleaning the Dethatcher The MF-MM dethatcher MultiTool is longer than a normal walking pace. WARNING Clear away all...
...". 483BA002 KN N Secure the handlebar in (5 cm), mow it with the engine running at full throttle. N Walk at no more than about 2 in the normal operating position. N Plan the route to "Mounting the MultiTool" for mounting instructions. Remove the outer hitch pin (wheel) from lawns. Cleaning the Dethatcher The MF-MM dethatcher MultiTool is longer than a normal walking pace. WARNING Clear away all...
Instruction Manual
Page 12
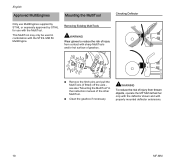
... Remove the hitch pins and pull the MultiTools (if fitted) off the axle - English Approved MultiEngines Mounting the MultiTool Checking Deflector Only use MultiEngines supplied by STIHL or expressly approved by STIHL for use with properly mounted deflector extensions. 481BA008 KN 486BA011 KN 10 MF-MM ... with the STIHL MM 56 MultiEngine. This MultiTool may only be used in the instruction manual of injury from thrown objects, operate the MF-MM dethatcher only with the deflector shown and with the MultiTool. N Clean the gearbox if necessary. Removing Existing MultiTools ...
... Remove the hitch pins and pull the MultiTools (if fitted) off the axle - English Approved MultiEngines Mounting the MultiTool Checking Deflector Only use MultiEngines supplied by STIHL or expressly approved by STIHL for use with properly mounted deflector extensions. 481BA008 KN 486BA011 KN 10 MF-MM ... with the STIHL MM 56 MultiEngine. This MultiTool may only be used in the instruction manual of injury from thrown objects, operate the MF-MM dethatcher only with the deflector shown and with the MultiTool. N Clean the gearbox if necessary. Removing Existing MultiTools ...
Instruction Manual
Page 13
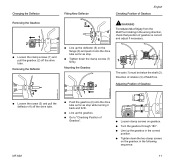
... KN Fitting New Deflector English Checking Position of Gearbox 5 7 76 WARNING To reduce risk of injury from the MultiTool rotating in the wrong direction, check that position of MultiTool. Adjusting Position of Gearbox". N Loosen clamp screws on the gearbox in the correct position. N Tighten down the clamp screws (7) firmly. N Line up the gearbox in the following sequence: MF-MM 11 N Go to "Checking Position of...
... KN Fitting New Deflector English Checking Position of Gearbox 5 7 76 WARNING To reduce risk of injury from the MultiTool rotating in the wrong direction, check that position of MultiTool. Adjusting Position of Gearbox". N Loosen clamp screws on the gearbox in the correct position. N Tighten down the clamp screws (7) firmly. N Line up the gearbox in the following sequence: MF-MM 11 N Go to "Checking Position of...
Instruction Manual
Page 14
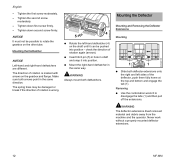
... away from the machine and the operator. Tighten the second screw moderately. - Make sure both arrows point in the same way. The spring tines may be pushed into position. Mounting the Deflector Mounting and Removing the Deflector Extensions Mounting 1 1 N Slide both dethatchers. Never work without a properly mounted deflector extensions. 12 MF-MM check the direction of the deflector...
... away from the machine and the operator. Tighten the second screw moderately. - Make sure both arrows point in the same way. The spring tines may be pushed into position. Mounting the Deflector Mounting and Removing the Deflector Extensions Mounting 1 1 N Slide both dethatchers. Never work without a properly mounted deflector extensions. 12 MF-MM check the direction of the deflector...

Instruction Manual
Page 15
... from the machine and the operator. WARNING The mud flap diverts removed material and debris away from contact with screw (2) and rotary knob (3) to the right-hand side of the attachment. N With your left hand on the frame. MF-MM 13 Stopping the Engine N See MultiEngine instruction manual. N Adjust the mud flap to the side of the power tool, never in front of...
... from the machine and the operator. WARNING The mud flap diverts removed material and debris away from contact with screw (2) and rotary knob (3) to the right-hand side of the attachment. N With your left hand on the frame. MF-MM 13 Stopping the Engine N See MultiEngine instruction manual. N Adjust the mud flap to the side of the power tool, never in front of...
Instruction Manual
Page 16
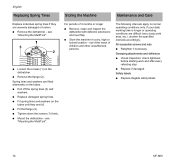
... full. N Pull off the spring tines (3) and washers. N Fit the flange (2). N Tighten down the screws (1) firmly. N Mount the dethatcher - N Store the machine in a dry, high or locked location - If your daily working time is longer or operating conditions are difficult (very dusty work and after every refueling stop N Replace if damaged Safety labels N Replace illegible safety labels 14 MF-MM N Fit spring tines...
... full. N Pull off the spring tines (3) and washers. N Fit the flange (2). N Tighten down the screws (1) firmly. N Mount the dethatcher - N Store the machine in a dry, high or locked location - If your daily working time is longer or operating conditions are difficult (very dusty work and after every refueling stop N Replace if damaged Safety labels N Replace illegible safety labels 14 MF-MM N Fit spring tines...
Instruction Manual
Page 17
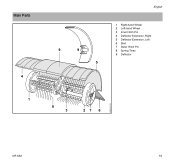
Main Parts 4 1 9 9 5 English 1 Right-hand Wheel 2 Left-hand Wheel 3 Inner Hitch Pin 4 Deflector Extension, Right 5 Deflector Extension, Left 6 Skirt 7 Outer Hitch Pin 8 Spring Tines 9 Deflector 8 3 27 6 483BA012 KN MF-MM 15
Main Parts 4 1 9 9 5 English 1 Right-hand Wheel 2 Left-hand Wheel 3 Inner Hitch Pin 4 Deflector Extension, Right 5 Deflector Extension, Left 6 Skirt 7 Outer Hitch Pin 8 Spring Tines 9 Deflector 8 3 27 6 483BA012 KN MF-MM 15
Instruction Manual
Page 18
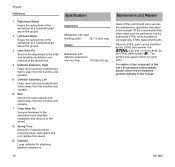
... the STIHL part number, the { logo and, in some cases, by authorized STIHL servicing dealers using genuine STIHL replacement parts. The symbol may appear alone on small parts. For repairs of any component of this unit's air emissions control system, please refer to the attachment and simplifies installation and removal of the wheel. 8 Spring Tines Elements of this unit should carry out only the maintenance operations described in this manual. 16 MF-MM Specifications Attachment...
... the STIHL part number, the { logo and, in some cases, by authorized STIHL servicing dealers using genuine STIHL replacement parts. The symbol may appear alone on small parts. For repairs of any component of this unit's air emissions control system, please refer to the attachment and simplifies installation and removal of the wheel. 8 Spring Tines Elements of this unit should carry out only the maintenance operations described in this manual. 16 MF-MM Specifications Attachment...
Instruction Manual
Page 19
... BOSS® English Some of STIHL's Common Law Trademarks STIHL InjectionTM MF-MM AutoCut® FARM BOSS® iCademy® MAGNUM® MasterWrench Service® MotoMix® OILOMATIC® 4-MIX ™ BioPlus ™ Easy2Start ™ EasySpool ™ ElastoStart ™ Ematic ™ FixCut ™ IntelliCarb ™ Master Control Lever ™ Micro ™ Pro Mark ™ Quiet Line ™ STIHL M-Tronic ™ 17
... BOSS® English Some of STIHL's Common Law Trademarks STIHL InjectionTM MF-MM AutoCut® FARM BOSS® iCademy® MAGNUM® MasterWrench Service® MotoMix® OILOMATIC® 4-MIX ™ BioPlus ™ Easy2Start ™ EasySpool ™ ElastoStart ™ Ematic ™ FixCut ™ IntelliCarb ™ Master Control Lever ™ Micro ™ Pro Mark ™ Quiet Line ™ STIHL M-Tronic ™ 17

Instruction Manual
Page 20
Any unauthorized use of these trademarks without the express written consent of trademarks is strictly prohibited. 18 MF-MM KG, Waiblingen is subject to change. English STIHL OUTFITTERS ™ STIHL PICCO ™ STIHL PolyCut ™ STIHL PowerSweep ™ STIHL Precision Series ™ STIHL RAPID ™ STIHL SuperCut ™ TapAction ™ TrimCut ™ This listing of ANDREAS STIHL AG & Co.
Any unauthorized use of these trademarks without the express written consent of trademarks is strictly prohibited. 18 MF-MM KG, Waiblingen is subject to change. English STIHL OUTFITTERS ™ STIHL PICCO ™ STIHL PolyCut ™ STIHL PowerSweep ™ STIHL Precision Series ™ STIHL RAPID ™ STIHL SuperCut ™ TapAction ™ TrimCut ™ This listing of ANDREAS STIHL AG & Co.


