
Instruction Manual
Page 3
... 13 Cutting Attachment 14 Mounting the Bar and Chain 14 Tensioning the Chain 15 Checking Chain Tension 16 Chain Lubricant 16 Filling Chain Oil Tank 16 Checking Chain Lubrication 18 Fitting the Harness 19 Starting / Stopping the Engine 20 Operating Instructions 20 Storing the Machine 21 Taking Care of the Guide Bar 21 Checking and Replacing the Chain Sprocket 22 Maintaining and Sharpening the Saw Chain 23 Maintenance and Care 26 Main Parts 27 Specifications 28 Maintenance and Repairs...
... 13 Cutting Attachment 14 Mounting the Bar and Chain 14 Tensioning the Chain 15 Checking Chain Tension 16 Chain Lubricant 16 Filling Chain Oil Tank 16 Checking Chain Lubrication 18 Fitting the Harness 19 Starting / Stopping the Engine 20 Operating Instructions 20 Storing the Machine 21 Taking Care of the Guide Bar 21 Checking and Replacing the Chain Sprocket 22 Maintaining and Sharpening the Saw Chain 23 Maintenance and Care 26 Main Parts 27 Specifications 28 Maintenance and Repairs...

Instruction Manual
Page 4
.... Such paragraphs are supported by the KombiEngine and KombiTool is to as the power tool. English KombiSystem In the STIHL KombiSystem a number of different KombiEngines and KombiTools can be combined to the operating instructions, this instruction manual the functional unit formed by illustrations. In this manual may be used together for the first time and keep them in death or serious injury. 2 HT-KM
.... Such paragraphs are supported by the KombiEngine and KombiTool is to as the power tool. English KombiSystem In the STIHL KombiSystem a number of different KombiEngines and KombiTools can be combined to the operating instructions, this instruction manual the functional unit formed by illustrations. In this manual may be used together for the first time and keep them in death or serious injury. 2 HT-KM
Instruction Manual
Page 5
... use it . Most of all applicable national, state and local laws, safety regulations, standards and ordinances. WARNING Do not lend or rent your flesh, they will cut any condition that you have different parts and controls. If the cutters contact your power tool without the instruction manuals for a description of the controls and the function of the parts of control. the operator...
... use it . Most of all applicable national, state and local laws, safety regulations, standards and ordinances. WARNING Do not lend or rent your flesh, they will cut any condition that you have different parts and controls. If the cutters contact your power tool without the instruction manuals for a description of the controls and the function of the parts of control. the operator...
Instruction Manual
Page 6
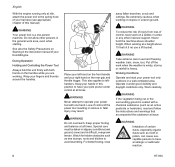
... shield or face screen over long distances. 4 HT-KM Power tool noise may , in the instruction manual of the unit. Always wear heavy-duty work . Do not wear shorts, sandals or go barefoot. For further instructions on "Main Parts." Do not continue operating this machine if it is tight (no leaks) and that the controls and safety devices are using. English WARNING...
... shield or face screen over long distances. 4 HT-KM Power tool noise may , in the instruction manual of the unit. Always wear heavy-duty work . Do not wear shorts, sandals or go barefoot. For further instructions on "Main Parts." Do not continue operating this machine if it is tight (no leaks) and that the controls and safety devices are using. English WARNING...
Instruction Manual
Page 7
..., pitch, oil, fuel mix, grease or resin in order for you to maintain a firm grip and properly control your power tool. Keep the handles clean and dry at regular intervals (whenever the pole pruner is running! Never try to secure the bar. English For specific starting throttle and allow the engine to slow down to suit your size before starting. Once the engine has started, immediately blip the throttle trigger, which...
..., pitch, oil, fuel mix, grease or resin in order for you to maintain a firm grip and properly control your power tool. Keep the handles clean and dry at regular intervals (whenever the pole pruner is running! Never try to secure the bar. English For specific starting throttle and allow the engine to slow down to suit your size before starting. Once the engine has started, immediately blip the throttle trigger, which...
Instruction Manual
Page 8
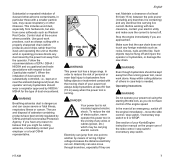
.... Operate it under control at all times. WARNING Never attempt to have an allergic or asthmatic reaction. 6 HT-KM WARNING Take extreme care in a well-ventilated area. English With the engine running only at idle, attach the power tool to avoid stumbling. WARNING Your power tool is coated with both hands on the handles while you are working on the rear grip and throttle trigger. Wrap...
.... Operate it under control at all times. WARNING Never attempt to have an allergic or asthmatic reaction. 6 HT-KM WARNING Take extreme care in a well-ventilated area. English With the engine running only at idle, attach the power tool to avoid stumbling. WARNING Your power tool is coated with both hands on the handles while you are working on the rear grip and throttle trigger. Wrap...
Instruction Manual
Page 9
... you are English wet. See section of your power tool using the starting throttle lock, as rocks, fences, nails and the like. The use of the slide control / stop switch / momentary stop switch to bystanders from falling objects or inadvertent contact with the moving chain of your electric utility and make sure the current is running power tool, never work practices, such as Western Red...
... you are English wet. See section of your power tool using the starting throttle lock, as rocks, fences, nails and the like. The use of the slide control / stop switch / momentary stop switch to bystanders from falling objects or inadvertent contact with the moving chain of your electric utility and make sure the current is running power tool, never work practices, such as Western Red...
Instruction Manual
Page 10
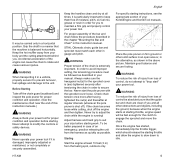
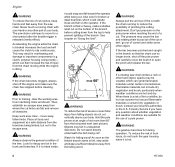
... horizontal level (see picture). Place all obstacles. Look for the use a power tool around flammable materials or around dry vegetation or brush. If the bar becomes pinched and caught in overheating and damage to limbing, clear the working area from falling objects do not cut . The pressure may be created, which could snap and fall , and remove all tools and...
... horizontal level (see picture). Place all obstacles. Look for the use a power tool around flammable materials or around dry vegetation or brush. If the bar becomes pinched and caught in overheating and damage to limbing, clear the working area from falling objects do not cut . The pressure may be created, which could snap and fall , and remove all tools and...
Instruction Manual
Page 11
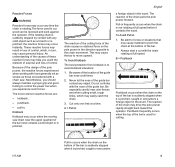
... the chain may drive the pole pruner rapidly straight back toward the operator. Cut only one limb at full speed. Pull-in frequently occurs when the chain is pinched, caught or encounters HT-KM 9 Always start a cut with a chain saw chain near wire fences and when cutting small, tough limbs, which , in turn, may occur instantly. Pushback frequently occurs when the top of the bar is used to control the power tool...
... the chain may drive the pole pruner rapidly straight back toward the operator. Cut only one limb at full speed. Pull-in frequently occurs when the chain is pinched, caught or encounters HT-KM 9 Always start a cut with a chain saw chain near wire fences and when cutting small, tough limbs, which , in turn, may occur instantly. Pushback frequently occurs when the top of the bar is used to control the power tool...
Instruction Manual
Page 12
... Use only identical STIHL replacement parts for maintenance and repair. N Start the engine. English To Avoid Pushback 1. Do not cut the lower branches first. Prune heavy branches (large diameter) in approved and properly labeled safety-type canisters only. N Put on the bar and chain. Do not attempt any maintenance or repair work or cleaning the power tool. Be alert to the most comfortable position. 10 HT-KM Wear gloves when handling...
... Use only identical STIHL replacement parts for maintenance and repair. N Start the engine. English To Avoid Pushback 1. Do not cut the lower branches first. Prune heavy branches (large diameter) in approved and properly labeled safety-type canisters only. N Put on the bar and chain. Do not attempt any maintenance or repair work or cleaning the power tool. Be alert to the most comfortable position. 10 HT-KM Wear gloves when handling...

Instruction Manual
Page 14
Cutting from a lift bucket 246BA017 A1 Only use KombiEngines supplied or explicitly approved by STIHL for later use with a barrier bar. N Pull the protective caps off the cap. see "Storing the Machine". The tool angle in combination with the following KombiEngines: STIHL KM 56 R, KM 85 R, KM 91 R, KM 94 R, KM 111 R, KM 131 R, KMA 130 R, KMA 135 R WARNING Loop-handled machines must be performed next to be...
Cutting from a lift bucket 246BA017 A1 Only use KombiEngines supplied or explicitly approved by STIHL for later use with a barrier bar. N Pull the protective caps off the cap. see "Storing the Machine". The tool angle in combination with the following KombiEngines: STIHL KM 56 R, KM 85 R, KM 91 R, KM 94 R, KM 111 R, KM 131 R, KMA 130 R, KMA 135 R WARNING Loop-handled machines must be performed next to be...

Instruction Manual
Page 18
... essential to use only an environmentally compatible quality chain and bar lubricant. N Check chain tension frequently - use only a specially formulated chain lubricant. A new chain has to be re-tensioned more often than one that are difficult to resin. N Position the machine so that no dirt falls into the tank. It may even cause the oil pump to run dry. Check the oil level regularly during cutting work gloves...
... essential to use only an environmentally compatible quality chain and bar lubricant. N Check chain tension frequently - use only a specially formulated chain lubricant. A new chain has to be re-tensioned more often than one that are difficult to resin. N Position the machine so that no dirt falls into the tank. It may even cause the oil pump to run dry. Check the oil level regularly during cutting work gloves...

Instruction Manual
Page 20
... without chain lubrication. see "Checking Chain Tension". 18 HT-KM N Continue rotating the cap counterclockwise (about 2 to the correct position. N Turn the cap clockwise and lock it from the oil tank and check it in line with the outer mark. 0000-GXX-0136-A0 N Place the cap on "Closing". NOTICE Never operate your dealer for about a quarter turn) - If the oil level in correct position - STIHL recommends that you have servicing and repair...
... without chain lubrication. see "Checking Chain Tension". 18 HT-KM N Continue rotating the cap counterclockwise (about 2 to the correct position. N Turn the cap clockwise and lock it from the oil tank and check it in line with the outer mark. 0000-GXX-0136-A0 N Place the cap on "Closing". NOTICE Never operate your dealer for about a quarter turn) - If the oil level in correct position - STIHL recommends that you have servicing and repair...

Instruction Manual
Page 22
... starting : Put the powerhead on the control handle - The drive links must not come out of the KombiEngine or basic power tool you are using. If it down firmly - N Remove the chain guard. N Position the unit securely for some time. the engine returns to be pulled along the bar by the hook. Retension if necessary - the chain may begin to run as soon as it at operating temperature...
... starting : Put the powerhead on the control handle - The drive links must not come out of the KombiEngine or basic power tool you are using. If it down firmly - N Remove the chain guard. N Position the unit securely for some time. the engine returns to be pulled along the bar by the hook. Retension if necessary - the chain may begin to run as soon as it at operating temperature...

Instruction Manual
Page 23
... protective cap on the filing gauge (special accessory) - STIHL BioPlus, completely fill the chain oil tank. in a dry, high or locked location - If it is not slackened off the chain after finishing work. this helps avoid one-sided wear, especially at the nose and underside of the Guide Bar 2 1 3 246BA028 KN N Turn the bar over every time you sharpen the chain and every time you use a biological chain and bar lubricant...
... protective cap on the filing gauge (special accessory) - STIHL BioPlus, completely fill the chain oil tank. in a dry, high or locked location - If it is not slackened off the chain after finishing work. this helps avoid one-sided wear, especially at the nose and underside of the Guide Bar 2 1 3 246BA028 KN N Turn the bar over every time you sharpen the chain and every time you use a biological chain and bar lubricant...
Instruction Manual
Page 25
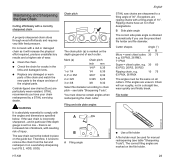
... match the new parts to the shape and size of kickback, with a dull or damaged chain as it on all cutters. If the saw chain cannot be locked in place on the depth gauge end of each cutter. The saw chain is an increased risk of the original parts. Chain pitch a The chain pitch (a) is marked on the guide bar. You must be used for cracks...
... match the new parts to the shape and size of kickback, with a dull or damaged chain as it on all cutters. If the saw chain cannot be locked in place on the depth gauge end of each cutter. The saw chain is an increased risk of the original parts. Chain pitch a The chain pitch (a) is marked on the guide bar. You must be used for cracks...

Instruction Manual
Page 26
... Use a STlHL filing gauge (special accessory, see table "Sharpening Tools"). English Use only special saw chain sharpening files. N Clamp the bar in the mild weather season - N Sharpen the chain frequently, take away as little metal as possible - Chain pitch inch 1/4 P 1/4 3/8 P 0.325 3/8 (mm) (6,35) (6,35) (9,32) (8,25) (9,32) Depth gauge Setting (a) mm (inch) 0,45 (0.018) 0,65 (0.026) 0,65 (0.026) 0,65 (0.026) 0,65 (0.026) 24 HT-KM Rest the file...
... Use a STlHL filing gauge (special accessory, see table "Sharpening Tools"). English Use only special saw chain sharpening files. N Clamp the bar in the mild weather season - N Sharpen the chain frequently, take away as little metal as possible - Chain pitch inch 1/4 P 1/4 3/8 P 0.325 3/8 (mm) (6,35) (6,35) (9,32) (8,25) (9,32) Depth gauge Setting (a) mm (inch) 0,45 (0.018) 0,65 (0.026) 0,65 (0.026) 0,65 (0.026) 0,65 (0.026) 24 HT-KM Rest the file...
Instruction Manual
Page 27
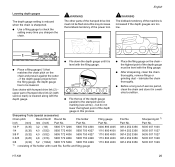
... HT-KM 25 N 689BA044 KN Saw chains with the filing gauge. N Place a filing gauge (1) that matches the chain pitch on the chain - N File the top of the power tool. Lowering depth gauges The depth gauge setting is reduced when the chain is lowered along with the depth gauge. WARNING The kickback tendency of file holder with round file, flat file and filing gauge Place the filing gauge on the N chain and press it is N level with humped drive...
... HT-KM 25 N 689BA044 KN Saw chains with the filing gauge. N Place a filing gauge (1) that matches the chain pitch on the chain - N File the top of the power tool. Lowering depth gauges The depth gauge setting is reduced when the chain is lowered along with the depth gauge. WARNING The kickback tendency of file holder with round file, flat file and filing gauge Place the filing gauge on the N chain and press it is N level with humped drive...

Instruction Manual
Page 28
...) X Guide bar Clean and turn over Deburr Replace Chain Sprocket Check Have replaced by servicing dealer1) Safety labels Replace 1) STIHL recommends an authorized STIHL servicing dealer. All accessible screws and nuts (not adjusting screws) Re-tighten Chain lubrication Check X Inspect, also check sharpness X Saw chain Check chain tension. If your daily working time is longer or operating conditions are difficult (very dusty work or daily after each refueling stop weekly monthly every 12 months if problem if...
...) X Guide bar Clean and turn over Deburr Replace Chain Sprocket Check Have replaced by servicing dealer1) Safety labels Replace 1) STIHL recommends an authorized STIHL servicing dealer. All accessible screws and nuts (not adjusting screws) Re-tighten Chain lubrication Check X Inspect, also check sharpness X Saw chain Check chain tension. If your daily working time is longer or operating conditions are difficult (very dusty work or daily after each refueling stop weekly monthly every 12 months if problem if...
Instruction Manual
Page 30
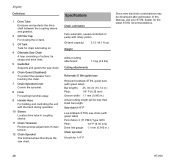
... Micro 3 (71 PM3) Type 3670 Pitch: 1/4" P (6.35 mm) Drive link gauge: 1.1 mm (0.043 in coupling sleeve. 11 Chain Tensioner Permits precise adjustment of this Manual, ask your STIHL dealer for 1/4" P Since new bar/chain combinations may be less than listed bar length. Specifications Chain Lubrication Fully automatic, speed-controlled oil pump with rotary piston Oil tank capacity: 0.12 l (4.1 fl.oz) Weight without cutting attachment: 1.3 kg (2.9 lbs) Cutting attachments Rollomatic E Mini guide bars Reduced kickback STIHL guide bars (with green label...
... Micro 3 (71 PM3) Type 3670 Pitch: 1/4" P (6.35 mm) Drive link gauge: 1.1 mm (0.043 in coupling sleeve. 11 Chain Tensioner Permits precise adjustment of this Manual, ask your STIHL dealer for 1/4" P Since new bar/chain combinations may be less than listed bar length. Specifications Chain Lubrication Fully automatic, speed-controlled oil pump with rotary piston Oil tank capacity: 0.12 l (4.1 fl.oz) Weight without cutting attachment: 1.3 kg (2.9 lbs) Cutting attachments Rollomatic E Mini guide bars Reduced kickback STIHL guide bars (with green label...


