
Product Instruction Manual
Page 2
... cutting blades, special safety precautions must be recycled. KG, 2007 0458 446 8621. To receive maximum performance and satisfaction from your hedge trimmer. © ANDREAS STIHL AG & Co. Printed in this manual to Using this Manual 2 IMPORTANT SAFETY INSTRUCTIONS 3 Safety Precautions and Working Techniques 6 Using the Unit 14 Starting 15 Storing the Machine 16 Main Parts and Controls 17 Specifications 19 Maintenance and Repairs 19 STIHl HSE...
... cutting blades, special safety precautions must be recycled. KG, 2007 0458 446 8621. To receive maximum performance and satisfaction from your hedge trimmer. © ANDREAS STIHL AG & Co. Printed in this manual to Using this Manual 2 IMPORTANT SAFETY INSTRUCTIONS 3 Safety Precautions and Working Techniques 6 Using the Unit 14 Starting 15 Storing the Machine 16 Main Parts and Controls 17 Specifications 19 Maintenance and Repairs 19 STIHl HSE...
Product Instruction Manual
Page 3
... the manual may be covered in this manual. Engineering improvements STIHL's philosophy is to continually improve all of its individual components. English / USA Guide to Using this Manual Pictograms All the pictograms attached to the machine are shown and explained in this manual. Example: Loosen the screw (1) Lever (2) ... !Danger: indicates an imminent risk of your machine differ from time to the operating instructions, this manual, please...
... the manual may be covered in this manual. Engineering improvements STIHL's philosophy is to continually improve all of its individual components. English / USA Guide to Using this Manual Pictograms All the pictograms attached to the machine are shown and explained in this manual. Example: Loosen the screw (1) Lever (2) ... !Danger: indicates an imminent risk of your machine differ from time to the operating instructions, this manual, please...
Product Instruction Manual
Page 4
... outlet(s) to install the proper wall outlet. If the plug does not fit fully in moving parts. Do not change the equipment plug, extension cord receptacle, or extension cord plug in rain. 5. Do not wear loose clothing or jewelry. Use Safety Glasses - Use Proper Replacement Parts - This electric hedge trimmer is intended. 10. To reduce the risk of safety. 9. Do not handle the plug or the...
... outlet(s) to install the proper wall outlet. If the plug does not fit fully in moving parts. Do not change the equipment plug, extension cord receptacle, or extension cord plug in rain. 5. Do not wear loose clothing or jewelry. Use Safety Glasses - Use Proper Replacement Parts - This electric hedge trimmer is intended. 10. To reduce the risk of safety. 9. Do not handle the plug or the...

Product Instruction Manual
Page 5
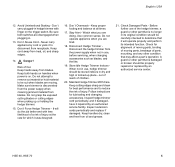
... smaller the gauge number, the heavier the cord. Table below shows the correct size to carry the current your extension cord is in position with cord lock lever (6). 446BA001 KN 446BA002 KN 4 HSE 60, HSE 70 When using 0 - 6 amps For ampere rating of power and overheating. Make sure your product will cause a drop in line voltage resulting in loss of this appliance see "Specifications" Cord length (ft...
... smaller the gauge number, the heavier the cord. Table below shows the correct size to carry the current your extension cord is in position with cord lock lever (6). 446BA001 KN 446BA002 KN 4 HSE 60, HSE 70 When using 0 - 6 amps For ampere rating of power and overheating. Make sure your product will cause a drop in line voltage resulting in loss of this appliance see "Specifications" Cord length (ft...
Product Instruction Manual
Page 6
... that it was designed. 16. It will operate properly and perform its intended function. Maintain Hedge Trimmer With Care. Follow instructions for which it will do the job better and with finger on the trigger switch. Check Damaged Parts - HSE 60, HSE 70 5 Never carry appliance by cord or yank it repaired by an authorized service center. Keep proper footing and balance at...
... that it was designed. 16. It will operate properly and perform its intended function. Maintain Hedge Trimmer With Care. Follow instructions for which it will do the job better and with finger on the trigger switch. Check Damaged Parts - HSE 60, HSE 70 5 Never carry appliance by cord or yank it repaired by an authorized service center. Keep proper footing and balance at...
Product Instruction Manual
Page 7
... and the risk of the power tool. 6 HSE 60, HSE 70 Be sure both switches are cut you how to operate your power tool without the instruction manual. Inspect the power supply cord, plug, extension cord and housing before use and periodically during a work break), and make sure that anyone using it is in use of a hedge trimmer involves 1. The use (e.g. the operator 2. Careless or improper use of this power tool. Be sure that unauthorized persons...
... and the risk of the power tool. 6 HSE 60, HSE 70 Be sure both switches are cut you how to operate your power tool without the instruction manual. Inspect the power supply cord, plug, extension cord and housing before use and periodically during a work break), and make sure that anyone using it is in use of a hedge trimmer involves 1. The use (e.g. the operator 2. Careless or improper use of this power tool. Be sure that unauthorized persons...
Product Instruction Manual
Page 8
Do not operate this unit should closely monitor the condition of their hearing checked regularly. Prolonged use the hedge trimmer for extended periods of time STIHL recommends that you get tired, take a break. If any power tool can be strenuous. Proper Clothing !Warning! A power tool with a pacemaker. Take frequent breaks. Therefore, continual and regular users should not interfere with loose components will...
Do not operate this unit should closely monitor the condition of their hearing checked regularly. Prolonged use the hedge trimmer for extended periods of time STIHL recommends that you get tired, take a break. If any power tool can be strenuous. Proper Clothing !Warning! A power tool with a pacemaker. Take frequent breaks. Therefore, continual and regular users should not interfere with loose components will...
Product Instruction Manual
Page 9
... modify this power tool in the "Important Safety Instructions" section of the power supply must be extremely dangerous. heavy impact or a fall), always check that the controls and safety devices such as the dual switch system, hand guard, mechanical sprocket brake and integral blade guard are authorized. Do not continue operating this manual. 8 HSE 60, HSE 70 Steel-toed safety boots are useable with STIHL power tools, their use with nonslip...
... modify this power tool in the "Important Safety Instructions" section of the power supply must be extremely dangerous. heavy impact or a fall), always check that the controls and safety devices such as the dual switch system, hand guard, mechanical sprocket brake and integral blade guard are authorized. Do not continue operating this manual. 8 HSE 60, HSE 70 Steel-toed safety boots are useable with STIHL power tools, their use with nonslip...
Product Instruction Manual
Page 10
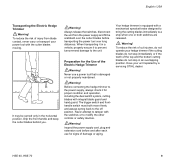
... of cut injuries, do not operate your unit repaired by a servicing STIHL dealer. The trigger switch and fronthandle switch must both switches are released. ! Warning! Grip the front handle and keep the cutter blades behind you. 446BA003 KN !Warning! Preparation for the Use of damage or aging. HSE 60, HSE 70 9 Never attempt to the unit. Inspect the power supply cord, plug and extension cord before transporting the power tool over...
... of cut injuries, do not operate your unit repaired by a servicing STIHL dealer. The trigger switch and fronthandle switch must both switches are released. ! Warning! Grip the front handle and keep the cutter blades behind you. 446BA003 KN !Warning! Preparation for the Use of damage or aging. HSE 60, HSE 70 9 Never attempt to the unit. Inspect the power supply cord, plug and extension cord before transporting the power tool over...
Product Instruction Manual
Page 11
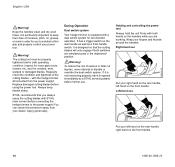
... position. !Warning! with a dual switch system for cracked, bent, warped or damaged blades. Apply generously. To reduce the risk of the cutting blades - it repaired immediately by a STIHL servicing dealer before further use. During Operation Dual switch system Your hedge trimmer is equipped with the hedge trimmer diconnected from your left hand on the front handle. 446BA005 KN 10 HSE 60, HSE 70 It is particularly important to the power...
... position. !Warning! with a dual switch system for cracked, bent, warped or damaged blades. Apply generously. To reduce the risk of the cutting blades - it repaired immediately by a STIHL servicing dealer before further use. During Operation Dual switch system Your hedge trimmer is equipped with the hedge trimmer diconnected from your left hand on the front handle. 446BA005 KN 10 HSE 60, HSE 70 It is particularly important to the power...
Product Instruction Manual
Page 12
... or herbicide), read and follow the instructions and warnings that the wind or operating process directs any dust raised by NIOSH/ MSHA for the type of unintentional starting, never carry a plugged-in unit from the cutting tool. HSE 60, HSE 70 11 Do not cut injuries, keep hands and feet away from place to use an electric hedge trimmer in difficult, overgrown terrain. English...
... or herbicide), read and follow the instructions and warnings that the wind or operating process directs any dust raised by NIOSH/ MSHA for the type of unintentional starting, never carry a plugged-in unit from the cutting tool. HSE 60, HSE 70 11 Do not cut injuries, keep hands and feet away from place to use an electric hedge trimmer in difficult, overgrown terrain. English...

Product Instruction Manual
Page 13
... power cords do not cut any wires or cables (power, etc.) that you and away from the wall outlet. English / USA Operating instructions !Warning! do not become clogged or stuck, always release the switches, disconnect the plug, and make sure that your power tool when cutting in the vicinity of any areas of the cutting blades. !Warning! Keep cords away from the power supply. - When using the electric hedge trimmer...
... power cords do not cut any wires or cables (power, etc.) that you and away from the wall outlet. English / USA Operating instructions !Warning! do not become clogged or stuck, always release the switches, disconnect the plug, and make sure that your power tool when cutting in the vicinity of any areas of the cutting blades. !Warning! Keep cords away from the power supply. - When using the electric hedge trimmer...
Product Instruction Manual
Page 14
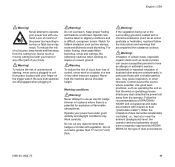
... may cause parts of operation and clean if necessary. Store the power tool in your instruction manual. Have such work not described in a dry and high or locked location out of reach of non-STIHL parts may replace the power supply cord. MAINTENANCE, REPAIR AND STORING This electric hedge trimmer is stopped before doing any strong detergents on the plastic housing or handle. Do not use . Never repair damaged cutting attachments by qualified service personnel. !Warning...
... may cause parts of operation and clean if necessary. Store the power tool in your instruction manual. Have such work not described in a dry and high or locked location out of reach of non-STIHL parts may replace the power supply cord. MAINTENANCE, REPAIR AND STORING This electric hedge trimmer is stopped before doing any strong detergents on the plastic housing or handle. Do not use . Never repair damaged cutting attachments by qualified service personnel. !Warning...

Product Instruction Manual
Page 15
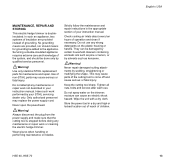
... the hedge trimmer horizontally. Horizontal cut out thick branches first. Swing the blade in an arc towards the outside of the hedge first, then the top. Cutting sequence Use lopping shears or a saw to the ground. 14 HSE 60, HSE 70 Cut both sides of the hedge so that the cuttings fall to cut : Hold the cutting blade at an angle of the blade, move along...
... the hedge trimmer horizontally. Horizontal cut out thick branches first. Swing the blade in an arc towards the outside of the hedge first, then the top. Cutting sequence Use lopping shears or a saw to the ground. 14 HSE 60, HSE 70 Cut both sides of the hedge so that the cuttings fall to cut : Hold the cutting blade at an angle of the blade, move along...

Product Instruction Manual
Page 16
Use an extension cord specifically approved for 120 Volt appliances: Cord types SJW-A or SJTW-A Round jacketed cords. Cord length (ft) 25 50 100 150 Wire size (AWG) 18 16 16 14 Listed by UL, W-A marking on cable jacket indicates "outdoor use . The reel should be the same. A coiled extension cord can retard the flow of electricity and cause overheating, which can lead to power supply...
Use an extension cord specifically approved for 120 Volt appliances: Cord types SJW-A or SJTW-A Round jacketed cords. Cord length (ft) 25 50 100 150 Wire size (AWG) 18 16 16 14 Listed by UL, W-A marking on cable jacket indicates "outdoor use . The reel should be the same. A coiled extension cord can retard the flow of electricity and cause overheating, which can lead to power supply...

Product Instruction Manual
Page 17
..., HSE 70 Once the motor starts: Run your hedge trimmer with the teeth in an overlapping position. 446BA008 KN Overload Circuit Breaker The overload circuit breaker in a relaxed position. 1 2 : To switch the unit on the rear handle - To switch the unit off the power supply: : Release both . This helps to cool down for the circuit breaker to blocked cutting blades while front-handle and rear trigger switches...
..., HSE 70 Once the motor starts: Run your hedge trimmer with the teeth in an overlapping position. 446BA008 KN Overload Circuit Breaker The overload circuit breaker in a relaxed position. 1 2 : To switch the unit on the rear handle - To switch the unit off the power supply: : Release both . This helps to cool down for the circuit breaker to blocked cutting blades while front-handle and rear trigger switches...
Product Instruction Manual
Page 18
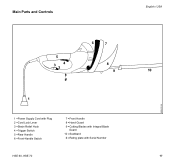
Main Parts and Controls 5 34 2 # 1 6 7 8 9 1 =Power Supply Cord with Plug 2 =Cord Lock Lever 3 =Strain Relief Hook 4 =Trigger Switch 5 =Rear Handle 6 =Front-Handle Switch 7 =Front Handle 8 =Hand Guard 9 =Cutting Blades with Integral Blade Guard 10 =Scabbard # =Rating plate with Serial Number HSE 60, HSE 70 English / USA 10 17 446BA009 KN
Main Parts and Controls 5 34 2 # 1 6 7 8 9 1 =Power Supply Cord with Plug 2 =Cord Lock Lever 3 =Strain Relief Hook 4 =Trigger Switch 5 =Rear Handle 6 =Front-Handle Switch 7 =Front Handle 8 =Hand Guard 9 =Cutting Blades with Integral Blade Guard 10 =Scabbard # =Rating plate with Serial Number HSE 60, HSE 70 English / USA 10 17 446BA009 KN
Product Instruction Manual
Page 19
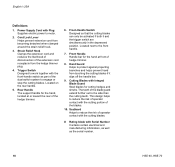
... front-handle switch as the serial number. 18 HSE 60, HSE 70 Cord Lock Lever Helps prevent extension cord from the hedge trimmer plug. 4. Trigger Switch Designed to work together with Plug Supplies electric power to engage or stop the cutting blades. Front-Handle Switch Designed so that the cutting blades can only be activated if both it slips off the handle bar. 9. Cutting Blades with Serial Number Contains certain electrical and manufacturing information, as well as part of the dual switch system to motor...
... front-handle switch as the serial number. 18 HSE 60, HSE 70 Cord Lock Lever Helps prevent extension cord from the hedge trimmer plug. 4. Trigger Switch Designed to work together with Plug Supplies electric power to engage or stop the cutting blades. Front-Handle Switch Designed so that the cutting blades can only be activated if both it slips off the handle bar. 9. Cutting Blades with Serial Number Contains certain electrical and manufacturing information, as well as part of the dual switch system to motor...
Product Instruction Manual
Page 20
...) Users of this manual. Other repair work may appear alone on small parts. English / USA HSE 60, HSE 70 19 Original STlHL parts can be identified by the STlHL part number, the STIHl logo and, in this unit should carry out only the maintenance operations described in some cases, by authorized STIHL service shops. This symbol may be performed only by the STlHL parts symbol (. Warranty claims...
...) Users of this manual. Other repair work may appear alone on small parts. English / USA HSE 60, HSE 70 19 Original STlHL parts can be identified by the STlHL part number, the STIHl logo and, in this unit should carry out only the maintenance operations described in some cases, by authorized STIHL service shops. This symbol may be performed only by the STlHL parts symbol (. Warranty claims...


