
Product Instruction Manual
Page 3
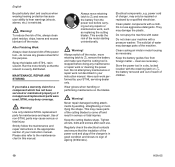
... Charger 15 Switching On 16 Switching Off 16 Storing the Machine 17 Sharpening Instructions 18 Maintenance and Care 19 Main Parts 20 Specifications 21 Special Accessories 22 Troubleshooting 23 Maintenance and Repairs 25 Battery Recycling 25 Disposal 25 Trademarks 26 Addresses 27 { HSA 65 English Allow only persons who fully understand this manual to reduce the risk of your hedge trimmer differs from time to...
... Charger 15 Switching On 16 Switching Off 16 Storing the Machine 17 Sharpening Instructions 18 Maintenance and Care 19 Main Parts 20 Specifications 21 Special Accessories 22 Troubleshooting 23 Maintenance and Repairs 25 Battery Recycling 25 Disposal 25 Trademarks 26 Addresses 27 { HSA 65 English Allow only persons who fully understand this manual to reduce the risk of your hedge trimmer differs from time to...
Product Instruction Manual
Page 4
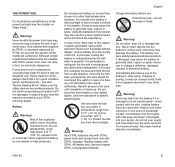
... machine or its products. Always use hedge trimmers in damp or wet locations. 2. In addition to the operating instructions, this manual, please contact your STIHL dealer for which , if not avoided, could result in severe or fatal injury. Such paragraphs are marked with battery plugged in. 2 HSA 65 Indicates an imminent risk of its individual components. Engineering Improvements STIHL's philosophy is recommended when...
... machine or its products. Always use hedge trimmers in damp or wet locations. 2. In addition to the operating instructions, this manual, please contact your STIHL dealer for which , if not avoided, could result in severe or fatal injury. Such paragraphs are marked with battery plugged in. 2 HSA 65 Indicates an imminent risk of its individual components. Engineering Improvements STIHL's philosophy is recommended when...
Product Instruction Manual
Page 5
.... Maintain Hedge Trimmer With Care - Keep cutting edge sharp and clean for lubricating and changing accessories. Follow instructions for best performance and to operate your power tool without the instruction manual. A guard or other part that anyone using it was designed. 10. Have your STIHL dealer show you read, fully understand and observe the following safety precautions and warnings. 8. Make sure trigger switch and switch lever are tired...
.... Maintain Hedge Trimmer With Care - Keep cutting edge sharp and clean for lubricating and changing accessories. Follow instructions for best performance and to operate your power tool without the instruction manual. A guard or other part that anyone using it was designed. 10. Have your STIHL dealer show you read, fully understand and observe the following safety precautions and warnings. 8. Make sure trigger switch and switch lever are tired...
Product Instruction Manual
Page 6
... of your instruction manual for a description of the controls and the function of the parts of your legs. Do not operate this machine when you are specifically designed to use (e.g. To reduce the risk of injury, the operator should not be allowed to match your model and meet your doctor before transporting, storing or carrying out any power tool can be...
... of your instruction manual for a description of the controls and the function of the parts of your legs. Do not operate this machine when you are specifically designed to use (e.g. To reduce the risk of injury, the operator should not be allowed to match your model and meet your doctor before transporting, storing or carrying out any power tool can be...
Product Instruction Manual
Page 7
... heat, rupture or ignite. Risk of the power tool parts see also "Before Starting Work." Do not disassemble, crush, heat above 212 °F (100 °C), expose to absorb spilled liquids. Do not place the battery in other way. Use STIHL batteries only with STIHL power tools and charge them only with STIHL AP battery only. Also seek medical attention immediately. If your STIHL servicing dealer. Doing...
... heat, rupture or ignite. Risk of the power tool parts see also "Before Starting Work." Do not disassemble, crush, heat above 212 °F (100 °C), expose to absorb spilled liquids. Do not place the battery in other way. Use STIHL batteries only with STIHL power tools and charge them only with STIHL AP battery only. Also seek medical attention immediately. If your STIHL servicing dealer. Doing...
Product Instruction Manual
Page 8
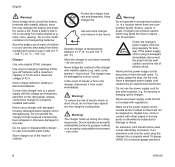
... a properly installed wall outlet. Never bridge the contacts of electric shock or short circuit, do not comply with the voltage and frequency specified on an easily combustible surface (e.g. Warning! Check the charger's power supply cord and plug regularly for any objects into a properly wired 16 gauge (AWG 16) or heavier gauge extension 6 HSA 65 An extension cord should not be used unless absolutely...
... a properly installed wall outlet. Never bridge the contacts of electric shock or short circuit, do not comply with the voltage and frequency specified on an easily combustible surface (e.g. Warning! Check the charger's power supply cord and plug regularly for any objects into a properly wired 16 gauge (AWG 16) or heavier gauge extension 6 HSA 65 An extension cord should not be used unless absolutely...
Product Instruction Manual
Page 9
... trigger switch and/or the switch lever on ,). Warning! with the cutting blades moving. Always switch off the power tool, move freely and always spring back to keep blades sharp. Carry the power tool by the handle - Keep clean. HSA 65 7 Warning! it is damaged or not properly maintained. Never use . Always connect the unit to modify the controls or safety devices. To reduce the risk of moisture, pitch, oil, grease...
... trigger switch and/or the switch lever on ,). Warning! with the cutting blades moving. Always switch off the power tool, move freely and always spring back to keep blades sharp. Carry the power tool by the handle - Keep clean. HSA 65 7 Warning! it is damaged or not properly maintained. Never use . Always connect the unit to modify the controls or safety devices. To reduce the risk of moisture, pitch, oil, grease...

Product Instruction Manual
Page 10
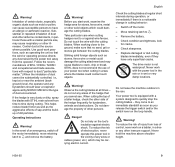
... around the handles. Be extremely cautious when working . During Operation Holding and Controlling the Power Tool Always hold the unit so that the cutting blades are clear of cut stems greater than hedges or similar soft vegetation. If the cutting blades become jammed by thick branches or other obstructions, switch off the motor immediately, move retaining latch to ƒ and remove the battery before...
... around the handles. Be extremely cautious when working . During Operation Holding and Controlling the Power Tool Always hold the unit so that the cutting blades are clear of cut stems greater than hedges or similar soft vegetation. If the cutting blades become jammed by thick branches or other obstructions, switch off the motor immediately, move retaining latch to ƒ and remove the battery before...
Product Instruction Manual
Page 11
..., switch off the motor. - Remove the battery. - Substantial or repeated inhalation of any bystanders should wear a respirator approved by the power tool away from the operator. Observe the cutting blades at or near the ambient (background) level, the operator and any wires or cables (power, etc.) which could contact such objects. Switch off the motor immediately, move retaining latch to crack, chip or break. The drive motor is...
..., switch off the motor. - Remove the battery. - Substantial or repeated inhalation of any bystanders should wear a respirator approved by the power tool away from the operator. Observe the cutting blades at or near the ambient (background) level, the operator and any wires or cables (power, etc.) which could contact such objects. Switch off the motor immediately, move retaining latch to crack, chip or break. The drive motor is...
Product Instruction Manual
Page 12
...! Electrical components, e.g. Do not clean your machine with water. Keep the battery guides free from the power tool before doing any repairs or maintenance work performed by your instruction manual. Never repair damaged cutting attachments by a qualified electrician. Do not use . After Finishing Work Always clean dust and dirt off the motor. Run the motor briefly so that the insulation of the power cord and plug of children. 10 HSA 65 Use of the motor starting unintentionally...
...! Electrical components, e.g. Do not clean your machine with water. Keep the battery guides free from the power tool before doing any repairs or maintenance work performed by your instruction manual. Never repair damaged cutting attachments by a qualified electrician. Do not use . After Finishing Work Always clean dust and dirt off the motor. Run the motor briefly so that the insulation of the power cord and plug of children. 10 HSA 65 Use of the motor starting unintentionally...
Product Instruction Manual
Page 13
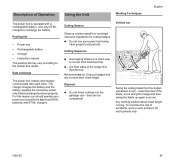
.... To minimize the risk of Operation Using the Unit Working Techniques English The power tool is tiring. Data exchange The power tool, battery and charger communicate with the approved STIHL batteries and STIHL chargers. Recommendation: Only cut Swing the cutting blade from the bottom upwards in such positions for cutting hedges. Power tool - Instruction manual The packing list may vary according to the market and model. lower the nose of the...
.... To minimize the risk of Operation Using the Unit Working Techniques English The power tool is tiring. Data exchange The power tool, battery and charger communicate with the approved STIHL batteries and STIHL chargers. Recommendation: Only cut Swing the cutting blade from the bottom upwards in such positions for cutting hedges. Power tool - Instruction manual The packing list may vary according to the market and model. lower the nose of the...

Product Instruction Manual
Page 15
...HSA 65 13 The charge time is so equipped) Remove the charged battery from the charge time in the room. AL 300 charger 3901BA014 KN 3901BA010 KN AL 100 charger This charger waits for cooling may therefore vary from the charger. End of charge and any problems that occur on the battery or power tool...a number of air in the "Specifications". The light emitting diode on the battery go off - Light emitting diode lights up green. see "Light Emitting Diodes (LED) on Charger" Charging begins as soon as the light emitting diodes (4) on when the battery is running. The battery is ...
...HSA 65 13 The charge time is so equipped) Remove the charged battery from the charge time in the room. AL 300 charger 3901BA014 KN 3901BA010 KN AL 100 charger This charger waits for cooling may therefore vary from the charger. End of charge and any problems that occur on the battery or power tool...a number of air in the "Specifications". The light emitting diode on the battery go off - Light emitting diode lights up green. see "Light Emitting Diodes (LED) on Charger" Charging begins as soon as the light emitting diodes (4) on when the battery is running. The battery is ...

Product Instruction Manual
Page 17
... flasing light ... ... 2) During operation: Power tool cuts out - Light Emitting Diodes (LED) on Battery". - Faulty battery - remove and refit the battery - is faulty and must cool down ; allow battery to cool down before it may be necessary to take the battery out of the power tool for this purpose. 3) Battery is too hot and must be replaced. 4) STIHL recommends a STIHL servicing dealer. have checked by a servicing dealer. is fully...
... flasing light ... ... 2) During operation: Power tool cuts out - Light Emitting Diodes (LED) on Battery". - Faulty battery - remove and refit the battery - is faulty and must cool down ; allow battery to cool down before it may be necessary to take the battery out of the power tool for this purpose. 3) Battery is too hot and must be replaced. 4) STIHL recommends a STIHL servicing dealer. have checked by a servicing dealer. is fully...

Product Instruction Manual
Page 18
... sure you use the power tool for the first time. Trigger switch Motor speed is controlled with both hands - the battery must be fully charged before leaving the factory. hold them in a relaxed position. Depress the trigger switch to accelerate the motor. 4 N Move the retaining latch (3) to ƒ - one hand on , and the switch lever (3), trigger switch lockout (4) and trigger switch (5) are operated simultaneously. N Make sure the cutting attachment is on the control handle - N Push...
... sure you use the power tool for the first time. Trigger switch Motor speed is controlled with both hands - the battery must be fully charged before leaving the factory. hold them in a relaxed position. Depress the trigger switch to accelerate the motor. 4 N Move the retaining latch (3) to ƒ - one hand on , and the switch lever (3), trigger switch lockout (4) and trigger switch (5) are operated simultaneously. N Make sure the cutting attachment is on the control handle - N Push...

Product Instruction Manual
Page 19
.... N Clean the cutting blades, check condition and spray them with a charge of children and other unauthorized persons. the blade scabbard can be mounted to protect it against unauthorized use in rotation. N Store the charger in a dry, locked location - N Store with STIHL resin solvent. N Thoroughly clean the machine, especially the cooling air inlets. Keep it out of the reach of the power tool or...
.... N Clean the cutting blades, check condition and spray them with a charge of children and other unauthorized persons. the blade scabbard can be mounted to protect it against unauthorized use in rotation. N Store the charger in a dry, locked location - N Store with STIHL resin solvent. N Thoroughly clean the machine, especially the cooling air inlets. Keep it out of the reach of the power tool or...
Product Instruction Manual
Page 21
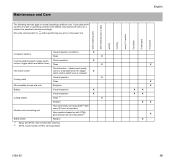
... inspection (condition) Clean X X Controls (retaining latch, trigger switch lockout, trigger switch and switch lever) Check operation Clean X X Two-hand control Check function - HSA 65 before performing any work area, etc.), shorten the specified intervals accordingly. blades must quickly come to a standstill when the trigger X switch and/or switch lever is longer or operating conditions are difficult (very dusty work on the power tool. Move the retaining latch to normal operating conditions only. Maintenance and Care...
... inspection (condition) Clean X X Controls (retaining latch, trigger switch lockout, trigger switch and switch lever) Check operation Clean X X Two-hand control Check function - HSA 65 before performing any work area, etc.), shorten the specified intervals accordingly. blades must quickly come to a standstill when the trigger X switch and/or switch lever is longer or operating conditions are difficult (very dusty work on the power tool. Move the retaining latch to normal operating conditions only. Maintenance and Care...
Product Instruction Manual
Page 23
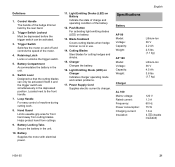
... Hz 75 W 1.6 A II, E (double insulated) HSA 65 21 Battery Compartment Accommodates the battery in use. 14. Located next to charger. Battery Supplies the motor with electrical power. 11. Power Supply Cord Supplies electric current to the front handle. 7. Retaining Latch Locks or unlocks the trigger switch. 5. Light Emitting Diodes (LED) on and off and controls the speed of the battery. 12. Blade Scabbard Covers cutting blades when hedge trimmer is not in the unit. 6. Light...
... Hz 75 W 1.6 A II, E (double insulated) HSA 65 21 Battery Compartment Accommodates the battery in use. 14. Located next to charger. Battery Supplies the motor with electrical power. 11. Power Supply Cord Supplies electric current to the front handle. 7. Retaining Latch Locks or unlocks the trigger switch. 5. Light Emitting Diodes (LED) on and off and controls the speed of the battery. 12. Blade Scabbard Covers cutting blades when hedge trimmer is not in the unit. 6. Light...
Product Instruction Manual
Page 24
... the power tool's operating site. up to 80% capacity: - up to 80% capacity: - up to 100% capacity: 25 min 50 min 35 min 60 min Cutting Attachment Weight without battery, with cutting attachment, without blade scabbard HSA 65: 7.9 lbs (3.6 kg) Carrying STIHL Rechargeable Batteries STIHL batteries comply with AP 80: - Special Accessories Contact your STIHL dealer for your product. Tooth spacing: 1.1 in UN-Manual ST/SG/AC.10/11/Rev.3/Part...
... the power tool's operating site. up to 80% capacity: - up to 80% capacity: - up to 100% capacity: 25 min 50 min 35 min 60 min Cutting Attachment Weight without battery, with cutting attachment, without blade scabbard HSA 65: 7.9 lbs (3.6 kg) Carrying STIHL Rechargeable Batteries STIHL batteries comply with AP 80: - Special Accessories Contact your STIHL dealer for your product. Tooth spacing: 1.1 in UN-Manual ST/SG/AC.10/11/Rev.3/Part...
Product Instruction Manual
Page 26
... the power tool. Operate the charger only in power tool / charger Guides dirty Battery too hot / too cold (1 light emitting diode on battery flash red for about 5 seconds) Charger faulty 1) STIHL recommends a STIHL servicing dealer. Remove the battery and refit it properly Install new battery1) Have charger checked by servicing dealer1) 24 HSA 65 Remedy Charge the battery Check battery1) and replace Clean the blades and spray them with STIHL resin solvent Carefully clean the guides Allow battery...
... the power tool. Operate the charger only in power tool / charger Guides dirty Battery too hot / too cold (1 light emitting diode on battery flash red for about 5 seconds) Charger faulty 1) STIHL recommends a STIHL servicing dealer. Remove the battery and refit it properly Install new battery1) Have charger checked by servicing dealer1) 24 HSA 65 Remedy Charge the battery Check battery1) and replace Clean the blades and spray them with STIHL resin solvent Carefully clean the guides Allow battery...
Product Instruction Manual
Page 27
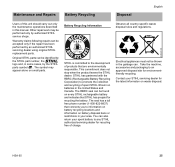
... disposal site for recycling free of spent STIHL lithium ion batteries in some cases, by an authorized STIHL servicing dealer using original STIHL replacement parts. The symbol may be found on battery disposal bans or restrictions in your spent battery to any STIHL authorized servicing dealer for environmentfriendly recycling. Contact your STIHL servicing dealer for recycling the battery. Maintenance and Repairs Battery Recycling Disposal English Users of products that are...
... disposal site for recycling free of spent STIHL lithium ion batteries in some cases, by an authorized STIHL servicing dealer using original STIHL replacement parts. The symbol may be found on battery disposal bans or restrictions in your spent battery to any STIHL authorized servicing dealer for environmentfriendly recycling. Contact your STIHL servicing dealer for recycling the battery. Maintenance and Repairs Battery Recycling Disposal English Users of products that are...


