
Instruction Manual
Page 2
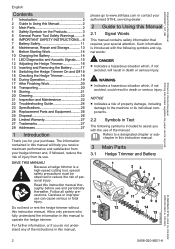
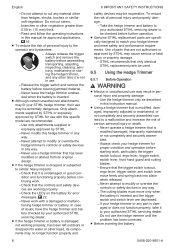
... rent the hedge trimmer without this instruction manual. 3 Main Parts 3.1 Hedge Trimmer and Battery 1 23 4 5 6 7 18 17 16 # # 11 10 13 98 12 14 15 0000100618_001 © ANDREAS STIHL AG & Co. Original Instruction Manual 0000009971_001_GB Printed on the Products 3 5 General Power Tool Safety Warnings.........4 6 IMPORTANT SAFETY INSTRUCTIONS.... 6 7 Battery Safety 11 8 Maintenance, Repair and Storage 13 9 Before Starting Work 14 10 Charging the Battery 14 11 LED Diagnostics and...
... rent the hedge trimmer without this instruction manual. 3 Main Parts 3.1 Hedge Trimmer and Battery 1 23 4 5 6 7 18 17 16 # # 11 10 13 98 12 14 15 0000100618_001 © ANDREAS STIHL AG & Co. Original Instruction Manual 0000009971_001_GB Printed on the Products 3 5 General Power Tool Safety Warnings.........4 6 IMPORTANT SAFETY INSTRUCTIONS.... 6 7 Battery Safety 11 8 Maintenance, Repair and Storage 13 9 Before Starting Work 14 10 Charging the Battery 14 11 LED Diagnostics and...
Instruction Manual
Page 3
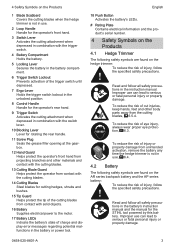
... Activates the battery's LEDs. # Rating Plate Contains electrical information and the pro‐ duct's serial number. 4 Safety Symbols on the Products 4.1 Hedge Trimmer The following safety symbols are found on the AR series backpack battery and the AP series battery: To reduce the risk of injury, follow all safety precau‐ tions in the battery's instruction manual and the manual for the STIHL tool powered by this...
... Activates the battery's LEDs. # Rating Plate Contains electrical information and the pro‐ duct's serial number. 4 Safety Symbols on the Products 4.1 Hedge Trimmer The following safety symbols are found on the AR series backpack battery and the AP series battery: To reduce the risk of injury, follow all safety precau‐ tions in the battery's instruction manual and the manual for the STIHL tool powered by this...
Instruction Manual
Page 4
... of electric shock if your mains-operated (corded) power tool or bat‐ tery-operated (cordless) power tool. 5.2 Work Area Safety a) Keep work area clean and well lit. Protect from heat, oil, sharp edges or moving parts. There is an increased risk of inattention while 4 0458-020-8601-A Use of an RCD or GFCI reduces the risk...
... of electric shock if your mains-operated (corded) power tool or bat‐ tery-operated (cordless) power tool. 5.2 Work Area Safety a) Keep work area clean and well lit. Protect from heat, oil, sharp edges or moving parts. There is an increased risk of inattention while 4 0458-020-8601-A Use of an RCD or GFCI reduces the risk...

Instruction Manual
Page 5
...-8601-A 5 A charger that can be repaired. Shorting the battery terminals together may result in unexpected situations. 5.6 Battery Tool Use and Care a) Recharge only with water. d) Under abusive conditions, liquid may create a risk of the tool in serious personal injury. If contact accidentally occurs, flush with the charger specified by poorly maintained power tools. Liquid ejected from one type of battery pack may...
...-8601-A 5 A charger that can be repaired. Shorting the battery terminals together may result in unexpected situations. 5.6 Battery Tool Use and Care a) Recharge only with water. d) Under abusive conditions, liquid may create a risk of the tool in serious personal injury. If contact accidentally occurs, flush with the charger specified by poorly maintained power tools. Liquid ejected from one type of battery pack may...
Instruction Manual
Page 6
... service damaged battery packs. Alternatively, it may be stren‐ uous. Batteries, chargers and other accessories are moving. Do not remove cut when blades are sold separately. 6.2 Operator WARNING ■ Working with an AP Adapter. This decreases the risk of being struck by a qualified repair person using only identical replace‐ ment parts. English e) Do not use a battery pack or tool that the safety of...
... service damaged battery packs. Alternatively, it may be stren‐ uous. Batteries, chargers and other accessories are moving. Do not remove cut when blades are sold separately. 6.2 Operator WARNING ■ Working with an AP Adapter. This decreases the risk of being struck by a qualified repair person using only identical replace‐ ment parts. English e) Do not use a battery pack or tool that the safety of...
Instruction Manual
Page 8
... expressly approved by STIHL for error messages, 22. - Never modify this specific model are recommended. - Use of parts that has been modified or altered from its compo‐ nents may no longer function properly and 8 6 IMPORTANT SAFETY INSTRUCTIONS safety devices may be used. 6.5 Using the Hedge Trimmer 6.5.1 Before Operation WARNING ■ Misuse or unauthorized use may be checked before starting work, particularly the...
... expressly approved by STIHL for error messages, 22. - Never modify this specific model are recommended. - Use of parts that has been modified or altered from its compo‐ nents may no longer function properly and 8 6 IMPORTANT SAFETY INSTRUCTIONS safety devices may be used. 6.5 Using the Hedge Trimmer 6.5.1 Before Operation WARNING ■ Misuse or unauthorized use may be checked before starting work, particularly the...

Instruction Manual
Page 9
... remove the battery before assembling, trans‐ porting, adjusting, inspect‐ ing, cleaning, servicing,...parts of your body are working on the hedge trimmer with one hand may lead to avoid stumbling or falling. - Check the contacts in the hedge trim‐ mer. ■ Before switching on the hedge trimmer, 14.1. ■ To help...Do not overreach. 6 IMPORTANT SAFETY INSTRUCTIONS - Never insert or use . - Remove the battery before clearing jammed material. ■ ... follow the instructions on switching on your hedge trimmer: English - Keep them free of moisture,...
... remove the battery before assembling, trans‐ porting, adjusting, inspect‐ ing, cleaning, servicing,...parts of your body are working on the hedge trimmer with one hand may lead to avoid stumbling or falling. - Check the contacts in the hedge trim‐ mer. ■ Before switching on the hedge trimmer, 14.1. ■ To help...Do not overreach. 6 IMPORTANT SAFETY INSTRUCTIONS - Never insert or use . - Remove the battery before clearing jammed material. ■ ... follow the instructions on switching on your hedge trimmer: English - Keep them free of moisture,...

Instruction Manual
Page 10
... Instructions DANGER ■ Contact with a smaller particle size, may be allowed in the area where it is not in a location where combustible gases, liquids, vapors, dusts or other obstruc‐ tions, release the trigger switch, trigger switch lock‐ out and switch lever immediately and remove the battery before attempt‐ ing to free the...
... Instructions DANGER ■ Contact with a smaller particle size, may be allowed in the area where it is not in a location where combustible gases, liquids, vapors, dusts or other obstruc‐ tions, release the trigger switch, trigger switch lock‐ out and switch lever immediately and remove the battery before attempt‐ ing to free the...

Instruction Manual
Page 11
... regular short inter‐ vals during operation, or immediately if there is inserted. - Use only genuine STIHL AR or AP series batteries with a resin solvent, such as STIHL Resin Remover and Lubricant, before starting : - Inspect the material to bystanders: - Switch off the motor immediately and remove the battery. ■ Contacting foreign objects while cutting could con‐ tact such objects. - Inspect...
... regular short inter‐ vals during operation, or immediately if there is inserted. - Use only genuine STIHL AR or AP series batteries with a resin solvent, such as STIHL Resin Remover and Lubricant, before starting : - Inspect the material to bystanders: - Switch off the motor immediately and remove the battery. ■ Contacting foreign objects while cutting could con‐ tact such objects. - Inspect...
Instruction Manual
Page 12
... contact with genuine STIHL AL 101, AL 301, AL 301-4 or AL 500 series chargers. - Use an inert absorbent such as garden chemicals and de-icing salts. - Never incinerate or place the battery on spilled battery fluid. - If storing the battery in water or other than powering STIHL prod‐ ucts could be extremely dangerous. - Store the battery indoors in use or charge a malfunctioning...
... contact with genuine STIHL AL 101, AL 301, AL 301-4 or AL 500 series chargers. - Use an inert absorbent such as garden chemicals and de-icing salts. - Never incinerate or place the battery on spilled battery fluid. - If storing the battery in water or other than powering STIHL prod‐ ucts could be extremely dangerous. - Store the battery indoors in use or charge a malfunctioning...
Instruction Manual
Page 13
... a damaged power supply cord replaced by welding, straightening or modi‐ fying the shape. Consult the fire department regarding proper disposal of a burned battery. 8 Maintenance, Repair and Storage 8.1 Warnings and Instructions WARNING ■ There are not authorized or approved by STIHL may cause parts of this manual. - Keep the battery guides free of personal injury. - 8 Maintenance, Repair and Storage ■ A battery fire can...
... a damaged power supply cord replaced by welding, straightening or modi‐ fying the shape. Consult the fire department regarding proper disposal of a burned battery. 8 Maintenance, Repair and Storage 8.1 Warnings and Instructions WARNING ■ There are not authorized or approved by STIHL may cause parts of this manual. - Keep the battery guides free of personal injury. - 8 Maintenance, Repair and Storage ■ A battery fire can...
Instruction Manual
Page 14
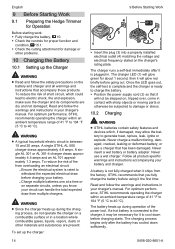
..., vapors, dusts or other problems. 10 Charging the Battery 10.1 Setting up the charger: 9 Before Starting Work 4 1 3 2 1 4 3 2 0000082682_004 ► Insert the plug (3) into a properly installed electrical outlet (4) matching the voltage and electrical frequency stated on the battery and charger and all product-specific warnings and instructions accompanying your battery and charger. Never use a charger that it will glow red briefly before charging starts. STIHL recommends that accompany those products...
..., vapors, dusts or other problems. 10 Charging the Battery 10.1 Setting up the charger: 9 Before Starting Work 4 1 3 2 1 4 3 2 0000082682_004 ► Insert the plug (3) into a properly installed electrical outlet (4) matching the voltage and electrical frequency stated on the battery and charger and all product-specific warnings and instructions accompanying your battery and charger. Never use a charger that it will glow red briefly before charging starts. STIHL recommends that accompany those products...

Instruction Manual
Page 15
... seconds. For a complete list of charge. If one LED glows red continu‐ ously: the battery is not in use for extended periods of about 50 °F to 68 °F (10 °C to charge, use for extended periods of time. ► Charge STIHL AR backpack batteries only with genuine STIHL AL 101, AL 301, AL 301-4 or AL 500 series chargers. 11 LED Diagnostics and...
... seconds. For a complete list of charge. If one LED glows red continu‐ ously: the battery is not in use for extended periods of about 50 °F to 68 °F (10 °C to charge, use for extended periods of time. ► Charge STIHL AR backpack batteries only with genuine STIHL AL 101, AL 301, AL 301-4 or AL 500 series chargers. 11 LED Diagnostics and...
Instruction Manual
Page 16
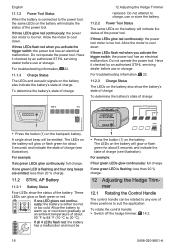
...STIHL servicing dealer before use or storage. Do not attempt to any one LED glows red continu‐ ously: the battery is either too hot or too cold. For troubleshooting information, 22. 11.2.3 Charge Status The LEDs on the battery will be rotated to charge, use or store the battery. 11.2.2 Power...: full charge. Do not operate the power tool. These LEDs can be emitted. If one green LED is flashing: less than 20 % charge. 11.2 STIHL AP Battery 11.2.1 Battery Status Four LEDs show the battery's state of charge: 12 Adjusting the Hedge Trimmer replaced. Allow ...
...STIHL servicing dealer before use or storage. Do not attempt to any one LED glows red continu‐ ously: the battery is either too hot or too cold. For troubleshooting information, 22. 11.2.3 Charge Status The LEDs on the battery will be rotated to charge, use or store the battery. 11.2.2 Power...: full charge. Do not operate the power tool. These LEDs can be emitted. If one green LED is flashing: less than 20 % charge. 11.2 STIHL AP Battery 11.2.1 Battery Status Four LEDs show the battery's state of charge: 12 Adjusting the Hedge Trimmer replaced. Allow ...

Instruction Manual
Page 17
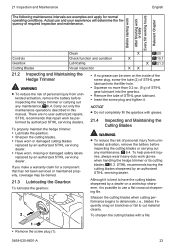
... unintended activation, always remove the battery before using it stops. The battery is 0458-020-8601-A 17 Use or storage outside the recommended ambient temperature range can reduce the perform‐ ance and/or service life of unintended activation, never store the battery in position. 13 Inserting and Removing the Battery 13.1 Inserting the Battery WARNING ■ Never use . To remove the battery: ► Release the...
... unintended activation, always remove the battery before using it stops. The battery is 0458-020-8601-A 17 Use or storage outside the recommended ambient temperature range can reduce the perform‐ ance and/or service life of unintended activation, never store the battery in position. 13 Inserting and Removing the Battery 13.1 Inserting the Battery WARNING ■ Never use . To remove the battery: ► Release the...

Instruction Manual
Page 21
... of lithium ion cells and batteries is dry and store it indoors in a dry and secure location. ► Keep it and its container to the hedge trimmer, 6.4. Never store the battery in a dry and secure location, out of the reach of 30 % to 45 % for STIHL AR series batteries (2 green LEDs). ► If storing the battery in the charger, disconnect the charger from...
... of lithium ion cells and batteries is dry and store it indoors in a dry and secure location. ► Keep it and its container to the hedge trimmer, 6.4. Never store the battery in a dry and secure location, out of the reach of 30 % to 45 % for STIHL AR series batteries (2 green LEDs). ► If storing the battery in the charger, disconnect the charger from...

Instruction Manual
Page 22
... as STIHL Resin Remover and Lubricant. ► Insert the battery and switch on the hedge trimmer for STIHL AP series batteries and a charge of required inspection and maintenance. Spraying it with a charge between 40 % and 60 % for a few seconds to evenly distribute the resin solvent throughout the cutting blades. ► Do not use detergents or solvents. Before starting work After finishing work...
... as STIHL Resin Remover and Lubricant. ► Insert the battery and switch on the hedge trimmer for STIHL AP series batteries and a charge of required inspection and maintenance. Spraying it with a charge between 40 % and 60 % for a few seconds to evenly distribute the resin solvent throughout the cutting blades. ► Do not use detergents or solvents. Before starting work After finishing work...
Instruction Manual
Page 23
... blades replaced by an authorized STIHL servicing dealer. ► Have worn, missing or damaged safety labels replaced by an authorized STIHL servicing dealer. STIHL recommends having the cutting blades sharpened by an authorized STIHL servicing dealer. Before starting work After finishing work or daily Every 50 working hours Relevant Chapter 21 Inspection and Maintenance The following maintenance intervals are no user-authorized repairs. To help prevent...
... blades replaced by an authorized STIHL servicing dealer. ► Have worn, missing or damaged safety labels replaced by an authorized STIHL servicing dealer. STIHL recommends having the cutting blades sharpened by an authorized STIHL servicing dealer. Before starting work After finishing work or daily Every 50 working hours Relevant Chapter 21 Inspection and Maintenance The following maintenance intervals are no user-authorized repairs. To help prevent...
Instruction Manual
Page 25
...;F to 104 °F (5 °C to 40 °C). 23 Specifications 23.1 STIHL HSA 100 - Battery not fully ► Charge the battery, 10. reached or exceeded. too cold. STIHL AR series - Tooth spacing: 1.3 in this man‐ ual. STIHL products must be checked by an authorized tery has been STIHL servicing dealer. As a result, engineering changes and improvements are not clean and lubricated. ► Clean...
...;F to 104 °F (5 °C to 40 °C). 23 Specifications 23.1 STIHL HSA 100 - Battery not fully ► Charge the battery, 10. reached or exceeded. too cold. STIHL AR series - Tooth spacing: 1.3 in this man‐ ual. STIHL products must be checked by an authorized tery has been STIHL servicing dealer. As a result, engineering changes and improvements are not clean and lubricated. ► Clean...
Instruction Manual
Page 26
... user is committed to the develop‐ ment of products that connects you to radio communications. This commitment does not stop when the product leaves the authorized STIHL servicing dealer. RBRC has a toll free phone number (1-800-822-8837) that are designed to correct the interference by the STIHL parts symbol . Genuine STIHL parts can be thrown in a resi‐ dential installation. this...
... user is committed to the develop‐ ment of products that connects you to radio communications. This commitment does not stop when the product leaves the authorized STIHL servicing dealer. RBRC has a toll free phone number (1-800-822-8837) that are designed to correct the interference by the STIHL parts symbol . Genuine STIHL parts can be thrown in a resi‐ dential installation. this...


