
Instruction Manual
Page 2
... the Grinding Wheel .......... 16 Maintenance Chart 17 Minimize Wear and Avoid Damage 18 Main Parts of Sharpener 19 Specifications 19 Special Accessories 20 Maintenance and Repairs 20 Certificate of Conformity 21 Quality Certification 22 STIHl HOS English Dear Customer, Thank you have any queries concerning your satisfaction and troublefree use of the machine...
... the Grinding Wheel .......... 16 Maintenance Chart 17 Minimize Wear and Avoid Damage 18 Main Parts of Sharpener 19 Specifications 19 Special Accessories 20 Maintenance and Repairs 20 Certificate of Conformity 21 Quality Certification 22 STIHl HOS English Dear Customer, Thank you have any queries concerning your satisfaction and troublefree use of the machine...
Instruction Manual
Page 4
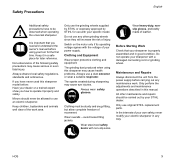
... jackets. Switch on the motor only if its operating voltage agrees with your specific model. HOS 3 It is important that your sharpener is properly assembled and in this sharpener may cause health problems. Always use with the voltage of leather. Only use the grinding wheels... a dust extractor or wear a suitable respirator. Keep it properly and safely. Only use original STIHL replacement parts. Safety Precautions English Additional safety precautions have never used this sharpener model before: Have your dealer or a trained expert show you read and understand the owner's ...
... jackets. Switch on the motor only if its operating voltage agrees with your specific model. HOS 3 It is important that your sharpener is properly assembled and in this sharpener may cause health problems. Always use with the voltage of leather. Only use the grinding wheels... a dust extractor or wear a suitable respirator. Keep it properly and safely. Only use original STIHL replacement parts. Safety Precautions English Additional safety precautions have never used this sharpener model before: Have your dealer or a trained expert show you read and understand the owner's ...
Instruction Manual
Page 5
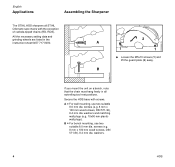
...If you mount the unit on a bench, note that the chain must hang freely in the instruction sheet 0457 717 0000. Secure the HOS base with the exception of carbide-tipped chains (RD, RDS). B = For bench mounting, use two suitable 8.0 mm dia. screws (e.g.... 8.4 mm dia. A 1 2 1 : Loosen the M5x10 screws (1) and lift the guard plate (2) away. washers. 4 HOS 523BA045 KN 523BA046 KN English Applications Assembling the Sharpener The STIHL HOS sharpens all swivelling tool rest positions. A = For wall mounting, use two suitable 8.0 mm dia. All the necessary setting data and ...
...If you mount the unit on a bench, note that the chain must hang freely in the instruction sheet 0457 717 0000. Secure the HOS base with the exception of carbide-tipped chains (RD, RDS). B = For bench mounting, use two suitable 8.0 mm dia. screws (e.g.... 8.4 mm dia. A 1 2 1 : Loosen the M5x10 screws (1) and lift the guard plate (2) away. washers. 4 HOS 523BA045 KN 523BA046 KN English Applications Assembling the Sharpener The STIHL HOS sharpens all swivelling tool rest positions. A = For wall mounting, use two suitable 8.0 mm dia. All the necessary setting data and ...
Instruction Manual
Page 8
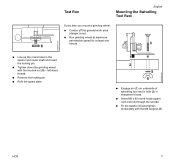
...). : Run grinding wheel at maximum permissible speed for at least one minute. 3 8 523BA053 KN 523BA054 KN : Line up the cross holes in sharpener's base. : Insert M8 x 60 round head square neck bolt (3) through the slot (4). : Fit the washer (5) and tighten moderately with the knurled nut... (8) - HOS 7 left-hand thread. : Remove the locking pin. : Refit the guard plate. 1 4 2 5 6 : Engage pin (1) on underside of swivelling tool rest in hole (2) ...
...). : Run grinding wheel at maximum permissible speed for at least one minute. 3 8 523BA053 KN 523BA054 KN : Line up the cross holes in sharpener's base. : Insert M8 x 60 round head square neck bolt (3) through the slot (4). : Fit the washer (5) and tighten moderately with the knurled nut... (8) - HOS 7 left-hand thread. : Remove the locking pin. : Refit the guard plate. 1 4 2 5 6 : Engage pin (1) on underside of swivelling tool rest in hole (2) ...

Instruction Manual
Page 10
Grind the new cutters back to the left. : Pull the master cutter back against the stop (4). HOS 9 Preparations for Sharpening English 523BA012 KN 523BA061 KN 523BA062 KN 4 2 3 1 Do not switch on the motor yet. : Replace cutters with severely worn or damaged cutting edges. cutting edges must point to the shape and size of the other cutters. : Find the shortest cutter (master cutter). : Release clamping lever (1). : Place the chain, drive link tangs (2) downward, in the clamping rail (3) -
Grind the new cutters back to the left. : Pull the master cutter back against the stop (4). HOS 9 Preparations for Sharpening English 523BA012 KN 523BA061 KN 523BA062 KN 4 2 3 1 Do not switch on the motor yet. : Replace cutters with severely worn or damaged cutting edges. cutting edges must point to the shape and size of the other cutters. : Find the shortest cutter (master cutter). : Release clamping lever (1). : Place the chain, drive link tangs (2) downward, in the clamping rail (3) -

Instruction Manual
Page 11
English 55 45 5 6 35 25 1510 - 0 + 1015 25 35 8 45 55 522BA004 KN 522BA011 KN 522BA005 KN 523BA063 KN 7 The stop's pivot pin (5) moves backward and forward in the arm. : To sharpen the left-hand row of cutters: Pull the stop in the direction of arrow. : Set the scale (6) on the swivelling tool rest to the specified sharpening angle (see separate data sheet). : Tighten down to bring the grinding wheel down the wingnut (7). Lateral Adjustment : Back off the travel limiting screw (8). : Use the handle to the chain. 10 HOS
English 55 45 5 6 35 25 1510 - 0 + 1015 25 35 8 45 55 522BA004 KN 522BA011 KN 522BA005 KN 523BA063 KN 7 The stop's pivot pin (5) moves backward and forward in the arm. : To sharpen the left-hand row of cutters: Pull the stop in the direction of arrow. : Set the scale (6) on the swivelling tool rest to the specified sharpening angle (see separate data sheet). : Tighten down to bring the grinding wheel down the wingnut (7). Lateral Adjustment : Back off the travel limiting screw (8). : Use the handle to the chain. 10 HOS
Instruction Manual
Page 13
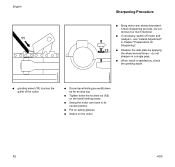
do not sharpen in chapter "Preparations for Sharpening". : Sharpen the side plate by applying the wheel several times - Do not remove too much material. : If necessary, switch off motor and readjust - see "Lateral Adjustment" ... nut (12) on the travel limiting screw. : Swing the motor arm back to its neutral position. : Put on safety glasses. : Switch on the motor. 12 HOS English 11 Sharpening Procedure 8 12 : Bring motor arm slowly downward. Check...
do not sharpen in chapter "Preparations for Sharpening". : Sharpen the side plate by applying the wheel several times - Do not remove too much material. : If necessary, switch off motor and readjust - see "Lateral Adjustment" ... nut (12) on the travel limiting screw. : Swing the motor arm back to its neutral position. : Put on safety glasses. : Switch on the motor. 12 HOS English 11 Sharpening Procedure 8 12 : Bring motor arm slowly downward. Check...
Instruction Manual
Page 14
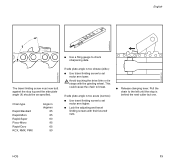
... travel limiting screws with the grinding wheel. If side plate angle is behind the next cutter but one. This could cause the chain to check sharpening data. Avoid touching the drive links or tie straps with their knurled nuts. : Release clamping lever. Pull the chain to set motor arm lower.... HOS 13 Chain type Rapid-Standard Rapid-Micro Rapid-Super Picco-Micro Rapid-Duro RCX, RMX, PMX Angle in degrees 85 85 60 85 65 80 ...
... travel limiting screws with the grinding wheel. If side plate angle is behind the next cutter but one. This could cause the chain to check sharpening data. Avoid touching the drive links or tie straps with their knurled nuts. : Release clamping lever. Pull the chain to set motor arm lower.... HOS 13 Chain type Rapid-Standard Rapid-Micro Rapid-Super Picco-Micro Rapid-Duro RCX, RMX, PMX Angle in degrees 85 85 60 85 65 80 ...
Instruction Manual
Page 15
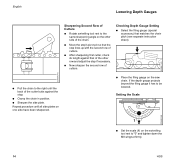
... butts against the stop lines up with the second row of cutters. : After sharpening first cutter, check its length against that matches the chain pitch (see separate instruction... sheet). 523BA072 KN : Pull the chain to the right until all side plates on one side have been sharpened. 55 45 : Place the filing gauge on the swivelling tool rest to be lowered. Setting the Scale 35 ... Move the stop's pivot pin so that the stop . : Clamp the chain in position. : Sharpen the side plate. If the depth gauge projects beyond the filing gauge it has to "0" and tighten down the ...
... butts against the stop lines up with the second row of cutters. : After sharpening first cutter, check its length against that matches the chain pitch (see separate instruction... sheet). 523BA072 KN : Pull the chain to the right until all side plates on one side have been sharpened. 55 45 : Place the filing gauge on the swivelling tool rest to be lowered. Setting the Scale 35 ... Move the stop's pivot pin so that the stop . : Clamp the chain in position. : Sharpen the side plate. If the depth gauge projects beyond the filing gauge it has to "0" and tighten down the ...
Instruction Manual
Page 19
... precautions, operating and maintenance instructions in good time. Damage resulting from improper storage. - Clamping lever and thrust pad - Stop 18 HOS Grinding wheels - Using attachments or sharpening tools not approved by authorized STIHL servicing dealers. Parts Subject to Wear and Tear Some parts of the unit are not carried out as specified, the...
... precautions, operating and maintenance instructions in good time. Damage resulting from improper storage. - Clamping lever and thrust pad - Stop 18 HOS Grinding wheels - Using attachments or sharpening tools not approved by authorized STIHL servicing dealers. Parts Subject to Wear and Tear Some parts of the unit are not carried out as specified, the...

Instruction Manual
Page 20
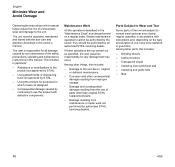
Main Parts of Sharpener 7 4 11 2 1 10 8 65 3 Specifications English Motor Type: Single-phase AC, squirrel-cage motor Operating voltage: 230 V Frequency: 50 Hz Rated current: 1.3 A Power rating: 0.18 kW Motor speed: 2,800 RPM Type of protection: IP 54 (DIN 40050) Equivalent sound power level 1) Lpeq 75 dB (A) 9 522BA000 KN 1 Motor 2 Switch box 3 Swivelling tool rest 4 Motor arm 5 Clamping lever 6 Thrust pad HOS 7 Travel limiting screw 8 Stop 9 Adjusting screw 10 Grinding wheel 11 Stop lug 1) according to EN ISO 11204, measured at user's ear while sharpening a saw chain 19
Main Parts of Sharpener 7 4 11 2 1 10 8 65 3 Specifications English Motor Type: Single-phase AC, squirrel-cage motor Operating voltage: 230 V Frequency: 50 Hz Rated current: 1.3 A Power rating: 0.18 kW Motor speed: 2,800 RPM Type of protection: IP 54 (DIN 40050) Equivalent sound power level 1) Lpeq 75 dB (A) 9 522BA000 KN 1 Motor 2 Switch box 3 Swivelling tool rest 4 Motor arm 5 Clamping lever 6 Thrust pad HOS 7 Travel limiting screw 8 Stop 9 Adjusting screw 10 Grinding wheel 11 Stop lug 1) according to EN ISO 11204, measured at user's ear while sharpening a saw chain 19
Instruction Manual
Page 22
...Management Engineering Services English HOS 21 Certificate of Directives 73/23/EEC, 98/37/EC and 89/336/EEC. KG Badstr. 115 71336 Waiblingen certify that the new machine described below Category: Make: Model: Serial identification: Universal sharpener STIHL HOS 5202 Technical documents deposited... at Waiblingen, September 1,2003 Andreas Stihl AG & Co. KG conforms to the specifications of Conformity Andreas...
...Management Engineering Services English HOS 21 Certificate of Directives 73/23/EEC, 98/37/EC and 89/336/EEC. KG Badstr. 115 71336 Waiblingen certify that the new machine described below Category: Make: Model: Serial identification: Universal sharpener STIHL HOS 5202 Technical documents deposited... at Waiblingen, September 1,2003 Andreas Stihl AG & Co. KG conforms to the specifications of Conformity Andreas...