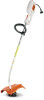
Product Instruction Manual
Page 2
... the Drive Tube 15 Mounting the Loop Handle 16 Mounting the Deflector 16 Mounting Cutting Tools 17 Fitting the Harness 19 Starting 19 Storing the Machine 20 Main Parts and Control 21 Specifications 23 Maintenance and Repairs 23 Addresses 24 STIHl FSE 60 English / USA Allow only persons who understand this manual. !Warning! To...
... the Drive Tube 15 Mounting the Loop Handle 16 Mounting the Deflector 16 Mounting Cutting Tools 17 Fitting the Harness 19 Starting 19 Storing the Machine 20 Main Parts and Control 21 Specifications 23 Maintenance and Repairs 23 Addresses 24 STIHl FSE 60 English / USA Allow only persons who understand this manual. !Warning! To...

Product Instruction Manual
Page 8
..., dexterity or judgment. All the above symptoms appear, seek medical advice immediately. !Warning! According to STIHL´s current knowledge, the electric motor of this tool. When in the development of whitefinger disease. The deflector provided with a pacemaker. FSE 60 7 Be alert. If you will not sustain whitefinger disease or carpal tunnel syndrome. To reduce...
..., dexterity or judgment. All the above symptoms appear, seek medical advice immediately. !Warning! According to STIHL´s current knowledge, the electric motor of this tool. When in the development of whitefinger disease. The deflector provided with a pacemaker. FSE 60 7 Be alert. If you will not sustain whitefinger disease or carpal tunnel syndrome. To reduce...

Product Instruction Manual
Page 12
... the power supply cord, plug, switch, cutting tool and deflector. !Warning! The cutting tool must be properly balanced as trimmer line, and the like. Inspect for loose parts (nuts, screws, etc.) and for proper control and less fatigue in safe operating condition. FSE 60 11 Never carry trimmer by power cable or yank... arrow on the switch. To reduce the risk of the cutting tool. Avoid damage to the electric trimmer. Always ensure that your finger on the deflector shows the correct direction of rotation of unintentional starting work.
... the power supply cord, plug, switch, cutting tool and deflector. !Warning! The cutting tool must be properly balanced as trimmer line, and the like. Inspect for loose parts (nuts, screws, etc.) and for proper control and less fatigue in safe operating condition. FSE 60 11 Never carry trimmer by power cable or yank... arrow on the switch. To reduce the risk of the cutting tool. Avoid damage to the electric trimmer. Always ensure that your finger on the deflector shows the correct direction of rotation of unintentional starting work.

Product Instruction Manual
Page 13
...attempt to use an electric trimmer in good condition and that bystanders are at all times (see chapter on slopes or uneven ground. 12 FSE 60 Keep proper footing and balance at all times. Be extremely cautious when working on mounting the cutting tool of moisture, pitch, oil or ...grease. 002BA056 KN !Warning! To reduce the risk of eye and other than weed or similar soft vegetation. Keep the deflector (and the skirt where appropriate) adjusted properly at least 50 feet (15 m) away. Operate your manual. The cutting tools may be used only ...
...attempt to use an electric trimmer in good condition and that bystanders are at all times (see chapter on slopes or uneven ground. 12 FSE 60 Keep proper footing and balance at all times. Be extremely cautious when working on mounting the cutting tool of moisture, pitch, oil or ...grease. 002BA056 KN !Warning! To reduce the risk of eye and other than weed or similar soft vegetation. Keep the deflector (and the skirt where appropriate) adjusted properly at least 50 feet (15 m) away. Operate your manual. The cutting tools may be used only ...
Product Instruction Manual
Page 14
If the cutting tool or deflector becomes clogged or stuck, always switch off the cutting tool at regular...in the appropriate section of your body. Follow the maintenance, lubrication and repair instructions in this kind. !Warning! FSE 60 13 Use the correct tool for maintenance and repair. Grass, weeds, etc. Check for alignment of moving parts, ...normally to be properly repaired or replaced by qualified service personnel. !Warning! Use only identical STIHL replacement parts for the job. STIHL parts may shatter at the rate for which it when picking up or holding the trimmer...
If the cutting tool or deflector becomes clogged or stuck, always switch off the cutting tool at regular...in the appropriate section of your body. Follow the maintenance, lubrication and repair instructions in this kind. !Warning! FSE 60 13 Use the correct tool for maintenance and repair. Grass, weeds, etc. Check for alignment of moving parts, ...normally to be properly repaired or replaced by qualified service personnel. !Warning! Use only identical STIHL replacement parts for the job. STIHL parts may shatter at the rate for which it when picking up or holding the trimmer...
Product Instruction Manual
Page 16
... equipped with mowing line larger than the intended diameter. To reduce the risk of serious injury, never use with a line-limiting blade in the deflector in the housing. STIHL Autocut 5-2 mowing head Nylon cutting cord advances automatically when tapped against the ground. !Warning Do not use wire or metal-reinforced line or... illustration of the various cutting tools and instructions on proper mounting see "Parts and Controls" chapter of this manual). !Warning! Using the mowing heads The STIHL Autocut mowing head produces a clean and tidy finish. FSE 60 15
... equipped with mowing line larger than the intended diameter. To reduce the risk of serious injury, never use with a line-limiting blade in the deflector in the housing. STIHL Autocut 5-2 mowing head Nylon cutting cord advances automatically when tapped against the ground. !Warning Do not use wire or metal-reinforced line or... illustration of the various cutting tools and instructions on proper mounting see "Parts and Controls" chapter of this manual). !Warning! Using the mowing heads The STIHL Autocut mowing head produces a clean and tidy finish. FSE 60 15

Product Instruction Manual
Page 17
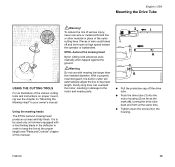
238BA003 KN English / USA Mounting the Loop Handle Mounting the Deflector A 1 2 Moving loop handle to most comfortable position : Loosen the screw (4). : Slide the loop handle along the drive tube to the required position. : Tighten the screw ...) in front of the control handle (2). : Insert the hex nut (3) in the hex recess on the deflector. : Make sure the holes line up. : Insert and tighten down screw (4). 238BA004 KN 16 FSE 60 Tighten down firmly. 4 3 : Push deflector (1) onto clamp (2) as far as stop. : Fit locknut (3) in the loop handle and fit screw (4) with...
238BA003 KN English / USA Mounting the Loop Handle Mounting the Deflector A 1 2 Moving loop handle to most comfortable position : Loosen the screw (4). : Slide the loop handle along the drive tube to the required position. : Tighten the screw ...) in front of the control handle (2). : Insert the hex nut (3) in the hex recess on the deflector. : Make sure the holes line up. : Insert and tighten down screw (4). 238BA004 KN 16 FSE 60 Tighten down firmly. 4 3 : Push deflector (1) onto clamp (2) as far as stop. : Fit locknut (3) in the loop handle and fit screw (4) with...

Product Instruction Manual
Page 19
...LINE 2 2 1 Mounting STIHL AutoCut C 5-2 Mowing Head : Slide the mowing head (1) over the shaft (2) and engage hexagon recess (3) on external hexagon (4). : Screw the spool (5) clockwise until the two arrow points are at the same time. : Rotate cap as far as stop and rotate it on the deflector (2) trims surplus line ... operates only if both lines are in the spool, press it down as far as stop and tighten down by hand. Adjusting Nylon Line STIHL AutoCut : Hold the rotating mowing head horizontal to the correct length. Avoid tapping the head more than once. tap it clockwise at least ...
...LINE 2 2 1 Mounting STIHL AutoCut C 5-2 Mowing Head : Slide the mowing head (1) over the shaft (2) and engage hexagon recess (3) on external hexagon (4). : Screw the spool (5) clockwise until the two arrow points are at the same time. : Rotate cap as far as stop and rotate it on the deflector (2) trims surplus line ... operates only if both lines are in the spool, press it down as far as stop and tighten down by hand. Adjusting Nylon Line STIHL AutoCut : Hold the rotating mowing head horizontal to the correct length. Avoid tapping the head more than once. tap it clockwise at least ...

Product Instruction Manual
Page 22
Main Parts and Control 3 4 2 5 6 English / USA 1 Power supply cord 2 Trigger switch 3 Starting lockout lever 4 Carrying loop 1 5 Loop handle 6 Drive tube 238BA011 KN 8 7 9 FSE 60 238BA012 KN 7 Mowing head 8 Line length limiter blade 9 Deflector 10 10 Strain relief 238BA013 KN 21
Main Parts and Control 3 4 2 5 6 English / USA 1 Power supply cord 2 Trigger switch 3 Starting lockout lever 4 Carrying loop 1 5 Loop handle 6 Drive tube 238BA011 KN 8 7 9 FSE 60 238BA012 KN 7 Mowing head 8 Line length limiter blade 9 Deflector 10 10 Strain relief 238BA013 KN 21

Product Instruction Manual
Page 23
... For easy control of extension cord receptacles and trimmer plug. 22 FSE 60 The mowing head is designed to supplement a lawn mower. 8 = Line length limiter blade. To switch the machine "on" and "off excess nylon line. 9= Deflector. Must be depressed before the trigger switch can be activated. 4... = Carrying loop. The deflector is intended to reduce the risk of injury from foreign objects flung backwards toward the operator by...
... For easy control of extension cord receptacles and trimmer plug. 22 FSE 60 The mowing head is designed to supplement a lawn mower. 8 = Line length limiter blade. To switch the machine "on" and "off excess nylon line. 9= Deflector. Must be depressed before the trigger switch can be activated. 4... = Carrying loop. The deflector is intended to reduce the risk of injury from foreign objects flung backwards toward the operator by...
Product Instruction Manual
Page 24
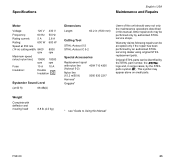
...only the maintenance operations described in some cases, by the STlHL part number, the STIHl logo and, in this manual. Specifications English / USA Maintenance and Repairs Motor Voltage: 120 V 230 V Frequency: 60 Hz 50 Hz Rating current: 5 A 2,6 A Rating: 600 W 600 W...Level (at 50 ft) 66 dB(A) Dimensions Length: 60.2 in (1530 mm) Cutting Tool STIHL-Autocut 5-2 STIHL-Autocut C 5-2 Special Accessories Replacement spool with deflector and mowing head 8.8 lb (4,0 kg) * see "Guide to Using this Manual" FSE 60 23 Warranty claims following repairs can be performed only by...
...only the maintenance operations described in some cases, by the STlHL part number, the STIHl logo and, in this manual. Specifications English / USA Maintenance and Repairs Motor Voltage: 120 V 230 V Frequency: 60 Hz 50 Hz Rating current: 5 A 2,6 A Rating: 600 W 600 W...Level (at 50 ft) 66 dB(A) Dimensions Length: 60.2 in (1530 mm) Cutting Tool STIHL-Autocut 5-2 STIHL-Autocut C 5-2 Special Accessories Replacement spool with deflector and mowing head 8.8 lb (4,0 kg) * see "Guide to Using this Manual" FSE 60 23 Warranty claims following repairs can be performed only by...

