
Instruction Manual
Page 3
... Work 16 8.1 Preparing the Trimmer for Operation 16 9 Charging the Battery 17 9.1 Setting up the Charger 17 9.2 Charging 17 10 LED Diagnostics and Acoustic Signals 18 10.1 STIHL AP Battery 18 10.2 STIHL AR Backpack Battery 19 11 Assembling the Trimmer 20 11.1 Mounting the Loop Handle 20...Trimmer and Battery 29 19.1 Trimmer 29 19.2 Battery 29 20 Cleaning 29 20.1 Cleaning the Trimmer and Battery 29 21 Inspection and Maintenance 30 21.1 Inspecting and Maintaining the Trimmer 30 22 Troubleshooting Guide 31 22.1 Trimmer and Battery 31 23 Specifications 33 23.1 STIHL FSA 86 R 33 ...
... Work 16 8.1 Preparing the Trimmer for Operation 16 9 Charging the Battery 17 9.1 Setting up the Charger 17 9.2 Charging 17 10 LED Diagnostics and Acoustic Signals 18 10.1 STIHL AP Battery 18 10.2 STIHL AR Backpack Battery 19 11 Assembling the Trimmer 20 11.1 Mounting the Loop Handle 20...Trimmer and Battery 29 19.1 Trimmer 29 19.2 Battery 29 20 Cleaning 29 20.1 Cleaning the Trimmer and Battery 29 21 Inspection and Maintenance 30 21.1 Inspecting and Maintaining the Trimmer 30 22 Troubleshooting Guide 31 22.1 Trimmer and Battery 31 23 Specifications 33 23.1 STIHL FSA 86 R 33 ...
Instruction Manual
Page 4
... 23.2 Symbols on the Trimmer and Battery 33 23.3 Engineering Improvements 33 23.4 FCC 15 Compliance Statement 33 24 Approved Deflector and Cutting Attachment Combinations 34 24.1 STIHL FSA 86 R 34 25 Replacement Parts and Equipment 35 25.1 Genuine STIHL Replacement Parts 35 26 Disposal 35 26....1 Disposal of the Power Tool 35 26.2 Battery Recycling 35 27 Limited Warranty 36 27.1 STIHL Incorporated Limited Warranty Policy 36 28...
... 23.2 Symbols on the Trimmer and Battery 33 23.3 Engineering Improvements 33 23.4 FCC 15 Compliance Statement 33 24 Approved Deflector and Cutting Attachment Combinations 34 24.1 STIHL FSA 86 R 34 25 Replacement Parts and Equipment 35 25.1 Genuine STIHL Replacement Parts 35 26 Disposal 35 26....1 Disposal of the Power Tool 35 26.2 Battery Recycling 35 27 Limited Warranty 36 27.1 STIHL Incorporated Limited Warranty Policy 36 28...
Instruction Manual
Page 5
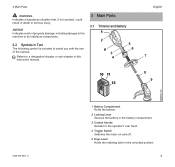
... manual: Refers to a designated chapter or sub-chapter in this instruction manual. 3 Main Parts 3.1 Trimmer and Battery 1 2 5 # 6 3 4 English 7 10 11 12 8 9 0000097271_001 0458-833-8621-A 1 Battery Compartment Holds the battery. 2 Locking Lever Secures the battery in the battery compartment. 3 Control Handle Handle for the operator's rear hand. 4 Trigger Switch Switches the motor on and off...
... manual: Refers to a designated chapter or sub-chapter in this instruction manual. 3 Main Parts 3.1 Trimmer and Battery 1 2 5 # 6 3 4 English 7 10 11 12 8 9 0000097271_001 0458-833-8621-A 1 Battery Compartment Holds the battery. 2 Locking Lever Secures the battery in the battery compartment. 3 Control Handle Handle for the operator's rear hand. 4 Trigger Switch Switches the motor on and off...
Instruction Manual
Page 6
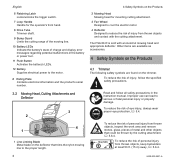
... Limits the cutting range of the mowing line. 10 Battery LEDs Indicate the battery's state of charge and display error messages regarding potential malfunctions in the battery or power tool. 11 Push Button Activates the battery's LEDs. 12 Battery Supplies electrical power to the motor. # Rating Plate Contains...the risk of eye injury, always wear proper eye protection, @ 5.4. 4 1 1 Line Limiting Blade Metal blade on the trimmer. The FSA 86 R is sold with the cutting attachment. Improper use can lead to the proper length. 0000097535_001 To reduce the risk of personal injury from thrown...
... Limits the cutting range of the mowing line. 10 Battery LEDs Indicate the battery's state of charge and display error messages regarding potential malfunctions in the battery or power tool. 11 Push Button Activates the battery's LEDs. 12 Battery Supplies electrical power to the motor. # Rating Plate Contains...the risk of eye injury, always wear proper eye protection, @ 5.4. 4 1 1 Line Limiting Blade Metal blade on the trimmer. The FSA 86 R is sold with the cutting attachment. Improper use can lead to the proper length. 0000097535_001 To reduce the risk of personal injury from thrown...
Instruction Manual
Page 7
... risk of personal injury or property damage from fire, use with mowing heads: The deflector may be used in the battery's instruction manual and the manual for the STIHL tool powered by this manual. 0458-833-8621-A 5 5 IMPORTANT SAFETY INSTRUCTIONS To reduce the risk of injury or... property damage from unintended activation, remove the battery any time the trimmer is not in combination with the PolyCut mowing head. 5 IMPORTANT ...
... risk of personal injury or property damage from fire, use with mowing heads: The deflector may be used in the battery's instruction manual and the manual for the STIHL tool powered by this manual. 0458-833-8621-A 5 5 IMPORTANT SAFETY INSTRUCTIONS To reduce the risk of injury or... property damage from unintended activation, remove the battery any time the trimmer is not in combination with the PolyCut mowing head. 5 IMPORTANT ...
Instruction Manual
Page 8
... it will do the job better and with less likelihood of a risk of injury at the rate for which it is off when inserting the battery. 8) Don't Force Trimmer - Use common sense. Before further use , trimmer should always be followed to determine that for which it was designed...65517; When using electric trimmers, basic safety precautions should be stored indoors in a dry, locked place out of reach of children with the battery removed. 5 IMPORTANT SAFETY INSTRUCTIONS 12)Maintain Trimmer With Care - Do not operate trimmer when you are recommended when working order. 15)Keep ...
... it will do the job better and with less likelihood of a risk of injury at the rate for which it is off when inserting the battery. 8) Don't Force Trimmer - Use common sense. Before further use , trimmer should always be followed to determine that for which it was designed...65517; When using electric trimmers, basic safety precautions should be stored indoors in a dry, locked place out of reach of children with the battery removed. 5 IMPORTANT SAFETY INSTRUCTIONS 12)Maintain Trimmer With Care - Do not operate trimmer when you are recommended when working order. 15)Keep ...

Instruction Manual
Page 9
To reduce the risk of personal injury from all foreign objects thrown or flung by a STIHL AR series backpack battery in combination with an AP Adapter. English 5.4 Personal Protective Equipment WARNING ■ Even a properly installed and adjusted deflector may not protect... or close-fitting protective glasses with adequate side protection that may be aggravated by a STIHL AP series battery. To reduce the risk of control: - Wear overalls or long pants made of heavy material to STIHL's current knowledge, the electric motor of this trimmer. If there is very important. ...
To reduce the risk of personal injury from all foreign objects thrown or flung by a STIHL AR series backpack battery in combination with an AP Adapter. English 5.4 Personal Protective Equipment WARNING ■ Even a properly installed and adjusted deflector may not protect... or close-fitting protective glasses with adequate side protection that may be aggravated by a STIHL AP series battery. To reduce the risk of control: - Wear overalls or long pants made of heavy material to STIHL's current knowledge, the electric motor of this trimmer. If there is very important. ...

Instruction Manual
Page 10
...risk of personal injury and property damage. - Cut grass and similar material only. Always release the trigger switch and remove the battery before continuing work gloves made of leather or another wearresistant material when handling the trimmer. 5.5 Trimmer WARNING ■ To reduce the...other types of personal injury to change the deflector. Use for the type of your hands: - Never operate the trimmer with your STIHL trimmer, their use . - English 5 IMPORTANT SAFETY INSTRUCTIONS - Wear substantial footwear with this trimmer in use may increase the risk ...
...risk of personal injury and property damage. - Cut grass and similar material only. Always release the trigger switch and remove the battery before continuing work gloves made of leather or another wearresistant material when handling the trimmer. 5.5 Trimmer WARNING ■ To reduce the...other types of personal injury to change the deflector. Use for the type of your hands: - Never operate the trimmer with your STIHL trimmer, their use . - English 5 IMPORTANT SAFETY INSTRUCTIONS - Wear substantial footwear with this trimmer in use may increase the risk ...

Instruction Manual
Page 11
...screws, etc.) and for error messages, @ 22. - Take the trimmer and battery to your authorized STIHL servicing dealer to match your authorized STIHL servicing dealer. ■ If the trimmer or battery is damaged, not working properly, has been left outdoors or dropped into water or...personal injury and property damage. - Failure to use or charge a malfunctioning, damaged, cracked, leaking or deformed battery. - Before replacing: - STIHL recommends that the battery has not been damaged. Never use the proper parts to the trimmer without the proper installation of all required ...
...screws, etc.) and for error messages, @ 22. - Take the trimmer and battery to your authorized STIHL servicing dealer to match your authorized STIHL servicing dealer. ■ If the trimmer or battery is damaged, not working properly, has been left outdoors or dropped into water or...personal injury and property damage. - Failure to use or charge a malfunctioning, damaged, cracked, leaking or deformed battery. - Before replacing: - STIHL recommends that the battery has not been damaged. Never use the proper parts to the trimmer without the proper installation of all required ...
Instruction Manual
Page 12
...and keep clean. - Be sure the retaining latch is damaged or does not function properly, take the following steps to your authorized STIHL servicing dealer. Never carry the trimmer with the cutting attachment: - Read and follow the instructions on switching on the trigger switch.... - To reduce the risk of serious personal injury or death. - Remove the battery before assembling, transporting, adjusting, inspecting, cleaning, servicing, maintaining or storing the trimmer and any part is in the trimmer. ■ Before...
...and keep clean. - Be sure the retaining latch is damaged or does not function properly, take the following steps to your authorized STIHL servicing dealer. Never carry the trimmer with the cutting attachment: - Read and follow the instructions on switching on the trigger switch.... - To reduce the risk of serious personal injury or death. - Remove the battery before assembling, transporting, adjusting, inspecting, cleaning, servicing, maintaining or storing the trimmer and any part is in the trimmer. ■ Before...
Instruction Manual
Page 13
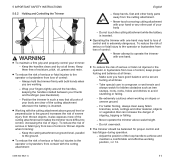
... for proper control and less fatigue during operation. - Keep hands, feet and other part of the cutting attachment whenever the battery is extremely dangerous. Do not touch the cutting attachment while the battery is inserted. ■ Operating the trimmer with one hand. ■ To reduce the risk of serious or fatal cut...
... for proper control and less fatigue during operation. - Keep hands, feet and other part of the cutting attachment whenever the battery is extremely dangerous. Do not touch the cutting attachment while the battery is inserted. ■ Operating the trimmer with one hand. ■ To reduce the risk of serious or fatal cut...
Instruction Manual
Page 14
Switch off the trimmer and remove the battery during favorable daylight conditions. - When respirable dust or other combustible materials and substances are...allowed in the area where it is coated with which you are present. - Never leave the trimmer unattended when the battery is a one-person machine. - To the extent possible, operate the trimmer so that is approved by NIOSH and rated...65517; Sparks generated from the operator. - Switch off the motor immediately and remove the battery. ■ The cutting attachment continues to have an allergic or asthmatic reaction.
Switch off the trimmer and remove the battery during favorable daylight conditions. - When respirable dust or other combustible materials and substances are...allowed in the area where it is coated with which you are present. - Never leave the trimmer unattended when the battery is a one-person machine. - To the extent possible, operate the trimmer so that is approved by NIOSH and rated...65517; Sparks generated from the operator. - Switch off the motor immediately and remove the battery. ■ The cutting attachment continues to have an allergic or asthmatic reaction.
Instruction Manual
Page 15
...injuries from the work area. Switch off the motor and remove the battery before inspecting a mowing head, cutting attachment or deflector. Keep the deflector properly adjusted at regular intervals, but only after removing the battery. 0458-833-8621-A 13 Never touch the cutting attachment or mowing ...head with your body while the battery is inserted, even when the cutting attachment is not moving. Switch off the ...
...injuries from the work area. Switch off the motor and remove the battery before inspecting a mowing head, cutting attachment or deflector. Keep the deflector properly adjusted at regular intervals, but only after removing the battery. 0458-833-8621-A 13 Never touch the cutting attachment or mowing ...head with your body while the battery is inserted, even when the cutting attachment is not moving. Switch off the ...
Instruction Manual
Page 16
... and mowing head before starting work immediately and have the trimmer inspected by your authorized STIHL servicing dealer. - Never incinerate or place the battery on the battery and all warnings and instructions that may result in fire, explosion and personal injury and...condition of any time trimming behavior changes during use or charge a malfunctioning, damaged, cracked, leaking or deformed battery. - Use STIHL AR and AP series batteries only to power compatible STIHL power tools. ■ Use of electrocution: - English ■ A damaged or loose cutting attachment or mowing...
... and mowing head before starting work immediately and have the trimmer inspected by your authorized STIHL servicing dealer. - Never incinerate or place the battery on the battery and all warnings and instructions that may result in fire, explosion and personal injury and...condition of any time trimming behavior changes during use or charge a malfunctioning, damaged, cracked, leaking or deformed battery. - Use STIHL AR and AP series batteries only to power compatible STIHL power tools. ■ Use of electrocution: - English ■ A damaged or loose cutting attachment or mowing...
Instruction Manual
Page 17
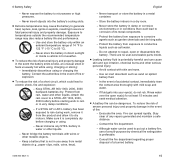
...and water. - Evacuate the area. Never insert objects into your eye(s): do not rub. Keep STIHL AR 900,1000, 2000, 3000 backpack batteries dry. If a STIHL AP or AR L battery has been exposed to corrosion of accidental contact, immediately rinse the contact area thoroughly with wires or...safe distance. - To reduce the risk of fire: - Stay clear of a burned battery. 0458-833-8621-A 15 Never expose the battery to a STIHL AR 1000, 2000, 3000 battery before charging or using or charging the battery. Make sure it to electric shock, fire and explosion: - Never transport or store...
...and water. - Evacuate the area. Never insert objects into your eye(s): do not rub. Keep STIHL AR 900,1000, 2000, 3000 backpack batteries dry. If a STIHL AP or AR L battery has been exposed to corrosion of accidental contact, immediately rinse the contact area thoroughly with wires or...safe distance. - To reduce the risk of fire: - Stay clear of a burned battery. 0458-833-8621-A 15 Never expose the battery to a STIHL AR 1000, 2000, 3000 battery before charging or using or charging the battery. Make sure it to electric shock, fire and explosion: - Never transport or store...
Instruction Manual
Page 18
... attempt to the power tool and an increased risk of foreign matter. STIHL recommends that all repair or replacement work , before storing, and any cleaning, maintenance or repair work be used for Operation Before starting work: ► Fully charge the battery, @ 9. ► Mount the trimmer's loop handle, @ 11.1. ► Mount a deflector that...
... attempt to the power tool and an increased risk of foreign matter. STIHL recommends that all repair or replacement work , before storing, and any cleaning, maintenance or repair work be used for Operation Before starting work: ► Fully charge the battery, @ 9. ► Mount the trimmer's loop handle, @ 11.1. ► Mount a deflector that...
Instruction Manual
Page 19
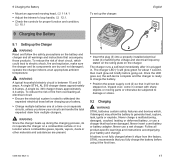
... Read and follow the safety precautions on the battery and charger and all product-specific warnings and instructions accompanying your battery and charger. The charger runs a self-test immediately after it the first time. 0458-833-8621-A 17 STIHL recommends that it will not be stepped on,... tripped over, come in contact with sharp objects or moving parts or otherwise be subjected to damage or stress. 9.2 Charging WARNING STIHL batteries contain safety features and devices which could lead to generate heat, rupture, leak, ignite or explode. To reduce the risk of short circuit...
... Read and follow the safety precautions on the battery and charger and all product-specific warnings and instructions accompanying your battery and charger. The charger runs a self-test immediately after it the first time. 0458-833-8621-A 17 STIHL recommends that it will not be stepped on,... tripped over, come in contact with sharp objects or moving parts or otherwise be subjected to damage or stress. 9.2 Charging WARNING STIHL batteries contain safety features and devices which could lead to generate heat, rupture, leak, ignite or explode. To reduce the risk of short circuit...
Instruction Manual
Page 20
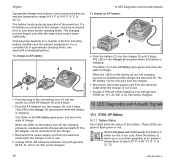
...charging. If one LED glows red continuously: the battery is not in use . ► Charge STIHL AR backpack batteries only with genuine STIHL AL 101, AL 300 or AL 500 series chargers. 10 LED Diagnostics and Acoustic Signals 10.1 STIHL AP Battery 10.1.1 Battery Status Four LEDs show the state of charge. ... Adapter can glow or flash green or red. The LEDs (1) on the battery turn off, the charging process is charging. If a hot battery is not in use . ► Charge STIHL AP series batteries only with genuine STIHL AL 300 or AL 500 series chargers. 0000-GXX-2680-A0 0000-GXX-3918...
...charging. If one LED glows red continuously: the battery is not in use . ► Charge STIHL AR backpack batteries only with genuine STIHL AL 101, AL 300 or AL 500 series chargers. 10 LED Diagnostics and Acoustic Signals 10.1 STIHL AP Battery 10.1.1 Battery Status Four LEDs show the state of charge. ... Adapter can glow or flash green or red. The LEDs (1) on the battery turn off, the charging process is charging. If a hot battery is not in use . ► Charge STIHL AP series batteries only with genuine STIHL AL 300 or AL 500 series chargers. 0000-GXX-2680-A0 0000-GXX-3918...
Instruction Manual
Page 21
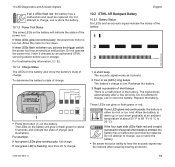
... The acoustic signal works as it checked by an authorized STIHL servicing dealer before use or store the battery. ► Be aware that your ability to charge, use or store the battery. 10.1.2 Power Tool Status The same LEDs on the battery also show the battery's state of short beeps There is too hot. Do... not operate the power tool. The LEDs on the battery. English 10.2 STIHL AR Backpack Battery 10.2.1 Battery Status Six LEDs and an acoustic signal indicate the status of about 5 seconds and indicate the state of charge: 80-100% 60-80% 40-60% ...
... The acoustic signal works as it checked by an authorized STIHL servicing dealer before use or store the battery. ► Be aware that your ability to charge, use or store the battery. 10.1.2 Power Tool Status The same LEDs on the battery also show the battery's state of short beeps There is too hot. Do... not operate the power tool. The LEDs on the battery. English 10.2 STIHL AR Backpack Battery 10.2.1 Battery Status Six LEDs and an acoustic signal indicate the status of about 5 seconds and indicate the state of charge: 80-100% 60-80% 40-60% ...
Instruction Manual
Page 22
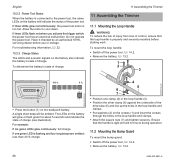
... an electrical malfunction. Do not operate the power tool. For troubleshooting information, @ 22. 10.2.3 Charge Status The LEDs and acoustic signals on the battery will glow or flash green for about 5 seconds and indicate the state of the drive tube (5) and line up the holes in the loop handle... indicate the status of charge. If one green LED is too hot. Have it checked by an authorized STIHL servicing dealer before starting work. To determine the battery's state of charge: 11 Assembling the Trimmer 11 Assembling the Trimmer 11.1 Mounting the Loop Handle WARNING To reduce the risk of...
... an electrical malfunction. Do not operate the power tool. For troubleshooting information, @ 22. 10.2.3 Charge Status The LEDs and acoustic signals on the battery will glow or flash green for about 5 seconds and indicate the state of the drive tube (5) and line up the holes in the loop handle... indicate the status of charge. If one green LED is too hot. Have it checked by an authorized STIHL servicing dealer before starting work. To determine the battery's state of charge: 11 Assembling the Trimmer 11 Assembling the Trimmer 11.1 Mounting the Loop Handle WARNING To reduce the risk of...
