
Instruction Manual
Page 3
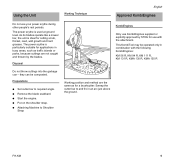
... be observed to operate this Manual 2 Safety Precautions and Working Techniques 3 Using the Unit 9 Approved KombiEngines 9 Mounting the KombiTool 10 Assembling the Unit 10 Adjusting the Cutter Bar 11 Fitting the Harness 12 Starting / Stopping the Engine 13 Lubricating the Gearbox 14 Storing the Machine 15 Maintenance and Care 15 Sharpening Instructions 15 Main Parts 16 Specifications 17 Maintenance and Repairs 17 Disposal 18...
... be observed to operate this Manual 2 Safety Precautions and Working Techniques 3 Using the Unit 9 Approved KombiEngines 9 Mounting the KombiTool 10 Assembling the Unit 10 Adjusting the Cutter Bar 11 Fitting the Harness 12 Starting / Stopping the Engine 13 Lubricating the Gearbox 14 Storing the Machine 15 Maintenance and Care 15 Sharpening Instructions 15 Main Parts 16 Specifications 17 Maintenance and Repairs 17 Disposal 18...
Instruction Manual
Page 4
... appear in this manual. Guide to Using this Manual Pictograms All the pictograms attached to the machine or its products. Example: N Loosen the screw (1). In addition to produce a power tool. DANGER Indicates a hazardous situation that require your area for the power tool. English KombiSystem In the STIHL KombiSystem a number of different KombiEngines and KombiTools can be combined to the operating instructions, this manual may contain...
... appear in this manual. Guide to Using this Manual Pictograms All the pictograms attached to the machine or its products. Example: N Loosen the screw (1). In addition to produce a power tool. DANGER Indicates a hazardous situation that require your area for the power tool. English KombiSystem In the STIHL KombiSystem a number of different KombiEngines and KombiTools can be combined to the operating instructions, this manual may contain...
Instruction Manual
Page 5
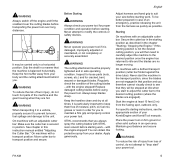
.... Different models may be observed to the use of control. Safety Precautions and Working Techniques Because a KombiEngine equipped with a power scythe KombiTool is a high-speed, fast-cutting power tool with the power scythe KombiTool only for cutting grass, weeds, hedges, shrubs, scrub, bushes and similar material. WARNING Do not lend or rent your power tool without the instruction manuals of your power tool. Use your KombiEngine equipped with sharp cutting blades, special...
.... Different models may be observed to the use of control. Safety Precautions and Working Techniques Because a KombiEngine equipped with a power scythe KombiTool is a high-speed, fast-cutting power tool with the power scythe KombiTool only for cutting grass, weeds, hedges, shrubs, scrub, bushes and similar material. WARNING Do not lend or rent your power tool without the instruction manuals of your power tool. Use your KombiEngine equipped with sharp cutting blades, special...
Instruction Manual
Page 6
... the cutting blades moving parts of the unit. Wear sound barriers (ear plugs or ear mufflers) to protect your hands. Clothing must be extremely dangerous. Do not wear shorts, sandals or go barefoot. Only attachments supplied by STIHL or expressly approved by your STIHL servicing dealer. Check in any way. In case of doubt, have their use with the specific STIHL KombiEngine model are...
... the cutting blades moving parts of the unit. Wear sound barriers (ear plugs or ear mufflers) to protect your hands. Clothing must be extremely dangerous. Do not wear shorts, sandals or go barefoot. Only attachments supplied by STIHL or expressly approved by your STIHL servicing dealer. Check in any way. In case of doubt, have their use with the specific STIHL KombiEngine model are...
Instruction Manual
Page 7
... chapter "Starting / Stopping the Engine." Replace damaged cutting blades before transporting the power tool over long distances. If this instruction manual entitled "Adjusting the Cutter Bar." It may be properly tightened and in order for cracked, bent, warped or damaged blades. Grip the shaft in a manner that you will be better prepared in case of control, do not touch hot parts of moisture, pitch, oil, fuel mix, grease or...
... chapter "Starting / Stopping the Engine." Replace damaged cutting blades before transporting the power tool over long distances. If this instruction manual entitled "Adjusting the Cutter Bar." It may be properly tightened and in order for cracked, bent, warped or damaged blades. Grip the shaft in a manner that you will be better prepared in case of control, do not touch hot parts of moisture, pitch, oil, fuel mix, grease or...
Instruction Manual
Page 8
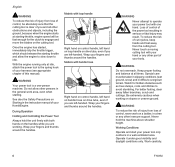
... the instruction manual of your KombiEngine. Never touch a moving cutting tool with loop handle Right hand on control handle, left hand on loop handle on the handles while you are left hand on handle hose on slopes or uneven ground. Once the engine has started, immediately blip the throttle trigger, which should release the starting . Wrap your body. WARNING Do not overreach. Work carefully. 6 FH-KM English...
... the instruction manual of your KombiEngine. Never touch a moving cutting tool with loop handle Right hand on control handle, left hand on loop handle on the handles while you are left hand on handle hose on slopes or uneven ground. Once the engine has started, immediately blip the throttle trigger, which should release the starting . Wrap your body. WARNING Do not overreach. Work carefully. 6 FH-KM English...
Instruction Manual
Page 9
... will cause the clutch to slip continuously. Operating Instructions WARNING Do not operate your power tool using the starting throttle lock, as you are approached. move for stones, glass, fence wire, metal, trash or other illnesses. which could damage the cutting attachment and may cause blades to dust ("particulate matter"). WARNING On units with an adjustable cutter bar: Carefully adjust the cutter bar to the desired cutting position.To reduce...
... will cause the clutch to slip continuously. Operating Instructions WARNING Do not operate your power tool using the starting throttle lock, as you are approached. move for stones, glass, fence wire, metal, trash or other illnesses. which could damage the cutting attachment and may cause blades to dust ("particulate matter"). WARNING On units with an adjustable cutter bar: Carefully adjust the cutter bar to the desired cutting position.To reduce...
Instruction Manual
Page 10
..., never operate this purpose. Check condition and tightness, look for cracks. - Spray the blades with a pressure washer. Use of non-STIHL parts may cause parts of children. 8 FH-KM Have such work or cleaning the power tool. WARNING Never repair damaged cutting attachments by welding, straightening or modifying the shape. Wear gloves when handling or performing maintenance on blades. DANGER Your power tool is not insulated against electric shock. English your STIHL servicing dealer...
..., never operate this purpose. Check condition and tightness, look for cracks. - Spray the blades with a pressure washer. Use of non-STIHL parts may cause parts of children. 8 FH-KM Have such work or cleaning the power tool. WARNING Never repair damaged cutting attachments by welding, straightening or modifying the shape. Wear gloves when handling or performing maintenance on blades. DANGER Your power tool is not insulated against electric shock. English your STIHL servicing dealer...
Instruction Manual
Page 11
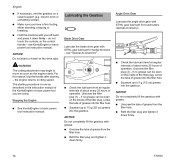
... or parks, because cuttings are not caught and thrown by STIHL for cutting scrub, thicket, reed, wild growth and hard grasses. Preparations N Set cutter bar to and fro in combination with the attachment. N Start the engine. FH-KM 9 they can - This KombiTool may be composted. The power scythe is particularly suitable for a brushcutter: Sweep the cutter bar to required angle. Using the Unit Working...
... or parks, because cuttings are not caught and thrown by STIHL for cutting scrub, thicket, reed, wild growth and hard grasses. Preparations N Set cutter bar to and fro in combination with the attachment. N Start the engine. FH-KM 9 they can - This KombiTool may be composted. The power scythe is particularly suitable for a brushcutter: Sweep the cutter bar to required angle. Using the Unit Working...

Instruction Manual
Page 12
... 10 413BA014 KN 3 4 When correctly installed, the red line (3) (arrow point) must be flush with the end of the coupling sleeve. 0000-GXX-1681-A0 English Mounting the KombiTool Assembling the Unit Mounting the Gearbox 2 1 Removing the Potective Cap If a cap is fitted on the end of the KombiTool's or basic power tool's drive tube: 002BA326 KN N Push the...
... 10 413BA014 KN 3 4 When correctly installed, the red line (3) (arrow point) must be flush with the end of the coupling sleeve. 0000-GXX-1681-A0 English Mounting the KombiTool Assembling the Unit Mounting the Gearbox 2 1 Removing the Potective Cap If a cap is fitted on the end of the KombiTool's or basic power tool's drive tube: 002BA326 KN N Push the...

Instruction Manual
Page 13
... the blades while making adjustments. 2 3 1 N Pull back the sliding sleeve (1) and use the lever (2) to adjust the joint by one or several holes. Transport Position The cutter bar can be folded flat against the drive tube and locked in position to 90° (right angle facing down the clamp screws moderately. and fit the blade scabbard before 0000-GXX-1685-A0 FH-KM 11 engine at...
... the blades while making adjustments. 2 3 1 N Pull back the sliding sleeve (1) and use the lever (2) to adjust the joint by one or several holes. Transport Position The cutter bar can be folded flat against the drive tube and locked in position to 90° (right angle facing down the clamp screws moderately. and fit the blade scabbard before 0000-GXX-1685-A0 FH-KM 11 engine at...

Instruction Manual
Page 14
... KN 12 FH-KM in direction of the harness and carabiner (spring hook) depend on the shoulder strap (1). N Fit the blade scabbard. N Release the sliding sleeve (1) and make sure the lock pin engages the quadrant (3). 0000-GXX-1686-A0 Fitting the Harness The type and style of drive tube - English moving the cutter bar to the transport position or from...
... KN 12 FH-KM in direction of the harness and carabiner (spring hook) depend on the shoulder strap (1). N Fit the blade scabbard. N Release the sliding sleeve (1) and make sure the lock pin engages the quadrant (3). 0000-GXX-1686-A0 Fitting the Harness The type and style of drive tube - English moving the cutter bar to the transport position or from...
Instruction Manual
Page 15
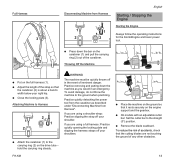
... 1 1 2 2 English Starting / Stopping the Engine Starting the Engine Always follow the operating instructions for the KombiEngine and basic power tool. 002BA310 KN N Press down the bar on the engine support and the gearbox. N Remove the blade scabbard. To reduce the risk of accidents, check that the cutting blades are using a full harness: Practice quickly opening the locking plate and slipping the harness straps off your shoulders. N Adjust the length...
... 1 1 2 2 English Starting / Stopping the Engine Starting the Engine Always follow the operating instructions for the KombiEngine and basic power tool. 002BA310 KN N Press down the bar on the engine support and the gearbox. N Remove the blade scabbard. To reduce the risk of accidents, check that the cutting blades are using a full harness: Practice quickly opening the locking plate and slipping the harness straps off your shoulders. N Adjust the length...
Instruction Manual
Page 16
... support (e.g. N Squeeze up to 5 g (1/5 oz) grease into the gearbox. Lubricating the Gearbox Blade Drive Gear Lubricate the blade drive gear with STIHL gear lubricant for brushcutters (special accessory). 2 N Check the lubricant level at regular intervals of about every 25 hours of grease into the filler hole. N Squeeze up to 10 g (2/5 oz) grease into the gearbox. WARNING The cutting attachment may begin to idling speed. see KombiEngine or basic power tool instruction manual...
... support (e.g. N Squeeze up to 5 g (1/5 oz) grease into the gearbox. Lubricating the Gearbox Blade Drive Gear Lubricate the blade drive gear with STIHL gear lubricant for brushcutters (special accessory). 2 N Check the lubricant level at regular intervals of about every 25 hours of grease into the filler hole. N Squeeze up to 10 g (2/5 oz) grease into the gearbox. WARNING The cutting attachment may begin to idling speed. see KombiEngine or basic power tool instruction manual...
Instruction Manual
Page 17
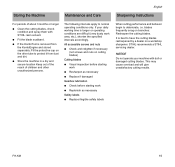
... cutting results. FH-KM 15 English Storing the Machine Maintenance and Care Sharpening Instructions For periods of children and other unauthorized persons. N Fit the blade scabbard. N Store the machine in a dry and secure location Keep out of the reach of about 3 months or longer N Clean the cutting blades, check condition and spray them with dull or damaged cutting blades. It is longer or operating...
... cutting results. FH-KM 15 English Storing the Machine Maintenance and Care Sharpening Instructions For periods of children and other unauthorized persons. N Fit the blade scabbard. N Store the machine in a dry and secure location Keep out of the reach of about 3 months or longer N Clean the cutting blades, check condition and spray them with dull or damaged cutting blades. It is longer or operating...
Instruction Manual
Page 19
... cases, by authorized STIHL servicing dealers using genuine STIHL replacement parts. Genuine STIHL parts can be performed only by the STIHL parts symbol K. The symbol may appear alone on small parts. For repairs of any component of drive shaft to the blade drive gear. 5 Adjusting Lever Used to set cutter bar to horizontal FH-KM: 2.1 kg (4.6 lbs) English Maintenance and Repairs Users of this unit should carry out only the maintenance operations described in coupling sleeve. Specifications Cutting blades Type: Cutting length: Tooth spacing...
... cases, by authorized STIHL servicing dealers using genuine STIHL replacement parts. Genuine STIHL parts can be performed only by the STIHL parts symbol K. The symbol may appear alone on small parts. For repairs of any component of drive shaft to the blade drive gear. 5 Adjusting Lever Used to set cutter bar to horizontal FH-KM: 2.1 kg (4.6 lbs) English Maintenance and Repairs Users of this unit should carry out only the maintenance operations described in coupling sleeve. Specifications Cutting blades Type: Cutting length: Tooth spacing...
Instruction Manual
Page 20
...® iCademy® MAGNUM® MasterWrench Service® MotoMix® OILOMATIC® 4-MIX ™ BioPlus ™ Easy2Start ™ EasySpool ™ ElastoStart ™ Ematic ™ FixCut ™ IntelliCarb ™ Master Control Lever ™ Micro ™ Pro Mark ™ Quiet Line ™ STIHL M-Tronic ™ 18 FH-KM English Disposal Trademarks Observe all country-specific waste disposal rules and regulations. Registrations #2,821...
...® iCademy® MAGNUM® MasterWrench Service® MotoMix® OILOMATIC® 4-MIX ™ BioPlus ™ Easy2Start ™ EasySpool ™ ElastoStart ™ Ematic ™ FixCut ™ IntelliCarb ™ Master Control Lever ™ Micro ™ Pro Mark ™ Quiet Line ™ STIHL M-Tronic ™ 18 FH-KM English Disposal Trademarks Observe all country-specific waste disposal rules and regulations. Registrations #2,821...

Instruction Manual
Page 21
STIHL OUTFITTERS ™ STIHL PICCO ™ STIHL PolyCut ™ STIHL PowerSweep ™ STIHL Precision Series ™ STIHL RAPID ™ STIHL SuperCut ™ TapAction ™ TrimCut ™ This listing of ANDREAS STIHL AG & Co. FH-KM English 19 KG, Waiblingen is subject to change. Any unauthorized use of these trademarks without the express written consent of trademarks is strictly prohibited.
STIHL OUTFITTERS ™ STIHL PICCO ™ STIHL PolyCut ™ STIHL PowerSweep ™ STIHL Precision Series ™ STIHL RAPID ™ STIHL SuperCut ™ TapAction ™ TrimCut ™ This listing of ANDREAS STIHL AG & Co. FH-KM English 19 KG, Waiblingen is subject to change. Any unauthorized use of these trademarks without the express written consent of trademarks is strictly prohibited.


