Operating Instructions
Page 1
ZS-SN10 ©2005 Sony Corporation 2-593-810-12 (1) Personal Audio System Operating Instructions This manual describes how to use the player. For the supplied software SonicStage, please see "Installation/Operating Guide."
ZS-SN10 ©2005 Sony Corporation 2-593-810-12 (1) Personal Audio System Operating Instructions This manual describes how to use the player. For the supplied software SonicStage, please see "Installation/Operating Guide."
Operating Instructions
Page 2
... relocate the receiving antenna. - Increase the separation between the equipment and receiver. - CAUTION The use of the following two conditions: (1) this device may cause undesired operation. Connect the equipment into an outlet on , the user is intended to alert the user to radio communications. Record the serial number in the literature accompanying the appliance. Information For customers in the United...
... relocate the receiving antenna. - Increase the separation between the equipment and receiver. - CAUTION The use of the following two conditions: (1) this device may cause undesired operation. Connect the equipment into an outlet on , the user is intended to alert the user to radio communications. Record the serial number in the literature accompanying the appliance. Information For customers in the United...
Operating Instructions
Page 3
... play list play) (MP3 CD only) ........ 18 Creating your own program (Program play 19 Playing tracks repeatedly (Repeat play) ....... 20 The Radio Presetting radio stations 21 Playing preset radio stations 22 Labeling the preset stations 23 The Audio Emphasis Selecting the audio emphasis 24 The Timer Falling asleep to music 25 Setting Up Choosing the power sources 26 Listening to a PC, TV, VCR, portable digital music player, etc 27 Additional Information Precautions 29 Troubleshooting 30 Maintenance 32 Specifications 32 Index 34 This manual mainly explains operations using...
... play list play) (MP3 CD only) ........ 18 Creating your own program (Program play 19 Playing tracks repeatedly (Repeat play) ....... 20 The Radio Presetting radio stations 21 Playing preset radio stations 22 Labeling the preset stations 23 The Audio Emphasis Selecting the audio emphasis 24 The Timer Falling asleep to music 25 Setting Up Choosing the power sources 26 Listening to a PC, TV, VCR, portable digital music player, etc 27 Additional Information Precautions 29 Troubleshooting 30 Maintenance 32 Specifications 32 Index 34 This manual mainly explains operations using...
Operating Instructions
Page 4
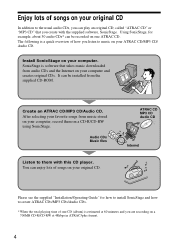
... on a CD-R/CD-RW using SonicStage. Enjoy lots of songs on your original CD In addition to the usual audio CDs, you can play an original CD, called "ATRAC CD" or "MP3 CD" that takes music downloaded from audio CDs and the Internet on your computer and creates original CDs. After selecting your favorite songs from the supplied CD-ROM. ATRAC CD MP3 CD Audio CD Internet Please see the supplied "Installation/Operating Guide" for...
... on a CD-R/CD-RW using SonicStage. Enjoy lots of songs on your original CD In addition to the usual audio CDs, you can play an original CD, called "ATRAC CD" or "MP3 CD" that takes music downloaded from audio CDs and the Internet on your computer and creates original CDs. After selecting your favorite songs from the supplied CD-ROM. ATRAC CD MP3 CD Audio CD Internet Please see the supplied "Installation/Operating Guide" for...
Operating Instructions
Page 6
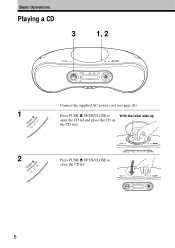
Basic Operations Playing a CD 3 1, 2 Connect the supplied AC power cord (see page 26). 1 Press PUSH Z OPEN/CLOSE to With the label side up open the CD lid and place the CD on the CD tray. 2 Press PUSH Z OPEN/CLOSE to close the CD lid. 6
Basic Operations Playing a CD 3 1, 2 Connect the supplied AC power cord (see page 26). 1 Press PUSH Z OPEN/CLOSE to With the label side up open the CD lid and place the CD on the CD tray. 2 Press PUSH Z OPEN/CLOSE to close the CD lid. 6

Operating Instructions
Page 7
Display Audio CD ATRAC CD/MP3 CD* Basic Operations Track number Playing time File name File number Playing time * When playing an MP3 CD, "MP3" appears in stop playback x pause playback u*1 (X on the CD. During this player reads all the tracks once. To Press adjust the volume VOLUME +*1, - (VOL +*1, - go to the next track > go back to the i (headphones) jack. • Playback starts from the beginning of the first track, press x in the display. 3 Press u (N on the remote) (direct power-on the file...
Display Audio CD ATRAC CD/MP3 CD* Basic Operations Track number Playing time File name File number Playing time * When playing an MP3 CD, "MP3" appears in stop playback x pause playback u*1 (X on the CD. During this player reads all the tracks once. To Press adjust the volume VOLUME +*1, - (VOL +*1, - go to the next track > go back to the i (headphones) jack. • Playback starts from the beginning of the first track, press x in the display. 3 Press u (N on the remote) (direct power-on the file...
Operating Instructions
Page 8
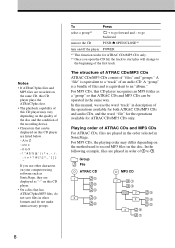
... the CD PUSH Z OPEN/CLOSE*3 turn on/off the player POWER *2 This function works for ATRAC CDs/MP3 CDs only. *3 Once you use the word "track" in order of an audio CD. A to record MP3 files on the disc. In the following example, files are played in description of the operations available for both ATRAC CDs/MP3 CDs and audio CDs, and the word "file" for the operations available for ATRAC CDs/MP3 CDs...
... the CD PUSH Z OPEN/CLOSE*3 turn on/off the player POWER *2 This function works for ATRAC CDs/MP3 CDs only. *3 Once you use the word "track" in order of an audio CD. A to record MP3 files on the disc. In the following example, files are played in description of the operations available for both ATRAC CDs/MP3 CDs and audio CDs, and the word "file" for the operations available for ATRAC CDs/MP3 CDs...

Operating Instructions
Page 9
... format cannot be played on your computer. Notes on MP3 CDs • Maximum number of groups: 255 Maximum number of files: 511 Maximum directory level: 8 • A group that has nothing recorded on it, set the writing software to the file name. Basic Operations Notes on ATRAC CDs • Maximum number of groups: 255 Maximum number of files: 999 • CD-Rs/CD-RWs recorded...
... format cannot be played on your computer. Notes on MP3 CDs • Maximum number of groups: 255 Maximum number of files: 511 Maximum directory level: 8 • A group that has nothing recorded on it, set the writing software to the file name. Basic Operations Notes on ATRAC CDs • Maximum number of groups: 255 Maximum number of files: 999 • CD-Rs/CD-RWs recorded...

Operating Instructions
Page 10
until the band you can't tune in the display. The player automatically scans the radio frequencies and stops when it finds a clear station. repeatedly to change the frequency step by step. 10 Indicates an FM stereo broadcast If you want appears in the display (direct power-on). 2 Hold down TUNE + or - Listening to the radio 1 2 Connect the supplied AC power cord (see page 26). 1 Press RADIO•BAND•AUTO Display PRESET repeatedly until the frequency digits begin to change in a station, press TUNE + or -
until the band you can't tune in the display. The player automatically scans the radio frequencies and stops when it finds a clear station. repeatedly to change the frequency step by step. 10 Indicates an FM stereo broadcast If you want appears in the display (direct power-on). 2 Hold down TUNE + or - Listening to the radio 1 2 Connect the supplied AC power cord (see page 26). 1 Press RADIO•BAND•AUTO Display PRESET repeatedly until the frequency digits begin to change in a station, press TUNE + or -

Operating Instructions
Page 11
To improve broadcast reception Reorient the antenna for AM 11 on the remote) turn on/off the radio POWER * The button has a tactile dot. for FM for FM. Reorient the player itself for additional operations POWER VOLUME -, + MODE Tip If the FM broadcast is noisy, press MODE repeatedly until "Mono" appears in the display and radio will play in monaural. To Press adjust the volume VOLUME +*, - (VOL +*, - Basic Operations Use these buttons for AM.
To improve broadcast reception Reorient the antenna for AM 11 on the remote) turn on/off the radio POWER * The button has a tactile dot. for FM for FM. Reorient the player itself for additional operations POWER VOLUME -, + MODE Tip If the FM broadcast is noisy, press MODE repeatedly until "Mono" appears in the display and radio will play in monaural. To Press adjust the volume VOLUME +*, - (VOL +*, - Basic Operations Use these buttons for AM.
Operating Instructions
Page 18
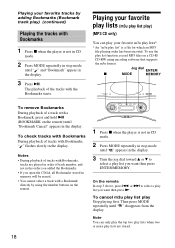
... tracks with Bookmarks During playback of the tracks with Bookmarks, " " flashes slowly in the display. To cancel m3u play list play list function, record MP3 files on a CD-R/ CD-RW using the number buttons on the remote) until " " appears in the display. 3 Turn the jog dial toward v or V to select a play list" is not in CD mode. 2 Press MODE repeatedly in stop mode until " " disappears from the display. Note You can play your favorite m3u play lists*. * An "m3u play list...
... tracks with Bookmarks During playback of the tracks with Bookmarks, " " flashes slowly in the display. To cancel m3u play list play list function, record MP3 files on a CD-R/ CD-RW using the number buttons on the remote) until " " appears in the display. 3 Turn the jog dial toward v or V to select a play list" is not in CD mode. 2 Press MODE repeatedly in stop mode until " " disappears from the display. Note You can play your favorite m3u play lists*. * An "m3u play list...

Operating Instructions
Page 22
... the corresponding number buttons. (Example: To tune in the stored station. AUTO PRESET PRESET + Jog dial Searching for preset radio stations 1 Press RADIO•BAND•AUTO PRESET to select the band. 2 Turn the jog dial to select your favorite preset station. 3 Press ENTER/MEMORY to tune in a stored station. ENTER/ MEMORY Playing preset radio stations 1 Press RADIO•BAND•AUTO PRESET to tune in the stored station. RADIO BAND PRESET - Tip You can play the preset station either by station name if you...
... the corresponding number buttons. (Example: To tune in the stored station. AUTO PRESET PRESET + Jog dial Searching for preset radio stations 1 Press RADIO•BAND•AUTO PRESET to select the band. 2 Turn the jog dial to select your favorite preset station. 3 Press ENTER/MEMORY to tune in a stored station. ENTER/ MEMORY Playing preset radio stations 1 Press RADIO•BAND•AUTO PRESET to tune in the stored station. RADIO BAND PRESET - Tip You can play the preset station either by station name if you...

Operating Instructions
Page 26
When the remote no longer operates the player, replace all the batteries with new ones. 26 Replacing batteries With normal use the AC power or batteries as a power source. 3 Battery compartment AC IN 1 to a wall outlet 1 Connecting the AC power cord Insert one end of the supplied AC power cord to the AC IN socket located at the rear of the player, and the other end to the wall outlet. 2 Inserting batteries into the remote Insert two size AAA (R03) batteries (not supplied). Setting Up Choosing the power sources You can use , the batteries should last for about six months.
When the remote no longer operates the player, replace all the batteries with new ones. 26 Replacing batteries With normal use the AC power or batteries as a power source. 3 Battery compartment AC IN 1 to a wall outlet 1 Connecting the AC power cord Insert one end of the supplied AC power cord to the AC IN socket located at the rear of the player, and the other end to the wall outlet. 2 Inserting batteries into the remote Insert two size AAA (R03) batteries (not supplied). Setting Up Choosing the power sources You can use , the batteries should last for about six months.
Operating Instructions
Page 27
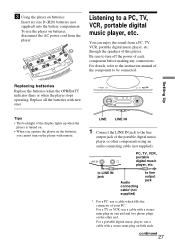
3 Using the player on batteries, disconnect the AC power cord from a PC, TV, VCR, portable digital music player, etc. Setting Up Replacing batteries Replace the batteries when the OPR/BATT indicator dims or when the player stops operating. to LINE IN jack Audio connecting cable*(not supplied) to the instruction manual of your PC. To use a cable with remote. Listening to be connected. For details, refer to line output jack * For a PC: use a cable with new ones. Replace all the batteries with a stereomini plug on...
3 Using the player on batteries, disconnect the AC power cord from a PC, TV, VCR, portable digital music player, etc. Setting Up Replacing batteries Replace the batteries when the OPR/BATT indicator dims or when the player stops operating. to LINE IN jack Audio connecting cable*(not supplied) to the instruction manual of your PC. To use a cable with remote. Listening to be connected. For details, refer to line output jack * For a PC: use a cable with new ones. Replace all the batteries with a stereomini plug on...
Operating Instructions
Page 29
Do not use the supplied AC power cord; On operation • If the player is brought directly from the center out. • Do not use solvents such as it checked by battery leakage or corrosion. • The nameplate indicating operating voltage, power consumption, etc. Notes on the lens inside the car. • Do not stick paper or sticker on the CD, nor scratch the...
Do not use the supplied AC power cord; On operation • If the player is brought directly from the center out. • Do not use solvents such as it checked by battery leakage or corrosion. • The nameplate indicating operating voltage, power consumption, etc. Notes on the lens inside the car. • Do not stick paper or sticker on the CD, nor scratch the...
Operating Instructions
Page 30
Troubleshooting General The power is no audio. • Adjust the volume. • Unplug the headphones when listening through speakers. There is not on. • Connect the AC power cord to a wall outlet securely. • Make sure the batteries are inserted correctly. • Replace all the batteries with new ones if they are weak. • You cannot turn on the player with the remote when you have any...
Troubleshooting General The power is no audio. • Adjust the volume. • Unplug the headphones when listening through speakers. There is not on. • Connect the AC power cord to a wall outlet securely. • Make sure the batteries are inserted correctly. • Replace all the batteries with new ones if they are weak. • You cannot turn on the player with the remote when you have any...
Operating Instructions
Page 31
... direct sunlight or fluorescent lamp light. • Move closer to the player when using poor quality CD-Rs/CDRWs or if there is a problem with the recording device or application software. The sound drops out. • Reduce the volume. • Clean the CD, or replace it if the CD is badly damaged. • Place the player in a location free from the TV. 31 Radio The audio...
... direct sunlight or fluorescent lamp light. • Move closer to the player when using poor quality CD-Rs/CDRWs or if there is a problem with the recording device or application software. The sound drops out. • Reduce the volume. • Clean the CD, or replace it if the CD is badly damaged. • Place the player in a location free from the TV. 31 Radio The audio...
Operating Instructions
Page 32
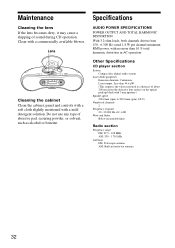
.... Lens Cleaning the cabinet Clean the cabinet, panel and controls with a soft cloth slightly moistened with a commercially available blower. Do not use any type of sound during CD operation. Other Specifications CD player section System Compact disc digital audio system Laser diode properties Emission duration: Continuous Laser output: Less than 10 % total harmonic distortion in ferrite bar antenna 32 Specifications AUDIO POWER SPECIFICATIONS POWER OUTPUT AND TOTAL HARMONIC DISTORTION With 3.2-ohm loads, both...
.... Lens Cleaning the cabinet Clean the cabinet, panel and controls with a soft cloth slightly moistened with a commercially available blower. Do not use any type of sound during CD operation. Other Specifications CD player section System Compact disc digital audio system Laser diode properties Emission duration: Continuous Laser output: Less than 10 % total harmonic distortion in ferrite bar antenna 32 Specifications AUDIO POWER SPECIFICATIONS POWER OUTPUT AND TOTAL HARMONIC DISTORTION With 3.2-ohm loads, both...
Operating Instructions
Page 33
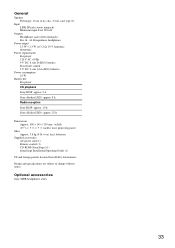
Design and specifications are subject to change without notice. batteries) Supplied accessories AC power cord (1) Remote control (1) CD-ROM (SonicStage) (1) SonicStage Installation/Operating Guide (1) US and foreign patents licensed from Dolby Laboratories. General Speaker Full range: 10 cm (4 in.) dia., 3.2 Ω, cone type (2) Input LINE IN jack (stereo minijack): Minimum input level 330 mV Outputs Headphones jack (stereo minijack): For 16 - 64 Ω impedance headphones Power output 2.3 W + 2.3 W (at 3.2 Ω, 10 % harmonic distortion) Power requirements For player: 120 V AC...
Design and specifications are subject to change without notice. batteries) Supplied accessories AC power cord (1) Remote control (1) CD-ROM (SonicStage) (1) SonicStage Installation/Operating Guide (1) US and foreign patents licensed from Dolby Laboratories. General Speaker Full range: 10 cm (4 in.) dia., 3.2 Ω, cone type (2) Input LINE IN jack (stereo minijack): Minimum input level 330 mV Outputs Headphones jack (stereo minijack): For 16 - 64 Ω impedance headphones Power output 2.3 W + 2.3 W (at 3.2 Ω, 10 % harmonic distortion) Power requirements For player: 120 V AC...
Operating Instructions
Page 34
... VCR, portable digital music player, etc. 27 to the radio 10 Locating a specific track 13 M, N, O m3u play list play 18 Maintenance 32 MEGA BASS 24 MP3 about MP3 5 display 12 playing order 8 P, Q Playing a CD 6 preset radio stations 22 tracks in random order 16 tracks repeatedly 20 Power sources 26 Precautions 29 Presetting radio stations 21 Program play 19 R Radio stations playing 22 presetting 21 Repeat play 20 S Search 14 Selecting audio emphasis 24 tracks 13 Setting up 26 Shuffle play 16 SonicStage 4 Specifications 32 T Timer 25 Troubleshooting 30 U, V, W, X, Y, Z Using the display 12 34
... VCR, portable digital music player, etc. 27 to the radio 10 Locating a specific track 13 M, N, O m3u play list play 18 Maintenance 32 MEGA BASS 24 MP3 about MP3 5 display 12 playing order 8 P, Q Playing a CD 6 preset radio stations 22 tracks in random order 16 tracks repeatedly 20 Power sources 26 Precautions 29 Presetting radio stations 21 Program play 19 R Radio stations playing 22 presetting 21 Repeat play 20 S Search 14 Selecting audio emphasis 24 tracks 13 Setting up 26 Shuffle play 16 SonicStage 4 Specifications 32 T Timer 25 Troubleshooting 30 U, V, W, X, Y, Z Using the display 12 34


