Primary User Manual
Page 2
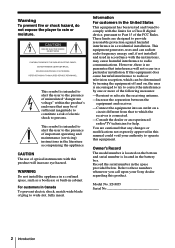
... and serial number is intended to alert the user to the presence of optical instruments with the limits for help. ZS-M35 Serial No 2 Introduction These limits are cautioned that to comply with this product will not occur in this manual could void your Sony dealer regarding this product. Record the serial number in cabinet. Model No. CAUTION The use of uninsulated "dangerous voltage" within...
... and serial number is intended to alert the user to the presence of optical instruments with the limits for help. ZS-M35 Serial No 2 Introduction These limits are cautioned that to comply with this product will not occur in this manual could void your Sony dealer regarding this product. Record the serial number in cabinet. Model No. CAUTION The use of uninsulated "dangerous voltage" within...

Primary User Manual
Page 3
... 22 Presetting radio stations 24 Playing preset radio stations Recording 25 Recording the track you programed) 29 Recording from the radio or a CD 31 Extending the recording time (Monaural recording) 33 Recording on a recorded MD Editing recorded tracks on the MD 34 Before editing 36 Erasing recordings (Erase Function) 39 Dividing recorded tracks (Divide Function) 41 Combining recorded tracks (Combine Function) 43 Moving recorded tracks (Move Function) 44 Labeling recordings (Name Function) The Audio Emphasis 49 Selecting the audio emphasis (SOUND/MEGA BASS) The Timer 50 Setting the clock 52...
... 22 Presetting radio stations 24 Playing preset radio stations Recording 25 Recording the track you programed) 29 Recording from the radio or a CD 31 Extending the recording time (Monaural recording) 33 Recording on a recorded MD Editing recorded tracks on the MD 34 Before editing 36 Erasing recordings (Erase Function) 39 Dividing recorded tracks (Divide Function) 41 Combining recorded tracks (Combine Function) 43 Moving recorded tracks (Move Function) 44 Labeling recordings (Name Function) The Audio Emphasis 49 Selecting the audio emphasis (SOUND/MEGA BASS) The Timer 50 Setting the clock 52...

Primary User Manual
Page 7
... record the whole CD. Basic Operations 7 Basic Operations 4 To record at normal speed, skip this step. 5 Press SYNCHRO REC CD N MD. Tips • Adjusting the volume or the audio emphasis (page 49) will be done properly. • When you record a whole CD, you cannot pause recording. Use these buttons for additional operations POWER CD x MD x YES ENTER NO CANCEL To stop recording turn on the MD to prevent the sound...
... record the whole CD. Basic Operations 7 Basic Operations 4 To record at normal speed, skip this step. 5 Press SYNCHRO REC CD N MD. Tips • Adjusting the volume or the audio emphasis (page 49) will be done properly. • When you record a whole CD, you cannot pause recording. Use these buttons for additional operations POWER CD x MD x YES ENTER NO CANCEL To stop recording turn on the MD to prevent the sound...

Primary User Manual
Page 17
... the display. You can use the 0/10 button as well as >10, 1 and 0. • To select a track on a CD or an MD using the number/character buttons. To locate Press a specific track directly the number/character button of the track. a point while listening to > (forward) or . (backward) the sound while playing and hold down until you find the point. The CD Player•The MD Player 17 Turn off the...
... the display. You can use the 0/10 button as well as >10, 1 and 0. • To select a track on a CD or an MD using the number/character buttons. To locate Press a specific track directly the number/character button of the track. a point while listening to > (forward) or . (backward) the sound while playing and hold down until you find the point. The CD Player•The MD Player 17 Turn off the...
Primary User Manual
Page 25
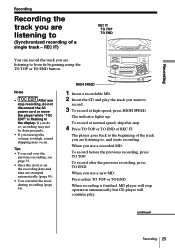
... do not disconnect the AC power cord or move the player while "TOC EDIT" is set, the recording date and time are stamped automatically (page 50). • You can record the track you are listening to (Synchronized recording of the track you use a recorded MD: To record before the previous recording, press TO TOP. The indicator lights up the volume too high, sound skipping may not be done...
... do not disconnect the AC power cord or move the player while "TOC EDIT" is set, the recording date and time are stamped automatically (page 50). • You can record the track you are listening to (Synchronized recording of the track you use a recorded MD: To record before the previous recording, press TO TOP. The indicator lights up the volume too high, sound skipping may not be done...
Primary User Manual
Page 28
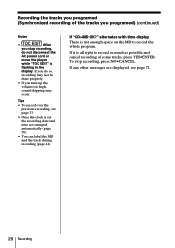
... recording, see page 72. 28 Recording If "CD>MD OK?" If it is flashing in the display. If any other messages are displayed, see page 33. • Once the clock is not enough space on the MD to record as much as possible and cancel recording of the tracks you programed) (continued) Notes • After you turn up the volume too high, sound...
... recording, see page 72. 28 Recording If "CD>MD OK?" If it is flashing in the display. If any other messages are displayed, see page 33. • Once the clock is not enough space on the MD to record as much as possible and cancel recording of the tracks you programed) (continued) Notes • After you turn up the volume too high, sound...

Primary User Manual
Page 29
... MD using the REC button. To stop recording, do so, recording may occur. Recording from the radio or a CD x CD CD u RADIO BAND REC/REC MODE You can record from the radio or a CD to record from. 2 Insert a recordable MD. 3 Press REC/REC MODE (z on page 39. when there is flashing in the station you do not disconnect the AC power cord or move the player while "TOC EDIT" is no sound...
... MD using the REC button. To stop recording, do so, recording may occur. Recording from the radio or a CD x CD CD u RADIO BAND REC/REC MODE You can record from the radio or a CD to record from. 2 Insert a recordable MD. 3 Press REC/REC MODE (z on page 39. when there is flashing in the station you do not disconnect the AC power cord or move the player while "TOC EDIT" is no sound...

Primary User Manual
Page 30
... AC power cord or move the player while "TOC EDIT" is recorded automatically as the track name (up the volume too high, sound skipping may not be made from a CD Track marks on the source CD are added, erase them after recording, see "Combining recorded tracks" on page 41). 1 Insert a CD. 2 Press CD x to 50 names) (page 23). Press the button again to resume recording. 30 Recording The player...
... AC power cord or move the player while "TOC EDIT" is recorded automatically as the track name (up the volume too high, sound skipping may not be made from a CD Track marks on the source CD are added, erase them after recording, see "Combining recorded tracks" on page 41). 1 Insert a CD. 2 Press CD x to 50 names) (page 23). Press the button again to resume recording. 30 Recording The player...

Primary User Manual
Page 31
Extending the recording time (Monaural recording) If you choose to record. Choose the recording mode accordingly. If you turn up the volume too high, sound skipping may not be made from radio, you cannot change the station. • If you do not disconnect the AC power cord or move the player while "TOC EDIT" is flashing in the display. Press LINE/LINE LEVEL until "LINE" appears in the display. 2 Insert a recordable MD...
Extending the recording time (Monaural recording) If you choose to record. Choose the recording mode accordingly. If you turn up the volume too high, sound skipping may not be made from radio, you cannot change the station. • If you do not disconnect the AC power cord or move the player while "TOC EDIT" is flashing in the display. Press LINE/LINE LEVEL until "LINE" appears in the display. 2 Insert a recordable MD...
Primary User Manual
Page 52
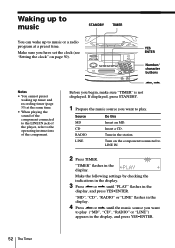
.... Turn on page 50). "TIMER" flashes in the display. 3 Press > or . Waking up to music STANDBY TIMER You can wake up timer and recording timer (page 55) at a preset time. YES ENTER Number/ character buttons Notes • You cannot preset waking up to music or a radio program at the same time. • When playing the sound of the component connected to the LINE IN jack of the player, refer to the operating instructions of...
.... Turn on page 50). "TIMER" flashes in the display. 3 Press > or . Waking up to music STANDBY TIMER You can wake up timer and recording timer (page 55) at a preset time. YES ENTER Number/ character buttons Notes • You cannot preset waking up to music or a radio program at the same time. • When playing the sound of the component connected to the LINE IN jack of the player, refer to the operating instructions of...

Primary User Manual
Page 55
... the operating instructions of the component. >, . Make sure you begin, make sure "TIMER" is not displayed. Make the following settings by checking the indications in the display, and press YES•ENTER. When recording from the component connected to record the radio at the same time. • When recording from the component connected to the LINE IN jack of the player, refer to the LINE IN jack of the player...
... the operating instructions of the component. >, . Make sure you begin, make sure "TIMER" is not displayed. Make the following settings by checking the indications in the display, and press YES•ENTER. When recording from the component connected to record the radio at the same time. • When recording from the component connected to the LINE IN jack of the player, refer to the LINE IN jack of the player...

Primary User Manual
Page 56
...". 2 Press the number/character buttons to set the hour and the minutes. Turn off the player before a timer-recording starts If you turn on the player, you can use the player before the preset time. Tips • To exit the standby mode, press STANDBY to change and re-enter it . to set the volume you made a mistake, press NO•CANCEL. To check/change the setting, display the setting you want...
...". 2 Press the number/character buttons to set the hour and the minutes. Turn off the player before a timer-recording starts If you turn on the player, you can use the player before the preset time. Tips • To exit the standby mode, press STANDBY to change and re-enter it . to set the volume you made a mistake, press NO•CANCEL. To check/change the setting, display the setting you want...

Primary User Manual
Page 57
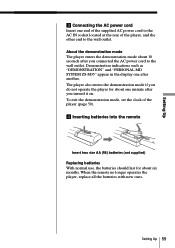
... player before connecting/ disconnecting the AC power cord or removing/inserting batteries. 3 to turn off the power of about one year. Setting Up Insert three size AA (R6) batteries (not supplied) (rear) Replacing batteries With normal use, the batteries should last for about one year. Setting Up Preparing the system According to save the memory data. Wrong connections cause malfunctions. Connect the AC power cord last. 2 Antenna terminals 1 Battery compartment (back-up batteries...
... player before connecting/ disconnecting the AC power cord or removing/inserting batteries. 3 to turn off the power of about one year. Setting Up Insert three size AA (R6) batteries (not supplied) (rear) Replacing batteries With normal use, the batteries should last for about one year. Setting Up Preparing the system According to save the memory data. Wrong connections cause malfunctions. Connect the AC power cord last. 2 Antenna terminals 1 Battery compartment (back-up batteries...
Primary User Manual
Page 59
... "PERSONAL MD SYSTEM ZS-M35" appear in the display one after you turned it on. When the remote no longer operates the player, replace all the batteries with new ones. To exit the demonstration mode, set the clock of the player (page 50). 4 Inserting batteries into the remote Insert two size AA (R6) batteries (not supplied) Replacing batteries With normal use, the batteries should last for about one end of the supplied AC power cord...
... "PERSONAL MD SYSTEM ZS-M35" appear in the display one after you turned it on. When the remote no longer operates the player, replace all the batteries with new ones. To exit the demonstration mode, set the clock of the player (page 50). 4 Inserting batteries into the remote Insert two size AA (R6) batteries (not supplied) Replacing batteries With normal use, the batteries should last for about one end of the supplied AC power cord...
Primary User Manual
Page 63
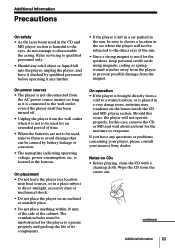
.... • Since a strong magnet is used in the sun, be sure to direct sunlight, excessive dust or mechanical shock. • Do not place the player on CDs • Before playing, clean the CD with a cleaning cloth. Additional Information Precautions On safety • As the laser beam used for the speakers, keep personal credit cards using magnetic coding or springwound watches away from...
.... • Since a strong magnet is used in the sun, be sure to direct sunlight, excessive dust or mechanical shock. • Do not place the player on CDs • Before playing, clean the CD with a cleaning cloth. Additional Information Precautions On safety • As the laser beam used for the speakers, keep personal credit cards using magnetic coding or springwound watches away from...

Primary User Manual
Page 69
.... "Disc Error" lights in the demonstration mode. Try erasing all tracks on the player. • Connect the AC power cord securely. • Adjust the volume. • Unplug the headphones from the i jack when listening through speakers. • Wait until "TOC Reading" disappears from vibration. • The sound may drop out or noise may be heard if the CD is recorded using a portable telephone or other equipment that emits radio...
.... "Disc Error" lights in the demonstration mode. Try erasing all tracks on the player. • Connect the AC power cord securely. • Adjust the volume. • Unplug the headphones from the i jack when listening through speakers. • Wait until "TOC Reading" disappears from vibration. • The sound may drop out or noise may be heard if the CD is recorded using a portable telephone or other equipment that emits radio...

Primary User Manual
Page 70
... recorded. Replace the disc with the label side up and the arrow pointing towards the opening until the player grips it. • The MD may be noisy (page 11). • Move the player away from the player. The AC power cord has been disconnected. The recorded sound drops out. • The sound was recorded at lower volume. This is record-protected ("Protected" appears). Release the track...
... recorded. Replace the disc with the label side up and the arrow pointing towards the opening until the player grips it. • The MD may be noisy (page 11). • Move the player away from the player. The AC power cord has been disconnected. The recorded sound drops out. • The sound was recorded at lower volume. This is record-protected ("Protected" appears). Release the track...
Primary User Manual
Page 71
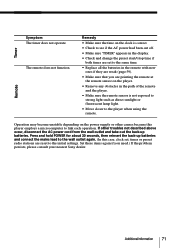
...; Make sure the time on the clock is correct. • Check to see if the AC power had been cut off. • Make sure "TIMER" appears in the display. • Check and change the preset start/stop time if both times are set , timer or preset radio stations are pointing the remote at the remote sensor on the power supply or other troubles not described above occur, disconnect the AC power cord from...
...; Make sure the time on the clock is correct. • Check to see if the AC power had been cut off. • Make sure "TIMER" appears in the display. • Check and change the preset start/stop time if both times are set , timer or preset radio stations are pointing the remote at the remote sensor on the power supply or other troubles not described above occur, disconnect the AC power cord from...

Primary User Manual
Page 73
Other Specifications CD player section System Compact disc digital audio system Laser diode properties Material: GaAlAs Wave length: 785 nm Emission duration: Continuous Laser output: Less than 44.6 µW (This output is the value measured at a distance of about 200 mm from 150 - 10,000 Hz; Specifications AUDIO POWER SPECIFICATIONS POWER OUTPUT AND TOTAL HARMONIC DISTORTION With 4-ohm loads, both channels driven from the objetive lens surface on the...
Other Specifications CD player section System Compact disc digital audio system Laser diode properties Material: GaAlAs Wave length: 785 nm Emission duration: Continuous Laser output: Less than 44.6 µW (This output is the value measured at a distance of about 200 mm from 150 - 10,000 Hz; Specifications AUDIO POWER SPECIFICATIONS POWER OUTPUT AND TOTAL HARMONIC DISTORTION With 4-ohm loads, both channels driven from the objetive lens surface on the...

Primary User Manual
Page 75
... AUTO PRESET 22 B Batteries for the remote control 59 C CD player 12 Checking playing time a CD 12 an MD 14 Cleaning 64 Clock 50 Combine function 41 Connection AC power cord 59 antenna 58 optional components 61 Creating your own program 20 D Demonstration mode 59 Display 12 - 14 Divide function 39 E, F Editing 34 Erase function 36 Error message 72 G Getting to the radio 10 Locating a specific point on a track 17 Locating a specific track 17 M MD player 12 MEGA BASS...
... AUTO PRESET 22 B Batteries for the remote control 59 C CD player 12 Checking playing time a CD 12 an MD 14 Cleaning 64 Clock 50 Combine function 41 Connection AC power cord 59 antenna 58 optional components 61 Creating your own program 20 D Demonstration mode 59 Display 12 - 14 Divide function 39 E, F Editing 34 Erase function 36 Error message 72 G Getting to the radio 10 Locating a specific point on a track 17 Locating a specific track 17 M MD player 12 MEGA BASS...


