
Operating Instructions
Page 5
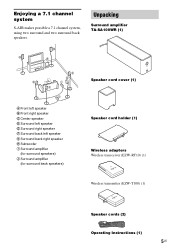
Enjoying a 7.1 channel system S-AIR makes possible a 7.1 channel system, using two surround and two surround back speakers. B A H C D F E G I J A Front left speaker B Front right speaker C Center speaker D Surround left speaker E Surround right speaker F Surround ...surround speakers) J Surround amplifier (for surround back speakers) Unpacking Surround amplifier TA-SA100WR (1) POWER POWER/ON LINE PHONES Speaker cord cover (1) Speaker cord holder (1) Wireless adapters Wireless transceiver (EZW-RT10) (1) Wireless transmitter (EZW-T100) (1) Speaker cords (2) Operating Instructions (1) 5US
Enjoying a 7.1 channel system S-AIR makes possible a 7.1 channel system, using two surround and two surround back speakers. B A H C D F E G I J A Front left speaker B Front right speaker C Center speaker D Surround left speaker E Surround right speaker F Surround ...surround speakers) J Surround amplifier (for surround back speakers) Unpacking Surround amplifier TA-SA100WR (1) POWER POWER/ON LINE PHONES Speaker cord cover (1) Speaker cord holder (1) Wireless adapters Wireless transceiver (EZW-RT10) (1) Wireless transmitter (EZW-T100) (1) Speaker cords (2) Operating Instructions (1) 5US
Operating Instructions
Page 6
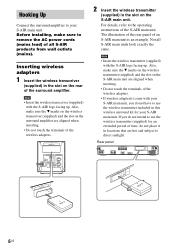
.... For details, refer to the operating instructions of an S-AIR main unit is an example. Note • Insert the wireless transmitter (supplied) with your S-AIR main unit, you do not intend to use the wireless transmitter included in locations that are aligned when inserting. •... period of time, do not have to use the wireless transmitter (supplied) for your S-AIR main unit. Not all S-AIR products from wall outlets (mains). Inserting wireless adapters 1 Insert the wireless transceiver (supplied) in the slot on the S-AIR main unit are aligned when inserting. • Do...
.... For details, refer to the operating instructions of an S-AIR main unit is an example. Note • Insert the wireless transmitter (supplied) with your S-AIR main unit, you do not intend to use the wireless transmitter included in locations that are aligned when inserting. •... period of time, do not have to use the wireless transmitter (supplied) for your S-AIR main unit. Not all S-AIR products from wall outlets (mains). Inserting wireless adapters 1 Insert the wireless transceiver (supplied) in the slot on the S-AIR main unit are aligned when inserting. • Do...
Operating Instructions
Page 7
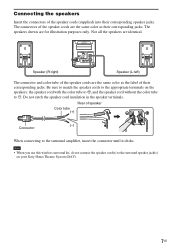
...to #. Be sure to match the speaker cords to the appropriate terminals on your Sony Home Theatre System (DAV). 7US The speakers shown are identical. The connectors of the speaker cords ...are the same color as their corresponding speaker jacks. EZW-RT10 S-AIR ID A B C PAIRING SPEAKER L ...the speaker cords (supplied) into their corresponding jacks. Note • When you use this wireless surround kit, do not connect the speaker cord(s) to the surround speaker jack(s) on ...
...to #. Be sure to match the speaker cords to the appropriate terminals on your Sony Home Theatre System (DAV). 7US The speakers shown are identical. The connectors of the speaker cords ...are the same color as their corresponding speaker jacks. EZW-RT10 S-AIR ID A B C PAIRING SPEAKER L ...the speaker cords (supplied) into their corresponding jacks. Note • When you use this wireless surround kit, do not connect the speaker cord(s) to the surround speaker jack(s) on ...
Operating Instructions
Page 8
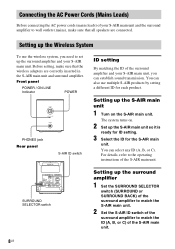
... surround amplifier to match the ID (A, B, or C) of the S-AIR main unit. Setting up the Wireless System To use multiple S-AIR products by setting a different ID for the S-AIR main unit. You can also use the wireless system, you can select any ID (A, B, or C). The system turns on the S-AIR main unit. For details, refer to wall outlets (mains...
... surround amplifier to match the ID (A, B, or C) of the S-AIR main unit. Setting up the Wireless System To use multiple S-AIR products by setting a different ID for the S-AIR main unit. You can also use the wireless system, you can select any ID (A, B, or C). The system turns on the S-AIR main unit. For details, refer to wall outlets (mains...
Operating Instructions
Page 12
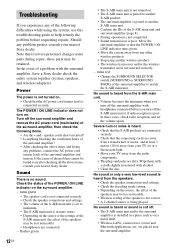
... The volume of the S-AIR main unit is set to match the S-AIR main unit. turns red • Change the SURROUND SELECTOR switch (SURROUND or SURROUND BACK) of a problem with the surround amplifier, have a Sony dealer check the entire system together (system, speakers, and wireless adapters). Wipe them with ...the connecting cords are dirty. Turn off . • The S-AIR main unit and/or the surround amplifier is being played. Note that the POWER / ON LINE indicator turns green. • Move the system away from the audio components. • The plugs and jacks are away from a ...
... The volume of the S-AIR main unit is set to match the S-AIR main unit. turns red • Change the SURROUND SELECTOR switch (SURROUND or SURROUND BACK) of a problem with the surround amplifier, have a Sony dealer check the entire system together (system, speakers, and wireless adapters). Wipe them with ...the connecting cords are dirty. Turn off . • The S-AIR main unit and/or the surround amplifier is being played. Note that the POWER / ON LINE indicator turns green. • Move the system away from the audio components. • The plugs and jacks are away from a ...
Operating Instructions
Page 15
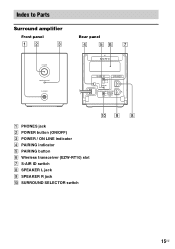
Index to Parts Surround amplifier Front panel Rear panel POWER POWER/ON LINE PHONES EZW-RT10 S-AIR ID A B C PAIRING SPEAKER L SURROUND SELECTOR R SURROUND SURROUND BACK A PHONES jack B POWER button (ON/OFF) C POWER / ON LINE indicator D PAIRING indicator E PAIRING button F Wireless transceiver (EZW-RT10) slot G S-AIR ID switch H SPEAKER L jack I SPEAKER R jack J SURROUND SELECTOR switch 15US
Index to Parts Surround amplifier Front panel Rear panel POWER POWER/ON LINE PHONES EZW-RT10 S-AIR ID A B C PAIRING SPEAKER L SURROUND SELECTOR R SURROUND SURROUND BACK A PHONES jack B POWER button (ON/OFF) C POWER / ON LINE indicator D PAIRING indicator E PAIRING button F Wireless transceiver (EZW-RT10) slot G S-AIR ID switch H SPEAKER L jack I SPEAKER R jack J SURROUND SELECTOR switch 15US
