User Guide
Page 9
... DVDs and more. ❑ Use my VAIO Access your VAIO user guide, interactive help with VAIO Care, system restore, backup and recovery, and contact Sony support. Choose from the following categories to articles, the VAIO technology page, specifications, and system and software information. ❑ Troubleshoot my VAIO Maintain and troubleshoot your VAIO computer. To access Help and Support...
... DVDs and more. ❑ Use my VAIO Access your VAIO user guide, interactive help with VAIO Care, system restore, backup and recovery, and contact Sony support. Choose from the following categories to articles, the VAIO technology page, specifications, and system and software information. ❑ Troubleshoot my VAIO Maintain and troubleshoot your VAIO computer. To access Help and Support...
User Guide
Page 12
Be sure to get started using your VAIO computer. ! Upon completion, connect one device (for the first time, do not connect any other hardware that did not originally come with only the supplied ... so on) at a time, following the manufacturers' instructions. ❑ Locating Controls and Ports (page 13) ❑ About the Indicator Lights (page 19) ❑ Connecting a Power Source (page 21) ❑ Using the Battery Pack (page 22) ❑ Shutting Down Your Computer Safely (page 29) n 12 N Getting Started Getting Started This section describes how to start up...
Be sure to get started using your VAIO computer. ! Upon completion, connect one device (for the first time, do not connect any other hardware that did not originally come with only the supplied ... so on) at a time, following the manufacturers' instructions. ❑ Locating Controls and Ports (page 13) ❑ About the Indicator Lights (page 19) ❑ Connecting a Power Source (page 21) ❑ Using the Battery Pack (page 22) ❑ Shutting Down Your Computer Safely (page 29) n 12 N Getting Started Getting Started This section describes how to start up...
User Guide
Page 13
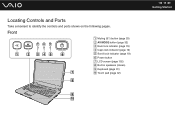
Locating Controls and Ports Take a moment to identify the controls and ports shown on the following pages. Front A Muting (S1) button (page 33) B AV MODE button (page 33) C Num lock indicator (page 19) D Caps lock indicator (page 19) E Scroll lock indicator (page 19) F Power button G LCD screen (page 102) H Built-in speakers (stereo) I Keyboard (page 31) J Touch pad (page 32) n 13 N Getting Started
Locating Controls and Ports Take a moment to identify the controls and ports shown on the following pages. Front A Muting (S1) button (page 33) B AV MODE button (page 33) C Num lock indicator (page 19) D Caps lock indicator (page 19) E Scroll lock indicator (page 19) F Power button G LCD screen (page 102) H Built-in speakers (stereo) I Keyboard (page 31) J Touch pad (page 32) n 13 N Getting Started
User Guide
Page 14
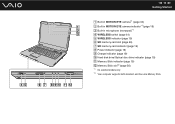
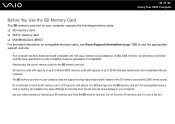
n 14 N Getting Started A Built-in MOTION EYE camera*1 (page 34) B Built-in MOTION EYE camera indicator*1 (page 19) C Built-in microphone (monaural)*1 D WIRELESS switch (page 61) E WIRELESS indicator (page 19) F SD memory card slot (page 56) G SD memory card indicator (page 19) H Power indicator (page 19) I Charge indicator (page 19) J Hard disk drive/Optical disc drive indicator (page 19) K Memory Stick indicator (page 19) L Memory Stick slot*2 (page 50) *1 On selected models only. *2 Your computer supports both standard- and Duo-size Memory Stick.
n 14 N Getting Started A Built-in MOTION EYE camera*1 (page 34) B Built-in MOTION EYE camera indicator*1 (page 19) C Built-in microphone (monaural)*1 D WIRELESS switch (page 61) E WIRELESS indicator (page 19) F SD memory card slot (page 56) G SD memory card indicator (page 19) H Power indicator (page 19) I Charge indicator (page 19) J Hard disk drive/Optical disc drive indicator (page 19) K Memory Stick indicator (page 19) L Memory Stick slot*2 (page 50) *1 On selected models only. *2 Your computer supports both standard- and Duo-size Memory Stick.
User Guide
Page 16
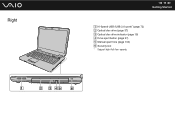
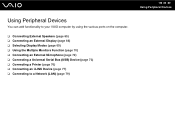
Right n 16 N Getting Started A Hi-Speed USB (USB 2.0) ports* (page 73) B Optical disc drive (page 37) C Optical disc drive indicator (page 19) D Drive eject button (page 37) E Manual eject hole (page 134) F Security slot * Support high-/full-/low- speeds.
Right n 16 N Getting Started A Hi-Speed USB (USB 2.0) ports* (page 73) B Optical disc drive (page 37) C Optical disc drive indicator (page 19) D Drive eject button (page 37) E Manual eject hole (page 134) F Security slot * Support high-/full-/low- speeds.

User Guide
Page 17
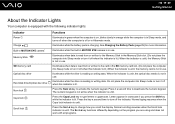
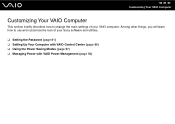
speeds. Left n 17 N Getting Started A Air vent B Monitor port (page 66) C Microphone jack (page 72) D Headphones jack (page 65) E Hi-Speed USB (USB 2.0) ports* (page 73) F i.LINK 4-pin (S400) port (page 77) G ExpressCard/34 slot (page 46) * Support high-/full-/low-
speeds. Left n 17 N Getting Started A Air vent B Monitor port (page 66) C Microphone jack (page 72) D Headphones jack (page 65) E Hi-Speed USB (USB 2.0) ports* (page 73) F i.LINK 4-pin (S400) port (page 77) G ExpressCard/34 slot (page 46) * Support high-/full-/low-

User Guide
Page 18
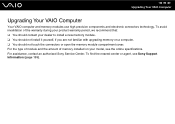
Bottom n 18 N Getting Started A Battery connector (page 22) B Air vents C Memory module compartment cover (page 97)
Bottom n 18 N Getting Started A Battery connector (page 22) B Air vents C Memory module compartment cover (page 97)
User Guide
Page 19
... turn it off when this indicator is lit.) When the indicator is unlit, the memory card is not in use . See Charging the Battery Pack (page 25) for more information. Illuminates while the drive is unlit. Letters appear in Hibernate mode. n 19 N Getting Started About the Indicator Lights Your computer is...
... turn it off when this indicator is lit.) When the indicator is unlit, the memory card is not in use . See Charging the Battery Pack (page 25) for more information. Illuminates while the drive is unlit. Letters appear in Hibernate mode. n 19 N Getting Started About the Indicator Lights Your computer is...
User Guide
Page 21
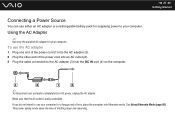
... into the DC IN port (4) on the computer. ✍ To disconnect your computer completely from AC power, unplug the AC adapter. See Using Hibernate Mode (page 90). Make sure that the AC outlet is easily accessible.
... into the DC IN port (4) on the computer. ✍ To disconnect your computer completely from AC power, unplug the AC adapter. See Using Hibernate Mode (page 90). Make sure that the AC outlet is easily accessible.
User Guide
Page 25
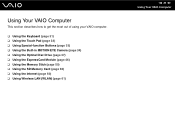
... battery pack. 2 Connect the AC adapter to the maximum charge level you selected with your desired maximum charge level, see Using the Battery Charge Functions (page 27).
... battery pack. 2 Connect the AC adapter to the maximum charge level you selected with your desired maximum charge level, see Using the Battery Charge Functions (page 27).
User Guide
Page 30
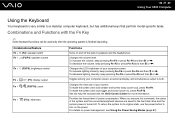
Using Your VAIO Computer This section describes how to get the most out of using your VAIO computer. ❑ Using the Keyboard (page 31) ❑ Using the Touch Pad (page 32) ❑ Using Special-function Buttons (page 33) ❑ Using the Built-in MOTION EYE Camera (page 34) ❑ Using the Optical Disc Drive (page 37) ❑ Using the ExpressCard Module (page 46) ❑ Using the Memory Stick (page 50) ❑ Using the SD Memory Card (page 56) ❑ Using the Internet (page 60) ❑ Using Wireless LAN (WLAN) (page 61) n 30 N Using Your VAIO Computer
Using Your VAIO Computer This section describes how to get the most out of using your VAIO computer. ❑ Using the Keyboard (page 31) ❑ Using the Touch Pad (page 32) ❑ Using Special-function Buttons (page 33) ❑ Using the Built-in MOTION EYE Camera (page 34) ❑ Using the Optical Disc Drive (page 37) ❑ Using the ExpressCard Module (page 46) ❑ Using the Memory Stick (page 50) ❑ Using the SD Memory Card (page 56) ❑ Using the Internet (page 60) ❑ Using Wireless LAN (WLAN) (page 61) n 30 N Using Your VAIO Computer
User Guide
Page 31
n 31 N Using Your VAIO Computer Using the Keyboard Your keyboard is finished launching. Changes the volume level. To increase the volume, keep pressing Fn+F3 or press Fn+F3 ...
n 31 N Using Your VAIO Computer Using the Keyboard Your keyboard is finished launching. Changes the volume level. To increase the volume, keep pressing Fn+F3 or press Fn+F3 ...
User Guide
Page 45
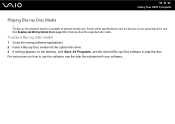
See the online specifications to find out the type of your software. n 45 N Using Your VAIO Computer Playing Blu-ray Disc Media ! To play the disc. For instructions on the desktop, click Start, All Programs, and the desired Blu-ray Disc ... nothing appears on how to use the software, see the help file included with your optical disc drive, and then Reading and Writing Optical Discs (page 39) to find out about the supported disc media. The Blu-ray Disc playback function is available on selected models only.
See the online specifications to find out the type of your software. n 45 N Using Your VAIO Computer Playing Blu-ray Disc Media ! To play the disc. For instructions on the desktop, click Start, All Programs, and the desired Blu-ray Disc ... nothing appears on how to use the software, see the help file included with your optical disc drive, and then Reading and Writing Optical Discs (page 39) to find out about the supported disc media. The Blu-ray Disc playback function is available on selected models only.
User Guide
Page 57
...Do not force the SD memory card in removing from the SD memory card slot. The SD memory card slot on compatible memory cards, see Sony Support Information (page 155) to your computer. Do not attempt to 32 GB have been tested and found compatible only with your computer. n 57 N Using ...Your VAIO Computer Before You Use the SD Memory Card The SD memory card slot on your computer supports the following memory cards: ❑ SD memory ...
...Do not force the SD memory card in removing from the SD memory card slot. The SD memory card slot on compatible memory cards, see Sony Support Information (page 155) to your computer. Do not attempt to 32 GB have been tested and found compatible only with your computer. n 57 N Using ...Your VAIO Computer Before You Use the SD Memory Card The SD memory card slot on your computer supports the following memory cards: ❑ SD memory ...
User Guide
Page 64
... Devices You can add functionality to your VAIO computer by using the various ports on the computer. ❑ Connecting External Speakers (page 65) ❑ Connecting an External Display (page 66) ❑ Selecting Display Modes (page 69) ❑ Using the Multiple Monitors Function (page 70) ❑ Connecting an External Microphone (page 72) ❑ Connecting a Universal Serial Bus...
... Devices You can add functionality to your VAIO computer by using the various ports on the computer. ❑ Connecting External Speakers (page 65) ❑ Connecting an External Display (page 66) ❑ Selecting Display Modes (page 69) ❑ Using the Multiple Monitors Function (page 70) ❑ Connecting an External Microphone (page 72) ❑ Connecting a Universal Serial Bus...

User Guide
Page 69
... time, depending on the type of your computer screen and the external display or projector at the same time, see Using the Multiple Monitors Function (page 70) for more information. n 69 N Using Peripheral Devices Selecting Display Modes You can select which display to use as the primary monitor when an external...
... time, depending on the type of your computer screen and the external display or projector at the same time, see Using the Multiple Monitors Function (page 70) for more information. n 69 N Using Peripheral Devices Selecting Display Modes You can select which display to use as the primary monitor when an external...

User Guide
Page 71
... Monitors function 1 Right-click on the desktop and select Personalize. 2 Click Display Settings. 3 Follow the on the muting (S1) button, see Using Special-function Buttons (page 33).
... Monitors function 1 Right-click on the desktop and select Personalize. 2 Click Display Settings. 3 Follow the on the muting (S1) button, see Using Special-function Buttons (page 33).
User Guide
Page 80
n 80 N Customizing Your VAIO Computer Customizing Your VAIO Computer This section briefly describes how to use and customize the look of your Sony software and utilities. ❑ Setting the Password (page 81) ❑ Setting Up Your Computer with VAIO Control Center (page 86) ❑ Using the Power Saving Modes (page 87) ❑ Managing Power with VAIO Power Management (page 92) Among other things, you will learn how to change the main settings of your VAIO computer.
n 80 N Customizing Your VAIO Computer Customizing Your VAIO Computer This section briefly describes how to use and customize the look of your Sony software and utilities. ❑ Setting the Password (page 81) ❑ Setting Up Your Computer with VAIO Control Center (page 86) ❑ Using the Power Saving Modes (page 87) ❑ Managing Power with VAIO Power Management (page 92) Among other things, you will learn how to change the main settings of your VAIO computer.
User Guide
Page 94
..., we recommend that: ❑ You should contact your model, see Sony Support Information (page 155). For assistance, contact an authorized Sony Service Center. To find the nearest center or agent, see the online specifications. n 94 N Upgrading Your VAIO Computer Upgrading Your VAIO Computer Your VAIO computer and memory modules use high precision components and electronic connectors...
..., we recommend that: ❑ You should contact your model, see Sony Support Information (page 155). For assistance, contact an authorized Sony Service Center. To find the nearest center or agent, see the online specifications. n 94 N Upgrading Your VAIO Computer Upgrading Your VAIO Computer Your VAIO computer and memory modules use high precision components and electronic connectors...
User Guide
Page 95
n 95 N Upgrading Your VAIO Computer Adding and Removing Memory If you want to expand the functionality of your computer, you can increase the amount of your memory module. ❑ ... and with the safety practice and regulatory compliance requirements for example). Before touching a memory module, ensure the following: ❑ The procedures described in the following pages. This damage may void your manufacturer's warranty. ❑ Only use memory modules that produce or hold static electricity (cellophane wrappers, for using and modifying electronic...
n 95 N Upgrading Your VAIO Computer Adding and Removing Memory If you want to expand the functionality of your computer, you can increase the amount of your memory module. ❑ ... and with the safety practice and regulatory compliance requirements for example). Before touching a memory module, ensure the following: ❑ The procedures described in the following pages. This damage may void your manufacturer's warranty. ❑ Only use memory modules that produce or hold static electricity (cellophane wrappers, for using and modifying electronic...