
User Guide
Page 15
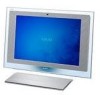
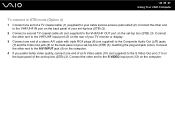
D Line In jack Connect an external audio device for audio input. speeds. B i.LINK (IEEE 1394) S400 port (page 103) C Microphone jack Connect an external microphone. E OPTICAL OUT port (Output Sampling Rate: 44.1 KHz/48.0 KHz/96.0 KHz) Connect an S/PDIF-compatible device such as digital headphones or an AV amplifier. Back n 15 N Getting Started A Back panel cover Remove the back panel cover to access the ports and jacks behind it (page 20). F Hi-Speed USB (USB 2.0) ports* (page 100) G Prop-up stand * Support high-/full-/low-
D Line In jack Connect an external audio device for audio input. speeds. B i.LINK (IEEE 1394) S400 port (page 103) C Microphone jack Connect an external microphone. E OPTICAL OUT port (Output Sampling Rate: 44.1 KHz/48.0 KHz/96.0 KHz) Connect an S/PDIF-compatible device such as digital headphones or an AV amplifier. Back n 15 N Getting Started A Back panel cover Remove the back panel cover to access the ports and jacks behind it (page 20). F Hi-Speed USB (USB 2.0) ports* (page 100) G Prop-up stand * Support high-/full-/low-
User Guide
Page 16
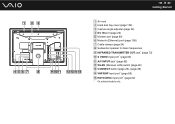
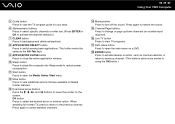
n 16 N Getting Started A Air vent B Hard disk bay cover (page 122) C Capture angle adjuster (page 43) D DC IN port (page 22) E Modem port (page 90) F Network (Ethernet) port (page 105) G Cable clamps (page 24) H Subwoofer speaker for bass frequencies I INFRARED TRANSMITTER OUT jack* (page 72) J S VIDEO input port* (page 65) K A/V INPUT jack* (page 65) L WLAN (Wireless LAN) switch (page 92) M CONNECT button (page 25), (page 28) N VHF/UHF input port* (page 55) O HDTV/ATSC input port* (page 62) * On selected models only.
n 16 N Getting Started A Air vent B Hard disk bay cover (page 122) C Capture angle adjuster (page 43) D DC IN port (page 22) E Modem port (page 90) F Network (Ethernet) port (page 105) G Cable clamps (page 24) H Subwoofer speaker for bass frequencies I INFRARED TRANSMITTER OUT jack* (page 72) J S VIDEO input port* (page 65) K A/V INPUT jack* (page 65) L WLAN (Wireless LAN) switch (page 92) M CONNECT button (page 25), (page 28) N VHF/UHF input port* (page 55) O HDTV/ATSC input port* (page 62) * On selected models only.
User Guide
Page 56
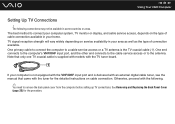
...Removing and Replacing the Back Panel Cover (page 20) for the detailed instructions on cable connection. n 56 N Using Your VAIO Computer Setting Up TV Connections ! If your home. TV signal reception strength will vary widely depending on the type of connection available. The following . ✍ You need to ...may not be available in your computer is not equipped with the VHF/UHF input port and is delivered with an external digital cable tuner, see the manual that only one TV coaxial cable is the TV coaxial cable (1). Note that came with the tuner for the procedure. Otherwise,...
...Removing and Replacing the Back Panel Cover (page 20) for the detailed instructions on cable connection. n 56 N Using Your VAIO Computer Setting Up TV Connections ! If your home. TV signal reception strength will vary widely depending on the type of connection available. The following . ✍ You need to ...may not be available in your computer is not equipped with the VHF/UHF input port and is delivered with an external digital cable tuner, see the manual that only one TV coaxial cable is the TV coaxial cable (1). Note that came with the tuner for the procedure. Otherwise,...
User Guide
Page 57
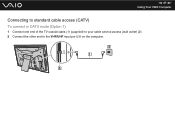
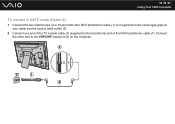
n 57 N Using Your VAIO Computer Connecting to standard cable access (CATV) To connect in CATV mode (Option 1) 1 Connect one end of the TV coaxial cable (1) (supplied) to your cable service access (wall outlet) (2). 2 Connect the other end to the VHF/UHF input port (3) on the computer.
n 57 N Using Your VAIO Computer Connecting to standard cable access (CATV) To connect in CATV mode (Option 1) 1 Connect one end of the TV coaxial cable (1) (supplied) to your cable service access (wall outlet) (2). 2 Connect the other end to the VHF/UHF input port (3) on the computer.
User Guide
Page 58
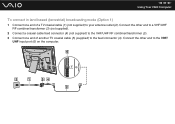
Connect the other end to the VHF/UHF input port (4) on a 75-ohm/300-ohm RCA transformer cable (1) (not supplied) to the screw-type grips at your cable service access (wall outlet) (2). 2 Connect one end of the TV coaxial cable (3) (supplied) to the transformer end of the RCA transformer cable (1). n 58 N Using Your VAIO Computer To connect in CATV mode (Option 2) 1 Connect the two metal hooks on the computer.
Connect the other end to the VHF/UHF input port (4) on a 75-ohm/300-ohm RCA transformer cable (1) (not supplied) to the screw-type grips at your cable service access (wall outlet) (2). 2 Connect one end of the TV coaxial cable (3) (supplied) to the transformer end of the RCA transformer cable (1). n 58 N Using Your VAIO Computer To connect in CATV mode (Option 2) 1 Connect the two metal hooks on the computer.
User Guide
Page 60
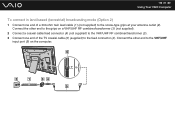
Connect the other end to a VHF/UHF RF combiner/transformer (3) (not supplied). 2 Connect a coaxial cable feed connector (4) (not supplied) to the VHF/UHF RF combiner/transformer (3). 3 Connect one end of another TV coaxial cable (5) (supplied) to the feed connector (4). n 60 N Using Your VAIO Computer To connect in land-based (terrestrial) broadcasting mode (Option 1) 1 Connect one end of a TV coaxial cable (1) (not supplied) to the VHF/ UHF input port (6) on the computer. Connect the other end to your antenna outlet (2).
Connect the other end to a VHF/UHF RF combiner/transformer (3) (not supplied). 2 Connect a coaxial cable feed connector (4) (not supplied) to the VHF/UHF RF combiner/transformer (3). 3 Connect one end of another TV coaxial cable (5) (supplied) to the feed connector (4). n 60 N Using Your VAIO Computer To connect in land-based (terrestrial) broadcasting mode (Option 1) 1 Connect one end of a TV coaxial cable (1) (not supplied) to the VHF/ UHF input port (6) on the computer. Connect the other end to your antenna outlet (2).
User Guide
Page 61
n 61 N Using Your VAIO Computer To connect in land-based (terrestrial) broadcasting mode (Option 2) 1 Connect one end of a 300-ohm twin lead cable (1) (not supplied) to the screw-type grips at your antenna outlet (2). Connect the other end to the feed connector (4). Connect the other end to the grips on a VHF/UHF RF combiner/transformer (3) (not supplied). 2 Connect a coaxial cable feed connector (4) (not supplied) to the VHF/UHF RF combiner/transformer (3). 3 Connect one end of the TV coaxial cable (5) (supplied) to the VHF/UHF input port (6) on the computer.
n 61 N Using Your VAIO Computer To connect in land-based (terrestrial) broadcasting mode (Option 2) 1 Connect one end of a 300-ohm twin lead cable (1) (not supplied) to the screw-type grips at your antenna outlet (2). Connect the other end to the feed connector (4). Connect the other end to the grips on a VHF/UHF RF combiner/transformer (3) (not supplied). 2 Connect a coaxial cable feed connector (4) (not supplied) to the VHF/UHF RF combiner/transformer (3). 3 Connect one end of the TV coaxial cable (5) (supplied) to the VHF/UHF input port (6) on the computer.

User Guide
Page 62
n 62 N Using Your VAIO Computer To connect to an antenna (air) for digital television system (ATSC signal standard) If you have an antenna for receiving the over-the-air signals transmitted by a digital TV broadcasting system, you can connect it to receive these signals for digital televisions, for example high definition TVs. 1 Connect one end of the TV coaxial cable (1) (supplied) to an ATSC antenna (not supplied) (2). 2 Connect the other end to the HDTV/ATSC input port (3) on the computer.
n 62 N Using Your VAIO Computer To connect to an antenna (air) for digital television system (ATSC signal standard) If you have an antenna for receiving the over-the-air signals transmitted by a digital TV broadcasting system, you can connect it to receive these signals for digital televisions, for example high definition TVs. 1 Connect one end of the TV coaxial cable (1) (supplied) to an ATSC antenna (not supplied) (2). 2 Connect the other end to the HDTV/ATSC input port (3) on the computer.
User Guide
Page 63
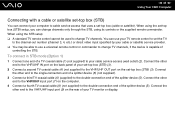
...) to the double-connection end of the splitter device (5). Connect the other end to the VHF/UHF input port (7) on the rear of your TV monitor or display. n 63 N Using Your VAIO Computer Connecting with a cable or satellite set-top box (STB) You can connect your cable or satellite...STB. When using the set -top box (STB) (3). To connect in STB mode (Option 1) 1 Connect one end of a TV coaxial cable (1) (not supplied) to your set-top box (STB) (3). 2 Connect a second TV coaxial cable (4) (not supplied) to the double-connection end of your cable service access (wall outlet) (2)....
...) to the double-connection end of the splitter device (5). Connect the other end to the VHF/UHF input port (7) on the rear of your TV monitor or display. n 63 N Using Your VAIO Computer Connecting with a cable or satellite set-top box (STB) You can connect your cable or satellite...STB. When using the set -top box (STB) (3). To connect in STB mode (Option 1) 1 Connect one end of a TV coaxial cable (1) (not supplied) to your set-top box (STB) (3). 2 Connect a second TV coaxial cable (4) (not supplied) to the double-connection end of your cable service access (wall outlet) (2)....
User Guide
Page 65
Connect the other end to the A/V INPUT jack (9) on the computer. 4 If you prefer better video quality, connect one end of your cable service access (wall outlet) (2). n 65 N Using Your VAIO Computer To connect in STB mode (Option 2) 1 Connect one end of an S Video cable (10) (not supplied) to ... set-top box (STB) (3). 2 Connect a second TV coaxial cable (4) (not supplied) to your TV monitor or display. 3 Connect one end of a stereo A/V cable with triple RCA plugs (6) (not supplied) to the S VIDEO input port (12) on the rear of a TV coaxial cable (1) (supplied) to the VHF/UHF OUT...
Connect the other end to the A/V INPUT jack (9) on the computer. 4 If you prefer better video quality, connect one end of your cable service access (wall outlet) (2). n 65 N Using Your VAIO Computer To connect in STB mode (Option 2) 1 Connect one end of an S Video cable (10) (not supplied) to ... set-top box (STB) (3). 2 Connect a second TV coaxial cable (4) (not supplied) to your TV monitor or display. 3 Connect one end of a stereo A/V cable with triple RCA plugs (6) (not supplied) to the S VIDEO input port (12) on the rear of a TV coaxial cable (1) (supplied) to the VHF/UHF OUT...
User Guide
Page 69
n 69 N Using Your VAIO Computer E Guide button Press to view the TV program guide for Media Center features. F Alphanumeric buttons Press to select specific channels or enter text. (Press ENTER or OK to activate the channel selection.) G ...
n 69 N Using Your VAIO Computer E Guide button Press to view the TV program guide for Media Center features. F Alphanumeric buttons Press to select specific channels or enter text. (Press ENTER or OK to activate the channel selection.) G ...

User Guide
Page 151
...-in MOTION EYE camera flicker? n 151 N Troubleshooting Why do the images captured by the built-in MOTION EYE camera suspended for a few seconds? The video input may be suspended for a few seconds if: ❑ a shortcut key with the Fn key is used. ❑ the CPU load increases. Why is normal and... noise. LightSource, Flickness, etc.) to the mismatch between lighting output frequency and shutter speed. This problem occurs when you can set an appropriate value to one of camera images.
...-in MOTION EYE camera flicker? n 151 N Troubleshooting Why do the images captured by the built-in MOTION EYE camera suspended for a few seconds? The video input may be suspended for a few seconds if: ❑ a shortcut key with the Fn key is used. ❑ the CPU load increases. Why is normal and... noise. LightSource, Flickness, etc.) to the mismatch between lighting output frequency and shutter speed. This problem occurs when you can set an appropriate value to one of camera images.
User Guide
Page 166
..., make sure the microphone is turned on and is properly plugged into the microphone jack on your computer. ❑ Your sound input device may have been incorrectly configured. Microphone feedback occurs when the microphone receives the sound from a sound output device. ❑... Control Panel. 3 Click Hardware and Sound. 4 Click Manage audio devices under Sound. 5 On the Recording tab, select the desired device for sound input and click Set Default. n 166 N Troubleshooting Microphone What should I prevent microphone feedback? To prevent this problem: ❑ Keep the microphone away from...
..., make sure the microphone is turned on and is properly plugged into the microphone jack on your computer. ❑ Your sound input device may have been incorrectly configured. Microphone feedback occurs when the microphone receives the sound from a sound output device. ❑... Control Panel. 3 Click Hardware and Sound. 4 Click Manage audio devices under Sound. 5 On the Recording tab, select the desired device for sound input and click Set Default. n 166 N Troubleshooting Microphone What should I prevent microphone feedback? To prevent this problem: ❑ Keep the microphone away from...
User Guide
Page 167
... Exit, select Exit Setup, and then press the Enter key. The BIOS setup screen appears. n 167 N Troubleshooting What should I do if I do not hear audio input from the built-in microphone through the builtin speakers or if the built-in microphone does not work? If not, restart the computer and press... the F2 key several times when the VAIO logo appears. 3 Press the < or , key to select Advanced to display the Advanced tab, select Voice Processor, and then press the Enter key. 4 Press the...
... Exit, select Exit Setup, and then press the Enter key. The BIOS setup screen appears. n 167 N Troubleshooting What should I do if I do not hear audio input from the built-in microphone through the builtin speakers or if the built-in microphone does not work? If not, restart the computer and press... the F2 key several times when the VAIO logo appears. 3 Press the < or , key to select Advanced to display the Advanced tab, select Voice Processor, and then press the Enter key. 4 Press the...