
User Guide
Page 4
n4 N Troubleshooting ...152 Computer ...154 System Security ...160 Built-in MOTION EYE Camera...161 Networking ...164 Bluetooth Technology ...167 Optical Discs ...171 Display ...176 Printing ...177 Microphone ...178 Mouse ...179 Speakers ...180 Touch Pad...182 Keyboard...183 Floppy Disks ...184 Audio/Video...185 HDMI ...188 Memory Stick ...190 Peripherals ...191 Support Options ...192 Sony Support Information ...193 Program Support Information...196 Trademarks ...206
n4 N Troubleshooting ...152 Computer ...154 System Security ...160 Built-in MOTION EYE Camera...161 Networking ...164 Bluetooth Technology ...167 Optical Discs ...171 Display ...176 Printing ...177 Microphone ...178 Mouse ...179 Speakers ...180 Touch Pad...182 Keyboard...183 Floppy Disks ...184 Audio/Video...185 HDMI ...188 Memory Stick ...190 Peripherals ...191 Support Options ...192 Sony Support Information ...193 Program Support Information...196 Trademarks ...206

User Guide
Page 9
... the floor. Sit in a neutral, comfortable position (3) while using your computer - Take frequent breaks while using the keyboard, pointing device, or external mouse. Place the display directly in a relaxed, upright posture and avoid slouching forward or leaning far backwards. Ergonomic Considerations Whenever possible, you should attempt to take account of the...
... the floor. Sit in a neutral, comfortable position (3) while using your computer - Take frequent breaks while using the keyboard, pointing device, or external mouse. Place the display directly in a relaxed, upright posture and avoid slouching forward or leaning far backwards. Ergonomic Considerations Whenever possible, you should attempt to take account of the...

User Guide
Page 10
... the tilt of the main unit. Choose a location where windows and lights do not exert excessive pressure on each side of the display to eliminate a risk of mechanical damage. ❑ Lighting - While adjusting the viewing angle, do not cause glare and reflection on the... display. Use indirect lighting to find the best position. Use the display's tilting feature to avoid bright spots on the display. Make sure you leave at least 4 inches (10 cm) of space behind and at least ...
... the tilt of the main unit. Choose a location where windows and lights do not exert excessive pressure on each side of the display to eliminate a risk of mechanical damage. ❑ Lighting - While adjusting the viewing angle, do not cause glare and reflection on the... display. Use indirect lighting to find the best position. Use the display's tilting feature to avoid bright spots on the display. Make sure you leave at least 4 inches (10 cm) of space behind and at least ...

User Guide
Page 12
The appearance of your computer may also vary in some countries or areas. G SONY logo lamp (page 120) H LCD screen (page 139) I HDMI SELECT indicator* (page 17) J WIRELESS indicator (page 17) K DISPLAY OFF indicator (page 17) L Hard disk drive/Optical disc drive indicator (page 17) * On selected models only. Front A Built-in speakers...
The appearance of your computer may also vary in some countries or areas. G SONY logo lamp (page 120) H LCD screen (page 139) I HDMI SELECT indicator* (page 17) J WIRELESS indicator (page 17) K DISPLAY OFF indicator (page 17) L Hard disk drive/Optical disc drive indicator (page 17) * On selected models only. Front A Built-in speakers...

User Guide
Page 13
... 18). C Capture angle adjuster (page 43) D Back panel cover Remove the back panel cover to turn off the volume. Back n 13 N Getting Started A Power button B DISPLAY OFF button Press this button also turns off the LCD backlight. E CONNECT button (page 26), (page 28) F i.LINK 4-pin (S400) port (page 110) G OPTICAL OUT...
... 18). C Capture angle adjuster (page 43) D Back panel cover Remove the back panel cover to turn off the volume. Back n 13 N Getting Started A Power button B DISPLAY OFF button Press this button also turns off the LCD backlight. E CONNECT button (page 26), (page 28) F i.LINK 4-pin (S400) port (page 110) G OPTICAL OUT...

User Guide
Page 17
... in orange while the computer is in Sleep mode, and turns off when the computer is not in MOTION EYE camera Media Access HDMI SELECT* DISPLAY OFF Hard disk drive/Optical disc drive WIRELESS * On selected models only. Illuminates in MOTION EYE camera is reading or writing data. Illuminates when the...
... in orange while the computer is in Sleep mode, and turns off when the computer is not in MOTION EYE camera Media Access HDMI SELECT* DISPLAY OFF Hard disk drive/Optical disc drive WIRELESS * On selected models only. Illuminates in MOTION EYE camera is reading or writing data. Illuminates when the...

User Guide
Page 37
... button Turns the volume on the computer screen. L Directional arrow keys Move the pointer on and off. N Windows key Displays the Start menu. See Setting Up Your Computer with the VAIO Control Center. K Touch pad See Using the Touch Pad (page 39) for use (page 26). when the (Num... assignment may be different from the above. In such a case, you can change the assignment with VAIO Control Center (page 120) and find out more information. n 37 N Using Your VAIO Computer G Indicators (Battery): turns on while connection between the computer and the wireless keyboard is ready ...
... button Turns the volume on the computer screen. L Directional arrow keys Move the pointer on and off. N Windows key Displays the Start menu. See Setting Up Your Computer with the VAIO Control Center. K Touch pad See Using the Touch Pad (page 39) for use (page 26). when the (Num... assignment may be different from the above. In such a case, you can change the assignment with VAIO Control Center (page 120) and find out more information. n 37 N Using Your VAIO Computer G Indicators (Battery): turns on while connection between the computer and the wireless keyboard is ready ...

User Guide
Page 39
...mouse is connected to place the pointer (2) on the screen using the touch pad. n 39 N Using Your VAIO Computer Action Point Click Double-click Right-click Drag Scroll Description Slide your finger on the touch pad (1) to your... pad while pressing the left button (3) once. To change other touch pad settings, click Start, All Programs, VAIO Control Center, Keyboard and Mouse and Pointing Device. Press the left button. Slide your finger along the bottom edge...right edge of the touch pad. In many applications, this action displays a shortcut menu. Press the left button twice.
...mouse is connected to place the pointer (2) on the screen using the touch pad. n 39 N Using Your VAIO Computer Action Point Click Double-click Right-click Drag Scroll Description Slide your finger on the touch pad (1) to your... pad while pressing the left button (3) once. To change other touch pad settings, click Start, All Programs, VAIO Control Center, Keyboard and Mouse and Pointing Device. Press the left button. Slide your finger along the bottom edge...right edge of the touch pad. In many applications, this action displays a shortcut menu. Press the left button twice.

User Guide
Page 41
... right side button to go back to the previous page. Press the wheel once to display a context-sensitive shortcut menu (if any). To change the button assignment, press and hold the central wheel. n 41 N Using Your VAIO Computer A Left button Click or double-click the left button to select items. To drag...
... right side button to go back to the previous page. Press the wheel once to display a context-sensitive shortcut menu (if any). To change the button assignment, press and hold the central wheel. n 41 N Using Your VAIO Computer A Left button Click or double-click the left button to select items. To drag...

User Guide
Page 45
... select the low light or low light compensation option in the viewfinder. 4 Click the Capture button below the displayed image. See the help file included with the software for more features. n 45 N Using Your VAIO Computer Capturing Still Images To capture a still image 1 Click Start, All Programs, ArcSoft WebCam Companion 2, and WebCam...
... select the low light or low light compensation option in the viewfinder. 4 Click the Capture button below the displayed image. See the help file included with the software for more features. n 45 N Using Your VAIO Computer Capturing Still Images To capture a still image 1 Click Start, All Programs, ArcSoft WebCam Companion 2, and WebCam...
User Guide
Page 46
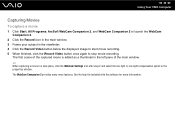
n 46 N Using Your VAIO Computer Capturing Movies To capture a movie 1 Click Start, All Programs, ArcSoft WebCam Companion 2, and WebCam Companion 2 to stop movie recording. The first scene of the ... WebCam Settings icon after step 2 and select the low light or low light compensation option in the viewfinder. 4 Click the Record Video button below the displayed image to start movie recording. 5 When finished, click the Record Video button once again to launch the WebCam Companion 2. 2 Click the Record icon in the...
n 46 N Using Your VAIO Computer Capturing Movies To capture a movie 1 Click Start, All Programs, ArcSoft WebCam Companion 2, and WebCam Companion 2 to stop movie recording. The first scene of the ... WebCam Settings icon after step 2 and select the low light or low light compensation option in the viewfinder. 4 Click the Record Video button below the displayed image to start movie recording. 5 When finished, click the Record Video button once again to launch the WebCam Companion 2. 2 Click the Record icon in the...
User Guide
Page 57
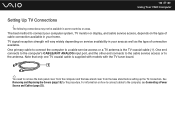
...information on how to connect cables to connect your computer system, TV monitor or display, and cable service access, depends on service availability in your home. One primary cable to connect the computer to the antenna. One end connects to the computer's CABLE/ANT ANALOG input port, ...available in some countries or areas. n 57 N Using Your VAIO Computer Setting Up TV Connections ! Note that only one TV coaxial cable is the TV coaxial cable (1). See Removing and Replacing the Covers (page 18) for the procedure. TV signal reception strength will vary widely depending on the type of...
...information on how to connect cables to connect your computer system, TV monitor or display, and cable service access, depends on service availability in your home. One primary cable to connect the computer to the antenna. One end connects to the computer's CABLE/ANT ANALOG input port, ...available in some countries or areas. n 57 N Using Your VAIO Computer Setting Up TV Connections ! Note that only one TV coaxial cable is the TV coaxial cable (1). See Removing and Replacing the Covers (page 18) for the procedure. TV signal reception strength will vary widely depending on the type of...

User Guide
Page 64
n 64 N Using Your VAIO Computer Connecting with a cable or satellite set-top box (STB) You can change channels only through the STB, using its controls or the supplied remote ... (10) (not supplied) to the S Video output port (11) on the other end to your TV monitor or display. 3 Connect one end and the straight plug on the back panel of your set-top box (STB) (3). 2 Connect a second TV coaxial cable (4) (not supplied) to cable service access that uses a set -top box (STB) (3), matching...
n 64 N Using Your VAIO Computer Connecting with a cable or satellite set-top box (STB) You can change channels only through the STB, using its controls or the supplied remote ... (10) (not supplied) to the S Video output port (11) on the other end to your TV monitor or display. 3 Connect one end and the straight plug on the back panel of your set-top box (STB) (3). 2 Connect a second TV coaxial cable (4) (not supplied) to cable service access that uses a set -top box (STB) (3), matching...

User Guide
Page 66
...double-connection end of the splitter device (5). Connect the other end to the VHF/UHF input port on the back panel of a TV coaxial cable (1) (supplied) to your TV monitor or display. Connect the other end to the VHF/UHF input port (9) on the set-top box (STB) (3). n 66 N Using... Your VAIO Computer To connect in STB mode (Option 2) 1 Connect one end of your set-top box (STB) (3). 2 Connect a second TV coaxial cable (4) (not supplied)...
...double-connection end of the splitter device (5). Connect the other end to the VHF/UHF input port on the back panel of a TV coaxial cable (1) (supplied) to your TV monitor or display. Connect the other end to the VHF/UHF input port (9) on the set-top box (STB) (3). n 66 N Using... Your VAIO Computer To connect in STB mode (Option 2) 1 Connect one end of your set-top box (STB) (3). 2 Connect a second TV coaxial cable (4) (not supplied)...

User Guide
Page 75
... receive the highdefinition video and sound outputs from the connected device and you to connect a device with the HDMI output port, such as a TV program, displayed on your computer and starting Windows. You cannot record the HDMI input, such as a hard disk drive recorder, to find out if your... computer is equipped with the HDMI Input function. See the online specifications to the computer. n 75 N Using Your VAIO Computer Using the HDMI Input ...
... receive the highdefinition video and sound outputs from the connected device and you to connect a device with the HDMI output port, such as a TV program, displayed on your computer and starting Windows. You cannot record the HDMI input, such as a hard disk drive recorder, to find out if your... computer is equipped with the HDMI Input function. See the online specifications to the computer. n 75 N Using Your VAIO Computer Using the HDMI Input ...

User Guide
Page 76
... input from the connected device and change the display and sound settings for the HDMI input. While the OSD menu is selected, the HDMI SELECT button and the HDMI SELECT indicator light illuminate in green. n 76 N Using Your VAIO Computer Using the HDMI Input Control Buttons The ...HDMI input control buttons allow you can change the display and sound settings for the HDMI input with the OSD menu. HDMI input control buttons HDMI...
... input from the connected device and change the display and sound settings for the HDMI input. While the OSD menu is selected, the HDMI SELECT button and the HDMI SELECT indicator light illuminate in green. n 76 N Using Your VAIO Computer Using the HDMI Input Control Buttons The ...HDMI input control buttons allow you can change the display and sound settings for the HDMI input with the OSD menu. HDMI input control buttons HDMI...

User Guide
Page 77
...base stand cover from the device on the computer, you want to the computer, see Connecting a Power Source and Cables (page 23). n 77 N Using Your VAIO Computer Connecting and Using the HDMI-Compatible Device You need to connect the HDMI-compatible device to your computer with the OSD menu, turning on... HDMI input. For information on your computer to the HDMI-compatible device ✍ You need to turn on how to connect cables to change the display input. See Removing and Replacing the Covers (page 18) for the HDMI Input (page 79). 1 Connect an HDMI cable (not supplied) to the HDMI ...
...base stand cover from the device on the computer, you want to the computer, see Connecting a Power Source and Cables (page 23). n 77 N Using Your VAIO Computer Connecting and Using the HDMI-Compatible Device You need to connect the HDMI-compatible device to your computer with the OSD menu, turning on... HDMI input. For information on your computer to the HDMI-compatible device ✍ You need to turn on how to connect cables to change the display input. See Removing and Replacing the Covers (page 18) for the HDMI Input (page 79). 1 Connect an HDMI cable (not supplied) to the HDMI ...

User Guide
Page 79
... the default SONY lamp activity ! To change this option when the computer input is selected. n 79 N Using Your VAIO Computer Changing the Display and Sound Settings for the HDMI input with the OSD menu. To enable or disable the Auto Input Sensing feature 1 Press the MENU button to display the OSD ...menu, enable or disable the Auto Input Sensing feature, and change the display and sound settings for the HDMI Input You can change the default SONY logo lamp activity while the HDMI input is selected. 1 Press the MENU button to display the OSD menu. 2 Press the Up (V) or Down (v) button...
... the default SONY lamp activity ! To change this option when the computer input is selected. n 79 N Using Your VAIO Computer Changing the Display and Sound Settings for the HDMI input with the OSD menu. To enable or disable the Auto Input Sensing feature 1 Press the MENU button to display the OSD ...menu, enable or disable the Auto Input Sensing feature, and change the display and sound settings for the HDMI Input You can change the default SONY logo lamp activity while the HDMI input is selected. 1 Press the MENU button to display the OSD menu. 2 Press the Up (V) or Down (v) button...

User Guide
Page 80
See Removing and Replacing the Covers (page 18) for the procedure. You cannot record the HDMI input, such as a TV program, displayed on your computer with the HDMI Input function. ✍ You need to the computer, see Connecting a Power Source and Cables (page 23). For information on ... from the base stand before connecting an HDMI cable. n 80 N Using Your VAIO Computer Viewing TV Programs with the HDMI Input Function If you are using a set-top box with an HDMI output port to view TV programs, you can display them on your computer or control the Windows Media Center with the HDMI...
See Removing and Replacing the Covers (page 18) for the procedure. You cannot record the HDMI input, such as a TV program, displayed on your computer with the HDMI Input function. ✍ You need to the computer, see Connecting a Power Source and Cables (page 23). For information on ... from the base stand before connecting an HDMI cable. n 80 N Using Your VAIO Computer Viewing TV Programs with the HDMI Input Function If you are using a set-top box with an HDMI output port to view TV programs, you can display them on your computer or control the Windows Media Center with the HDMI...

User Guide
Page 81
... the other end to the HDMI INPUT port (8) on the computer. n 81 N Using Your VAIO Computer To connect a set-top box using the HDMI INPUT port 1 Connect one end of your set-top box (STB) (3). 2 Connect a second TV coaxial cable (4) (not supplied) to the VHF/UHF output port on the set -top box... (STB) and the other end to the VHF/UHF input port on the back panel of a TV coaxial cable (1) (supplied) to your TV monitor or display. 3 Connect...
... the other end to the HDMI INPUT port (8) on the computer. n 81 N Using Your VAIO Computer To connect a set-top box using the HDMI INPUT port 1 Connect one end of your set-top box (STB) (3). 2 Connect a second TV coaxial cable (4) (not supplied) to the VHF/UHF output port on the set -top box... (STB) and the other end to the VHF/UHF input port on the back panel of a TV coaxial cable (1) (supplied) to your TV monitor or display. 3 Connect...

