
User Guide
Page 4
n4 N Troubleshooting ...140 Computer ...142 System Security ...148 Built-in MOTION EYE Camera...150 Internet ...153 Networking ...155 Optical Discs ...158 Display ...163 Printing ...165 Microphone ...166 Mouse ...168 Speakers ...169 Keyboard...171 Floppy Disks ...172 PC Cards ...173 Audio/Video...175 Memory Stick Media ...178 Peripherals ...179 Support Options ...180 Sony Support Information ...180 Program Support Information...184 Trademarks ...195
n4 N Troubleshooting ...140 Computer ...142 System Security ...148 Built-in MOTION EYE Camera...150 Internet ...153 Networking ...155 Optical Discs ...158 Display ...163 Printing ...165 Microphone ...166 Mouse ...168 Speakers ...169 Keyboard...171 Floppy Disks ...172 PC Cards ...173 Audio/Video...175 Memory Stick Media ...178 Peripherals ...179 Support Options ...180 Sony Support Information ...180 Program Support Information...184 Trademarks ...195
User Guide
Page 14
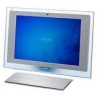
... in specifications. G Power button H Remote sensor* Point the supplied remote commander to this button to identify the controls and ports shown on the following pages. ! I SONY logo lamp (page 111) J LCD screen (page 128) K Hard disk drive indicator (page 19) L DISPLAY OFF indicator (page 19) * On selected models only. Front A .... n 14 N Getting Started Locating Controls and Ports Take a moment to turn off the LCD backlight. The appearance of your computer may also vary in microphone (monaural) E Power indicator (page 19) F DISPLAY OFF button Press this sensor for operations.
... in specifications. G Power button H Remote sensor* Point the supplied remote commander to this button to identify the controls and ports shown on the following pages. ! I SONY logo lamp (page 111) J LCD screen (page 128) K Hard disk drive indicator (page 19) L DISPLAY OFF indicator (page 19) * On selected models only. Front A .... n 14 N Getting Started Locating Controls and Ports Take a moment to turn off the LCD backlight. The appearance of your computer may also vary in microphone (monaural) E Power indicator (page 19) F DISPLAY OFF button Press this sensor for operations.

User Guide
Page 15
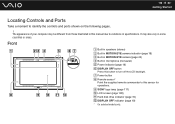
D Line In jack Connect an external audio device for audio input. F Hi-Speed USB (USB 2.0) ports* (page 100) G Prop-up stand * Support high-/full-/low- B i.LINK (IEEE 1394) S400 port (page 103) C Microphone jack Connect an external microphone. speeds. E OPTICAL OUT port (Output Sampling Rate: 44.1 KHz/48.0 KHz/96.0 KHz) Connect an S/PDIF-compatible device such as digital headphones or an AV amplifier. Back n 15 N Getting Started A Back panel cover Remove the back panel cover to access the ports and jacks behind it (page 20).
D Line In jack Connect an external audio device for audio input. F Hi-Speed USB (USB 2.0) ports* (page 100) G Prop-up stand * Support high-/full-/low- B i.LINK (IEEE 1394) S400 port (page 103) C Microphone jack Connect an external microphone. speeds. E OPTICAL OUT port (Output Sampling Rate: 44.1 KHz/48.0 KHz/96.0 KHz) Connect an S/PDIF-compatible device such as digital headphones or an AV amplifier. Back n 15 N Getting Started A Back panel cover Remove the back panel cover to access the ports and jacks behind it (page 20).

User Guide
Page 140
...sony.com/ES/VAIO/BR/ for customers in Brazil ❑ Computer (page 142) ❑ System Security (page 148) ❑ Built-in MOTION EYE Camera (page 150) ❑ Internet (page 153) ❑ Networking (page 155) ❑ Optical Discs (page 158) ❑ Display (page 163) ❑ Printing (page 165) ❑ Microphone... (page 166) ❑ Mouse (page 168) ❑ Speakers (page 169) ❑ Keyboard (page 171) ❑ Floppy Disks (page 172) ❑ PC Cards (page 173) ❑ Audio/Video (page 175) n 140 N...
...sony.com/ES/VAIO/BR/ for customers in Brazil ❑ Computer (page 142) ❑ System Security (page 148) ❑ Built-in MOTION EYE Camera (page 150) ❑ Internet (page 153) ❑ Networking (page 155) ❑ Optical Discs (page 158) ❑ Display (page 163) ❑ Printing (page 165) ❑ Microphone... (page 166) ❑ Mouse (page 168) ❑ Speakers (page 169) ❑ Keyboard (page 171) ❑ Floppy Disks (page 172) ❑ PC Cards (page 173) ❑ Audio/Video (page 175) n 140 N...
User Guide
Page 166
... the Recording tab, select the desired device for sound input and click Set Default. To prevent this problem: ❑ Keep the microphone away from a sound output device, such as a speaker. Microphone feedback occurs when the microphone receives the sound from a sound output device. ❑ Turn down the volume of the speakers and the...
... the Recording tab, select the desired device for sound input and click Set Default. To prevent this problem: ❑ Keep the microphone away from a sound output device, such as a speaker. Microphone feedback occurs when the microphone receives the sound from a sound output device. ❑ Turn down the volume of the speakers and the...
User Guide
Page 167
..., and then press the Enter key. The BIOS setup screen appears. If not, restart the computer and press the F2 key several times when the VAIO logo appears. 3 Press the < or , key to select Advanced to display the Advanced tab, select Voice Processor, and then press the Enter key. 4 Press ... press the Enter key. 5 Press the < or , key to disable the acoustic echo canceller function: 1 Turn on the computer. 2 Press the F2 key when the VAIO logo appears. At the confirmation prompt, press the Enter key. n 167 N Troubleshooting What should I do if I do not hear audio input from the built-in...
..., and then press the Enter key. The BIOS setup screen appears. If not, restart the computer and press the F2 key several times when the VAIO logo appears. 3 Press the < or , key to select Advanced to display the Advanced tab, select Voice Processor, and then press the Enter key. 4 Press ... press the Enter key. 5 Press the < or , key to disable the acoustic echo canceller function: 1 Turn on the computer. 2 Press the F2 key when the VAIO logo appears. At the confirmation prompt, press the Enter key. n 167 N Troubleshooting What should I do if I do not hear audio input from the built-in...