
Manual
Page 1
3-264-043-23(1) Wireless Stereo Headphone System Operating Instructions GB Mode d'emploi FR Manual de instrucciones ES MDR-RF920RK MDR-RF960RK © 2005 Sony Corporation
3-264-043-23(1) Wireless Stereo Headphone System Operating Instructions GB Mode d'emploi FR Manual de instrucciones ES MDR-RF920RK MDR-RF960RK © 2005 Sony Corporation
Manual
Page 2
... recycling of rechargeable batteries, call : Sony Customer Information Services Center 1-800-222-7669 or http://www.sony.com/ Declaration of Conformity Trade Name: SONY Model No.: MDR-RF920R MDR-RF960R (Headphones Unit) Responsible Party: Sony Electronics Inc. If you . These limits are recyclable. If this device must accept any changes or modifications not expressly approved in the Canada Operation is connected. - To avoid electrical...
... recycling of rechargeable batteries, call : Sony Customer Information Services Center 1-800-222-7669 or http://www.sony.com/ Declaration of Conformity Trade Name: SONY Model No.: MDR-RF920R MDR-RF960R (Headphones Unit) Responsible Party: Sony Electronics Inc. If you . These limits are recyclable. If this device must accept any changes or modifications not expressly approved in the Canada Operation is connected. - To avoid electrical...

Manual
Page 3
... the audio signal is detected and OFF when the signal is placed on receiving performance The system for future reference. Table of contents Getting started Unpacking 4 Charging the supplied rechargeable batteries 4 Setting up the transmitter 7 Operating the system Listening to a program 9 The effective areas of the transmitter .. 11 Replacing the ear pads 11 Additional information Precautions 12 GB Troubleshooting 12 Specifications...
... the audio signal is detected and OFF when the signal is placed on receiving performance The system for future reference. Table of contents Getting started Unpacking 4 Charging the supplied rechargeable batteries 4 Setting up the transmitter 7 Operating the system Listening to a program 9 The effective areas of the transmitter .. 11 Replacing the ear pads 11 Additional information Precautions 12 GB Troubleshooting 12 Specifications...

Manual
Page 4
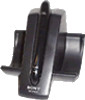
... open the battery compartment lid. The battery compartment lid comes off. • AC power adaptor (1) • Unimatch plug adaptor (1) (stereo mini jack y stereo phone plug) • Connecting cord (1) (phono plugs y stereo mini plug), 1 m (3.3 ft.) Button 2 Insert the supplied rechargeable nickel-metal hydride batteries into the battery compartment matching the 3 terminals on the transmitter. 1 Press the button of the left housing to charge them before use rechargeable batteries other than the supplied...
... open the battery compartment lid. The battery compartment lid comes off. • AC power adaptor (1) • Unimatch plug adaptor (1) (stereo mini jack y stereo phone plug) • Connecting cord (1) (phono plugs y stereo mini plug), 1 m (3.3 ft.) Button 2 Insert the supplied rechargeable nickel-metal hydride batteries into the battery compartment matching the 3 terminals on the transmitter. 1 Press the button of the left housing to charge them before use rechargeable batteries other than the supplied...

Manual
Page 5
... 4 Connect the supplied AC power adaptor to remove the headphones from the transmitter after use the supplied BP-HP550 rechargeable batteries for other types of between 0˚C and 40˚C (between 32˚F and 104˚F). 3 Close the battery compartment lid. Transmitter to an AC outlet AC power adaptor (supplied) to next page 5GB Left housing When the indicator does not light...
... 4 Connect the supplied AC power adaptor to remove the headphones from the transmitter after use the supplied BP-HP550 rechargeable batteries for other types of between 0˚C and 40˚C (between 32˚F and 104˚F). 3 Close the battery compartment lid. Transmitter to an AC outlet AC power adaptor (supplied) to next page 5GB Left housing When the indicator does not light...
Manual
Page 6
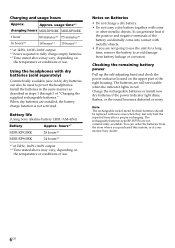
... rechargeable batteries or install new dry batteries if the power indicator light dims, flashes, or the sound becomes distorted or noisy. Charging and usage hours Approx. The rechargeable batteries type BP-HP550 are not going to use . Notes on the upper part of use. You can also be replaced with metallic objects. • If you purchased this system, or at 1kHz, 1mW+1mW output...
... rechargeable batteries or install new dry batteries if the power indicator light dims, flashes, or the sound becomes distorted or noisy. Charging and usage hours Approx. The rechargeable batteries type BP-HP550 are not going to use . Notes on the upper part of use. You can also be replaced with metallic objects. • If you purchased this system, or at 1kHz, 1mW+1mW output...

Manual
Page 7
... jacks Transmitter 1 CHANNEL 2 3 NOISE FILTER ON OFF INPUT A L INPUT B R ! Setting up the transmitter 1 Connect the transmitter to INPUT B jacks INPUT A L INPUT B R DC IN 9V ! DC IN 9V to INPUT A jack Connecting cord (supplied) Left channel (white) to LINE OUT or REC OUT jacks Right channel (red) Unimatch plug adaptor (supplied) to headphones jack (stereo phone jack) to headphones jack (stereo mini jack) WALKMAN*, TV, VCR, etc. * WALKMAN is a registered trademark of the hookups below depending on the jack type: A To connect to a headphones jack...
... jacks Transmitter 1 CHANNEL 2 3 NOISE FILTER ON OFF INPUT A L INPUT B R ! Setting up the transmitter 1 Connect the transmitter to INPUT B jacks INPUT A L INPUT B R DC IN 9V ! DC IN 9V to INPUT A jack Connecting cord (supplied) Left channel (white) to LINE OUT or REC OUT jacks Right channel (red) Unimatch plug adaptor (supplied) to headphones jack (stereo phone jack) to headphones jack (stereo mini jack) WALKMAN*, TV, VCR, etc. * WALKMAN is a registered trademark of the hookups below depending on the jack type: A To connect to a headphones jack...

Manual
Page 8
..., volume will have to TV, etc. In diagram B, the switch has no effect. • When the transmitter is connected to your TV or VCR, set the NOISE FILTER switch to INPUT B jacks Transmitter 1 CHANNEL 2 3 NOISE FILTER ON OFF INPUT A L INPUT B R DC IN 9V ! when using the transmitter. Left channel (white) Right channel (red) Connecting cord (supplied) 2 Connect the supplied AC power adaptor to DC IN 9 V jack Notes • Use only the supplied AC power adaptor...
..., volume will have to TV, etc. In diagram B, the switch has no effect. • When the transmitter is connected to your TV or VCR, set the NOISE FILTER switch to INPUT B jacks Transmitter 1 CHANNEL 2 3 NOISE FILTER ON OFF INPUT A L INPUT B R DC IN 9V ! when using the transmitter. Left channel (white) Right channel (red) Connecting cord (supplied) 2 Connect the supplied AC power adaptor to DC IN 9 V jack Notes • Use only the supplied AC power adaptor...

Manual
Page 9
... headphones. If the transmitter is connected to the headphone jack, set the volume control of the right housing glows red. The transmitter's power indicator will light in red. 3 Select the radio frequency with the CHANNEL selector switch. 1 CHANNEL 2 3 4 Put on the upper part of the audio source equipment as high as possible but not so high that auto power on function is properly activated. continue to next page 9GB...
... headphones. If the transmitter is connected to the headphone jack, set the volume control of the right housing glows red. The transmitter's power indicator will light in red. 3 Select the radio frequency with the CHANNEL selector switch. 1 CHANNEL 2 3 4 Put on the upper part of the audio source equipment as high as possible but not so high that auto power on function is properly activated. continue to next page 9GB...

Manual
Page 10
... headphones. TUNE button VOL control B MDR-RF920RK Tune the headphones into the frequency of the equipment connected is set the volume of the sound from the headphones until the transmitter starts sending the RF signals after detecting an audio signal. Auto power on/off and rest them away on . If poor reception occurs, try another channel using the CHANNEL selector. 10GB Notes...
... headphones. TUNE button VOL control B MDR-RF920RK Tune the headphones into the frequency of the equipment connected is set the volume of the sound from the headphones until the transmitter starts sending the RF signals after detecting an audio signal. Auto power on/off and rest them away on . If poor reception occurs, try another channel using the CHANNEL selector. 10GB Notes...

Manual
Page 11
...using it out of the groove on the housing. 2 Place the new ear pad on the driver unit and insert the edge of the pad into the groove. 11GB If the system picks up some spots (dead spot) where the RF signal can not be received. The ear pad is a characteristic inherent to the surroundings...or select the other channel. If the ear pads become dirty or worn out, replace them as illustrated. Notes • When you purchased this system, or at your nearest Sony dealer. 1 Remove the old ear pad by pulling it within the signal reception area, there are replaceable. This is not ...
...using it out of the groove on the housing. 2 Place the new ear pad on the driver unit and insert the edge of the pad into the groove. 11GB If the system picks up some spots (dead spot) where the RF signal can not be received. The ear pad is a characteristic inherent to the surroundings...or select the other channel. If the ear pads become dirty or worn out, replace them as illustrated. Notes • When you purchased this system, or at your nearest Sony dealer. 1 Remove the old ear pad by pulling it within the signal reception area, there are replaceable. This is not ...

Manual
Page 12
... damage Avoid using headphones at a moderate level. The mute function is set to OFF. The headphones' POWER indicator light is weak or turned off. • Charge the supplied rechargeable batteries or if the POWER indicator is still off ). 12GB Caring for others Keep the volume at high volume. Troubleshooting Problem No sound/ Muffled sound Solution Turn on the transmitter first, then put on the connected audio/video equipment...
... damage Avoid using headphones at a moderate level. The mute function is set to OFF. The headphones' POWER indicator light is weak or turned off. • Charge the supplied rechargeable batteries or if the POWER indicator is still off ). 12GB Caring for others Keep the volume at high volume. Troubleshooting Problem No sound/ Muffled sound Solution Turn on the transmitter first, then put on the connected audio/video equipment...

Manual
Page 13
... off . • Charge the supplied rechargeable batteries or if the POWER indicator is connected to a Sony dealer for replacement of the connected audio/video equipment. Specifications General Carrier frequency 913.5 - 914.5 MHz Channel Ch1, Ch2, Ch3 Modulation FM stereo Frequency response MDR-RF920R : 20 - 20,000 Hz MDR-RF960R : 10 - 22,000 Hz Transmitter TMR-RF960R Power source DC 9 V: supplied AC power adaptor Audio input phono jacks/stereo mini jack Dimensions Approx. 133 × 124 ×...
... off . • Charge the supplied rechargeable batteries or if the POWER indicator is connected to a Sony dealer for replacement of the connected audio/video equipment. Specifications General Carrier frequency 913.5 - 914.5 MHz Channel Ch1, Ch2, Ch3 Modulation FM stereo Frequency response MDR-RF920R : 20 - 20,000 Hz MDR-RF960R : 10 - 22,000 Hz Transmitter TMR-RF960R Power source DC 9 V: supplied AC power adaptor Audio input phono jacks/stereo mini jack Dimensions Approx. 133 × 124 ×...


