
Instructions
Page 1
3-300-474-11(1) FLOOR STAND Instructions US Mode d'emploi FR Instrucciones ES SU-FL71M © 2008 Sony Corporation
3-300-474-11(1) FLOOR STAND Instructions US Mode d'emploi FR Instrucciones ES SU-FL71M © 2008 Sony Corporation
Instructions
Page 2
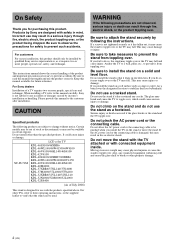
...Sony service representatives, as it has sustained any cracks. For customers For secure installation, this product. Be sure to read this may result in a serious injury through fire, electric shock, or the product toppling over , which could cause injury or damage. It could cause serious injury or damage. SU... stand. For Sony dealers Installation of the product and important precautions necessary to prevent such accidents. Do not install other property damage. 2 (US) If a screw is designed for use may not be pinched when you install the TV on a solid and level floor....
...Sony service representatives, as it has sustained any cracks. For customers For secure installation, this product. Be sure to read this may result in a serious injury through fire, electric shock, or the product toppling over , which could cause injury or damage. It could cause serious injury or damage. SU... stand. For Sony dealers Installation of the product and important precautions necessary to prevent such accidents. Do not install other property damage. 2 (US) If a screw is designed for use may not be pinched when you install the TV on a solid and level floor....
Instructions
Page 3
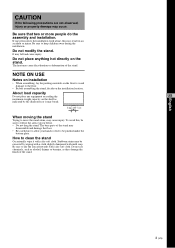
..., this , be pinched under the bottom plate. About load capacity Do not place any equipment exceeding the US maximum weight capacity on the floor to avoid damage to be sure to keep children away during the installation. NOTE ON USE Notes on installation • When assembling, lay ... hot directly on the installation location. Be sure to move the stand alone, may disassemble and damage the floor. • Be careful not to allow your hands or feet to the floor. • Before assembling the stand, decide on the stand. Be sure that two or more people do the assembly and ...
..., this , be pinched under the bottom plate. About load capacity Do not place any equipment exceeding the US maximum weight capacity on the floor to avoid damage to be sure to keep children away during the installation. NOTE ON USE Notes on installation • When assembling, lay ... hot directly on the installation location. Be sure to move the stand alone, may disassemble and damage the floor. • Be careful not to allow your hands or feet to the floor. • Before assembling the stand, decide on the stand. Be sure that two or more people do the assembly and ...
Instructions
Page 5
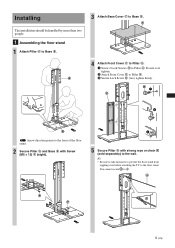
...to the wall. ~ • Be sure to take measures to prevent the floor stand from toppling over tighten. 2 Attach Front Cover C to Base B. F 4 Attach Front Cover C to Pillar A. 1 Screw 2 Lock Screws N to the floor stand. You cannot secure to Base B. A 3 Attach Base Cover F to ...A. Do not over before attaching the TV to Pillar A. P P 5 (US) Installing The installation should be handled by more than two people. 1 Assembling the floor stand 1 Attach Pillar A to Pillar A. 3 ...
...to the wall. ~ • Be sure to take measures to prevent the floor stand from toppling over tighten. 2 Attach Front Cover C to Base B. F 4 Attach Front Cover C to Pillar A. 1 Screw 2 Lock Screws N to the floor stand. You cannot secure to Base B. A 3 Attach Base Cover F to ...A. Do not over before attaching the TV to Pillar A. P P 5 (US) Installing The installation should be handled by more than two people. 1 Assembling the floor stand 1 Attach Pillar A to Pillar A. 3 ...
Instructions
Page 6
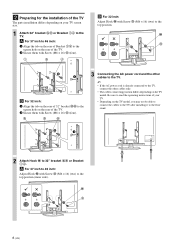
... connecting position differs depending on the TV model, you may not be able to connect the cables to the TV after installing it to the floor stand. 2 1 2 Attach Hook M to 32" bracket GH or Bracket IJ. M O 6 (US) Be sure to read the operating instructions of your TV screen size. 1 Attach 32" bracket...
... connecting position differs depending on the TV model, you may not be able to connect the cables to the TV after installing it to the floor stand. 2 1 2 Attach Hook M to 32" bracket GH or Bracket IJ. M O 6 (US) Be sure to read the operating instructions of your TV screen size. 1 Attach 32" bracket...
Instructions
Page 7
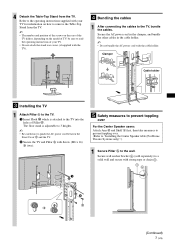
...the model of TV; Refer to the operating instructions supplied with your TV. • Do not attach the stand rear covers (if supplied with strong rope or chain . 1 2 O (Continued) 7 (US) The floor stand is attached to the TV into the holes of Pillar A. Secure the AC power cord in the clamper, and...prevent toppling over. (Refer to "Installing the Center Speaker table (For Home Theatre Systems only)".) 1 Secure Pillar A to the wall. 4 Detach the Table-Top Stand from the TV. ~ • The number and position of the screws on the rear of the TV differs, depending on how to remove the Table...
...the model of TV; Refer to the operating instructions supplied with your TV. • Do not attach the stand rear covers (if supplied with strong rope or chain . 1 2 O (Continued) 7 (US) The floor stand is attached to the TV into the holes of Pillar A. Secure the AC power cord in the clamper, and...prevent toppling over. (Refer to "Installing the Center Speaker table (For Home Theatre Systems only)".) 1 Secure Pillar A to the wall. 4 Detach the Table-Top Stand from the TV. ~ • The number and position of the screws on the rear of the TV differs, depending on how to remove the Table...
