Sony SU-W200 Support and Manuals
Get Help and Manuals for this Sony item
View All Support Options Below
Free Sony SU-W200 manuals!
Problems with Sony SU-W200?
Ask a Question
Free Sony SU-W200 manuals!
Problems with Sony SU-W200?
Ask a Question
Popular Sony SU-W200 Manual Pages
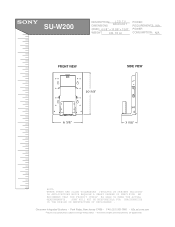
Dimensions Diagram (SU-W200 Wall Mount) - Page 1
...8226; FAX (201) 930 7891 • b2b.sel.sony.com
Features and specifications subject to change without notice. • Non-metric weights and measurements are approximate.
SONY WILL NOT BE RESPONSIBLE FOR INACCURACIES IN THE DESIGN OR MANUFACTURE OF ENCLOSURES . SU-W200
MDDEEOSSDCCERRLII:PPTTIIOONN:: DIMENSIONS
LCD TV BRACKET
(W(WWEHHIGDDH))::T6: 5/8 " x 10 5/8" x 3 5/8"
WEIGHT:
4 lb 10 oz...
Operating Instructions (primary manual) - Page 2

.... We are not liable for installing this
manual. For Sony Dealers Sufficient expertise is required for installing this instruction manual thoroughly to do the installation work safely.
The installation location should be a flat, perpendicular wall with a reinforcing material inside. • Do not apply a weight other than the TV to support the TV and the Wall-Mount Bracket. Be sure to...
Operating Instructions (primary manual) - Page 3

Do not use the bracket with a TV whose operating instructions do not specify the use of this bracket.
• Be especially careful not to drop the TV when you install it high on a wall. Caution
• This Wall-Mount Bracket is only for Sony 23-inch LCD Color TVs. US
3
Operating Instructions (primary manual) - Page 4

... edge of bracket A and the side wall is 25 cm (9 7/8 inches) or more
Mark this portion using a pencil. Step 1: Check the parts
Check all the parts are appropriate for the wall. that between the upper edge of bracket A and the ceiling is made of the wall.
Installation
For Sony Dealers
For the installation, have ready eight commercially available mounting screws, anchor...
Operating Instructions (primary manual) - Page 5

... screws you prepared at the positions marked in Step 2 (page 4). Wall
Screws you prepared
2 - 3 mm (3/32 - 1/8 inches)
2 Press bracket A to 1/8 inches) from the wall. Then fully tighten the four screws on the wall.
Bracket A
,
Wall
Bracket A Wall
3 Fully tighten four of the screws you prepared in screw holes 1 to the wall
1 Insert four of 2 to 3 mm (3/32 to the...
Operating Instructions (primary manual) - Page 6

...of the LCD display, place the TV on a
soft mat. Step 4: Attach bracket B to the TV
Before attaching bracket B, disconnect the AC power adaptor and all the cables from the TV. TV ...and cause damage. • When removing the TV stand, hold it firmly.
2 Secure bracket B to the Operating Instructions supplied with the TV.
1 Remove the four screws as illustrated above.
To prevent damaging...
Operating Instructions (primary manual) - Page 7

..., there is no need to one of the stay.)
1 Remove the two screws as illustrated below.
2 Pull out the stay as illustrated below.
Step 5: Attach bracket C to the TV
You can adjust the angle of the Wall-Mount Bracket to change the position of four different angles (0, 5, 10 or 15 degrees).
Operating Instructions (primary manual) - Page 8

Note Be careful not to get your fingers pinched between the stay and the bracket.
4 Connect the cables to align the holes when you choose an angle of 10 degrees. The illustration below ...so that they pass along the sides of the stay with the holes corresponding to the desired angle on bracket C, and secure the stay using the two screws removed in step 1.
5 10
15
3 Align the screw holes of...
Operating Instructions (primary manual) - Page 9

...TV until you confirm that bracket C is firmly secured to the wall without the rear cover. • Hold the TV firmly. Bracket A
Bracket C
Wall Notes • Secure the TV to bracket
A at three locations.
continued
9 Bracket C
Bracket B
Two screws (supplied)
Step 6: Secure the TV to the wall
1 Hook bracket C on bracket A.
5 Fix bracket C into bracket B as illustrated below, and secure...
Operating Instructions (primary manual) - Page 10

... TV from the Wall-Mount Bracket
To detach the TV, remove the rear cover from the TV, then remove the two screws.
Wall
Two screws
10
2 Align the screw holes on bracket C with those on how to replace the rear cover, refer to the Operating Instructions of the TV. Bracket A
Two screws (supplied)
Step 7: Replace the rear cover on...
Operating Instructions (primary manual) - Page 11

Specifications
268 (10 5/8)
168 (6 5/8)
89.5 (3 5/8)
Unit: mm (inches) Bracket mass:
Approx. 2.1 kg (4 lb 10 oz) Supportable weight:
Approx. 10 kg (22 lb 1 oz)
Design and specifications are subject to change without notice.
11
Sony SU-W200 Reviews
We have not received any reviews for Sony yet.