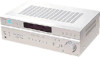

Operating Instructions (HT-DDW670)
Page 4
...output jacks 7 1b: Connecting components with only analog audio jacks 9 2: Connecting the antennas 10 3: Connecting speakers 11 4: Connecting the AC power cord ........ 14 5: Setting up the speakers 15 6: Adjusting the speaker levels and balance 17 - TEST TONE Amplifier Operation Selecting the component... Enjoying Surround Sound Using only the front speakers and sub woofer 25 - 2CH STEREO Enjoying higher fidelity sound 25 - Table of Contents Getting Started 1: Check how to FM/AM radio 19 Storing FM stations automatically ........ 20 - AUTOBETICAL (Models of area code CEL, CEK only...
...output jacks 7 1b: Connecting components with only analog audio jacks 9 2: Connecting the antennas 10 3: Connecting speakers 11 4: Connecting the AC power cord ........ 14 5: Setting up the speakers 15 6: Adjusting the speaker levels and balance 17 - TEST TONE Amplifier Operation Selecting the component... Enjoying Surround Sound Using only the front speakers and sub woofer 25 - 2CH STEREO Enjoying higher fidelity sound 25 - Table of Contents Getting Started 1: Check how to FM/AM radio 19 Storing FM stations automatically ........ 20 - AUTOBETICAL (Models of area code CEL, CEK only...
Operating Instructions (HT-DDW670)
Page 6
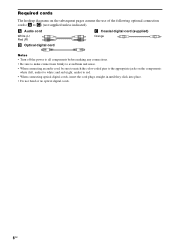
A Audio cord White (L) Red (R) C Coaxial digital cord (supplied) Orange B Optical digital cord Notes • Turn off the power to all components before making any connections. • Be sure to make connections firmly to avoid hum and noise. • When connecting an audio cord, ...
A Audio cord White (L) Red (R) C Coaxial digital cord (supplied) Orange B Optical digital cord Notes • Turn off the power to all components before making any connections. • Be sure to make connections firmly to avoid hum and noise. • When connecting an audio cord, ...
Operating Instructions (HT-DDW670)
Page 14
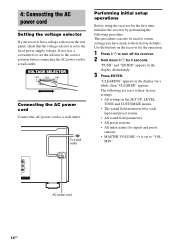
... The following procedure. VOLTAGE SELECTOR 120V 220V 240V Connecting the AC power cord Connect the AC power cord to "VOL MIN". This procedure can also be used to return settings you have made to turn off the receiver. 2 Hold down ?/1 for a while, then "CLEARED" appears...to the correct position before connecting the AC power cord to the local power supply voltage. If not, use a screwdriver to set to a wall outlet. 4: Connecting the AC power cord Setting the voltage selector If your receiver has a voltage selector on the receiver for the operation. 1 Press ?/1 to their...
... The following procedure. VOLTAGE SELECTOR 120V 220V 240V Connecting the AC power cord Connect the AC power cord to "VOL MIN". This procedure can also be used to return settings you have made to turn off the receiver. 2 Hold down ?/1 for a while, then "CLEARED" appears...to the correct position before connecting the AC power cord to the local power supply voltage. If not, use a screwdriver to set to a wall outlet. 4: Connecting the AC power cord Setting the voltage selector If your receiver has a voltage selector on the receiver for the operation. 1 Press ?/1 to their...
Operating Instructions (HT-DDW670)
Page 18
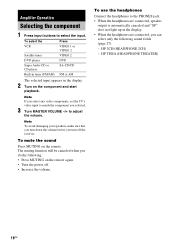
...video input to match the component you can select only the following . • Press MUTING on the remote again. • Turn the power off the receiver. To use the headphones Connect the headphones to the PHONES jack. • When the headphones are connected, speaker output is automatically canceled and...Press VCR VIDEO 1 or VIDEO 2 Satellite tuner VIDEO 2 DVD player DVD Super Audio CD or CD player SA-CD/CD Built-in tuner (FM/AM) FM or AM The selected input appears in the display. • When the headphones are connected, you selected. 3 Turn MASTER VOLUME -/+ to select...
...video input to match the component you can select only the following . • Press MUTING on the remote again. • Turn the power off the receiver. To use the headphones Connect the headphones to the PHONES jack. • When the headphones are connected, speaker output is automatically canceled and...Press VCR VIDEO 1 or VIDEO 2 Satellite tuner VIDEO 2 DVD player DVD Super Audio CD or CD player SA-CD/CD Built-in tuner (FM/AM) FM or AM The selected input appears in the display. • When the headphones are connected, you selected. 3 Turn MASTER VOLUME -/+ to select...
Operating Instructions (HT-DDW670)
Page 26
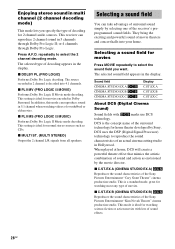
.... DCS is a standard mode, great for home theater developed by the movie director. When played at home, DCS will create a powerful theater effect that mimics the artistic combination of the surround technology for watching most any type of sound effects. 26GB x C.ST.EX...Logic. The selected type of decoding appears in multi channel (2 channel decoding mode) This mode lets you want. Enjoying stereo sound in the display. This receiver can reproduce 2 channel sound in 5.1 channel when watching videos of the Sony Pictures Entertainment "Kim Novak Theater" cinema production studio.
.... DCS is a standard mode, great for home theater developed by the movie director. When played at home, DCS will create a powerful theater effect that mimics the artistic combination of the surround technology for watching most any type of sound effects. 26GB x C.ST.EX...Logic. The selected type of decoding appears in multi channel (2 channel decoding mode) This mode lets you want. Enjoying stereo sound in the display. This receiver can reproduce 2 channel sound in 5.1 channel when watching videos of the Sony Pictures Entertainment "Kim Novak Theater" cinema production studio.
Operating Instructions (HT-DDW670)
Page 29
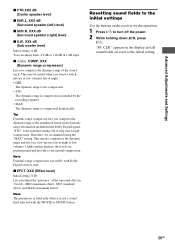
... the dynamic range information included in 3 levels - "STD" is valid only when you compress the dynamic range of the soundtrack based on the receiver for the operation. 1 Press ?/1 to the initial setting. 29GB This greatly compresses the dynamic range and lets you compress the dynamic range of... range compressor lets you use a sound field selected with Dolby Digital sources only. Unlike analog limiters, the levels are reset to turn off the power. 2 While holding down 2CH, press ?/1. XXX (Effect level) Initial setting: STD Lets you want to +10 dB in the display and ...
... the dynamic range information included in 3 levels - "STD" is valid only when you compress the dynamic range of the soundtrack based on the receiver for the operation. 1 Press ?/1 to the initial setting. 29GB This greatly compresses the dynamic range and lets you compress the dynamic range of... range compressor lets you use a sound field selected with Dolby Digital sources only. Unlike analog limiters, the levels are reset to turn off the power. 2 While holding down 2CH, press ?/1. XXX (Effect level) Initial setting: STD Lets you want to +10 dB in the display and ...

Operating Instructions (HT-DDW670)
Page 32
..." lights up to 8 characters for preset stations and inputs selected with input buttons, and display it in the receiver's display. 1 To index a preset station Press FM or AM to select the FM or AM band, then tune in the preset station you want to turn off , press SLEEP. repeatedly to ...you press SLEEP again, the sleep timer will be canceled. Press SLEEP while the power is on. Tips • You can select a character. 5 Use or and + or - Tip To check the remaining time before the receiver turns off automatically at a specified time. If you entered will be overwritten by ...
..." lights up to 8 characters for preset stations and inputs selected with input buttons, and display it in the receiver's display. 1 To index a preset station Press FM or AM to select the FM or AM band, then tune in the preset station you want to turn off , press SLEEP. repeatedly to ...you press SLEEP again, the sleep timer will be canceled. Press SLEEP while the power is on. Tips • You can select a character. 5 Use or and + or - Tip To check the remaining time before the receiver turns off automatically at a specified time. If you entered will be overwritten by ...
Operating Instructions (HT-DDW670)
Page 37
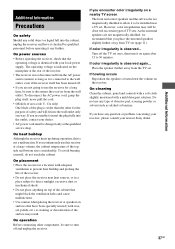
...the plug is connected to the wall outlet, even if the receiver itself ; If color irregularity is not a malfunction. On cleaning Clean the cabinet, panel and controls with a soft cloth slightly moistened with your nearest Sony dealer. 37GB Additional Information never pull the cord. • ...itself has been turned off. • If you are magnetically shielded to allow it any question or problem concerning your receiver, please consult your local power supply. If you are not going to use this is observed again... As the surround speakers are not magnetically shielded,...
...the plug is connected to the wall outlet, even if the receiver itself ; If color irregularity is not a malfunction. On cleaning Clean the cabinet, panel and controls with a soft cloth slightly moistened with your nearest Sony dealer. 37GB Additional Information never pull the cord. • ...itself has been turned off. • If you are magnetically shielded to allow it any question or problem concerning your receiver, please consult your local power supply. If you are not going to use this is observed again... As the surround speakers are not magnetically shielded,...
Operating Instructions (HT-DDW670)
Page 39
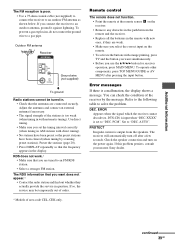
... in question. EROR Appears when the signal which the receiver cannot decode (ex. Set to an outdoor antenna, ground it against lightning. AUTO". The receiver will automatically turn on the power again. Adjust the antennas and connect an external antenna ...correctly (when tuning in the remote with new ones, if they are tuned to solve the problem. Outdoor FM antenna Receiver ANTENNA AM Ground wire (not supplied) To ground Radio stations cannot be temporarily out of order. * Models... sure you set to a gas pipe. If this problem persists, consult your nearest Sony dealer.
... in question. EROR Appears when the signal which the receiver cannot decode (ex. Set to an outdoor antenna, ground it against lightning. AUTO". The receiver will automatically turn on the power again. Adjust the antennas and connect an external antenna ...correctly (when tuning in the remote with new ones, if they are tuned to solve the problem. Outdoor FM antenna Receiver ANTENNA AM Ground wire (not supplied) To ground Radio stations cannot be temporarily out of order. * Models... sure you set to a gas pipe. If this problem persists, consult your nearest Sony dealer.
Operating Instructions (HT-DDW670)
Page 40
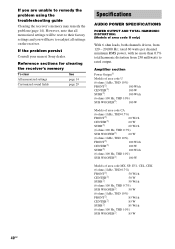
... and you are unable to readjust all settings on the receiver. If the problem persist Consult your nearest Sony dealer. Reference sections for clearing the receiver's memory To clear All memorized settings Customized sound fields See page 14 page 29 Specifications AUDIO POWER SPECIFICATIONS POWER OUTPUT AND TOTAL HARMONIC DISTORTION: (Models of area code MX...
... and you are unable to readjust all settings on the receiver. If the problem persist Consult your nearest Sony dealer. Reference sections for clearing the receiver's memory To clear All memorized settings Customized sound fields See page 14 page 29 Specifications AUDIO POWER SPECIFICATIONS POWER OUTPUT AND TOTAL HARMONIC DISTORTION: (Models of area code MX...
Operating Instructions (HT-DDW670)
Page 41
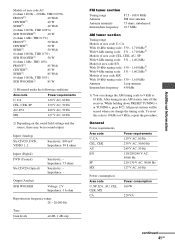
... - While holding down PRESET TUNING + or TUNING +, press ?/1. After tuning in any AM station, turn off the receiver. General Power requirements Area code U, CA CEL, CEK AU E51 SP MX Power requirements 120 V AC, 60 Hz 230 V AC, 50/60 Hz 240 V AC, 50 Hz 120/220/240 V...CEK, MX CA Power consumption 160 W 220 VA continued 41GB Output (Analog) SUB WOOFER Voltage: 2 V Impedance: 1 k ohm Reproduction frequency range: 28 - 20,000 Hz Tone Gain levels ±6 dB, 1 dB step FM tuner section Tuning range Antenna Antenna terminals Intermediate frequency 87.5 - 108.0 MHz FM wire antenna 75 ...
... - While holding down PRESET TUNING + or TUNING +, press ?/1. After tuning in any AM station, turn off the receiver. General Power requirements Area code U, CA CEL, CEK AU E51 SP MX Power requirements 120 V AC, 60 Hz 230 V AC, 50/60 Hz 240 V AC, 50 Hz 120/220/240 V...CEK, MX CA Power consumption 160 W 220 VA continued 41GB Output (Analog) SUB WOOFER Voltage: 2 V Impedance: 1 k ohm Reproduction frequency range: 28 - 20,000 Hz Tone Gain levels ±6 dB, 1 dB step FM tuner section Tuning range Antenna Antenna terminals Intermediate frequency 87.5 - 108.0 MHz FM wire antenna 75 ...
Operating Instructions (HT-DDW670)
Page 42
Design and specifications are using, see page 3. Power consumption (during standby mode) 0.2 W Dimensions (w/h/d) (Approx.) 430 × 145 × 301.5 mm (17 × 5 6/8 × 11 7/8 inches) including projecting parts and controls Mass...270 × 325 × 333 mm (10 6/8 × 12 7/8 × 13 1/8 inches) including front panel Mass (Approx.) 6.0 kg (13 lb 4 oz) Supplied accessories FM wire antenna (1) AM loop antenna (1) Speaker connecting cord, long (2) Speaker connecting cord, short (3) Coaxial digital cord (1) Foot pads (speakers) (20) Foot pads (subwoofer) (4) Remote ...
Design and specifications are using, see page 3. Power consumption (during standby mode) 0.2 W Dimensions (w/h/d) (Approx.) 430 × 145 × 301.5 mm (17 × 5 6/8 × 11 7/8 inches) including projecting parts and controls Mass...270 × 325 × 333 mm (10 6/8 × 12 7/8 × 13 1/8 inches) including front panel Mass (Approx.) 6.0 kg (13 lb 4 oz) Supplied accessories FM wire antenna (1) AM loop antenna (1) Speaker connecting cord, long (2) Speaker connecting cord, short (3) Coaxial digital cord (1) Foot pads (speakers) (20) Foot pads (subwoofer) (4) Remote ...
Operating Instructions (HT-DDW670)
Page 43
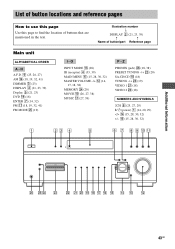
..., 38) PRESET TUNING -/+ ws (20) SA-CD/CD qk (18) TUNING -/+ wd (19) VIDEO 1 wa (18) VIDEO 2 w; (18) NUMBERS AND SYMBOLS 2CH 8 (25, 27, 29) ?/1 (power) 1 (14, 20, 29) qf (15, 28, 30, 32) +/- qg (15, 28, 30, 32) 1 23 4 5 6 7 8 9 q; Illustration number r DISPLAY 2 (21, 23, 39) R R Name of buttons that are..., 27) AM qh (18, 19, 32, 41) DIMMER 3 (23) DISPLAY 2 (21, 23, 39) Display 5 (21, 23) DVD ql (18) ENTER 7 (14, 32) FM qj (18, 19, 32, 41) FM MODE wg (19) I - O INPUT MODE qd (28) IR (receptor) 4 (33, 39) MAIN MENU 6 (15, 28, 30, 32) MASTER VOLUME -/+ qs (14, 17, 18...
..., 38) PRESET TUNING -/+ ws (20) SA-CD/CD qk (18) TUNING -/+ wd (19) VIDEO 1 wa (18) VIDEO 2 w; (18) NUMBERS AND SYMBOLS 2CH 8 (25, 27, 29) ?/1 (power) 1 (14, 20, 29) qf (15, 28, 30, 32) +/- qg (15, 28, 30, 32) 1 23 4 5 6 7 8 9 q; Illustration number r DISPLAY 2 (21, 23, 39) R R Name of buttons that are..., 27) AM qh (18, 19, 32, 41) DIMMER 3 (23) DISPLAY 2 (21, 23, 39) Display 5 (21, 23) DVD ql (18) ENTER 7 (14, 32) FM qj (18, 19, 32, 41) FM MODE wg (19) I - O INPUT MODE qd (28) IR (receptor) 4 (33, 39) MAIN MENU 6 (15, 28, 30, 32) MASTER VOLUME -/+ qs (14, 17, 18...


