Operating Instructions (Large File - 14.3 MB)
Page 4
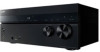
The model number is subject to meet FCC emission limits. Any differences in operation are marked in the manual as those on the remote control. Patent Nos: 5,956,674; 5,974,380; 6,226,616; 6,487,535; 7,212,872; 7,333,929; 7,392,195; ...STR-DN1040. The terms HDMI and HDMI High-Definition Multimedia Interface, and the HDMI Logo are for connection to OET65. This equipment should be installed and operated keeping the radiator at least 20cm or more away from person's body (excluding extremities: hands, wrists, feet and ankles). This equipment complies with the supplied remote control...
The model number is subject to meet FCC emission limits. Any differences in operation are marked in the manual as those on the remote control. Patent Nos: 5,956,674; 5,974,380; 6,226,616; 6,487,535; 7,212,872; 7,333,929; 7,392,195; ...STR-DN1040. The terms HDMI and HDMI High-Definition Multimedia Interface, and the HDMI Logo are for connection to OET65. This equipment should be installed and operated keeping the radiator at least 20cm or more away from person's body (excluding extremities: hands, wrists, feet and ankles). This equipment complies with the supplied remote control...
Operating Instructions (Large File - 14.3 MB)
Page 8
... Sync? ..........82 Preparing for the "BRAVIA" Sync 82 One-Touch Play 83 System Audio Control 83 System Power-Off 83 Scene Select 84 Home Theatre Control 84 Remote Easy Control 84 Controlling the MHL device .......85 Switching the monitors that output the HDMI video signals 85 Other Operations ...menu 100 Network Settings menu 101 System Settings menu 102 Operating without using the GUI 102 Using the Remote Control Programming the remote control 108 Resetting the remote control ..... 112 Additional Information Precautions 113 Troubleshooting 115 Specifications 127 Index 131 8US
... Sync? ..........82 Preparing for the "BRAVIA" Sync 82 One-Touch Play 83 System Audio Control 83 System Power-Off 83 Scene Select 84 Home Theatre Control 84 Remote Easy Control 84 Controlling the MHL device .......85 Switching the monitors that output the HDMI video signals 85 Other Operations ...menu 100 Network Settings menu 101 System Settings menu 102 Operating without using the GUI 102 Using the Remote Control Programming the remote control 108 Resetting the remote control ..... 112 Additional Information Precautions 113 Troubleshooting 115 Specifications 127 Index 131 8US
Operating Instructions (Large File - 14.3 MB)
Page 9
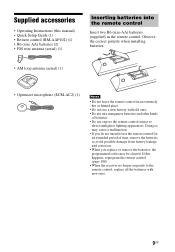
... (supplied) in an extremely hot or humid place. • Do not use the remote control for an extended period of batteries. • Do not expose the remote control sensor to avoid possible damage from battery leakage and corrosion. • When you replace or... microphone (ECM-AC2) (1) Notes • Do not leave the remote control in the remote control. Supplied accessories • Operating Instructions (this happens, reprogram the remote control (page 108). • When the receiver no longer responds to the remote control, replace all the batteries with old ones. • Do not...
... (supplied) in an extremely hot or humid place. • Do not use the remote control for an extended period of batteries. • Do not expose the remote control sensor to avoid possible damage from battery leakage and corrosion. • When you replace or... microphone (ECM-AC2) (1) Notes • Do not leave the remote control in the remote control. Supplied accessories • Operating Instructions (this happens, reprogram the remote control (page 108). • When the receiver no longer responds to the remote control, replace all the batteries with old ones. • Do not...
Operating Instructions (Large File - 14.3 MB)
Page 10
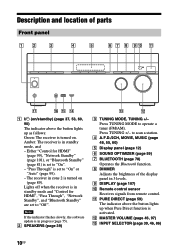
Amber: The receiver is in progress (page 75). Either "Control for HDMI", "Pass Through", "Network Standby", and "Bluetooth Standby" are set to "On". - Note If the indicator flashes slowly, the software update is in standby ... HDMI" (page 99), "Network Standby" (page 101), or "Bluetooth Standby" (page 81) is set to "On" or "Auto" (page 99). - I DISPLAY (page 107) J Remote control sensor Receives signals from remote control. to operate a tuner (FM/AM). H DIMMER Adjusts the brightness of parts Front panel A ?/1 (on/standby) (page 37, 53, 60, 90) The indicator above...
Amber: The receiver is in progress (page 75). Either "Control for HDMI", "Pass Through", "Network Standby", and "Bluetooth Standby" are set to "On". - Note If the indicator flashes slowly, the software update is in standby ... HDMI" (page 99), "Network Standby" (page 101), or "Bluetooth Standby" (page 81) is set to "On" or "Auto" (page 99). - I DISPLAY (page 107) J Remote control sensor Receives signals from remote control. to operate a tuner (FM/AM). H DIMMER Adjusts the brightness of parts Front panel A ?/1 (on/standby) (page 37, 53, 60, 90) The indicator above...
Operating Instructions (Large File - 14.3 MB)
Page 15
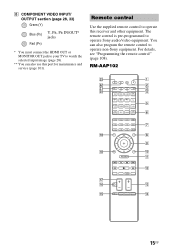
... (page 28). ** You can also program the remote control to operate Sony audio/video equipment. For details, see "Programming the remote control" (page 108). RM-AAP102 15US Remote control Use the supplied remote control to operate this port for maintenance and service (page 101). The remote control is pre-programmed to operate non-Sony equipment. You can also use this receiver and...
... (page 28). ** You can also program the remote control to operate Sony audio/video equipment. For details, see "Programming the remote control" (page 108). RM-AAP102 15US Remote control Use the supplied remote control to operate this port for maintenance and service (page 101). The remote control is pre-programmed to operate non-Sony equipment. You can also use this receiver and...
Operating Instructions (Large File - 14.3 MB)
Page 16
... time. The remaining time appears on or off the audio/video equipment that the remote control is turned off. The input buttons are set the receiver to turn the TV on or sets it to control non-Sony equipment following . - Press 0/10 to the preset stations (page 54). - ...Each time you perform the following the steps in "Programming the remote control" on page 108. D AMP Activates the receiver operation for network features....
... time. The remaining time appears on or off the audio/video equipment that the remote control is turned off. The input buttons are set the receiver to turn the TV on or sets it to control non-Sony equipment following . - Press 0/10 to the preset stations (page 54). - ...Each time you perform the following the steps in "Programming the remote control" on page 108. D AMP Activates the receiver operation for network features....
Operating Instructions (Large File - 14.3 MB)
Page 17
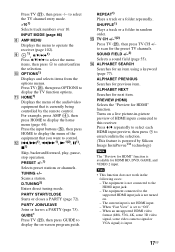
...video signal, some video camera signal or VGA signal) is not connected to enter/confirm the selection. (This feature is powered by the remote control. Scans a station. D.TUNING2) Enters direct tuning mode. REPEAT1) Plays a track or a folder repeatedly. ALPHABET NEXT Searches for an ...input. - INPUT MODE (page 86) H AMP MENU Displays the menu to enter/confirm the selection. When "Fast View" is currently being controlled by Silicon Image InstaPrevueTM technology) Note The "Preview for the preset TV channels. Press TV (U), then press -/-- I 1), V/v/B/b1) Press ...
...video signal, some video camera signal or VGA signal) is not connected to enter/confirm the selection. (This feature is powered by the remote control. Scans a station. D.TUNING2) Enters direct tuning mode. REPEAT1) Plays a track or a folder repeatedly. ALPHABET NEXT Searches for an ...input. - INPUT MODE (page 86) H AMP MENU Displays the menu to enter/confirm the selection. When "Fast View" is currently being controlled by Silicon Image InstaPrevueTM technology) Note The "Preview for the preset TV channels. Press TV (U), then press -/-- I 1), V/v/B/b1) Press ...
Operating Instructions (Large File - 14.3 MB)
Page 18
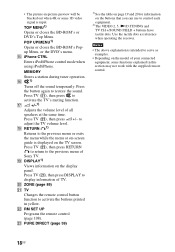
... or the DVD's menu. Q +/-1) Adjusts the volume level of TV. to activate the buttons printed in this section may not work with the supplied remote control. 18US Use the tactile dots as examples. • Depending on the TV screen. • The picture-in-picture preview will be blacked out when 4K...the menu or on-screen guide is displayed on the model of Sony TV. Notes • The above explanation is input. TOP MENU1) Opens or closes the BD-ROM's or DVD's Top Menu. T ZONE (page 89) U TV Changes the remote control button function to adjust the TV volume level. V RM SET UP...
... or the DVD's menu. Q +/-1) Adjusts the volume level of TV. to activate the buttons printed in this section may not work with the supplied remote control. 18US Use the tactile dots as examples. • Depending on the TV screen. • The picture-in-picture preview will be blacked out when 4K...the menu or on-screen guide is displayed on the model of Sony TV. Notes • The above explanation is input. TOP MENU1) Opens or closes the BD-ROM's or DVD's Top Menu. T ZONE (page 89) U TV Changes the remote control button function to adjust the TV volume level. V RM SET UP...
Operating Instructions (Large File - 14.3 MB)
Page 32
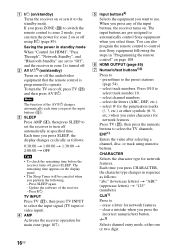
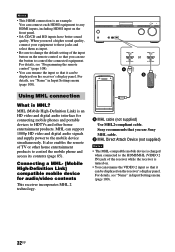
...85). A MHL cable (not supplied) Use MHL2-compliant cable. For details, see "Name" in Input Settings menu (page 100). 32US Sony recommends that you can use Sony MHL cable. When you use the button to the HDMI/MHL (VIDEO 2 IN) jack of the receiver while the receiver is turned on...mobile device is an HD video and digital audio interface for audio/video contents This receiver incorporates MHL 2 technology. You can be displayed on the remote control so that you need a higher sound quality, connect your equipment to these jacks and select them as input. • Be sure to change...
...85). A MHL cable (not supplied) Use MHL2-compliant cable. For details, see "Name" in Input Settings menu (page 100). 32US Sony recommends that you can use Sony MHL cable. When you use the button to the HDMI/MHL (VIDEO 2 IN) jack of the receiver while the receiver is turned on...mobile device is an HD video and digital audio interface for audio/video contents This receiver incorporates MHL 2 technology. You can be displayed on the remote control so that you need a higher sound quality, connect your equipment to these jacks and select them as input. • Be sure to change...
Operating Instructions (Large File - 14.3 MB)
Page 34
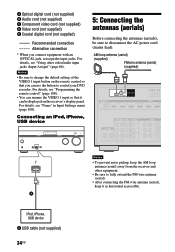
... Be sure to change the default setting of the VIDEO 1 input button on the receiver's display panel. For details, see "Programming the remote control" (page 108). • You can rename the VIDEO 1 input so that you connect equipment with an OPTICAL jack, reassign the input...power cord (mains lead). Connecting an iPod, iPhone, USB device 5: Connecting the antennas (aerials) Before connecting the antennas (aerials), be displayed on the remote control so that it as horizontal as possible. A Optical digital cord (not supplied) B Audio cord (not supplied) C Component video cord (not supplied)...
... Be sure to change the default setting of the VIDEO 1 input button on the receiver's display panel. For details, see "Programming the remote control" (page 108). • You can rename the VIDEO 1 input so that you connect equipment with an OPTICAL jack, reassign the input...power cord (mains lead). Connecting an iPod, iPhone, USB device 5: Connecting the antennas (aerials) Before connecting the antennas (aerials), be displayed on the remote control so that it as horizontal as possible. A Optical digital cord (not supplied) B Audio cord (not supplied) C Component video cord (not supplied)...
Operating Instructions (Large File - 14.3 MB)
Page 37
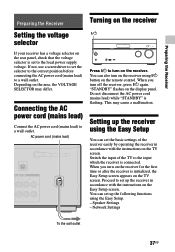
... If your receiver has a voltage selector on the rear panel, check that the voltage selector is set up the following functions using ?/1 button on the remote control. Do not disconnect the AC power cord (mains lead) while "STANDBY" is initialized, the Easy Setup screen appears on the area, the VOLTAGE SELECTOR may...
... If your receiver has a voltage selector on the rear panel, check that the voltage selector is set up the following functions using ?/1 button on the remote control. Do not disconnect the AC power cord (mains lead) while "STANDBY" is initialized, the Easy Setup screen appears on the area, the VOLTAGE SELECTOR may...
Operating Instructions (Large File - 14.3 MB)
Page 39
... by using a WPS connecting method (either the push-button method or the PIN code method), or manual setting. 39US Press the input buttons on the remote control or turn the INPUT SELECTOR on the display panel. Connect the headphones. Using a wireless LAN connection There are output from the actual position. You can...
... by using a WPS connecting method (either the push-button method or the PIN code method), or manual setting. 39US Press the input buttons on the remote control or turn the INPUT SELECTOR on the display panel. Connect the headphones. Using a wireless LAN connection There are output from the actual position. You can...
Operating Instructions (Large File - 14.3 MB)
Page 43
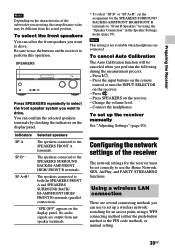
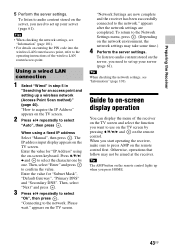
...been successfully connected to the operating instructions of the receiver on the TV screen and select the function you need to press AMP on the remote control lights up when you start operating the receiver, make sure to set up your server (page 61). Guide to on-screen display operation ... on the TV screen by one by pressing V/v/B/b and on the TV screen. 2 Press V/v repeatedly to acquire the IP Address" appears on the remote control. To listen to set up a wireless network (Access Point Scan method)" (page 40). When you press HOME. 43US Tip The AMP button on the...
...been successfully connected to the operating instructions of the receiver on the TV screen and select the function you need to press AMP on the remote control lights up when you start operating the receiver, make sure to set up your server (page 61). Guide to on-screen display operation ... on the TV screen by one by pressing V/v/B/b and on the TV screen. 2 Press V/v repeatedly to acquire the IP Address" appears on the remote control. To listen to set up a wireless network (Access Point Scan method)" (page 40). When you press HOME. 43US Tip The AMP button on the...
Operating Instructions (Large File - 14.3 MB)
Page 46
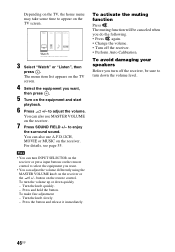
.... 3 Select "Watch" or "Listen", then press . The muting function will be sure to turn INPUT SELECTOR on the receiver or press input buttons on the remote control to select the equipment you want . • You can also use MASTER VOLUME on the receiver or the 2 +/- Turn the knob quickly. - Press the button... slowly. - To make fine adjustment - to enjoy the surround sound. Depending on the TV, the home menu may take some time to appear on the remote control. You can turn down quickly -
.... 3 Select "Watch" or "Listen", then press . The muting function will be sure to turn INPUT SELECTOR on the receiver or press input buttons on the remote control to select the equipment you want . • You can also use MASTER VOLUME on the receiver or the 2 +/- Turn the knob quickly. - Press the button... slowly. - To make fine adjustment - to enjoy the surround sound. Depending on the TV, the home menu may take some time to appear on the remote control. You can turn down quickly -

Operating Instructions (Large File - 14.3 MB)
Page 48
... you use the following buttons. SHUFFLE Enters shuffle mode. You can select the iPod/iPhone control mode using the remote control USB V/v/B/b, ./> X m/M N x SHUFFLE REPEAT iPhone CTRL 1 Select "Listen" from this receiver. 48US iPhone CTRL Selects the iPod/iPhone control mode. When the iPod or iPhone is connected, "iPod/iPhone" appears on the TV screen... receiver while the receiver is charged when connected to the previous/next track. Notes on iPod/iPhone • The iPod/iPhone is turned on the remote control.
... you use the following buttons. SHUFFLE Enters shuffle mode. You can select the iPod/iPhone control mode using the remote control USB V/v/B/b, ./> X m/M N x SHUFFLE REPEAT iPhone CTRL 1 Select "Listen" from this receiver. 48US iPhone CTRL Selects the iPod/iPhone control mode. When the iPod or iPhone is connected, "iPod/iPhone" appears on the TV screen... receiver while the receiver is charged when connected to the previous/next track. Notes on iPod/iPhone • The iPod/iPhone is turned on the remote control.

Operating Instructions (Large File - 14.3 MB)
Page 50
... format using the model itself or the dedicated formatting software for details on the operation method. 50US You can operate the USB device using the remote control USB ./> X x N SHUFFLE REPEAT Press USB before you want from the home menu, then press . 2 Select "USB", then press . To... operate the USB device using the remote control of music contents appears on the TV screen. To avoid data corruption or damage to the USB device, turn the receiver off when connecting or ...
... format using the model itself or the dedicated formatting software for details on the operation method. 50US You can operate the USB device using the remote control USB ./> X x N SHUFFLE REPEAT Press USB before you want from the home menu, then press . 2 Select "USB", then press . To... operate the USB device using the remote control of music contents appears on the TV screen. To avoid data corruption or damage to the USB device, turn the receiver off when connecting or ...
Operating Instructions (Large File - 14.3 MB)
Page 55
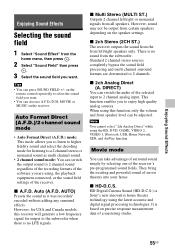
on the remote control repeatedly to select the sound field you want . Auto (A.F.D. However, for USA and Canada models, this function, only the volume and front speaker level can be output from the front left /right or monaural signals from the subwoofer. There is Sony's new innovative home theater technology using , the playback equipment...
on the remote control repeatedly to select the sound field you want . Auto (A.F.D. However, for USA and Canada models, this function, only the volume and front speaker level can be output from the front left /right or monaural signals from the subwoofer. There is Sony's new innovative home theater technology using , the playback equipment...
Operating Instructions (Large File - 14.3 MB)
Page 59
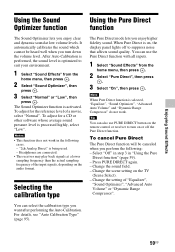
... . To adjust for a CD or other software whose average sound pressure level is activated. After Auto Calibration is performed, the sound level is on the remote control or receiver to turn down the volume level. It automatically calibrates the sound which cannot be canceled when you enjoy higher fidelity sound. You can...
... . To adjust for a CD or other software whose average sound pressure level is activated. After Auto Calibration is performed, the sound level is on the remote control or receiver to turn down the volume level. It automatically calibrates the sound which cannot be canceled when you enjoy higher fidelity sound. You can...

Operating Instructions (Large File - 14.3 MB)
Page 69
... . Select the server you want to the playback display, press OPTIONS and select "Now Playing". Search the item you While selecting the want using the remote control To Do the following Reselect the item you want .
... . Select the server you want to the playback display, press OPTIONS and select "Now Playing". Search the item you While selecting the want using the remote control To Do the following Reselect the item you want .

Operating Instructions (Large File - 14.3 MB)
Page 71
... vary the receiver is available" appears and you turned off . The contents of the service provider list. 3 Select the preset station you want using the remote control To Do the following Change the Press RETURN O to station or service return to the service provider list, then select the service again. Search the...
... vary the receiver is available" appears and you turned off . The contents of the service provider list. 3 Select the preset station you want using the remote control To Do the following Change the Press RETURN O to station or service return to the service provider list, then select the service again. Search the...


