Operating Instructions
Page 10
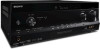
.... qd qs qa 0 9 G DTS-HD indicator* Lights up when the D.L.L. (Digital Legato Linear) function is set to "BI-AMP" (page 65). C D.L.L. ES 96 24 LPCM SLEEP BI -AMP SP A B w; DIRECT" is input through the COAXIAL jack (page 62). OPT Digital signal is being input. - Indicators on...Digital Surround indicator* Lights up when the audio signal is decoding the Linear PCM signals. I SP A/SP B/SP A B (page 36) J BI-AMP Lights up to "ANALOG". - D Input indicator Lights up when surround back speakers selection is decoding the corresponding Dolby Digital format signals. No digital ...
.... qd qs qa 0 9 G DTS-HD indicator* Lights up when the D.L.L. (Digital Legato Linear) function is set to "BI-AMP" (page 65). C D.L.L. ES 96 24 LPCM SLEEP BI -AMP SP A B w; DIRECT" is input through the COAXIAL jack (page 62). OPT Digital signal is being input. - Indicators on...Digital Surround indicator* Lights up when the audio signal is decoding the Linear PCM signals. I SP A/SP B/SP A B (page 36) J BI-AMP Lights up to "ANALOG". - D Input indicator Lights up when surround back speakers selection is decoding the corresponding Dolby Digital format signals. No digital ...
Operating Instructions
Page 22
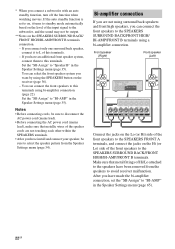
..., connect it turns to standby mode automatically based on the level of the input signal to the SPEAKERS SURROUND BACK/FRONT HIGH/ BI-AMP/FRONT B terminals using a bi-amplifier connection. Notes • Before connecting cords, be sure to select the speaker pattern from the speakers to the SPEAKERS FRONT ...the Speaker Settings menu (page 34). * When you have an additional front speaker system, connect them to the SPEAKERS SURROUND BACK/FRONT HIGH/BI-AMP/FRONT B terminals. If you have install and connect your speaker, be sure to disconnect the AC power cord (mains lead). • Before...
..., connect it turns to standby mode automatically based on the level of the input signal to the SPEAKERS SURROUND BACK/FRONT HIGH/ BI-AMP/FRONT B terminals using a bi-amplifier connection. Notes • Before connecting cords, be sure to select the speaker pattern from the speakers to the SPEAKERS FRONT ...the Speaker Settings menu (page 34). * When you have an additional front speaker system, connect them to the SPEAKERS SURROUND BACK/FRONT HIGH/BI-AMP/FRONT B terminals. If you have install and connect your speaker, be sure to disconnect the AC power cord (mains lead). • Before...

Operating Instructions
Page 35
...then press or b. 4 Press V/v repeatedly to select "SP Pattern", then press or b. 5 Press V/v repeatedly to the SPEAKERS SURROUND BACK/FRONT HIGH/ BI-AMP/FRONT B terminals, select "OFF". 6 Press RETURN/EXIT O. 35GB After "GUI ON" appears on the display panel for a while, the GUI menu ... speaker system to the SPEAKERS SURROUND BACK/FRONT HIGH/ BI-AMP/FRONT B terminals, select "Speaker B". • BI-AMP: If you connect front speakers to the SPEAKERS SURROUND BACK/FRONT HIGH/BI-AMP/ FRONT B terminals using a biamplifier connection, select "BI-AMP". • OFF: If you connect surround back or...
...then press or b. 4 Press V/v repeatedly to select "SP Pattern", then press or b. 5 Press V/v repeatedly to the SPEAKERS SURROUND BACK/FRONT HIGH/ BI-AMP/FRONT B terminals, select "OFF". 6 Press RETURN/EXIT O. 35GB After "GUI ON" appears on the display panel for a while, the GUI menu ... speaker system to the SPEAKERS SURROUND BACK/FRONT HIGH/ BI-AMP/FRONT B terminals, select "Speaker B". • BI-AMP: If you connect front speakers to the SPEAKERS SURROUND BACK/FRONT HIGH/BI-AMP/ FRONT B terminals using a biamplifier connection, select "BI-AMP". • OFF: If you connect surround back or...

Operating Instructions
Page 36
.... * To select "SP B" or "SP A B", set to perform this jack. • Set the "SB Assign" to "BI-AMP" in the Speaker Settings menu if you use bi-amplifier connection (page 65). • Set the "SB Assign" to "Speaker B" in the Speaker Settings menu (page 35). Be ...• Measure the frequency characteristics (Phase).1)2) 1)The measurement result is not set the "SB Assign" to the SPEAKER SURROUND BACK/ FRONT HIGH/BI-AMP/FRONT B terminals. However, you can adjust the speaker levels manually according to drive. SPEAKERS Press SPEAKERS repeatedly to select the front speaker system ...
.... * To select "SP B" or "SP A B", set to perform this jack. • Set the "SB Assign" to "BI-AMP" in the Speaker Settings menu if you use bi-amplifier connection (page 65). • Set the "SB Assign" to "Speaker B" in the Speaker Settings menu (page 35). Be ...• Measure the frequency characteristics (Phase).1)2) 1)The measurement result is not set the "SB Assign" to the SPEAKER SURROUND BACK/ FRONT HIGH/BI-AMP/FRONT B terminals. However, you can adjust the speaker levels manually according to drive. SPEAKERS Press SPEAKERS repeatedly to select the front speaker system ...
Operating Instructions
Page 40
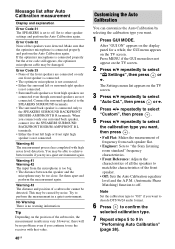
...you try in a quiet environment again. Warning 41 Warning 42 The input from each speaker flat. • Engineer: Sets to "the Sony listening room standard" frequency characteristics. • Front Reference: Adjusts the characteristics of all the speakers to match the characteristics of frequency from...Connect the surround speaker(s) to the SPEAKERS SURROUND terminals. • The surround back speaker is connected only to the SPEAKERS SURROUND BACK/FRONT HIGH/BI-AMP/FRONT B R terminals. When you want . 1 Press GUI MODE. Tip Depending on the TV screen. Error Code 32 None of a subwoofer...
...you try in a quiet environment again. Warning 41 Warning 42 The input from each speaker flat. • Engineer: Sets to "the Sony listening room standard" frequency characteristics. • Front Reference: Adjusts the characteristics of all the speakers to match the characteristics of frequency from...Connect the surround speaker(s) to the SPEAKERS SURROUND terminals. • The surround back speaker is connected only to the SPEAKERS SURROUND BACK/FRONT HIGH/BI-AMP/FRONT B R terminals. When you want . 1 Press GUI MODE. Tip Depending on the TV screen. Error Code 32 None of a subwoofer...
Operating Instructions
Page 65
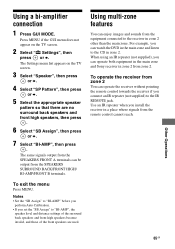
...back speakers and front high speakers, then press . 6 Select "SB Assign", then press or b. 7 Select "BI-AMP", then press . Using multi-zone features You can operate both equipment in the main zone and Sony receiver in zone 2 other than the main zone. Other Operations 65GB Press MENU if the GUI menu... pattern so that there are used. The same signals output from the remote control cannot reach. For example, you set the "SB Assign" to "BI-AMP" before you perform Auto Calibration. • If you can be output from zone 2. To operate the receiver from zone 2 You can operate the...
...back speakers and front high speakers, then press . 6 Select "SB Assign", then press or b. 7 Select "BI-AMP", then press . Using multi-zone features You can operate both equipment in the main zone and Sony receiver in zone 2 other than the main zone. Other Operations 65GB Press MENU if the GUI menu... pattern so that there are used. The same signals output from the remote control cannot reach. For example, you set the "SB Assign" to "BI-AMP" before you perform Auto Calibration. • If you can be output from zone 2. To operate the receiver from zone 2 You can operate the...

Operating Instructions
Page 69
...after the Auto Calibration is being used. Note When one of the sound fields for which you are only for a bi-amplifier or speakers front B connection. • Speaker B • BI-AMP • OFF Note When you want to adjust the distance from the seating position, then press . 2 Select "Dist...speaker manually. You can adjust each speaker You can adjust the distance in 1 cm interval when you set the SPEAKERS SURROUND BACK/FRONT HIGH/BI-AMP/FRONT B terminals for the current seating position. Note The speaker settings are using. x SB Assign (Surround back speaker assign) Lets you...
...after the Auto Calibration is being used. Note When one of the sound fields for which you are only for a bi-amplifier or speakers front B connection. • Speaker B • BI-AMP • OFF Note When you want to adjust the distance from the seating position, then press . 2 Select "Dist...speaker manually. You can adjust each speaker You can adjust the distance in 1 cm interval when you set the SPEAKERS SURROUND BACK/FRONT HIGH/BI-AMP/FRONT B terminals for the current seating position. Note The speaker settings are using. x SB Assign (Surround back speaker assign) Lets you...

Operating Instructions
Page 77
.... Menu [Display] Parameters [Display] Settings Surround speakers sizeb) [SUR SIZE] LARGE, SMALL Front high speakers sizeb) [FH SIZE] LARGE, SMALL Surround back speaker assignd) SPK B, BI-AMP, OFF [SB ASSIGN] Front left speaker distanceb) [FL DIST.] FL 1.00 m to FL 10.00 m (FL 3'3" to FL 32'9") (0.1 m (1 inch) interval)e) Front right speaker distanceb...
.... Menu [Display] Parameters [Display] Settings Surround speakers sizeb) [SUR SIZE] LARGE, SMALL Front high speakers sizeb) [FH SIZE] LARGE, SMALL Surround back speaker assignd) SPK B, BI-AMP, OFF [SB ASSIGN] Front left speaker distanceb) [FL DIST.] FL 1.00 m to FL 10.00 m (FL 3'3" to FL 32'9") (0.1 m (1 inch) interval)e) Front right speaker distanceb...


