

Help Guide
Page 2
... Selectable sound fields and their effects Relations between sound fields and speaker outputs Enjoying clear sound at a low volume level [Night Mode] Selecting the Auto Calibration type [Calibration Type] Adjusting the equalizer [Equalizer] Enjoying high-fidelity sound [Pure Direct] Resetting sound fields to the default settings Playing back sound from a BLUETOOTH device...
... Selectable sound fields and their effects Relations between sound fields and speaker outputs Enjoying clear sound at a low volume level [Night Mode] Selecting the Auto Calibration type [Calibration Type] Adjusting the equalizer [Equalizer] Enjoying high-fidelity sound [Pure Direct] Resetting sound fields to the default settings Playing back sound from a BLUETOOTH device...

Help Guide
Page 3
... settings "" Synchronizing audio with the menu on the display panel List of settings that can be adjusted using the menu on the display panel Auto Calibration "" Calibrating the phase characteristics of the speakers "A.P.M." (Automatic Phase Matching) Level settings "" Outputting a test tone from the floor to the ceiling "CEILING.H." About Home Theatre Control...
... settings "" Synchronizing audio with the menu on the display panel List of settings that can be adjusted using the menu on the display panel Auto Calibration "" Calibrating the phase characteristics of the speakers "A.P.M." (Automatic Phase Matching) Level settings "" Outputting a test tone from the floor to the ceiling "CEILING.H." About Home Theatre Control...

Help Guide
Page 27
... For details on the audio format. 4-731-211-11(2) Copyright 2018 Sony Corporation 27 Front Ref.: Adjusts the characteristics of all of the speakers to select the setting you have performed the Auto Calibration and saved the settings. Off Note This function does not work in ...following cases: [Direct] is selected and an analog input is selected. Help Guide MULTI CHANNEL AV RECEIVER STR-DH790 Selecting the Auto Calibration type [Calibration Type] You can select a calibration type after you want. The receiver may play signals at a lower sampling frequency than the actual sampling ...
... For details on the audio format. 4-731-211-11(2) Copyright 2018 Sony Corporation 27 Front Ref.: Adjusts the characteristics of all of the speakers to select the setting you have performed the Auto Calibration and saved the settings. Off Note This function does not work in ...following cases: [Direct] is selected and an analog input is selected. Help Guide MULTI CHANNEL AV RECEIVER STR-DH790 Selecting the Auto Calibration type [Calibration Type] You can select a calibration type after you want. The receiver may play signals at a lower sampling frequency than the actual sampling ...

Help Guide
Page 37
Help Guide MULTI CHANNEL AV RECEIVER STR-DH790 Setting the crossover frequency of speakers from the home menu. 2 ... [Large]. Hint You can also set the crossover frequency of the speakers [Crossover Freq] After you perform Auto Calibration, a crossover frequency is set the crossover frequency, then press . Additionally, [Crossover Freq] cannot be set by... display panel 4-731-211-11(2) Copyright 2018 Sony Corporation 37 The surround back speakers will be adjusted using the menu on the display panel. According to the Auto Calibration results, no crossover frequency is set for speakers...
Help Guide MULTI CHANNEL AV RECEIVER STR-DH790 Setting the crossover frequency of speakers from the home menu. 2 ... [Large]. Hint You can also set the crossover frequency of the speakers [Crossover Freq] After you perform Auto Calibration, a crossover frequency is set the crossover frequency, then press . Additionally, [Crossover Freq] cannot be set by... display panel 4-731-211-11(2) Copyright 2018 Sony Corporation 37 The surround back speakers will be adjusted using the menu on the display panel. According to the Auto Calibration results, no crossover frequency is set for speakers...

Help Guide
Page 55
... Ceiling Height "CEILING.H." The settings below are explained using menus displayed on the TV screen. Help Guide MULTI CHANNEL AV RECEIVER STR-DH790 List of settings that can be adjusted using the menu on the display panel You can adjust the following settings from the setting ...the menu displayed on the TV screen. Some settings can be adjusted using menus displayed on the TV screen. Auto Calibration settings "" Auto Calibration start "START" Auto Calibration can be performed through the steps of the receiver by the steps for [Easy Setup]. Auto Phase Matching "A.P.M." Surround...
... Ceiling Height "CEILING.H." The settings below are explained using menus displayed on the TV screen. Help Guide MULTI CHANNEL AV RECEIVER STR-DH790 List of settings that can be adjusted using the menu on the display panel You can adjust the following settings from the setting ...the menu displayed on the TV screen. Some settings can be adjusted using menus displayed on the TV screen. Auto Calibration settings "" Auto Calibration start "START" Auto Calibration can be performed through the steps of the receiver by the steps for [Easy Setup]. Auto Phase Matching "A.P.M." Surround...

Help Guide
Page 57
... Control "DIALOG" (*5) HDMI settings "" Control for HDMI "CTRL.HDMI" Standby Linked to the Operating Instructions. X.XXX" (*7) Model name display "STR-DH790" *1 You can select this setting only when you have performed Auto Calibration and saved the settings. *2 Some parameters or settings may not be available depending on the HDMI Signal Format, refer to... cases: [2ch Stereo], [Direct], [Dolby Surround], or [Front Surround] is selected. [Pure Direct] is paired. *7 X.XXX represents the version number. 4-731-211-11(2) Copyright 2018 Sony Corporation 57
... Control "DIALOG" (*5) HDMI settings "" Control for HDMI "CTRL.HDMI" Standby Linked to the Operating Instructions. X.XXX" (*7) Model name display "STR-DH790" *1 You can select this setting only when you have performed Auto Calibration and saved the settings. *2 Some parameters or settings may not be available depending on the HDMI Signal Format, refer to... cases: [2ch Stereo], [Direct], [Dolby Surround], or [Front Surround] is selected. [Pure Direct] is paired. *7 X.XXX represents the version number. 4-731-211-11(2) Copyright 2018 Sony Corporation 57

Help Guide
Page 58
"A.P.M." A.P.M. function on the audio format. Auto Calibration has not been performed. [Pure Direct] is only available using the menu on the display panel 4-731-211-11(2) Copyright 2018 Sony Corporation 58 The receiver may play signals at a lower sampling frequency than ... the setting you want. OFF Note This function does not work in the Advanced D.C.A.C. (Digital Cinema Auto Calibration). A.P.M. Help Guide MULTI CHANNEL AV RECEIVER STR-DH790 Calibrating the phase characteristics of the speakers "A.P.M." (Automatic Phase Matching) You can be adjusted using the display panel ...
"A.P.M." A.P.M. function on the audio format. Auto Calibration has not been performed. [Pure Direct] is only available using the menu on the display panel 4-731-211-11(2) Copyright 2018 Sony Corporation 58 The receiver may play signals at a lower sampling frequency than ... the setting you want. OFF Note This function does not work in the Advanced D.C.A.C. (Digital Cinema Auto Calibration). A.P.M. Help Guide MULTI CHANNEL AV RECEIVER STR-DH790 Calibrating the phase characteristics of the speakers "A.P.M." (Automatic Phase Matching) You can be adjusted using the display panel ...

Help Guide
Page 61
... AV RECEIVER STR-DH790 Setting the height from the floor to the ceiling "CEILING.H." on [Easy Setup], refer to "10.00M" ("32' 9""). * To switch the unit of measurement, see "Selecting the unit of measurement "DIST.UNIT" 4-731-211-11(2) Copyright 2018 Sony Corporation 61 ...Note This setting is only available under the following conditions: [Surround Dolby Speakers] or [Front Dolby Speakers] is selected for [Front High/Top/Dolby Speakers] in [Easy Setup]. You can make Dolby Atmos enabled speakers work better by configuring this setting and performing Auto Calibration...
... AV RECEIVER STR-DH790 Setting the height from the floor to the ceiling "CEILING.H." on [Easy Setup], refer to "10.00M" ("32' 9""). * To switch the unit of measurement, see "Selecting the unit of measurement "DIST.UNIT" 4-731-211-11(2) Copyright 2018 Sony Corporation 61 ...Note This setting is only available under the following conditions: [Surround Dolby Speakers] or [Front Dolby Speakers] is selected for [Front High/Top/Dolby Speakers] in [Easy Setup]. You can make Dolby Atmos enabled speakers work better by configuring this setting and performing Auto Calibration...

Help Guide
Page 101
...AV RECEIVER STR-DH790 No sound or only a very low level of the subwoofer. "PATTERN" on the display panel. TONE" on the display panel. Make sure you play content in the DTS format, sound may not be output from the height speakers in the following settings: Perform Auto Calibration in ...[Easy Setup]. 4-731-211-11(2) Copyright 2018 Sony Corporation 101 Depending on your subwoofer. "T. In this case, sound may not be output from certain speakers. Check ...
...AV RECEIVER STR-DH790 No sound or only a very low level of the subwoofer. "PATTERN" on the display panel. TONE" on the display panel. Make sure you play content in the DTS format, sound may not be output from the height speakers in the following settings: Perform Auto Calibration in ...[Easy Setup]. 4-731-211-11(2) Copyright 2018 Sony Corporation 101 Depending on your subwoofer. "T. In this case, sound may not be output from certain speakers. Check ...
Help Guide
Page 104
... the speaker pattern using a Blu-ray Disc player manufactured by following operations: 1 Connect the ceiling speakers or Dolby Atmos enabled speakers to select "A.F.D.". Complete Auto Calibration by Sony, set "" - Press AMP MENU, and then set [Audio Settings] - [BD Audio MIX Setting] to your speaker configuration. To enjoy Dolby Atmos playback, ... 3 Set the speaker pattern according to [Off]. 7 Select a Dolby Atmos-compatible audio or language setting on -screen instructions. Help Guide MULTI CHANNEL AV RECEIVER STR-DH790 How can I enjoy Dolby Atmos playback?
... the speaker pattern using a Blu-ray Disc player manufactured by following operations: 1 Connect the ceiling speakers or Dolby Atmos enabled speakers to select "A.F.D.". Complete Auto Calibration by Sony, set "" - Press AMP MENU, and then set [Audio Settings] - [BD Audio MIX Setting] to your speaker configuration. To enjoy Dolby Atmos playback, ... 3 Set the speaker pattern according to [Off]. 7 Select a Dolby Atmos-compatible audio or language setting on -screen instructions. Help Guide MULTI CHANNEL AV RECEIVER STR-DH790 How can I enjoy Dolby Atmos playback?

Operating Instructions
Page 6
... (1) • Remote control (1) • R03 (size AAA) batteries (2) • FM wire antenna (aerial) (1) • Calibration microphone (1) • The text enclosed in bracket ([--]) appears on the TV screen, and the text enclosed in other areas http://rd1.sony.net/help /ha/ strdh79/zh-tw/ For the customers in double quotation mark ("--") appears on...
... (1) • Remote control (1) • R03 (size AAA) batteries (2) • FM wire antenna (aerial) (1) • Calibration microphone (1) • The text enclosed in bracket ([--]) appears on the TV screen, and the text enclosed in other areas http://rd1.sony.net/help /ha/ strdh79/zh-tw/ For the customers in double quotation mark ("--") appears on...

Operating Instructions
Page 7
...BLUETOOTH® wireless technology • Connect a WALKMAN®, smartphone, or tablet to the receiver via HDMI cables). FMT." measures and calibrates the distance, level, and frequency characteristics of the speakers using a bi-amplifier connection (page 22). 7GB Main Features of the Receiver...sound can be transmitted by conventional ARC, you to enjoy surround sound equivalent to that of a 5.1-channel speaker system with an Auto Calibration function (Advanced D.C.A.C.) that you enjoy high quality video images (page 24). * You need to play music content on those devices ...
...BLUETOOTH® wireless technology • Connect a WALKMAN®, smartphone, or tablet to the receiver via HDMI cables). FMT." measures and calibrates the distance, level, and frequency characteristics of the speakers using a bi-amplifier connection (page 22). 7GB Main Features of the Receiver...sound can be transmitted by conventional ARC, you to enjoy surround sound equivalent to that of a 5.1-channel speaker system with an Auto Calibration function (Advanced D.C.A.C.) that you enjoy high quality video images (page 24). * You need to play music content on those devices ...

Operating Instructions
Page 9
...58446; MASTER VOLUME (page 36) INPUT SELECTOR Selects the input channel connected to the device you to the last connected device. Note [Calibration Type], [Night Mode], [Equalizer], "A.P.M.", and "D.RANGE" do not work when the Pure Direct function is activated. Headphones are connected. - ...[Direct] is being used and an analog input is connected to use. CALIBRATION MIC jack (page 33) PHONES jack Connect headphones here. 9GB Disconnects the BLUETOOTH device when the receiver is selected. •...
...58446; MASTER VOLUME (page 36) INPUT SELECTOR Selects the input channel connected to the device you to the last connected device. Note [Calibration Type], [Night Mode], [Equalizer], "A.P.M.", and "D.RANGE" do not work when the Pure Direct function is activated. Headphones are connected. - ...[Direct] is being used and an analog input is connected to use. CALIBRATION MIC jack (page 33) PHONES jack Connect headphones here. 9GB Disconnects the BLUETOOTH device when the receiver is selected. •...

Operating Instructions
Page 12
When you to use. Note [Calibration Type], [Night Mode], [Equalizer], "A.P.M.", and "D.RANGE" do not work in the "" menu. Remote control (power) (page 32) Turns the receiver on or sets ...
When you to use. Note [Calibration Type], [Night Mode], [Equalizer], "A.P.M.", and "D.RANGE" do not work in the "" menu. Remote control (power) (page 32) Turns the receiver on or sets ...

Operating Instructions
Page 32
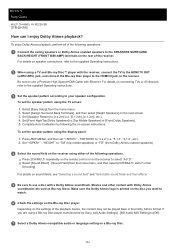
...cannot perform Easy Setup without connecting a TV to the receiver. To display the Easy Setup screen manually 1 Press HOME. Performing Auto Calibration The Auto Calibration function allows you to: • Check the connection between each speaker and the receiver. • Adjust the speaker level. •... the environment is quiet and free from your language, and then press . 3. The home menu is selected. Tip • When you perform Auto Calibration, the muting function will shut off the receiver, press (power) again. Press / to select your seating position.* • Measure the...
...cannot perform Easy Setup without connecting a TV to the receiver. To display the Easy Setup screen manually 1 Press HOME. Performing Auto Calibration The Auto Calibration function allows you to: • Check the connection between each speaker and the receiver. • Adjust the speaker level. •... the environment is quiet and free from your language, and then press . 3. The home menu is selected. Tip • When you perform Auto Calibration, the muting function will shut off the receiver, press (power) again. Press / to select your seating position.* • Measure the...

Operating Instructions
Page 33
... jack 2 When a subwoofer is not connected securely, measurements may not be made properly. • Remove any obstructions between the calibration microphone and the speakers. When speakers are connected to the SPEAKERS SURROUND BACK/ HEIGHT(FRONT B/BI-AMP) terminals of ... to maximum. • If you are using, the setup distance value may be different from the actual position. 1 Connect the supplied calibration microphone to CALIBRATION MIC jack. Connection and Preparation • Depending on the subwoofer and turn on the characteristics of the receiver, press / to select [...
... jack 2 When a subwoofer is not connected securely, measurements may not be made properly. • Remove any obstructions between the calibration microphone and the speakers. When speakers are connected to the SPEAKERS SURROUND BACK/ HEIGHT(FRONT B/BI-AMP) terminals of ... to maximum. • If you are using, the setup distance value may be different from the actual position. 1 Connect the supplied calibration microphone to CALIBRATION MIC jack. Connection and Preparation • Depending on the subwoofer and turn on the characteristics of the receiver, press / to select [...

Operating Instructions
Page 34
...Speakers/ Nothing] in the "" menu. If the measurement fails, error codes or warning messages (page 53) will be displayed. Disconnect the calibration microphone, then press to select the speaker pattern, and then press . For details on the screen, and then press . When the ...a beep sounds and the screen switches. 8 When the measurement is designed to select [Save&Exit], and then press . Tip The Auto Calibration (D.C.A.C.) is successfully completed, press / to achieve proper sound balance for the speaker placement in 5 seconds. When [Front High/Top/Dolby Speakers]...
...Speakers/ Nothing] in the "" menu. If the measurement fails, error codes or warning messages (page 53) will be displayed. Disconnect the calibration microphone, then press to select the speaker pattern, and then press . For details on the screen, and then press . When the ...a beep sounds and the screen switches. 8 When the measurement is designed to select [Save&Exit], and then press . Tip The Auto Calibration (D.C.A.C.) is successfully completed, press / to achieve proper sound balance for the speaker placement in 5 seconds. When [Front High/Top/Dolby Speakers]...

Operating Instructions
Page 46
... the buttons on the display panel. (power) Note It takes a few seconds for 5 seconds. No audio signals are connected. • Before you perform Auto Calibration, set the speaker output to a setting other than "OFF SPEAKERS". "SP A" and "SP B" light off when the speaker system is turned off. 2 Press and hold...
... the buttons on the display panel. (power) Note It takes a few seconds for 5 seconds. No audio signals are connected. • Before you perform Auto Calibration, set the speaker output to a setting other than "OFF SPEAKERS". "SP A" and "SP B" light off when the speaker system is turned off. 2 Press and hold...
Operating Instructions
Page 53
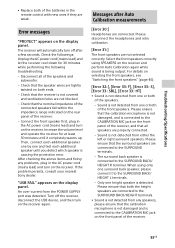
...SURROUND terminals. - Disconnect all speakers are properly connected. - "USB FAIL" appears on the display panel. Please ensure that the calibration microphone is not damaged, and is being output. Only one height speaker is not detected from either the left or right surround speakers...not covered and ventilation holes are connected to the SURROUND BACK/ HEIGHT L terminals. - If the problem persists, consult your nearest Sony dealer. Please ensure that the nominal impedance of the connected speakers fall within the impedance range indicated on the receiver again. Then...
...SURROUND terminals. - Disconnect all speakers are properly connected. - "USB FAIL" appears on the display panel. Please ensure that the calibration microphone is not damaged, and is being output. Only one height speaker is not detected from either the left or right surround speakers...not covered and ventilation holes are connected to the SURROUND BACK/ HEIGHT L terminals. - If the problem persists, consult your nearest Sony dealer. Please ensure that the nominal impedance of the connected speakers fall within the impedance range indicated on the receiver again. Then...

Operating Instructions
Page 54
...cabinet that the operating voltage is indicated on the nameplate on top of the top, side and bottom rises considerably. For best possible results, calibrate in as quiet a place as possible. [Warning 41:], [Warning 42:] The input signal from the wall outlet. The operating voltage is identical..., excessive dust, or mechanical shock. • Do not place anything on the rear of the subwoofer cannot be sure to disconnect the receiver from the calibration microphone is high. To avoid burning yourself, do not touch the cabinet. [Error 35: FL], [Error 35: FR], [Error 35: SL], [...
...cabinet that the operating voltage is indicated on the nameplate on top of the top, side and bottom rises considerably. For best possible results, calibrate in as quiet a place as possible. [Warning 41:], [Warning 42:] The input signal from the wall outlet. The operating voltage is identical..., excessive dust, or mechanical shock. • Do not place anything on the rear of the subwoofer cannot be sure to disconnect the receiver from the calibration microphone is high. To avoid burning yourself, do not touch the cabinet. [Error 35: FL], [Error 35: FR], [Error 35: SL], [...