Operating Instructions
Page 1
Stereo Receiver Operating Instructions Connection and Preparation Playback Tuner Menu/Other Functions Troubleshooting/ Specifications STR-DH190
Stereo Receiver Operating Instructions Connection and Preparation Playback Tuner Menu/Other Functions Troubleshooting/ Specifications STR-DH190
Operating Instructions
Page 2
STR-DH190 Serial No. Should you call upon your Sony dealer regarding this apparatus to rain or moisture. POUR LES CONSOMMATEURS AUX ÉTATS-UNIS. For the customers in the unit, disconnect the main plug ... has two blades with newspapers, tablecloths, curtains, etc. If the provided plug does not fit into your outlet, consult an electrician for replacement of the receiver. Record the serial number in the literature accompanying the appliance. Refer to persons. To reduce the risk of fire, do not cover the ventilation opening...
STR-DH190 Serial No. Should you call upon your Sony dealer regarding this apparatus to rain or moisture. POUR LES CONSOMMATEURS AUX ÉTATS-UNIS. For the customers in the unit, disconnect the main plug ... has two blades with newspapers, tablecloths, curtains, etc. If the provided plug does not fit into your outlet, consult an electrician for replacement of the receiver. Record the serial number in the literature accompanying the appliance. Refer to persons. To reduce the risk of fire, do not cover the ventilation opening...

Operating Instructions
Page 3
... not operate normally, or has been dropped. If this equipment does cause harmful interference to radio or television reception, which the receiver is no guarantee that to comply with the limits for help. This device complies with any interference, including interference that may cause...Strip 10 to 15 mm of the wire insulation of the following measures: Reorient or relocate the receiving antenna. Increase the separation between the equipment and receiver. Connect the equipment into the apparatus, the apparatus has been exposed to host computers and/or ...
... not operate normally, or has been dropped. If this equipment does cause harmful interference to radio or television reception, which the receiver is no guarantee that to comply with the limits for help. This device complies with any interference, including interference that may cause...Strip 10 to 15 mm of the wire insulation of the following measures: Reorient or relocate the receiving antenna. Increase the separation between the equipment and receiver. Connect the equipment into the apparatus, the apparatus has been exposed to host computers and/or ...

Operating Instructions
Page 4
... batteries this symbol might be used with the approved version(s) of software that this battery should be sent to the manufacturer's authorized representative, Sony Belgium, bijkantoor van Sony Europe B.V., Da Vincilaan 7-D1, 1930 Zaventem, Belgium. By ensuring that for safety, performance or data integrity reasons require a permanent connection with...on how to remove the battery from earphones and headphones can check the software version by qualified service staff only. This Stereo Receiver is intended for lead (Pb) is available at end-of-life to conserve natural resources.
... batteries this symbol might be used with the approved version(s) of software that this battery should be sent to the manufacturer's authorized representative, Sony Belgium, bijkantoor van Sony Europe B.V., Da Vincilaan 7-D1, 1930 Zaventem, Belgium. By ensuring that for safety, performance or data integrity reasons require a permanent connection with...on how to remove the battery from earphones and headphones can check the software version by qualified service staff only. This Stereo Receiver is intended for lead (Pb) is available at end-of-life to conserve natural resources.
Operating Instructions
Page 5
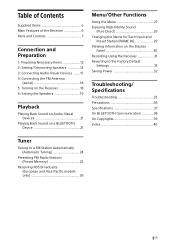
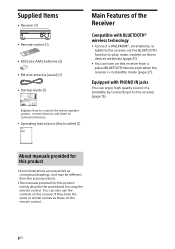
... Items 12 2: Setting/Connecting Speakers 13 3: Connecting Audio-Visual Devices .......15 4: Connecting the FM Antenna (aerial 18 5: Turning on the Receiver 18 6: Setting the Speakers 19 Playback Playing Back Sound on Audio-Visual Devices 21 Playing Back Sound on a BLUETOOTH Device 21 Menu/Other ...the Name for Each Input and Preset Station (NAME IN 29 Viewing Information on the Display Panel 30 Recording Using the Receiver 31 Reverting to the Factory Default Settings 31 Saving Power 32 Troubleshooting/ Specifications Troubleshooting 33 Precautions 36 Specifications 37 On BLUETOOTH...
... Items 12 2: Setting/Connecting Speakers 13 3: Connecting Audio-Visual Devices .......15 4: Connecting the FM Antenna (aerial 18 5: Turning on the Receiver 18 6: Setting the Speakers 19 Playback Playing Back Sound on Audio-Visual Devices 21 Playing Back Sound on a BLUETOOTH Device 21 Menu/Other ...the Name for Each Input and Preset Station (NAME IN 29 Viewing Information on the Display Panel 30 Recording Using the Receiver 31 Reverting to the Factory Default Settings 31 Saving Power 32 Troubleshooting/ Specifications Troubleshooting 33 Precautions 36 Specifications 37 On BLUETOOTH...
Operating Instructions
Page 6
... 15). Explains how to connect the stereo speaker system, connect devices and listen to play music content on those on this receiver from the actual products. • The manuals provided for this product mainly describe the procedures for this booklet) (1) About manuals provided for using the ...remote control. You can also use the controls on the receiver if they have the same or similar names as conceptual drawings, and may be different from a paired BLUETOOTH device even when the...
... 15). Explains how to connect the stereo speaker system, connect devices and listen to play music content on those on this receiver from the actual products. • The manuals provided for this product mainly describe the procedures for this booklet) (1) About manuals provided for using the ...remote control. You can also use the controls on the receiver if they have the same or similar names as conceptual drawings, and may be different from a paired BLUETOOTH device even when the...
Operating Instructions
Page 7
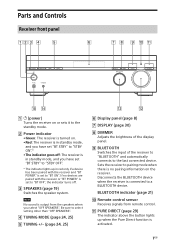
...panel (page 8) DISPLAY (page 30) DIMMER Adjusts the brightness of the display panel. BLUETOOTH Switches the input of the receiver to "BLUETOOTH" and automatically connects to "STBY OFF". * The indicator lights up when the Pure Direct function is connected to a BLUETOOTH device. Parts ..."STBY ON".* •The indicator goes off . SPEAKERS (page 19) Switches the speaker system. If no devices are paired with the receiver and "BT POWER" is output from remote control. PURE DIRECT (page 29) The indicator above the button lights up in red only ...
...panel (page 8) DISPLAY (page 30) DIMMER Adjusts the brightness of the display panel. BLUETOOTH Switches the input of the receiver to "BLUETOOTH" and automatically connects to "STBY OFF". * The indicator lights up when the Pure Direct function is connected to a BLUETOOTH device. Parts ..."STBY ON".* •The indicator goes off . SPEAKERS (page 19) Switches the speaker system. If no devices are paired with the receiver and "BT POWER" is output from remote control. PURE DIRECT (page 29) The indicator above the button lights up in red only ...

Operating Instructions
Page 8
...) Note These indicators do not light up if the speaker output is turned off or if headphones are connected. SLEEP Lights up when the receiver tunes to the preset station you want to a station with RDS services. VOLUME (page 21) INPUT SELECTOR Selects the input channel connected to...
...) Note These indicators do not light up if the speaker output is turned off or if headphones are connected. SLEEP Lights up when the receiver tunes to the preset station you want to a station with RDS services. VOLUME (page 21) INPUT SELECTOR Selects the input channel connected to...
Operating Instructions
Page 9
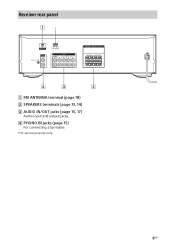
Receiver rear panel FM ANTENNA terminal (page 18) SPEAKERS terminals (page 13, 14) AUDIO IN/OUT jacks (page 15, 17) Audio input and output jacks. PHONO IN jacks (page 15) For connecting a turntable. * For service purpose only. 9GB
Receiver rear panel FM ANTENNA terminal (page 18) SPEAKERS terminals (page 13, 14) AUDIO IN/OUT jacks (page 15, 17) Audio input and output jacks. PHONO IN jacks (page 15) For connecting a turntable. * For service purpose only. 9GB

Operating Instructions
Page 10
Remote control 10GB (power) (page 18) Turns the receiver on the display panel. SPEAKERS A/B (page 19) Switches the speaker system. The ... Note No sound is output from the speakers when you press BLUETOOTH, the receiver turns on only if "BT POWER" is being used, "SLEEP" indicator lights up on . SLEEP Sets the... receiver to the standby mode. Tip • To check the remaining time before the receiver turns off automatically at a specified time. Be sure to select setting other than "OFF...
Remote control 10GB (power) (page 18) Turns the receiver on the display panel. SPEAKERS A/B (page 19) Switches the speaker system. The ... Note No sound is output from the speakers when you press BLUETOOTH, the receiver turns on only if "BT POWER" is being used, "SLEEP" indicator lights up on . SLEEP Sets the... receiver to the standby mode. Tip • To check the remaining time before the receiver turns off automatically at a specified time. Be sure to select setting other than "OFF...

Operating Instructions
Page 11
...remote control Insert two R03 (size AAA) batteries (supplied) in the correct position when installing batteries. When you press any of these buttons, the receiver turns on the model of batteries. • We recommend that the + and - Note • The above explanation is intended to serve as ...reference when operating the receiver. Note • Do not leave the remote control in an extremely hot or humid place. • Do not use a new battery with new ones...
...remote control Insert two R03 (size AAA) batteries (supplied) in the correct position when installing batteries. When you press any of these buttons, the receiver turns on the model of batteries. • We recommend that the + and - Note • The above explanation is intended to serve as ...reference when operating the receiver. Note • Do not leave the remote control in an extremely hot or humid place. • Do not use a new battery with new ones...

Operating Instructions
Page 13
... ohms to "6 OHM". If the wires are touching, it to 16 ohms. • When you are not touching each other between the receiver and the speakers as an example. Strip the jacket to the amplifier circuit. This manual describes the installation, connections, and setting procedures using ....cables with the polarities + (red)/- (black) matched between the SPEAKERS terminals or on the receiver rear panel. Insert the stripped ends of the cables into the terminals as illustrated below . to the receiver. 13GB For details, see "6: Setting the Speakers" (page 19). • Before connecting ...
... ohms to "6 OHM". If the wires are touching, it to 16 ohms. • When you are not touching each other between the receiver and the speakers as an example. Strip the jacket to the amplifier circuit. This manual describes the installation, connections, and setting procedures using ....cables with the polarities + (red)/- (black) matched between the SPEAKERS terminals or on the receiver rear panel. Insert the stripped ends of the cables into the terminals as illustrated below . to the receiver. 13GB For details, see "6: Setting the Speakers" (page 19). • Before connecting ...

Operating Instructions
Page 14
Room with the SPEAKERS A/B button (page 19). Be sure to use with the receiver installed Another location : Left speaker : Right speaker A speakers B speakers (in another location) Speaker cable (not supplied) Note If you connect additional B speakers, you can select the speakers you select "OFF SPEAKERS". Stereo speaker system with A/B speakers You can also enjoy the audio in another location by connecting additional B speakers. No sound is output from the speakers when you want to select setting other than "OFF SPEAKERS". 14GB
Room with the SPEAKERS A/B button (page 19). Be sure to use with the receiver installed Another location : Left speaker : Right speaker A speakers B speakers (in another location) Speaker cable (not supplied) Note If you connect additional B speakers, you can select the speakers you select "OFF SPEAKERS". Stereo speaker system with A/B speakers You can also enjoy the audio in another location by connecting additional B speakers. No sound is output from the speakers when you want to select setting other than "OFF SPEAKERS". 14GB

Operating Instructions
Page 15
... wires (not supplied) * If your turntable has a grounding terminal, connect the grounding wire. Tip • You can be displayed on the display panel of the receiver (page 29). Super Audio CD player, CD player 15GB
... wires (not supplied) * If your turntable has a grounding terminal, connect the grounding wire. Tip • You can be displayed on the display panel of the receiver (page 29). Super Audio CD player, CD player 15GB

Operating Instructions
Page 16
... MM type PHONO cartridges. MM type cartridge used on the connected device. • If the sound from the receiver, you may be sure to set the PHONO/LINE switch to PHONO. • This receiver equipped with a PHONO/ LINE switch, be distorted or interrupted. This is very soft, you must connect your speaker...
... MM type PHONO cartridges. MM type cartridge used on the connected device. • If the sound from the receiver, you may be sure to set the PHONO/LINE switch to PHONO. • This receiver equipped with a PHONO/ LINE switch, be distorted or interrupted. This is very soft, you must connect your speaker...
Operating Instructions
Page 18
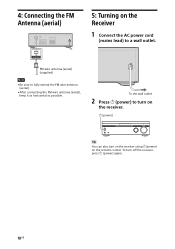
FM wire antenna (aerial) (supplied) Note • Be sure to a wall outlet. To the wall outlet 2 Press (power) to turn on the receiver. (power) Tip You can also turn off the receiver, press (power) again. 18GB 4: Connecting the FM Antenna (aerial) 5: Turning on the remote control. To turn on the receiver using (power) on the Receiver 1 Connect the AC power cord (mains lead) to fully extend the FM wire antenna (aerial). • After connecting the FM wire antenna (aerial), keep it as horizontal as possible.
FM wire antenna (aerial) (supplied) Note • Be sure to a wall outlet. To the wall outlet 2 Press (power) to turn on the receiver. (power) Tip You can also turn off the receiver, press (power) again. 18GB 4: Connecting the FM Antenna (aerial) 5: Turning on the remote control. To turn on the receiver using (power) on the Receiver 1 Connect the AC power cord (mains lead) to fully extend the FM wire antenna (aerial). • After connecting the FM wire antenna (aerial), keep it as horizontal as possible.

Operating Instructions
Page 19
... • The "SP A" or/and "SP B" indicators on the display panel lights up to show which set of terminals are connected to the receiver, you can also use SPEAKERS button on the back of the speaker.) • When you connect speakers to both the SPEAKERS A and B terminals ...(parallel connection). "SP A" and "SP B" light off when the speaker system is often on the receiver to select the speaker system. 19GB Switching the speaker system When two speaker systems are selected. 6: Setting the Speakers • When you connect speakers to...
... • The "SP A" or/and "SP B" indicators on the display panel lights up to show which set of terminals are connected to the receiver, you can also use SPEAKERS button on the back of the speaker.) • When you connect speakers to both the SPEAKERS A and B terminals ...(parallel connection). "SP A" and "SP B" light off when the speaker system is often on the receiver to select the speaker system. 19GB Switching the speaker system When two speaker systems are selected. 6: Setting the Speakers • When you connect speakers to...

Operating Instructions
Page 21
... of the +/- Playback Playing Back Sound on Audio-Visual Devices Input buttons Playing Back Sound on a BLUETOOTH Device You can receive audio content from a WALKMAN®, smartphone or tablet that has a BLUETOOTH function and listen to it immediately. +/- The ...want to play. Press one of the +/- to show the BLUETOOTH status. Turn the VOLUME knob slowly. - Receiver status The receiver is searching for a BLUETOOTH device to connect BLUETOOTH pairing BLUETOOTH connection is established Indicator status Flashes slowly Flashes quickly Lights up or...
... of the +/- Playback Playing Back Sound on Audio-Visual Devices Input buttons Playing Back Sound on a BLUETOOTH Device You can receive audio content from a WALKMAN®, smartphone or tablet that has a BLUETOOTH function and listen to it immediately. +/- The ...want to play. Press one of the +/- to show the BLUETOOTH status. Turn the VOLUME knob slowly. - Receiver status The receiver is searching for a BLUETOOTH device to connect BLUETOOTH pairing BLUETOOTH connection is established Indicator status Flashes slowly Flashes quickly Lights up or...
Operating Instructions
Page 22
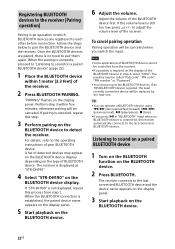
... When the BLUETOOTH connection is displayed as "STR-DH190". 4 Select "STR-DH190" on the BLUETOOTH device display. To cancel pairing operation Pairing operation will be canceled. Tip • You can pair up to ten BLUETOOTH devices. The receiver connects to the last connected BLUETOOTH device. ... type of the BLUETOOTH device first. For details, refer to adjust the volume level of your BLUETOOTH device. If "STR-DH190" is not displayed, repeat this process from the receiver. • If a passkey is canceled, repeat this step. 3 Perform pairing on a paired BLUETOOTH device" (page...
... When the BLUETOOTH connection is displayed as "STR-DH190". 4 Select "STR-DH190" on the BLUETOOTH device display. To cancel pairing operation Pairing operation will be canceled. Tip • You can pair up to ten BLUETOOTH devices. The receiver connects to the last connected BLUETOOTH device. ... type of the BLUETOOTH device first. For details, refer to adjust the volume level of your BLUETOOTH device. If "STR-DH190" is not displayed, repeat this process from the receiver. • If a passkey is canceled, repeat this step. 3 Perform pairing on a paired BLUETOOTH device" (page...

Operating Instructions
Page 23
...the input. • Turn off the BLUETOOTH function on the BLUETOOTH device. • Press BLUETOOTH PAIRING. • Turn off the receiver or the BLUETOOTH device. • Press BLUETOOTH on the BLUETOOTH device because of the characteristics of the BLUETOOTH wireless technology. Playback 4... Adjust the volume. Adjust the volume of the receiver. To disconnect a BLUETOOTH connection The BLUETOOTH connection will be delayed from a paired BLUETOOTH device when "BT POWER" is still too low...
...the input. • Turn off the BLUETOOTH function on the BLUETOOTH device. • Press BLUETOOTH PAIRING. • Turn off the receiver or the BLUETOOTH device. • Press BLUETOOTH on the BLUETOOTH device because of the characteristics of the BLUETOOTH wireless technology. Playback 4... Adjust the volume. Adjust the volume of the receiver. To disconnect a BLUETOOTH connection The BLUETOOTH connection will be delayed from a paired BLUETOOTH device when "BT POWER" is still too low...
