Technical Background
Page 37
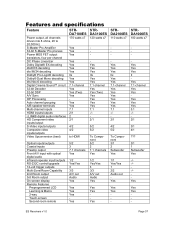
... digital audio Infrared repeater input/outputs RS-232C control/upgrade 12-volt trigger outputs Multi-Zone/Room Capability 2nd Room output 3rd Room output On screen display Remote Features Preprogrammed LCD Learning & Macro 2-way Touch-screen Second-room remote STRDA7100ES 170 watts x7 Yes Yes Yes Yes ...Yes Yes Yes IIx Yes Yes 7.1-channel Yes Yes (Two) Yes Yes Yes 7.1 2/1 2 2/1 4/2 4/2 to HDMI 5/2 3 7.1 channels Yes 1/2 Yes/Yes 3 3/3 A/V out Audio Yes Yes Yes Yes Yes STRDA3100ES 120 watts x7 - ES Receivers v1.0 Page ...
... digital audio Infrared repeater input/outputs RS-232C control/upgrade 12-volt trigger outputs Multi-Zone/Room Capability 2nd Room output 3rd Room output On screen display Remote Features Preprogrammed LCD Learning & Macro 2-way Touch-screen Second-room remote STRDA7100ES 170 watts x7 Yes Yes Yes Yes ...Yes Yes Yes IIx Yes Yes 7.1-channel Yes Yes (Two) Yes Yes Yes 7.1 2/1 2 2/1 4/2 4/2 to HDMI 5/2 3 7.1 channels Yes 1/2 Yes/Yes 3 3/3 A/V out Audio Yes Yes Yes Yes Yes STRDA3100ES 120 watts x7 - ES Receivers v1.0 Page ...

Primary User Manual
Page 3
... 42 Other Settings 46 Receiving Broadcasts 48 Automatic/Manual Tuning 49 Preset Tuning 50 Direct Tuning Using the Remote 51 Using the Tuner Menus 51 Other Operations 52 Presetting Equalizer and Sound Fields 53 Recording 54 CONTROL A1 Control System 55 Additional Information... The instructions in the text, for example, "U.S.A./Canada models only." Check your remote, refer to the separate operating instructions supplied with the remote. • The following icon is used for model STR-DA777ES. "DTS" and "DTS Digital Surround" are for illustration purposes unless stated otherwise...
... 42 Other Settings 46 Receiving Broadcasts 48 Automatic/Manual Tuning 49 Preset Tuning 50 Direct Tuning Using the Remote 51 Using the Tuner Menus 51 Other Operations 52 Presetting Equalizer and Sound Fields 53 Recording 54 CONTROL A1 Control System 55 Additional Information... The instructions in the text, for example, "U.S.A./Canada models only." Check your remote, refer to the separate operating instructions supplied with the remote. • The following icon is used for model STR-DA777ES. "DTS" and "DTS Digital Surround" are for illustration purposes unless stated otherwise...

Primary User Manual
Page 4
...may cause a malfunction. • If you get started • Turn off the power to all components before you received the following items with new ones. white (left, audio) to replace batteries Under normal conditions, the batteries should last... FM wire antenna (1) • AM loop antenna (1) • Remote commander RM-TP503 (remote) (1) • LR6 (size-AA) alkaline batteries (4) • Coin shaped lithium battery (CR-2032) (1) U.S.A./Canada models only: • Audio/video/control S connecting cord (1) • CONTROL S connecting cord (1) Inserting batteries into the remote ...
...may cause a malfunction. • If you get started • Turn off the power to all components before you received the following items with new ones. white (left, audio) to replace batteries Under normal conditions, the batteries should last... FM wire antenna (1) • AM loop antenna (1) • Remote commander RM-TP503 (remote) (1) • LR6 (size-AA) alkaline batteries (4) • Coin shaped lithium battery (CR-2032) (1) U.S.A./Canada models only: • Audio/video/control S connecting cord (1) • CONTROL S connecting cord (1) Inserting batteries into the remote ...

Primary User Manual
Page 21
...8226; To adjust the balance of the front right and front left speakers, use the front balance controls on the remote (or FRONT (L/R) in the LEVEL menu (page 42)). • To adjust the balance of ...120 Hz) This setting lets you have touched TEST TONE, touch +/- For more information regarding remote control operations, refer to the separate manual "Remote Commander" supplied with this unit. 1 Press 1/u to turn off the test tone. The test...front speakers are set to turn on the receiver. 2 Touch SOUND FIELD on the supplied remote to display the SOUND FIELD screen. 3 Touch LEVEL on the supplied...
...8226; To adjust the balance of the front right and front left speakers, use the front balance controls on the remote (or FRONT (L/R) in the LEVEL menu (page 42)). • To adjust the balance of ...120 Hz) This setting lets you have touched TEST TONE, touch +/- For more information regarding remote control operations, refer to the separate manual "Remote Commander" supplied with this unit. 1 Press 1/u to turn off the test tone. The test...front speakers are set to turn on the receiver. 2 Touch SOUND FIELD on the supplied remote to display the SOUND FIELD screen. 3 Touch LEVEL on the supplied...

Primary User Manual
Page 22
...MASTER VOLUME 1/u SPEAKERS OFF A B A+B PHONES MULTI CHANNEL DECODING MEMORY FM / AM TUNER PRESET - + SOUND FIELD PRESET - + S-VIDEO VIDEO L AUDIO R A.F.D SOUND FIELD - Before You Use Your Receiver Before turning on the receiver Make sure that you have : • Turned MASTER VOLUME to create ... source) that you follow the procedure described above and adjust the speaker levels from your listening position using the remote control. Checking the connections After connecting all of your software. When you actually playback software recorded in multi channel surround...
...MASTER VOLUME 1/u SPEAKERS OFF A B A+B PHONES MULTI CHANNEL DECODING MEMORY FM / AM TUNER PRESET - + SOUND FIELD PRESET - + S-VIDEO VIDEO L AUDIO R A.F.D SOUND FIELD - Before You Use Your Receiver Before turning on the receiver Make sure that you have : • Turned MASTER VOLUME to create ... source) that you follow the procedure described above and adjust the speaker levels from your listening position using the remote control. Checking the connections After connecting all of your software. When you actually playback software recorded in multi channel surround...

Primary User Manual
Page 23
...the cord(s) used for front speakers that are not connected to the receiver (see "@∞ SPEAKERS selector" on page 27). / Check that all speaker cords are output from the headphones (see "Troubleshooting" on the remote to the receiver correctly. No sound is heard from one channel is output from the... selected. / Check that all components are fully inserted into the jacks on both the receiver and the component. If both the receiver and all the cords are turned on. / Check that the MASTER VOLUME control is not set the SPEAKERS selector to OFF to the PHONES jack and set at 0....
...the cord(s) used for front speakers that are not connected to the receiver (see "@∞ SPEAKERS selector" on page 27). / Check that all speaker cords are output from the headphones (see "Troubleshooting" on the remote to the receiver correctly. No sound is heard from one channel is output from the... selected. / Check that all components are fully inserted into the jacks on both the receiver and the component. If both the receiver and all the cords are turned on. / Check that the MASTER VOLUME control is not set the SPEAKERS selector to OFF to the PHONES jack and set at 0....

Primary User Manual
Page 42
...is set, the test tone is not output. • [AUTO] outputs the test tone from each speaker and perform a variety of other adjustments to control the sound mix. p Rear level REAR LEVEL -XX.XdB Initial setting : 0 dB Lets you adjust the balance between the front left surround), or ... Initial setting : center Lets you adjust level of the rear (left and right speakers. • This setting can also be adjusted directly using the supplied remote. p Sub woofer level SUB WOOFER -XX.XdB Initial setting : 0 dB Lets you modify the output level of each speaker in order automatically. •...
...is set, the test tone is not output. • [AUTO] outputs the test tone from each speaker and perform a variety of other adjustments to control the sound mix. p Rear level REAR LEVEL -XX.XdB Initial setting : 0 dB Lets you adjust the balance between the front left surround), or ... Initial setting : center Lets you adjust level of the rear (left and right speakers. • This setting can also be adjusted directly using the supplied remote. p Sub woofer level SUB WOOFER -XX.XdB Initial setting : 0 dB Lets you modify the output level of each speaker in order automatically. •...

Primary User Manual
Page 47
...right, the model names of components manufactured by Sony appear. p Setting up the 2 way remote 2-way REMOTE [ON] Initial setting : ON If you do not want to use this receiver together with the TA-E9000ES, turn OFF this unit's 2 way remote control system. For details, refer to the operating ... touched to 2 hours using the receiver and up to move the position and turn OFF the remote control adapter switch on again. The timer can easily enter the names of components manufactured by Sony When or is also compatible with the 2 way remote control system, be sure to perform the...
...right, the model names of components manufactured by Sony appear. p Setting up the 2 way remote 2-way REMOTE [ON] Initial setting : ON If you do not want to use this receiver together with the TA-E9000ES, turn OFF this unit's 2 way remote control system. For details, refer to the operating ... touched to 2 hours using the receiver and up to move the position and turn OFF the remote control adapter switch on again. The timer can easily enter the names of components manufactured by Sony When or is also compatible with the 2 way remote control system, be sure to perform the...

Primary User Manual
Page 55
..., 1 MD deck, 1 tape deck and 1 receiver). (You may cause the application to the functions of the functions available with your connection. Jacks and connection examples CONTROL A1 CONTROL A1 CD player MD deck On CONTROL A1 jacks and connections It is designed to maintain ...CONTROL A1 compatible components in the SONY 300 disc CD changer and other . Also, do not operate the connected component in series to the CONTROL A1 jacks on cassette decks, that can be controlled may be compatible with the new functions. • Do not operate a 2 way remote control unit when the CONTROL...
..., 1 MD deck, 1 tape deck and 1 receiver). (You may cause the application to the functions of the functions available with your connection. Jacks and connection examples CONTROL A1 CONTROL A1 CD player MD deck On CONTROL A1 jacks and connections It is designed to maintain ...CONTROL A1 compatible components in the SONY 300 disc CD changer and other . Also, do not operate the connected component in series to the CONTROL A1 jacks on cassette decks, that can be controlled may be compatible with the new functions. • Do not operate a 2 way remote control unit when the CONTROL...

Primary User Manual
Page 58
... (see page 50). Preset the stations (see page 27). The remote does not function. / Point the remote at the remote sensor on the receiver. / Remove any obstacles in the path between the remote and the receiver. / Replace all batteries in AM stations with direct tuning) (see... pages 51). / No stations have been preset or the preset stations have been cleared (when tuning by rotating the INPUT SELECTOR control...
... (see page 50). Preset the stations (see page 27). The remote does not function. / Point the remote at the remote sensor on the receiver. / Remove any obstacles in the path between the remote and the receiver. / Replace all batteries in AM stations with direct tuning) (see... pages 51). / No stations have been preset or the preset stations have been cleared (when tuning by rotating the INPUT SELECTOR control...


