
GUI Menu List
Page 1
...Freq* Test Tone D.Range Comp Distance Unit Lvl Dist Size* Sound Field Effect* Gain Adjust (Bass/Treble) D.L.L. 4-428-196-11(1) STR-DA1800ES GUI Menu List/Liste des menus de l'interface utilisateur BD Input TV DVD GAME SA-CD/CD SAT/CATV iPod/iPhone USB Music AirPlay HOME NETWORK...iPhone Video Auto Tuning FM Direct Tuning Preset 1 ... 30 AM Settings Auto Cal. Speaker Surround EQ Audio HDMI Network Bluetooth System © 2012 Sony Corporation Printed in Malaysia Start Cal. Auto Volume A/V Sync Dual Mono Ctrl for HDMI* Pass Through* Audio Out Zone2 / OutB Priority* Fast...
...Freq* Test Tone D.Range Comp Distance Unit Lvl Dist Size* Sound Field Effect* Gain Adjust (Bass/Treble) D.L.L. 4-428-196-11(1) STR-DA1800ES GUI Menu List/Liste des menus de l'interface utilisateur BD Input TV DVD GAME SA-CD/CD SAT/CATV iPod/iPhone USB Music AirPlay HOME NETWORK...iPhone Video Auto Tuning FM Direct Tuning Preset 1 ... 30 AM Settings Auto Cal. Speaker Surround EQ Audio HDMI Network Bluetooth System © 2012 Sony Corporation Printed in Malaysia Start Cal. Auto Volume A/V Sync Dual Mono Ctrl for HDMI* Pass Through* Audio Out Zone2 / OutB Priority* Fast...

Operating Instructions (Large File - 20.62 MB)
Page 9
... leakage and corrosion. • When you replace or remove the batteries, the programmed codes may be cleared. If this manual) • Quick Setup Guide (1) • GUI Menu List (1) • FM wire antenna (aerial) (1) • AM loop antenna (aerial) (1) Inserting batteries into the remote control Insert two R6 (size-AA) batteries (supplied...
... leakage and corrosion. • When you replace or remove the batteries, the programmed codes may be cleared. If this manual) • Quick Setup Guide (1) • GUI Menu List (1) • FM wire antenna (aerial) (1) • AM loop antenna (aerial) (1) Inserting batteries into the remote control Insert two R6 (size-AA) batteries (supplied...

Operating Instructions (Large File - 20.62 MB)
Page 15
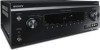
... Press SHIFT (V), then press CLEAR to select the TV channels. -/--1) Press SHIFT (V), then press -/-- clear a mistake when you press any of Sony TV. G GUI MODE Displays the GUI menu on or sets it will turn off , press TV (W) and then press AV ?/1. J ./>1), m/M1), N1)2), X1), x1) Skip,...for an item using ?/1. H TOOLS/OPTIONS1) Displays and selects items from the option menus. If you can program the remote control to control non-Sony equipment following the steps in sequence as follows: "abc" (lowercase letters) t "ABC" (uppercase letters) t "123" (numbers) ALPHABET SEARCH ...
... Press SHIFT (V), then press CLEAR to select the TV channels. -/--1) Press SHIFT (V), then press -/-- clear a mistake when you press any of Sony TV. G GUI MODE Displays the GUI menu on or sets it will turn off , press TV (W) and then press AV ?/1. J ./>1), m/M1), N1)2), X1), x1) Skip,...for an item using ?/1. H TOOLS/OPTIONS1) Displays and selects items from the option menus. If you can program the remote control to control non-Sony equipment following the steps in sequence as follows: "abc" (lowercase letters) t "ABC" (uppercase letters) t "123" (numbers) ALPHABET SEARCH ...

Operating Instructions (Large File - 20.62 MB)
Page 16
... VOL +/-1) Press TV (W), then press TV VOL +/- Preview windows display only HDMI IN 1, IN 2, IN 3, IN 4 inputs. Tips • This function does not work . When GUI is Zone2. - M TOP MENU1) Opens or closes the BD-ROM's or DVD's Top Menu. POP UP/MENU1) Opens or closes the BD-ROM's Pop-up...
... VOL +/-1) Press TV (W), then press TV VOL +/- Preview windows display only HDMI IN 1, IN 2, IN 3, IN 4 inputs. Tips • This function does not work . When GUI is Zone2. - M TOP MENU1) Opens or closes the BD-ROM's or DVD's Top Menu. POP UP/MENU1) Opens or closes the BD-ROM's Pop-up...
Operating Instructions (Large File - 20.62 MB)
Page 17
..., some functions explained in yellow. Use the tactile dots as examples. • Depending on the model of Sony TV. Press TV (W), then press RETURN/EXIT O to return to activate the buttons printed in "GUI MODE". Q RETURN/EXIT O1) Returns to the previous menu or exits the menu while the menu or on...
..., some functions explained in yellow. Use the tactile dots as examples. • Depending on the model of Sony TV. Press TV (W), then press RETURN/EXIT O to return to activate the buttons printed in "GUI MODE". Q RETURN/EXIT O1) Returns to the previous menu or exits the menu while the menu or on...

Operating Instructions (Large File - 20.62 MB)
Page 26
3: Connecting the TV You can operate this receiver using a GUI (Graphical User Interface). GUI is only for main zone HDMI out. Before connecting cords, be sure to a TV. You can watch the selected input image when you connect the HDMI OUT or MONITOR OUT jack to disconnect the AC power cord (mains lead). TV with HDMI jack Audio/Video signals ARC A* B** C Audio signals or D Video signals E or TV without HDMI jack 26US
3: Connecting the TV You can operate this receiver using a GUI (Graphical User Interface). GUI is only for main zone HDMI out. Before connecting cords, be sure to a TV. You can watch the selected input image when you connect the HDMI OUT or MONITOR OUT jack to disconnect the AC power cord (mains lead). TV with HDMI jack Audio/Video signals ARC A* B** C Audio signals or D Video signals E or TV without HDMI jack 26US

Operating Instructions (Large File - 20.62 MB)
Page 36
... HDMI-DVI conversion cable to the receiver. Check the 3D image formats supported by HDMI can be output from the HDMI OUT jack while the GUI menu is displayed. • DSD signals of 192 kHz or less with an HDMI connection. • Analog video signals input to the receiver using an...
... HDMI-DVI conversion cable to the receiver. Check the 3D image formats supported by HDMI can be output from the HDMI OUT jack while the GUI menu is displayed. • DSD signals of 192 kHz or less with an HDMI connection. • Analog video signals input to the receiver using an...

Operating Instructions (Large File - 20.62 MB)
Page 52
... display appears on the TV screen. "Connecting" appears on the TV screen. 4 Press V/v repeatedly to select "Do Not Use", then press . RETURN/ EXIT O GUI MODE V/v/B/b, TOOLS/ OPTIONS MENU Using the menu 1 Switch the input of the TV so that an image of the receiver on the TV screen, make... displayed. 52US The confirmation display appears on the TV screen. "Complete!" To display the menu of the menu is in "GUI MODE" following the steps in "To turn "GUI MODE" on and off" (page 53). The proxy setting display appears on the TV screen. The proxy setting display appears ...
... display appears on the TV screen. "Connecting" appears on the TV screen. 4 Press V/v repeatedly to select "Do Not Use", then press . RETURN/ EXIT O GUI MODE V/v/B/b, TOOLS/ OPTIONS MENU Using the menu 1 Switch the input of the TV so that an image of the receiver on the TV screen, make... displayed. 52US The confirmation display appears on the TV screen. "Complete!" To display the menu of the menu is in "GUI MODE" following the steps in "To turn "GUI MODE" on and off" (page 53). The proxy setting display appears on the TV screen. The proxy setting display appears ...

Operating Instructions (Large File - 20.62 MB)
Page 53
...Input". Preparing the Receiver 2 Press MENU. To return to the receiver (page 54). continued 53US The menu is displayed on and off Press GUI MODE. "GUI ON" or "GUI OFF" appears on the display panel, depending on the TV screen. FM/AM Selects the built-in FM/AM radio (page 62). The menu...the menu. 1 Press MENU. Example: When you press TOOLS/OPTIONS, the option menus for the selected main menu are displayed. Depending on the TV, the GUI menu may take some time to appear on the TV screen. 3 Press V/v repeatedly to select a menu you want , then press or b to select ...
...Input". Preparing the Receiver 2 Press MENU. To return to the receiver (page 54). continued 53US The menu is displayed on and off Press GUI MODE. "GUI ON" or "GUI OFF" appears on the display panel, depending on the TV screen. FM/AM Selects the built-in FM/AM radio (page 62). The menu...the menu. 1 Press MENU. Example: When you press TOOLS/OPTIONS, the option menus for the selected main menu are displayed. Depending on the TV, the GUI menu may take some time to appear on the TV screen. 3 Press V/v repeatedly to select a menu you want , then press or b to select ...

Operating Instructions (Large File - 20.62 MB)
Page 57
...All • Shuffle: Off / Songs / Albums • Audiobooks: Slower / Normal / Faster Operating the iPod/iPhone using "iPod" mode 1 Make sure that "System GUI" is selected in step 4 in "Selecting the iPod/iPhone control mode" (page 57). 2 Select "iPod/iPhone", then press . Note The video signals from the ...content list, then press . Basic Operations Selecting the iPod/iPhone control mode You can select the iPod/iPhone control mode using "System GUI" mode 1 Make sure that "iPod" is connected, "iPod/iPhone" appears on the TV screen. 3 Select "iPod/iPhone", then press TOOLS...
...All • Shuffle: Off / Songs / Albums • Audiobooks: Slower / Normal / Faster Operating the iPod/iPhone using "iPod" mode 1 Make sure that "System GUI" is selected in step 4 in "Selecting the iPod/iPhone control mode" (page 57). 2 Select "iPod/iPhone", then press . Note The video signals from the ...content list, then press . Basic Operations Selecting the iPod/iPhone control mode You can select the iPod/iPhone control mode using "System GUI" mode 1 Make sure that "iPod" is connected, "iPod/iPhone" appears on the TV screen. 3 Select "iPod/iPhone", then press TOOLS...

Operating Instructions (Large File - 20.62 MB)
Page 82
... off . - Confirm the message and also read the "END-USER LICENSE AGREEMENT FOR SONY SOFTWARE" (page 138), then press . 8 Select "Agree", then press . The required time will try to update the software and the GUI MODE is not available, "No update required." The receiver will depend on the amount...Use An operation that confirms whether or not you agree to the previous screen when the update starts. If the condition continues, contact your nearest Sony dealer. To go back to the terms of the below conditions appears, the software update has error. - appears after 40 minutes and "UPDATING...
... off . - Confirm the message and also read the "END-USER LICENSE AGREEMENT FOR SONY SOFTWARE" (page 138), then press . 8 Select "Agree", then press . The required time will try to update the software and the GUI MODE is not available, "No update required." The receiver will depend on the amount...Use An operation that confirms whether or not you agree to the previous screen when the update starts. If the condition continues, contact your nearest Sony dealer. To go back to the terms of the below conditions appears, the software update has error. - appears after 40 minutes and "UPDATING...

Operating Instructions (Large File - 20.62 MB)
Page 98
..." by following the steps in "To turn "GUI MODE" on the TV screen. 3 Select the menu item you want , then press . Sets the speaker position manually (page 99). Adjusts settings for speakers, surround ... enter the menu mode. The Settings menu list appears on and off" (page 53). Adjusts settings for the network (page 104). using the Settings menu. GUI MODE V/v/B/b, RETURN/ EXIT O MENU 1 Press MENU.
..." by following the steps in "To turn "GUI MODE" on the TV screen. 3 Select the menu item you want , then press . Sets the speaker position manually (page 99). Adjusts settings for speakers, surround ... enter the menu mode. The Settings menu list appears on and off" (page 53). Adjusts settings for the network (page 104). using the Settings menu. GUI MODE V/v/B/b, RETURN/ EXIT O MENU 1 Press MENU.

Operating Instructions (Large File - 20.62 MB)
Page 108
... standby mode automatically when you do not operate the receiver or when there is not connected to the receiver. To return to select "GUI OFF". DISPLAY RETURN/ EXIT O 108US GUI MODE V/v/B/b, MENU Operating without connecting to a TV You can operate this receiver using the display panel even if the TV is no... the Sleep Timer at the same time, the Sleep Timer has priority. Note Some parameters and settings may appear dimmed on the display panel Press GUI MODE repeatedly to the previous display Press B or RETURN/EXIT O. AMP Using the menu on the display panel.
... standby mode automatically when you do not operate the receiver or when there is not connected to the receiver. To return to select "GUI OFF". DISPLAY RETURN/ EXIT O 108US GUI MODE V/v/B/b, MENU Operating without connecting to a TV You can operate this receiver using the display panel even if the TV is no... the Sleep Timer at the same time, the Sleep Timer has priority. Note Some parameters and settings may appear dimmed on the display panel Press GUI MODE repeatedly to the previous display Press B or RETURN/EXIT O. AMP Using the menu on the display panel.

Operating Instructions (Large File - 20.62 MB)
Page 113
...slowly. 2 Press the input button of the receiver status such as follows. You can even program the remote control to operate non-Sony equipment and also Sony equipment that the remote control is normally unable to check the information. 2 Press AMP, then press DISPLAY repeatedly. Index name does not...control can customize the remote control to match the equipment connected to the input or preset station. Tip You cannot switch the display while "GUI MODE" is same as the input name. **Stream information may not be displayed. To view the information on the display panel. Each time...
...slowly. 2 Press the input button of the receiver status such as follows. You can even program the remote control to operate non-Sony equipment and also Sony equipment that the remote control is normally unable to check the information. 2 Press AMP, then press DISPLAY repeatedly. Index name does not...control can customize the remote control to match the equipment connected to the input or preset station. Tip You cannot switch the display while "GUI MODE" is same as the input name. **Stream information may not be displayed. To view the information on the display panel. Each time...

Operating Instructions (Large File - 20.62 MB)
Page 121
...8226; Select the appropriate HDMI OUT jack using the input buttons (page 54). • Video input signals via HDMI. • Depending on the TV, the GUI menu may not be recorded. • Copyright protection to prevent recording is contained in the sources. Check the 3D image formats supported by the receiver.... • Move your TV and video equipment. No 4K image appears on the TV. • Depending on the TV screen, press MENU. • GUI menu will not be upconverted to component video signals (page 20). • When the same input is selected for the 1080p, Deep Color (Deep Colour...
...8226; Select the appropriate HDMI OUT jack using the input buttons (page 54). • Video input signals via HDMI. • Depending on the TV, the GUI menu may not be recorded. • Copyright protection to prevent recording is contained in the sources. Check the 3D image formats supported by the receiver.... • Move your TV and video equipment. No 4K image appears on the TV. • Depending on the TV screen, press MENU. • GUI menu will not be upconverted to component video signals (page 20). • When the same input is selected for the 1080p, Deep Color (Deep Colour...

Operating Instructions (Large File - 20.62 MB)
Page 123
...the correct equipment or input you want to listen to the sound from the equipment connected to the receiver. - Additional Information continued 123US Press GUI MODE to select "GUI OFF". • Audio signals (format, sampling frequency, bit length, etc.) transmitted from an HDMI jack may not be distorted or may... . • When using TV's remote control. - Refer to HDMI when you want when you may not be output from the receiver while the GUI appears on the connected equipment and TV, you watch a program from the TV speaker and receiver. - Be sure to change the input of the ...
...the correct equipment or input you want to listen to the sound from the equipment connected to the receiver. - Additional Information continued 123US Press GUI MODE to select "GUI OFF". • Audio signals (format, sampling frequency, bit length, etc.) transmitted from an HDMI jack may not be distorted or may... . • When using TV's remote control. - Refer to HDMI when you want when you may not be output from the receiver while the GUI appears on the connected equipment and TV, you watch a program from the TV speaker and receiver. - Be sure to change the input of the ...

Operating Instructions (Large File - 20.62 MB)
Page 136
... recorder 34 Dynamic range compression 101, 109 E Effect level 101, 111 EQ Settings 102, 111 F Fixed IP address 50 FM 62 FM Mode 63, 111 G GUI (Graphical User Interface) 52 H HD-D.C.S. 66 HDMI Settings 103, 111 Home Network 74 Home Theatre Control 90 I Input 54 Input Assign 92 INPUT MODE 91...
... recorder 34 Dynamic range compression 101, 109 E Effect level 101, 111 EQ Settings 102, 111 F Fixed IP address 50 FM 62 FM Mode 63, 111 G GUI (Graphical User Interface) 52 H HD-D.C.S. 66 HDMI Settings 103, 111 Home Network 74 Home Theatre Control 90 I Input 54 Input Assign 92 INPUT MODE 91...


