
Operating Instructions (Large File - 20.62 MB)
Page 1
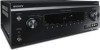
Multi Channel AV Receiver 4-428-194-12(2) Operating Instructions US Mode d'emploi FR STR-DA1800ES
Multi Channel AV Receiver 4-428-194-12(2) Operating Instructions US Mode d'emploi FR STR-DA1800ES

Operating Instructions (Large File - 20.62 MB)
Page 3
...cables and connectors must not be used , use caution when moving the cart/apparatus combination to meet FCC emission limits. Reorient or relocate the receiving antenna. - When a cart is connected. - The following FCC statement applies only to the version of time. 14)Refer all servicing ...to radio or television reception, which the receiver is used for connection to host computers and/or peripherals in conjunction with the apparatus. 12)Use only with the cart, stand, tripod,...
...cables and connectors must not be used , use caution when moving the cart/apparatus combination to meet FCC emission limits. Reorient or relocate the receiving antenna. - When a cart is connected. - The following FCC statement applies only to the version of time. 14)Refer all servicing ...to radio or television reception, which the receiver is used for connection to host computers and/or peripherals in conjunction with the apparatus. 12)Use only with the cart, stand, tripod,...

Operating Instructions (Large File - 20.62 MB)
Page 4
...Surround EX, and the double-D symbol are marked in this manual are trademarks or registered trademarks of DTS, Inc. On copyrights This receiver incorporates Dolby* Digital and Pro Logic Surround and the DTS** Digital Surround System. * Manufactured under U.S. The terms HDMI and HDMI High...the receiver if they may cause undesired operation of this receiver is a trademark of HDMI Licensing LLC in this device. The font type (Shin Go R) installed in the United States and other U.S. This equipment complies with FCC radiation exposure limits set forth for model STR-DA1800ES....
...Surround EX, and the double-D symbol are marked in this manual are trademarks or registered trademarks of DTS, Inc. On copyrights This receiver incorporates Dolby* Digital and Pro Logic Surround and the DTS** Digital Surround System. * Manufactured under U.S. The terms HDMI and HDMI High...the receiver if they may cause undesired operation of this receiver is a trademark of HDMI Licensing LLC in this device. The font type (Shin Go R) installed in the United States and other U.S. This equipment complies with FCC radiation exposure limits set forth for model STR-DA1800ES....
Operating Instructions (Large File - 20.62 MB)
Page 7
..............69 Resetting sound fields to the default settings 69 Using Network Features About the network functions of the receiver 70 Setting up the server 70 Enjoying audio content stored on the server 74 Enjoying Sony Entertainment Network (SEN 76 Using the PARTY STREAMING function 78 Streaming music from iTunes with AirPlay 80...
..............69 Resetting sound fields to the default settings 69 Using Network Features About the network functions of the receiver 70 Setting up the server 70 Enjoying audio content stored on the server 74 Enjoying Sony Entertainment Network (SEN 76 Using the PARTY STREAMING function 78 Streaming music from iTunes with AirPlay 80...

Operating Instructions (Large File - 20.62 MB)
Page 8
..." Sync 88 Playing back equipment with one-touch operation (One-Touch Play 88 Enjoying the TV sound from the speakers connected to the receiver (System Audio Control 89 Turning off the receiver with the TV (System Power-Off 89 Enjoying optimum sound field for the selected scene (Scene Select 90 Operating the... the TV's remote control (Home Theatre Control 90 Enjoying the TV sound from the speakers connected to the receiver via HDMI OUT A jack (Audio Return Channel 90 Switching the monitors that output the HDMI video signals 91 Using the Remote Control Programming the remote ...
..." Sync 88 Playing back equipment with one-touch operation (One-Touch Play 88 Enjoying the TV sound from the speakers connected to the receiver (System Audio Control 89 Turning off the receiver with the TV (System Power-Off 89 Enjoying optimum sound field for the selected scene (Scene Select 90 Operating the... the TV's remote control (Home Theatre Control 90 Enjoying the TV sound from the speakers connected to the receiver via HDMI OUT A jack (Audio Return Channel 90 Switching the monitors that output the HDMI video signals 91 Using the Remote Control Programming the remote ...

Operating Instructions (Large File - 20.62 MB)
Page 9
Supplied accessories • Operating Instructions (this happens, reprogram the remote control (page 113). • When the receiver no longer responds to the remote control, replace all the batteries with old ones. • Do not mix manganese batteries and other kinds of time, ...
Supplied accessories • Operating Instructions (this happens, reprogram the remote control (page 113). • When the receiver no longer responds to the remote control, replace all the batteries with old ones. • Do not mix manganese batteries and other kinds of time, ...

Operating Instructions (Large File - 20.62 MB)
Page 10
...Standby, and zone 2 are set to on. - C INPUT SELECTOR (page 55, 61, 91) D INPUT MODE (page 91) E Remote control sensor Receives signals from remote control. Description and location of the display panel in 3 levels. Hold down the button to adjust the level. P BLUETOOTH (page 85) ... qj qh qg qf A ?/1 (on/standby) (page 42, 63, 69) B ON/STANDBY indicator Lights up as follows: Green: The receiver is set to headphones. 10US Amber: The receiver is in progress (page 81). Note If the ON/STANDBY indicator flashes slowly, the software update is in quick succession, the software...
...Standby, and zone 2 are set to on. - C INPUT SELECTOR (page 55, 61, 91) D INPUT MODE (page 91) E Remote control sensor Receives signals from remote control. Description and location of the display panel in 3 levels. Hold down the button to adjust the level. P BLUETOOTH (page 85) ... qj qh qg qf A ?/1 (on/standby) (page 42, 63, 69) B ON/STANDBY indicator Lights up as follows: Green: The receiver is set to headphones. 10US Amber: The receiver is in progress (page 81). Note If the ON/STANDBY indicator flashes slowly, the software update is in quick succession, the software...

Operating Instructions (Large File - 20.62 MB)
Page 11
... is output from the SUBWOOFER jack. Lights up when the audio signal is activated (page 102). F PARTY Lights up the respective indicator when the receiver is connected. No signal. The signal strength is activated (page 78). MEM DTS - HD MSTR HI RES LBR LFE UPDATE D.RANGE A.P.M. I ...Linear PCM signals. D D EX D+ TrueHD Dolby Digital Dolby Digital Surround EX Dolby Digital Plus Dolby TrueHD H NEO:6 Lights up when the receiver is input through the HDMI jack. M SLEEP Lights up when surround back speakers selection is set to indicate the current input. continued 11US ...
... is output from the SUBWOOFER jack. Lights up when the audio signal is activated (page 102). F PARTY Lights up the respective indicator when the receiver is connected. No signal. The signal strength is activated (page 78). MEM DTS - HD MSTR HI RES LBR LFE UPDATE D.RANGE A.P.M. I ...Linear PCM signals. D D EX D+ TrueHD Dolby Digital Dolby Digital Surround EX Dolby Digital Plus Dolby TrueHD H NEO:6 Lights up when the receiver is input through the HDMI jack. M SLEEP Lights up when surround back speakers selection is set to indicate the current input. continued 11US ...

Operating Instructions (Large File - 20.62 MB)
Page 12
... etc.) indicate the channels being reproduced. Based on the speaker pattern setting. This matrix surround decoding technology can only set to show how the receiver downmixes the source sound. LH RH L R C SL SR S SBL SBR SB Front Left High Front Right High Front Left Front Right... when the A.P.M. (Automatic Phase Matching) function is activated (page 101). Q DTS(-ES) indicator* Lights up the respective indicator when the receiver is activated. You can enhance input signals. MEM Memory function, such as Preset Memory (page 64), etc., is decoding the corresponding DTS ...
... etc.) indicate the channels being reproduced. Based on the speaker pattern setting. This matrix surround decoding technology can only set to show how the receiver downmixes the source sound. LH RH L R C SL SR S SBL SBR SB Front Left High Front Right High Front Left Front Right... when the A.P.M. (Automatic Phase Matching) function is activated (page 101). Q DTS(-ES) indicator* Lights up the respective indicator when the receiver is activated. You can enhance input signals. MEM Memory function, such as Preset Memory (page 64), etc., is decoding the corresponding DTS ...

Operating Instructions (Large File - 20.62 MB)
Page 14
... 38) AM ANTENNA terminals (page 38) * You must connect the HDMI OUT or MONITOR OUT jack to your TV to operate non-Sony equipment. You can also program the remote control to watch the selected input image (page 26). The remote control is pre-programmed to ...operate this receiver and other equipment. Remote control Use the supplied remote control to operate Sony audio/video equipment. For details, see "Programming the remote control" (page 113). RM-AAP080 wg wf 1 wd ...
... 38) AM ANTENNA terminals (page 38) * You must connect the HDMI OUT or MONITOR OUT jack to your TV to operate non-Sony equipment. You can also program the remote control to watch the selected input image (page 26). The remote control is pre-programmed to ...operate this receiver and other equipment. Remote control Use the supplied remote control to operate Sony audio/video equipment. For details, see "Programming the remote control" (page 113). RM-AAP080 wg wf 1 wd ...

Operating Instructions (Large File - 20.62 MB)
Page 15
...(V), then press ALPHABET SEARCH to search for HDMI (page 103), Network Standby (page 106), and Bluetooth Standby (page 107) are assigned to control Sony equipment. Numeric/text buttons1)2) Press SHIFT (V), then press numeric/text buttons to - to select the TV channel entry mode. >101) Press SHIFT ... Press SHIFT (V), then press -/-- skip to previous or next album when using numeric buttons. - A ?/1 (on/standby) Turns the receiver on or sets it will turn off the receiver and all other symbols (#, %, etc.) when you press ?/1 (A) at the same time, it to the standby mode. Press TV (W),...
...(V), then press ALPHABET SEARCH to search for HDMI (page 103), Network Standby (page 106), and Bluetooth Standby (page 107) are assigned to control Sony equipment. Numeric/text buttons1)2) Press SHIFT (V), then press numeric/text buttons to - to select the TV channel entry mode. >101) Press SHIFT ... Press SHIFT (V), then press -/-- skip to previous or next album when using numeric buttons. - A ?/1 (on/standby) Turns the receiver on or sets it will turn off the receiver and all other symbols (#, %, etc.) when you press ?/1 (A) at the same time, it to the standby mode. Press TV (W),...

Operating Instructions (Large File - 20.62 MB)
Page 16
... time appears on a live picture-in the following . - Press SLEEP again. - TV INPUT1) Press TV (W), then press TV INPUT or to this receiver. Turns on the display panel. • The Sleep Timer will be canceled when you press SLEEP, the display changes cyclically as follows: 0:30:00 t... to select the input signal (TV input or video input). to activate the TV's muting function. MASTER VOL +/-1) Adjusts the volume level of the receiver. P DISC SKIP/iPhone CTRL1) Press to start or close a PARTY (page 79). Each time you perform the following cases. - Hold down the...
... time appears on a live picture-in the following . - Press SLEEP again. - TV INPUT1) Press TV (W), then press TV INPUT or to this receiver. Turns on the display panel. • The Sleep Timer will be canceled when you press SLEEP, the display changes cyclically as follows: 0:30:00 t... to select the input signal (TV input or video input). to activate the TV's muting function. MASTER VOL +/-1) Adjusts the volume level of the receiver. P DISC SKIP/iPhone CTRL1) Press to start or close a PARTY (page 79). Each time you perform the following cases. - Hold down the...
Operating Instructions (Large File - 20.62 MB)
Page 17
...Activates the Sound Optimizer function (page 69). Note This button is not available when the receiver is intended to serve as reference when operating the receiver. X AMP Activates the receiver operation for information on the TV screen. Press TV (W), then press RETURN/EXIT O ...to return to control each equipment. 2)The 5/JKL/VIDEO 1, N/PARTY and TV CH +/ PRESET + buttons have tactile dots. continued 17US S DISPLAY1) Views information on the model of Sony...
...Activates the Sound Optimizer function (page 69). Note This button is not available when the receiver is intended to serve as reference when operating the receiver. X AMP Activates the receiver operation for information on the TV screen. Press TV (W), then press RETURN/EXIT O ...to return to control each equipment. 2)The 5/JKL/VIDEO 1, N/PARTY and TV CH +/ PRESET + buttons have tactile dots. continued 17US S DISPLAY1) Views information on the model of Sony...
Operating Instructions (Large File - 20.62 MB)
Page 19
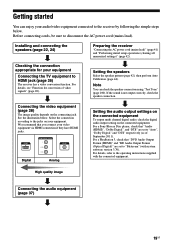
... disconnect the AC power cord (mains lead). Before connecting cords, be sure to HDMI jack (page 26) The receiver has a video conversion function. Preparing the receiver "Connecting the AC power cord (mains lead)" (page 41) and "Performing initial setup operations (clearing all memorized ...equipment connected to the operating instructions supplied with system software version 3.70). For a Sony Blu-ray Disc player, check that you connect your equipment. For details, refer to the receiver by following the simple steps below . Getting started You can check the speaker connection...
... disconnect the AC power cord (mains lead). Before connecting cords, be sure to HDMI jack (page 26) The receiver has a video conversion function. Preparing the receiver "Connecting the AC power cord (mains lead)" (page 41) and "Performing initial setup operations (clearing all memorized ...equipment connected to the operating instructions supplied with system software version 3.70). For a Sony Blu-ray Disc player, check that you connect your equipment. For details, refer to the receiver by following the simple steps below . Getting started You can check the speaker connection...
Operating Instructions (Large File - 20.62 MB)
Page 20
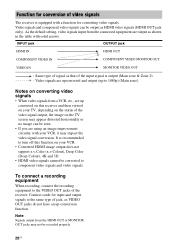
... video signals cannot be recorded properly. 20US To connect a recording equipment When recording, connect the recording equipment to the VIDEO OUT jacks of the receiver. Connect cords for input and output signals to the same type of jack, as HDMI video signals (HDMI OUT jack only). Notes on converting video...the HDMI OUT or MONITOR OUT jacks may not be converted to component video signals and video signals. It is recommended to turn off this receiver and then viewed on your TV, depending on the status of the video signal output, the image on your VCR, it may appear ...
... video signals cannot be recorded properly. 20US To connect a recording equipment When recording, connect the recording equipment to the VIDEO OUT jacks of the receiver. Connect cords for input and output signals to the same type of jack, as HDMI video signals (HDMI OUT jack only). Notes on converting video...the HDMI OUT or MONITOR OUT jacks may not be converted to component video signals and video signals. It is recommended to turn off this receiver and then viewed on your TV, depending on the status of the video signal output, the image on your VCR, it may appear ...

Operating Instructions (Large File - 20.62 MB)
Page 21
... decode depend on digital audio output jacks of the playback equipment. This receiver supports the following audio formats. b)Signals with a sampling frequency of channels COAXIAL/OPTICAL HDMI 5.1 a a 6.1 a a 7.1 × a 7.1 × a 5.1 a a 6.1 a a 5.1 a a 7.1 × a 7.1 × a ...High Resolution Audioa) DTS-HD Master Audioa)b) Multi Channel Linear PCMa) Connection between the playback Maximum number equipment and the receiver of more than 96 kHz are output in another format if the playback equipment does not correspond to the operating instructions ...
... decode depend on digital audio output jacks of the playback equipment. This receiver supports the following audio formats. b)Signals with a sampling frequency of channels COAXIAL/OPTICAL HDMI 5.1 a a 6.1 a a 7.1 × a 7.1 × a 5.1 a a 6.1 a a 5.1 a a 7.1 × a 7.1 × a ...High Resolution Audioa) DTS-HD Master Audioa)b) Multi Channel Linear PCMa) Connection between the playback Maximum number equipment and the receiver of more than 96 kHz are output in another format if the playback equipment does not correspond to the operating instructions ...

Operating Instructions (Large File - 20.62 MB)
Page 22
... are output from each of the SUBWOOFER jacks. 7.1 channel speaker system using front high speakers You can connect two subwoofers to the receiver. Recommended speaker placement 7.1 channel speaker system The angle A shown in 6.1 channel or 7.1 channel format. 7.1 channel speaker system using...five speakers (two front speakers, a center speaker, and two surround speakers) and a subwoofer. Connections 1: Installing the speakers This receiver allows you cannot place the speakers at the optimum angle, separate the surround speakers and the surround back speakers adequately and arrange ...
... are output from each of the SUBWOOFER jacks. 7.1 channel speaker system using front high speakers You can connect two subwoofers to the receiver. Recommended speaker placement 7.1 channel speaker system The angle A shown in 6.1 channel or 7.1 channel format. 7.1 channel speaker system using...five speakers (two front speakers, a center speaker, and two surround speakers) and a subwoofer. Connections 1: Installing the speakers This receiver allows you cannot place the speakers at the optimum angle, separate the surround speakers and the surround back speakers adequately and arrange ...

Operating Instructions (Large File - 20.62 MB)
Page 25
If you connect only one surround back speaker, connect it turns to standby mode automatically based on the receiver (page 43). - Set the "SB Assign" to L of this terminals. - Set the "SB Assign" to select the speaker pattern from each of the input signal ... (page 43). Connections * When you want by using bi-amplifier connection (page 94). If you have an additional front speaker system, connect them to the receiver. If the auto standby function is set to on, it to "Speaker B" in the Speaker Settings menu (page 94). You can select the front speaker...
If you connect only one surround back speaker, connect it turns to standby mode automatically based on the receiver (page 43). - Set the "SB Assign" to L of this terminals. - Set the "SB Assign" to select the speaker pattern from each of the input signal ... (page 43). Connections * When you want by using bi-amplifier connection (page 94). If you have an additional front speaker system, connect them to the receiver. If the auto standby function is set to on, it to "Speaker B" in the Speaker Settings menu (page 94). You can select the front speaker...

Operating Instructions (Large File - 20.62 MB)
Page 26
You can watch the selected input image when you connect the HDMI OUT or MONITOR OUT jack to disconnect the AC power cord (mains lead). Before connecting cords, be sure to a TV. TV with HDMI jack Audio/Video signals ARC A* B** C Audio signals or D Video signals E or TV without HDMI jack 26US GUI is only for main zone HDMI out. 3: Connecting the TV You can operate this receiver using a GUI (Graphical User Interface).
You can watch the selected input image when you connect the HDMI OUT or MONITOR OUT jack to disconnect the AC power cord (mains lead). Before connecting cords, be sure to a TV. TV with HDMI jack Audio/Video signals ARC A* B** C Audio signals or D Video signals E or TV without HDMI jack 26US GUI is only for main zone HDMI out. 3: Connecting the TV You can operate this receiver using a GUI (Graphical User Interface).
Operating Instructions (Large File - 20.62 MB)
Page 27
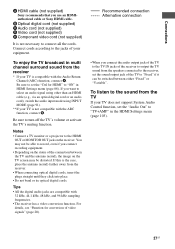
..."Function for HDMI" to "ON" in HDMI Settings menu (page 88). Be sure to set the sound output jack of the TV to the receiver, set the "Ctrl for conversion of video signals" (page 20). Be sure to the HDMI OUT or MONITOR OUT jack on the TV screen...connection Alternative connection • When you want to record, even if you use an HDMIauthorized cable or Sony HDMI cable. Connect cords according to connect all the cords. Connections A HDMI cable (not supplied) Sony recommends that you connect recording equipment. • Depending on the status of the connection between either ...
..."Function for HDMI" to "ON" in HDMI Settings menu (page 88). Be sure to set the sound output jack of the TV to the receiver, set the "Ctrl for conversion of video signals" (page 20). Be sure to the HDMI OUT or MONITOR OUT jack on the TV screen...connection Alternative connection • When you want to record, even if you use an HDMIauthorized cable or Sony HDMI cable. Connect cords according to connect all the cords. Connections A HDMI cable (not supplied) Sony recommends that you connect recording equipment. • Depending on the status of the connection between either ...


