
Operating Instructions
Page 2
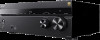
...has been turned off and on a circuit different from the mains, connect the unit to which the receiver is replaced by an incorrect type. As the power cord is no guarantee that to an easily accessible.... This unit generates, uses, and can be used batteries according to them whenever you have any interference received, including interference that may cause undesired operation. 2EN However, there is used in the U.S.A. Refer to the...in cabinet. For Remote Commander CAUTION Risk of Conformity Trade Name: SONY Model: STR-AN1000 Responsible Party: Sony Electronics Inc.
...has been turned off and on a circuit different from the mains, connect the unit to which the receiver is replaced by an incorrect type. As the power cord is no guarantee that to an easily accessible.... This unit generates, uses, and can be used batteries according to them whenever you have any interference received, including interference that may cause undesired operation. 2EN However, there is used in the U.S.A. Refer to the...in cabinet. For Remote Commander CAUTION Risk of Conformity Trade Name: SONY Model: STR-AN1000 Responsible Party: Sony Electronics Inc.

Operating Instructions
Page 3
... unit must accept any interference, including interference that any other words, this unit shall automatically discontinue transmission in Canada This unit contains licence-exempt transmitter(s)/ receiver(s) that comply with ISED radiation exposure limits set forth for connection to the following two conditions: (1) This unit may cause undesired operation of the unit...
... unit must accept any interference, including interference that any other words, this unit shall automatically discontinue transmission in Canada This unit contains licence-exempt transmitter(s)/ receiver(s) that comply with ISED radiation exposure limits set forth for connection to the following two conditions: (1) This unit may cause undesired operation of the unit...
Operating Instructions
Page 5
...Precautions 60 Specifications 64 5EN You can do with BLUETOOTH headphones/ speakers 51 What you can also use the controls on the receiver if they have the same or similar names as those on the remote control. •• Some illustrations are presented as ...this product 4 About These Operating Instructions 5 Supplied Accessories 6 Parts and Controls 7 Preparation Installing Speakers 15 Connecting Speakers 17 Connecting to Sony wireless rear speaker/ subwoofer 26 Connecting a TV 28 Connecting Audio-Visual Devices 33 Connecting the Antenna (aerial 39 Connecting to a Network ...
...Precautions 60 Specifications 64 5EN You can do with BLUETOOTH headphones/ speakers 51 What you can also use the controls on the receiver if they have the same or similar names as those on the remote control. •• Some illustrations are presented as ...this product 4 About These Operating Instructions 5 Supplied Accessories 6 Parts and Controls 7 Preparation Installing Speakers 15 Connecting Speakers 17 Connecting to Sony wireless rear speaker/ subwoofer 26 Connecting a TV 28 Connecting Audio-Visual Devices 33 Connecting the Antenna (aerial 39 Connecting to a Network ...

Operating Instructions
Page 6
... the remote control for an extended period of time, remove the batteries to avoid possible damage from battery leakage and corrosion. ••When the receiver no longer responds to the remote control, replace both of batteries. ••Do not expose the remote control sensor to direct sunlight or lights...
... the remote control for an extended period of time, remove the batteries to avoid possible damage from battery leakage and corrosion. ••When the receiver no longer responds to the remote control, replace both of batteries. ••Do not expose the remote control sensor to direct sunlight or lights...

Operating Instructions
Page 7
...47). ZONE SELECT, ZONE POWER (page 45) DIMMER Adjusts the brightness of the display panel. Remote control sensor Receives signals from remote control. PURE DIRECT The indicator above the button lights up when the Pure Direct function is set to the BLUETOOTH®... (USB) port Connect a USB device here. CALIBRATION MIC jack (page 41) PHONES jack Connect headphones here. 7EN Parts and Controls Receiver Front panel (power) (page 42) Power indicator (page 8) SPEAKERS (page 43) BLUETOOTH Switches the...
...47). ZONE SELECT, ZONE POWER (page 45) DIMMER Adjusts the brightness of the display panel. Remote control sensor Receives signals from remote control. PURE DIRECT The indicator above the button lights up when the Pure Direct function is set to the BLUETOOTH®... (USB) port Connect a USB device here. CALIBRATION MIC jack (page 41) PHONES jack Connect headphones here. 7EN Parts and Controls Receiver Front panel (power) (page 42) Power indicator (page 8) SPEAKERS (page 43) BLUETOOTH Switches the...

Operating Instructions
Page 8
Power indicator •• Green: The receiver is turned on. •• Amber: The receiver is in standby mode, and you have set one of the following: -- [Control for HDMI] or [Network/Bluetooth Standby] is set to [On]. -- [Standby Through] is set to [On] or [Auto]. -- [Power] is set to [On] for [Zone2] or [Zone3]. •• The indicator goes off: The receiver is in standby mode and all of the following settings are set to [Off]: -- [Control for HDMI] -- [Standby Through] -- [Network/Bluetooth Standby] -- [Power] for [Zone2] and [Zone3] 8EN
Power indicator •• Green: The receiver is turned on. •• Amber: The receiver is in standby mode, and you have set one of the following: -- [Control for HDMI] or [Network/Bluetooth Standby] is set to [On]. -- [Standby Through] is set to [On] or [Auto]. -- [Power] is set to [On] for [Zone2] or [Zone3]. •• The indicator goes off: The receiver is in standby mode and all of the following settings are set to [Off]: -- [Control for HDMI] -- [Standby Through] -- [Network/Bluetooth Standby] -- [Power] for [Zone2] and [Zone3] 8EN

Operating Instructions
Page 9
...activated (page 47). A.P.M. HDMI Digital signals are input through the selected HDMI IN jack. Indicators on . ST Lights up when the receiver tunes to a FM stereo broadcast. HDMI OUT A + B Indicates the HDMI OUT jacks that currently output the audio/video signals. Speaker... Native function is activated. IN-CEILING Lights up when the In-Ceiling Speaker Mode is activated. NETWORK Lights up when the receiver is connected to [Transmitter]. ZONE2 Lights up when eARC signals are input through the HDMI OUT A (TV) jack, and "ARC"...
...activated (page 47). A.P.M. HDMI Digital signals are input through the selected HDMI IN jack. Indicators on . ST Lights up when the receiver tunes to a FM stereo broadcast. HDMI OUT A + B Indicates the HDMI OUT jacks that currently output the audio/video signals. Speaker... Native function is activated. IN-CEILING Lights up when the In-Ceiling Speaker Mode is activated. NETWORK Lights up when the receiver is connected to [Transmitter]. ZONE2 Lights up when eARC signals are input through the HDMI OUT A (TV) jack, and "ARC"...

Operating Instructions
Page 10
...; ZONE 3 OUT jacks AUDIO IN jacks VIDEO IN/MONITOR OUT jacks IR REMOTE IN/OUT jacks ••You can control the receiver from a distance by connecting an IR repeater (not supplied) to the IR REMOTE IN jack. ••You can start or stop playback of devices... such as a CD player connected to the receiver by connecting an IR blaster (not supplied) to the IR REMOTE OUT jack. FM ANTENNA terminal OPTICAL IN TV jack 10EN
...; ZONE 3 OUT jacks AUDIO IN jacks VIDEO IN/MONITOR OUT jacks IR REMOTE IN/OUT jacks ••You can control the receiver from a distance by connecting an IR repeater (not supplied) to the IR REMOTE IN jack. ••You can start or stop playback of devices... such as a CD player connected to the receiver by connecting an IR blaster (not supplied) to the IR REMOTE OUT jack. FM ANTENNA terminal OPTICAL IN TV jack 10EN

Operating Instructions
Page 11
... as reference when you connect the TV to the MONITOR OUT jack, the home menu of this receiver is not displayed on the TV screen, connect the TV to the HDMI IN jacks of this receiver using the menu on the TV screen. About input/output of video signals The digital video... HDMI OUT B/ZONE 2 jacks. 11EN The analog video signals input from VIDEO IN jacks are output from the MONITOR OUT jack only. To operate this receiver are output from HDMI OUT A (TV) or HDMI OUT B/ZONE 2 jacks only. HDMI OUT jack Any one of HDMI OUT A (TV) the HDMI IN or...
... as reference when you connect the TV to the MONITOR OUT jack, the home menu of this receiver is not displayed on the TV screen, connect the TV to the HDMI IN jacks of this receiver using the menu on the TV screen. About input/output of video signals The digital video... HDMI OUT B/ZONE 2 jacks. 11EN The analog video signals input from VIDEO IN jacks are output from the MONITOR OUT jack only. To operate this receiver are output from HDMI OUT A (TV) or HDMI OUT B/ZONE 2 jacks only. HDMI OUT jack Any one of HDMI OUT A (TV) the HDMI IN or...

Operating Instructions
Page 12
...Displays the menu on the TV screen. BLUETOOTH TX/RX Switches the [Bluetooth Mode] to be operated for the receiver. In [Receiver] mode, the receiver receives and outputs audio from the player. (muting) Turns off the sound temporarily. Press the button again to select ...or Zone 3 on or sets it to BLUETOOTH headphones/speakers. MAIN, ZONE 2, ZONE 3 Selects the location to [Transmitter] or [Receiver]. In [Transmitter] mode, the receiver sends audio to standby mode. CUSTOM1 Saves and recalls various settings for each zone" (page 14). 12EN Input buttons GAME...
...Displays the menu on the TV screen. BLUETOOTH TX/RX Switches the [Bluetooth Mode] to be operated for the receiver. In [Receiver] mode, the receiver receives and outputs audio from the player. (muting) Turns off the sound temporarily. Press the button again to select ...or Zone 3 on or sets it to BLUETOOTH headphones/speakers. MAIN, ZONE 2, ZONE 3 Selects the location to [Transmitter] or [Receiver]. In [Transmitter] mode, the receiver sends audio to standby mode. CUSTOM1 Saves and recalls various settings for each zone" (page 14). 12EN Input buttons GAME...

Operating Instructions
Page 13
.... Note ••The above explanation is pressed. SETTINGS Displays the [Setup] menu on the TV screen. Press to serve as reference when operating the receiver. When [HDMI OUT B Mode] is set to turn off the output for the HDMI OUT A (TV) and HDMI OUT B/ZONE 2 jacks. TEST Displays the [Test...
.... Note ••The above explanation is pressed. SETTINGS Displays the [Setup] menu on the TV screen. Press to serve as reference when operating the receiver. When [HDMI OUT B Mode] is set to turn off the output for the HDMI OUT A (TV) and HDMI OUT B/ZONE 2 jacks. TEST Displays the [Test...

Operating Instructions
Page 15
... front left /right channels. Place the speakers and subwoofers according to the speaker system of Dolby Atmos 3D movies without the need to this AV receiver. Produces LFE (low frequency effect) channel sounds and reinforces bass parts of other channels. Abbreviations used in illustrations FL FR CNT SL SR SBL SBR...
... front left /right channels. Place the speakers and subwoofers according to the speaker system of Dolby Atmos 3D movies without the need to this AV receiver. Produces LFE (low frequency effect) channel sounds and reinforces bass parts of other channels. Abbreviations used in illustrations FL FR CNT SL SR SBL SBR...

Operating Instructions
Page 17
...;• Before connecting cables, be output. •• If you have two subwoofers, you connect a subwoofer with the polarities (+/-) matched between the receiver and the speakers. ••Improper connection may not be sure to disconnect the AC power cord (mains lead). •• Before connecting the ...;• Be sure not remove too much of the speaker cable sleeves, so as to prevent the wires of the speaker and this receiver. Also, be sure to tightly twist the speaker wire strands and insert them to the terminals of the speaker cables from touching each other...
...;• Before connecting cables, be output. •• If you have two subwoofers, you connect a subwoofer with the polarities (+/-) matched between the receiver and the speakers. ••Improper connection may not be sure to disconnect the AC power cord (mains lead). •• Before connecting the ...;• Be sure not remove too much of the speaker cable sleeves, so as to prevent the wires of the speaker and this receiver. Also, be sure to tightly twist the speaker wire strands and insert them to the terminals of the speaker cables from touching each other...

Operating Instructions
Page 18
Tip ••This receiver allows you to connect Sony wireless rear speakers and a Sony subwoofer (page 26). •• When your Sony TV has the S-CENTER SPEAKER IN jack, you can output the center part of the receiver sound from the TV speaker (page 30). ••By setting [SpeakerRelocation/... you set to a setting that does not have surround back and height speakers. Speaker configuration and speaker pattern settings This receiver allows you to connect up to 7.1.2 channels in terms of hearing. The table below shows examples of speaker configurations and speaker pattern ...
Tip ••This receiver allows you to connect Sony wireless rear speakers and a Sony subwoofer (page 26). •• When your Sony TV has the S-CENTER SPEAKER IN jack, you can output the center part of the receiver sound from the TV speaker (page 30). ••By setting [SpeakerRelocation/... you set to a setting that does not have surround back and height speakers. Speaker configuration and speaker pattern settings This receiver allows you to connect up to 7.1.2 channels in terms of hearing. The table below shows examples of speaker configurations and speaker pattern ...

Operating Instructions
Page 24
... of Hi/Lo attached to the speakers have made the connection, set [Surround Back Speaker Assign] in [Manual Speaker Settings] under [Speaker Settings] to avoid receiver malfunction. After you operate the tweeter and woofer using separate amplifiers. 30˚ 100˚ - 120˚ Surround speakers Center speaker Subwoofer Front... speaker Monaural audio cable (not supplied) Speaker cable (not supplied) Make sure that metal fittings of this receiver. You can make the bi-amplifier connection.
... of Hi/Lo attached to the speakers have made the connection, set [Surround Back Speaker Assign] in [Manual Speaker Settings] under [Speaker Settings] to avoid receiver malfunction. After you operate the tweeter and woofer using separate amplifiers. 30˚ 100˚ - 120˚ Surround speakers Center speaker Subwoofer Front... speaker Monaural audio cable (not supplied) Speaker cable (not supplied) Make sure that metal fittings of this receiver. You can make the bi-amplifier connection.

Operating Instructions
Page 26
... is displayed for the first time, follow the steps below. Connecting to Sony wireless rear speaker/subwoofer The receiver is compatible with connection to the operating instructions supplied with the receiver, visit the Sony website. •• If you to perform Auto Calibration. Tip •&#...flashes twice repeatedly in Auto Calibration to the receiver the next time you connect the wireless rear speaker/subwoofer to the receiver for the target speakers, select [Finish]. 6 Press (enter). Once connected, the Sony wireless rear speaker/subwoofer will be automatically connected ...
... is displayed for the first time, follow the steps below. Connecting to Sony wireless rear speaker/subwoofer The receiver is compatible with connection to the operating instructions supplied with the receiver, visit the Sony website. •• If you to perform Auto Calibration. Tip •&#...flashes twice repeatedly in Auto Calibration to the receiver the next time you connect the wireless rear speaker/subwoofer to the receiver for the target speakers, select [Finish]. 6 Press (enter). Once connected, the Sony wireless rear speaker/subwoofer will be automatically connected ...

Operating Instructions
Page 27
... selects the better channel for wireless interference. ••[Off]: The receiver selects a channel from [Off] to [On], it may be improved by changing the following setting. 1 Press HOME. A stronger mode for transmission. Note If you change ...
... selects the better channel for wireless interference. ••[Off]: The receiver selects a channel from [Off] to [On], it may be improved by changing the following setting. 1 Press HOME. A stronger mode for transmission. Note If you change ...

Operating Instructions
Page 28
... cables or digital connecting cables, then reassign the input jacks if the sound is the case, place the antenna (aerial) farther away from the receiver. •• When connecting an optical digital cable, insert the plugs straight until they click into place. •• Do not bend or... in the menu on the HDMI signal format setting, visit the Help Guide. •• We do not recommend using the menu. Sony recommends that supports bandwidths up to the HDMI OUT or MONITOR OUT jack. For details on the receiver. If this receiver using an HDMI-DVI conversion cable.
... cables or digital connecting cables, then reassign the input jacks if the sound is the case, place the antenna (aerial) farther away from the receiver. •• When connecting an optical digital cable, insert the plugs straight until they click into place. •• Do not bend or... in the menu on the HDMI signal format setting, visit the Help Guide. •• We do not recommend using the menu. Sony recommends that supports bandwidths up to the HDMI OUT or MONITOR OUT jack. For details on the receiver. If this receiver using an HDMI-DVI conversion cable.

Operating Instructions
Page 29
... function via an HDMI connection Connect your TV with this connection, you can listen to the TV audio from the speakers connected to the receiver while the receiver sends audio and video signals to the TV. Press HOME, then select [Setup] - [HDMI Settings] - [Audio Return Channel] - [eARC] or [ARC...]. •• You also need to another device, disconnect the device and connect the receiver. 29EN Tip If the HDMI jack of the receiver. Audio/Video signals HDMI cable (not supplied) Note •• To use your TV to the HDMI OUT A (TV)...
... function via an HDMI connection Connect your TV with this connection, you can listen to the TV audio from the speakers connected to the receiver while the receiver sends audio and video signals to the TV. Press HOME, then select [Setup] - [HDMI Settings] - [Audio Return Channel] - [eARC] or [ARC...]. •• You also need to another device, disconnect the device and connect the receiver. 29EN Tip If the HDMI jack of the receiver. Audio/Video signals HDMI cable (not supplied) Note •• To use your TV to the HDMI OUT A (TV)...

Operating Instructions
Page 30
...Center Sync function) To use this function, you connect your TV to the HDMI OUT A (TV) jack of the receiver. For details, see the operating instructions of your TV. •• If you need to connect your TV to the...Field] is set to [On]. 30EN Also, set [TV Center Speaker] to [Use TV as dialogue can output the center part of the receiver, press HOME, select [Setup] - [Speaker Settings] - [TV/Screen Center Settings] - [TV Center Speaker Mode] and then set to ... the sound may not be output through the TV speaker. Tip •• Some Sony TVs have an S-CENTER SPEAKER IN jack.
...Center Sync function) To use this function, you connect your TV to the HDMI OUT A (TV) jack of the receiver. For details, see the operating instructions of your TV. •• If you need to connect your TV to the...Field] is set to [On]. 30EN Also, set [TV Center Speaker] to [Use TV as dialogue can output the center part of the receiver, press HOME, select [Setup] - [Speaker Settings] - [TV/Screen Center Settings] - [TV Center Speaker Mode] and then set to ... the sound may not be output through the TV speaker. Tip •• Some Sony TVs have an S-CENTER SPEAKER IN jack.
