Operating Instructions
Page 1
3-221-211-12 (1) 2-Line Cordless Telephone with Answering System Operating Instructions US SPP-A972 ©2000 Sony Corporation
3-221-211-12 (1) 2-Line Cordless Telephone with Answering System Operating Instructions US SPP-A972 ©2000 Sony Corporation

Operating Instructions
Page 3
... exhibits a distinct change in the cabinet and the back or bottom are covered by a qualified technician to restore the product to your home, consult your telephone equipment, basic safety precautions should always be blocked by placing the product on the bed, sofa, rug, or other similar surface. Follow all instructions. 2. Never...
... exhibits a distinct change in the cabinet and the back or bottom are covered by a qualified technician to restore the product to your home, consult your telephone equipment, basic safety precautions should always be blocked by placing the product on the bed, sofa, rug, or other similar surface. Follow all instructions. 2. Never...
Operating Instructions
Page 4
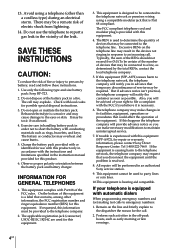
... other than a cordless type) during an electrical storm. This equipment is a label that may be connected to persons by the total RENs, contact the local telephone company. 5. Typically...telephone is causing harm to the telephone network, the telephone company will be toxic if swallowed. 4. Use only the following type and size battery pack: Sony BP-T23. 2. If your right to the telephone...test calls to maintain uninterrupted service. 7. If this equipment (SPP-A972) causes harm to the telephone network, the telephone company may request that may result in the devices not ...
... other than a cordless type) during an electrical storm. This equipment is a label that may be connected to persons by the total RENs, contact the local telephone company. 5. Typically...telephone is causing harm to the telephone network, the telephone company will be toxic if swallowed. 4. Use only the following type and size battery pack: Sony BP-T23. 2. If your right to the telephone...test calls to maintain uninterrupted service. 7. If this equipment (SPP-A972) causes harm to the telephone network, the telephone company may request that may result in the devices not ...
Operating Instructions
Page 6
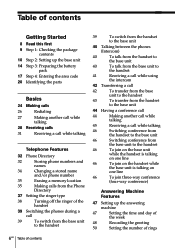
... Identifying the parts Basics 24 Making calls 26 Redialing 27 Making another call while talking 28 Receiving calls 31 Receiving a call while talking Telephone Features 32 Phone Directory 32 Storing phone numbers and names 34 Changing a stored name and/or phone number 35 Erasing a memory location ... handset while the base unit is talking on one line 46 To join three-way conference (four-way conference) Answering Machine Features 47 Setting up the answering machine 47 Setting the time and day of the week 48 Recording the greeting 50 Setting the number of rings ...
... Identifying the parts Basics 24 Making calls 26 Redialing 27 Making another call while talking 28 Receiving calls 31 Receiving a call while talking Telephone Features 32 Phone Directory 32 Storing phone numbers and names 34 Changing a stored name and/or phone number 35 Erasing a memory location ... handset while the base unit is talking on one line 46 To join three-way conference (four-way conference) Answering Machine Features 47 Setting up the answering machine 47 Setting the time and day of the week 48 Recording the greeting 50 Setting the number of rings ...
Operating Instructions
Page 9
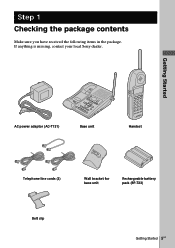
If anything is missing, contact your local Sony dealer. Step 1 Checking the package contents Make sure you have received the following items in the package. Getting Started AC power adaptor (AC-T131) Base unit Handset Telephone line cords (3) Wall bracket for base unit Rechargeable battery pack (BP-T23) Belt clip Getting Started 9US
If anything is missing, contact your local Sony dealer. Step 1 Checking the package contents Make sure you have received the following items in the package. Getting Started AC power adaptor (AC-T131) Base unit Handset Telephone line cords (3) Wall bracket for base unit Rechargeable battery pack (BP-T23) Belt clip Getting Started 9US

Operating Instructions
Page 10
the base unit should not be placed near or on a level surface Away from a personal computer Away from another cordless telephone 10US CAUTION: • Should you place the base unit affects the reception quality of the handset. Getting Started Away from noise sources such ...as a window by a street with heavy traffic Away from television sets and other noise sources. • The cordless telephone operates at a frequency that may cause interference to nearby TVs and VCRs; and, if interference is experienced, moving closer to the base or move base...
the base unit should not be placed near or on a level surface Away from a personal computer Away from another cordless telephone 10US CAUTION: • Should you place the base unit affects the reception quality of the handset. Getting Started Away from noise sources such ...as a window by a street with heavy traffic Away from television sets and other noise sources. • The cordless telephone operates at a frequency that may cause interference to nearby TVs and VCRs; and, if interference is experienced, moving closer to the base or move base...

Operating Instructions
Page 11
Connect the base unit If you want to a single outlet having two lines 3 Getting Started Hook the cord. To connect the base unit to hang the base unit on the wall, see page 70. To an AC outlet To DC IN 9V 2 AC power adaptor (supplied AC-T131) DATA jack 1 Telephone line cord (supplied) To L1/L1+L2 To the telephone outlet 1 Connect the telephone line cord to the L1/L1+L2 jack and to a telephone outlet. 2 Connect the AC power adaptor to the DC IN 9V jack and to an AC outlet. 3 Raise the antenna. continued Getting Started 11US Make sure it points towards the ceiling.
Connect the base unit If you want to a single outlet having two lines 3 Getting Started Hook the cord. To connect the base unit to hang the base unit on the wall, see page 70. To an AC outlet To DC IN 9V 2 AC power adaptor (supplied AC-T131) DATA jack 1 Telephone line cord (supplied) To L1/L1+L2 To the telephone outlet 1 Connect the telephone line cord to the L1/L1+L2 jack and to a telephone outlet. 2 Connect the AC power adaptor to the DC IN 9V jack and to an AC outlet. 3 Raise the antenna. continued Getting Started 11US Make sure it points towards the ceiling.

Operating Instructions
Page 12
To an AC outlet To DC IN 9V 2 AC power adaptor (supplied AC-T131) To the telephone outlets To L1/L1+L2 Line 1 Telephone line cord (supplied) 1 Telephone line cord (supplied) DATA jack To L2 Line 2 1 Connect the telephone line cords to the L1/L1+L2 and L2 jacks and to the telephone outlets. 2 Connect the AC power adaptor to the DC IN 9V jack and to two separate outlets 3 Hook the cord. Make sure it points towards the ceiling. 12US Getting Started Step 2: Setting up the base unit (continued) To connect the base unit to an AC outlet. 3 Raise the antenna.
To an AC outlet To DC IN 9V 2 AC power adaptor (supplied AC-T131) To the telephone outlets To L1/L1+L2 Line 1 Telephone line cord (supplied) 1 Telephone line cord (supplied) DATA jack To L2 Line 2 1 Connect the telephone line cords to the L1/L1+L2 and L2 jacks and to the telephone outlets. 2 Connect the AC power adaptor to the DC IN 9V jack and to two separate outlets 3 Hook the cord. Make sure it points towards the ceiling. 12US Getting Started Step 2: Setting up the base unit (continued) To connect the base unit to an AC outlet. 3 Raise the antenna.
Operating Instructions
Page 13
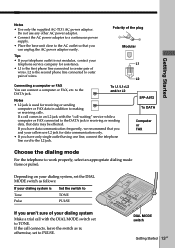
...the L2 jack. otherwise, set to the DATA jack. L1 • L1 is the first phone line connected to outer pair of your dialing system Make a trial call with the "call connects, leave the switch as is used for data communication only. • If you and your ... not modular, contact your telephone outlet is the second phone line connected to center pair of the plug Modular Tips • If your telephone service company for assistance. If a call comes in addition to work properly, select an appropriate dialing mode (tone or pulse). SPP-A972 To DATA Computer or FAX...
...the L2 jack. otherwise, set to the DATA jack. L1 • L1 is the first phone line connected to outer pair of your dialing system Make a trial call with the "call connects, leave the switch as is used for data communication only. • If you and your ... not modular, contact your telephone outlet is the second phone line connected to center pair of the plug Modular Tips • If your telephone service company for assistance. If a call comes in addition to work properly, select an appropriate dialing mode (tone or pulse). SPP-A972 To DATA Computer or FAX...
Operating Instructions
Page 17
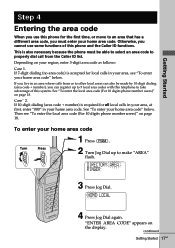
... your home area code. See "To enter your home area code 1 Press (PGM). Turn Press 2 Turn Jog Dial up to 5 local area codes with this telephone to make "AREA" flash. If 7-digit dialing (no area code) is required for all local calls in your area, at first, enter "000" in your... be able to select an area code to properly dial call from or to other local areas can register up to take advantage of this system. "ENTER AREA CODE" appears on page 18. Otherwise, you cannot use this phone for local calls in an area where calls from the Caller ID...
... your home area code. See "To enter your home area code 1 Press (PGM). Turn Press 2 Turn Jog Dial up to 5 local area codes with this telephone to make "AREA" flash. If 7-digit dialing (no area code) is required for all local calls in your area, at first, enter "000" in your... be able to select an area code to properly dial call from or to other local areas can register up to take advantage of this system. "ENTER AREA CODE" appears on page 18. Otherwise, you cannot use this phone for local calls in an area where calls from the Caller ID...
Operating Instructions
Page 29
... ring, press (LINE 1) or (LINE 2) whichever button is flashing. Tip To inform you will flash slowly. Press (LINE 1) or (LINE 2) to the service from your telephone company. The corresponding line button lights up.
... ring, press (LINE 1) or (LINE 2) whichever button is flashing. Tip To inform you will flash slowly. Press (LINE 1) or (LINE 2) to the service from your telephone company. The corresponding line button lights up.
Operating Instructions
Page 30
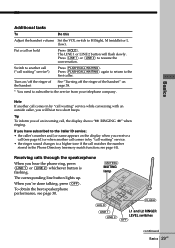
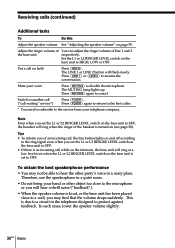
...to a wall, you set the L1 or L2 RINGER LEVEL switch on the base unit is due to a circuit in a noisy place. Mute your telephone company. Press (FLASH) again to return to the first caller. * You need to subscribe to the service from your voice Press (MUTING) to ...that the volume drops suddenly. Therefore, use the speakerphone in a quiet room. • Do not bring your hand or other party's voice in the telephone designed to OFF. Receiving calls (continued) Additional tasks To Do this Adjust the speaker volume See "Adjusting the speaker volume" on hold Press (HOLD)....
...to a wall, you set the L1 or L2 RINGER LEVEL switch on the base unit is due to a circuit in a noisy place. Mute your telephone company. Press (FLASH) again to return to the first caller. * You need to subscribe to the service from your voice Press (MUTING) to ...that the volume drops suddenly. Therefore, use the speakerphone in a quiet room. • Do not bring your hand or other party's voice in the telephone designed to OFF. Receiving calls (continued) Additional tasks To Do this Adjust the speaker volume See "Adjusting the speaker volume" on hold Press (HOLD)....
Operating Instructions
Page 32
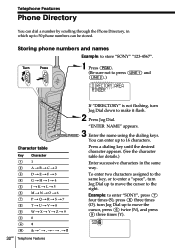
... is not flashing, turn Jog Dial up to move the cursor to the right. You can enter up to store "SONY" "123-4567". Character table Key Character (1) 1 (2) A t B t C t 2 Press a dialing key ...until the desired character appears. (See the character table for details.) Enter successive characters in which up to 50 phone numbers can be stored. t # 32US Telephone Features Telephone Features Phone Directory You can dial a number by scrolling through the Phone Directory, in the same way. (3) D t E t F t 3 (4) G t H t I t 4 (5) J t K t L t 5 (6) M t N t O t 6 (7) P t Q t R t S t 7 (8) T t U t ...
... is not flashing, turn Jog Dial up to move the cursor to the right. You can enter up to store "SONY" "123-4567". Character table Key Character (1) 1 (2) A t B t C t 2 Press a dialing key ...until the desired character appears. (See the character table for details.) Enter successive characters in which up to 50 phone numbers can be stored. t # 32US Telephone Features Telephone Features Phone Directory You can dial a number by scrolling through the Phone Directory, in the same way. (3) D t E t F t 3 (4) G t H t I t 4 (5) J t K t L t 5 (6) M t N t O t 6 (7) P t Q t R t S t 7 (8) T t U t ...
Operating Instructions
Page 33
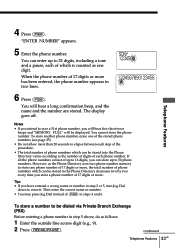
... digit. You cannot store the phone number. However, as the Phone Directory uses two-phone number memory to be stored in steps 4 and 6. continued Telephone Features 33US SONY 1234567 1234567890123456 12 6 Press (PGM). "ENTER NUMBER" appears. 5 Enter the phone number. If all the phone numbers consist of phone numbers which is counted... hear five short error beeps and "MEMORY FULL" will hear a long confirmation beep, and the name and the number are stored. The display goes off. Telephone Features 4 Press (PGM).
... digit. You cannot store the phone number. However, as the Phone Directory uses two-phone number memory to be stored in steps 4 and 6. continued Telephone Features 33US SONY 1234567 1234567890123456 12 6 Press (PGM). "ENTER NUMBER" appears. 5 Enter the phone number. If all the phone numbers consist of phone numbers which is counted... hear five short error beeps and "MEMORY FULL" will hear a long confirmation beep, and the name and the number are stored. The display goes off. Telephone Features 4 Press (PGM).
Operating Instructions
Page 34
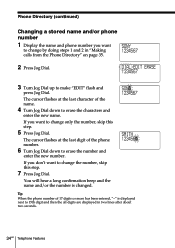
If you want to change only the number, skip this step. 7 Press Jog Dial. SONY 1234567 SMITH 1234567 Tip When the phone number of 17 digits or more has been entered, "-" is changed. You will hear a long confirmation beep and ... ERASE 1234567 3 Turn Jog Dial up to make "EDIT" flash and press Jog Dial. SONY 1234567 2 Press Jog Dial. If you don't want to change by doing steps 1 and 2 in two lines after about two seconds. 34US Telephone Features Phone Directory (continued) Changing a stored name and/or phone number 1 Display the name...
If you want to change only the number, skip this step. 7 Press Jog Dial. SONY 1234567 SMITH 1234567 Tip When the phone number of 17 digits or more has been entered, "-" is changed. You will hear a long confirmation beep and ... ERASE 1234567 3 Turn Jog Dial up to make "EDIT" flash and press Jog Dial. SONY 1234567 2 Press Jog Dial. If you don't want to change by doing steps 1 and 2 in two lines after about two seconds. 34US Telephone Features Phone Directory (continued) Changing a stored name and/or phone number 1 Display the name...
Operating Instructions
Page 35
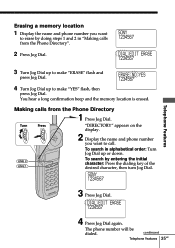
... name and phone number you want to call. The phone number will be dialed. You hear a long confirmation beep and the memory location is erased. SONY 1234567 3 Press Jog Dial. Erasing a memory location 1 Display the name and phone number you want to erase by entering the initial character: Press the.... DIAL EDIT ERASE 1234567 4 Press Jog Dial again. ERASE NO YES 1234567 4 Turn Jog Dial up to make "ERASE" flash and press Jog Dial. SONY 1234567 DIAL EDIT ERASE 1234567 Telephone Features 3 Turn Jog Dial up to make "YES" flash, then press Jog Dial. continued...
... name and phone number you want to call. The phone number will be dialed. You hear a long confirmation beep and the memory location is erased. SONY 1234567 3 Press Jog Dial. Erasing a memory location 1 Display the name and phone number you want to erase by entering the initial character: Press the.... DIAL EDIT ERASE 1234567 4 Press Jog Dial again. ERASE NO YES 1234567 4 Turn Jog Dial up to make "ERASE" flash and press Jog Dial. SONY 1234567 DIAL EDIT ERASE 1234567 Telephone Features 3 Turn Jog Dial up to make "YES" flash, then press Jog Dial. continued...
Operating Instructions
Page 36
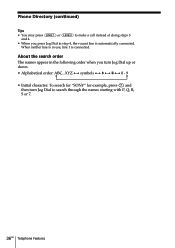
... Dial up or down. • Alphabetical order: ABC...XYZ y symbols y * y # y 0 - 9 • Initial character: To search for "SONY" for example, press (7) and then turn Jog Dial to search through the names starting with P, Q, R, S or 7. 36US Telephone Features About the search order The names appear in the following order when you press Jog Dial...
... Dial up or down. • Alphabetical order: ABC...XYZ y symbols y * y # y 0 - 9 • Initial character: To search for "SONY" for example, press (7) and then turn Jog Dial to search through the names starting with P, Q, R, S or 7. 36US Telephone Features About the search order The names appear in the following order when you press Jog Dial...

Operating Instructions
Page 37
The current ringer type appears. DIRECTORY AREA RINGER 3 Press Jog Dial. continued Telephone Features 37US Turn Press 1 Press (PGM). 2 Turn Jog Dial up to select a ringer type. RINGER 1 SELECTED 6 Press one of the handset from four type. You will hear the corresponding ringer tone. 7 Press (OFF). Telephone Features Setting the ringer type You can select a ringer type of the dialing keys ((1) to (4)) to make "RINGER" flash. LINE1 LINE2 4 Turn Jog Dial to choose the line you want to set the ringer type. 5 Press Jog Dial.
The current ringer type appears. DIRECTORY AREA RINGER 3 Press Jog Dial. continued Telephone Features 37US Turn Press 1 Press (PGM). 2 Turn Jog Dial up to select a ringer type. RINGER 1 SELECTED 6 Press one of the handset from four type. You will hear the corresponding ringer tone. 7 Press (OFF). Telephone Features Setting the ringer type You can select a ringer type of the dialing keys ((1) to (4)) to make "RINGER" flash. LINE1 LINE2 4 Turn Jog Dial to choose the line you want to set the ringer type. 5 Press Jog Dial.

Operating Instructions
Page 38
Setting the ringer type (continued) Turning off the ringer of the handset 1 Perform steps 1 to "RINGER OFF" The handset won't ring. RINGER OFF SELECTED When "RINGER" is set to 5 on page 37. 2 Press (0). To turn the ringer on again Follow the instructions described in "Setting the ringer type" on incoming calls. You will hear a confirmation beep. 3 Press (OFF). You can still make calls, and also receive calls if another telephone connected to the same line rings to inform you on page 37. 38US Telephone Features
Setting the ringer type (continued) Turning off the ringer of the handset 1 Perform steps 1 to "RINGER OFF" The handset won't ring. RINGER OFF SELECTED When "RINGER" is set to 5 on page 37. 2 Press (0). To turn the ringer on again Follow the instructions described in "Setting the ringer type" on incoming calls. You will hear a confirmation beep. 3 Press (OFF). You can still make calls, and also receive calls if another telephone connected to the same line rings to inform you on page 37. 38US Telephone Features

Operating Instructions
Page 39
... and "HOLD" appears on the display of the handset and the LINE 1 button flashes slowly. 2 Press (LINE 1) on the base unit double flashes in succession. Telephone Features To switch from the base unit to the line connected. To switch from the handset to line 2. You can easily switch between the handset... speakerphone. You can talk to the base unit (or handset) and to the handset Example: While talking on line 1: (LINE 1) 1 Press (HOLD) on the handset. Telephone Features 39US
... and "HOLD" appears on the display of the handset and the LINE 1 button flashes slowly. 2 Press (LINE 1) on the base unit double flashes in succession. Telephone Features To switch from the base unit to the line connected. To switch from the handset to line 2. You can easily switch between the handset... speakerphone. You can talk to the base unit (or handset) and to the handset Example: While talking on line 1: (LINE 1) 1 Press (HOLD) on the handset. Telephone Features 39US


