Operating Instructions
Page 2
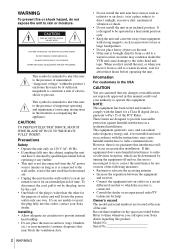
... a cold to radio communications. Information For customers in this manual could void your Sony dealer regarding this product. Precautions Safety • Operate the ...literature accompanying the appliance. Owner's record The model and serial numbers are designed to persons. Record these numbers in a particular installation....blade of the plug is intended to alert the user to the video head and tape. To disconnect the cord, pull it out by... in a horizontal position only. • Keep the unit and cassettes away from equipment with the instructions, may block the ventilation slots....
... a cold to radio communications. Information For customers in this manual could void your Sony dealer regarding this product. Precautions Safety • Operate the ...literature accompanying the appliance. Owner's record The model and serial numbers are designed to persons. Record these numbers in a particular installation....blade of the plug is intended to alert the user to the video head and tape. To disconnect the cord, pull it out by... in a horizontal position only. • Keep the unit and cassettes away from equipment with the instructions, may block the ventilation slots....
Operating Instructions
Page 3
... safety purpose of the polarized plug by forcing it . Overloading Do not overload wall outlets, extension cords or convenience receptacles beyond their capacity, since this manual for future reference. Cleaning Unplug the set from the type of electrical power supplied to the plugs, receptacles, and the point where the cord exits...
... safety purpose of the polarized plug by forcing it . Overloading Do not overload wall outlets, extension cords or convenience receptacles beyond their capacity, since this manual for future reference. Cleaning Unplug the set from the type of electrical power supplied to the plugs, receptacles, and the point where the cord exits...
Operating Instructions
Page 5
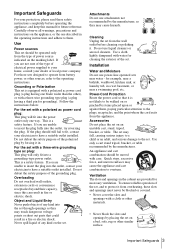
Caution Television programs, films, video tapes and other materials may be contrary to the provisions of this recorder with another VCR Additional Information 56 Antenna information 57 Troubleshooting 59 Specifications 60 Index to parts and controls 65 Index Back ...Presetting channels 27 Step 7 : Setting up the VCR Plus+® system (SLV-N700 only) Basic Operations 30 Playing a tape 33 Recording TV programs 36 Recording TV programs using the VCR Plus+® system (SLV-N700 only) 39 Setting the timer manually 42 Locking the VCR (Child Lock) Additional Operations 43 Playing/searching at ...
Caution Television programs, films, video tapes and other materials may be contrary to the provisions of this recorder with another VCR Additional Information 56 Antenna information 57 Troubleshooting 59 Specifications 60 Index to parts and controls 65 Index Back ...Presetting channels 27 Step 7 : Setting up the VCR Plus+® system (SLV-N700 only) Basic Operations 30 Playing a tape 33 Recording TV programs 36 Recording TV programs using the VCR Plus+® system (SLV-N700 only) 39 Setting the timer manually 42 Locking the VCR (Child Lock) Additional Operations 43 Playing/searching at ...
Operating Instructions
Page 6
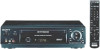
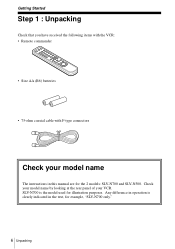
Check your model name by looking at the rear panel of your model name The instructions in the text, for example, "SLV-N700 only." 6 Unpacking SLV-N700 is clearly indicated in this manual are for the 2 models: SLV-N700 and SLV-N500. Any difference in operation is the model used for illustration purposes. Getting Started Step 1 : Unpacking Check that you have received the following items with the VCR: • Remote commander • Size AA (R6) batteries • 75-ohm coaxial cable with F-type connectors Check your VCR.
Check your model name by looking at the rear panel of your model name The instructions in the text, for example, "SLV-N700 only." 6 Unpacking SLV-N700 is clearly indicated in this manual are for the 2 models: SLV-N700 and SLV-N500. Any difference in operation is the model used for illustration purposes. Getting Started Step 1 : Unpacking Check that you have received the following items with the VCR: • Remote commander • Size AA (R6) batteries • 75-ohm coaxial cable with F-type connectors Check your VCR.

Operating Instructions
Page 13
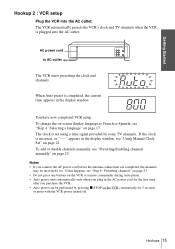
... antenna connections are completed, the channels may be performed by some TV channels. AC power cord to French or Spanish, see "Presetting/disabling channels manually" on the VCR continuously for the first time after you plug in the display window. When Auto preset is incorrect, or "--:--" appears in the... the AC outlet. The VCR automatically presets the VCR's clock and TV channels when the VCR is set . If this happens, see "Using Manual Clock Set" on -screen display language to AC outlet The VCR starts presetting the clock and channels. To change the on page 21.
... antenna connections are completed, the channels may be performed by some TV channels. AC power cord to French or Spanish, see "Presetting/disabling channels manually" on the VCR continuously for the first time after you plug in the display window. When Auto preset is incorrect, or "--:--" appears in the... the AC outlet. The VCR automatically presets the VCR's clock and TV channels when the VCR is set . If this happens, see "Using Manual Clock Set" on -screen display language to AC outlet The VCR starts presetting the clock and channels. To change the on page 21.
Operating Instructions
Page 15
..., see "Step 4 : Selecting a language" on page 17. Hookups 15 If the clock is set . If this happens, see "Presetting/disabling channels manually" on -screen display language to AC outlet The VCR starts presetting the clock and channels. To change the on page 25. You have now completed... VCR setup. To add or disable channels manually, see "Step 6 : Presetting channels" on page 23. • Do not press any buttons on the VCR or remote commander during Auto preset....
..., see "Step 4 : Selecting a language" on page 17. Hookups 15 If the clock is set . If this happens, see "Presetting/disabling channels manually" on -screen display language to AC outlet The VCR starts presetting the clock and channels. To change the on page 25. You have now completed... VCR setup. To add or disable channels manually, see "Step 6 : Presetting channels" on page 23. • Do not press any buttons on the VCR or remote commander during Auto preset....
Operating Instructions
Page 18
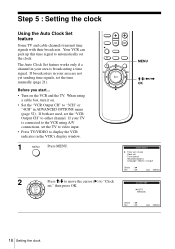
... up this time signal to automatically set the "VCR Output CH" to either channel. If both are not yet sending time signals, set the time manually (page 21). The Auto Clock Set feature works only if a channel in your area are used, set the clock. Step 5 : Setting the clock Using the..." to "3CH" or "4CH" in the VCR's display window. 1 MENU Press MENU. 2 Press M/m to move the cursor (B) to "Clock set the TV to video input. • Press TV/VIDEO to the VCR using a cable box, turn it on the VCR and the TV. PLAY OK MENU M/m/ When using A/V connections, set ," then press...
... up this time signal to automatically set the "VCR Output CH" to either channel. If both are not yet sending time signals, set the time manually (page 21). The Auto Clock Set feature works only if a channel in your area are used, set the clock. Step 5 : Setting the clock Using the..." to "3CH" or "4CH" in the VCR's display window. 1 MENU Press MENU. 2 Press M/m to move the cursor (B) to "Clock set the TV to video input. • Press TV/VIDEO to the VCR using a cable box, turn it on the VCR and the TV. PLAY OK MENU M/m/ When using A/V connections, set ," then press...
Operating Instructions
Page 20
Notes • The clock cannot be set automatically if you leave the cable box on. 20 Setting the clock If nothing happens even after you wait about 20 minutes, set the clock manually (page 21). • If there are only a few channels in your area that carries a time signal in your area. If so, set the clock manually (page 21). • If you made Hookup 3, make sure you do not receive a channel that carry time signals, setting the clock automatically may take up to about 20 minutes.
Notes • The clock cannot be set automatically if you leave the cable box on. 20 Setting the clock If nothing happens even after you wait about 20 minutes, set the clock manually (page 21). • If there are only a few channels in your area that carries a time signal in your area. If so, set the clock manually (page 21). • If you made Hookup 3, make sure you do not receive a channel that carry time signals, setting the clock automatically may take up to about 20 minutes.

Operating Instructions
Page 21
... move the cursor (B) to "Clock set the "VCR Output CH" to either channel. PLAY OK CLOCK SET AUTO MANUAL Select : Vv Set : OK Quit : MENU 3 Press M/m to display the VCR indicator in ADVANCED OPTIONS menu ...12 : 0 0 AM Select : Bb End : OK Set : Vv Quit : MENU continued Setting the clock 21 Getting Started Using Manual Clock Set Before you start... • Turn on the VCR and the TV. • Set the "VCR Output CH" to "... VCR using A/V connections, set the TV to video input. • Press TV/VIDEO to select MANUAL, then press OK. MENU M/m/, OK 1 MENU Press MENU.
... move the cursor (B) to "Clock set the "VCR Output CH" to either channel. PLAY OK CLOCK SET AUTO MANUAL Select : Vv Set : OK Quit : MENU 3 Press M/m to display the VCR indicator in ADVANCED OPTIONS menu ...12 : 0 0 AM Select : Bb End : OK Set : Vv Quit : MENU continued Setting the clock 21 Getting Started Using Manual Clock Set Before you start... • Turn on the VCR and the TV. • Set the "VCR Output CH" to "... VCR using A/V connections, set the TV to video input. • Press TV/VIDEO to select MANUAL, then press OK. MENU M/m/, OK 1 MENU Press MENU.
Operating Instructions
Page 23
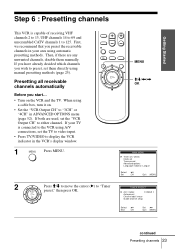
... • Turn on . • Set the "VCR Output CH" to "3CH" or "4CH" in ADVANCED OPTIONS menu (page 52). When using manual presetting methods (page 25). OK MENU M/m/ If you have already decided which channels you preset the receivable channels in the VCR's display window. 1 MENU Press.... • Press TV/VIDEO to display the VCR indicator in your TV is capable of receiving VHF channels 2 to 13, UHF channels 14 to 69 and unscrambled CATV channels 1 to 125. First, we recommend that you wish to preset, set them manually. Getting Started Step 6 : Presetting channels ...
... • Turn on . • Set the "VCR Output CH" to "3CH" or "4CH" in ADVANCED OPTIONS menu (page 52). When using manual presetting methods (page 25). OK MENU M/m/ If you have already decided which channels you preset the receivable channels in the VCR's display window. 1 MENU Press.... • Press TV/VIDEO to display the VCR indicator in your TV is capable of receiving VHF channels 2 to 13, UHF channels 14 to 69 and unscrambled CATV channels 1 to 125. First, we recommend that you wish to preset, set them manually. Getting Started Step 6 : Presetting channels ...
Operating Instructions
Page 25
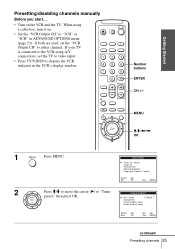
If your TV is connected to the VCR using a cable box, turn it on the VCR and the TV. MENU M/m/ When using A/V connections, set the "VCR Output CH" to display the VCR indicator in ADVANCED OPTIONS menu (page 52). If both are used, set the TV to video input. • Press TV/VIDEO to either channel. Getting Started Presetting/disabling channels manually Before you start... • Turn on . • Set the "VCR Output CH" to "3CH" or "4CH" in the VCR's display window. 123 456 789 0 Number buttons ENTER CH +/-
If your TV is connected to the VCR using a cable box, turn it on the VCR and the TV. MENU M/m/ When using A/V connections, set the "VCR Output CH" to display the VCR indicator in ADVANCED OPTIONS menu (page 52). If both are used, set the TV to video input. • Press TV/VIDEO to either channel. Getting Started Presetting/disabling channels manually Before you start... • Turn on . • Set the "VCR Output CH" to "3CH" or "4CH" in the VCR's display window. 123 456 789 0 Number buttons ENTER CH +/-

Operating Instructions
Page 36
The date, time and channel number of that the VCR clock is longer than the total recording time. ?/1 123 456 789 0 VCR Plus+ Number buttons MENU M/m/ You can preset up to eight programs together with its safety tab in the TV program ... set automatically. Make sure the tape is set to the video channel. Recording TV programs using a cable box, turn it to the correct time. • Turn on . • Insert a tape with manual timer settings at one time. When using the VCR Plus+® system (SLV-N700 only) Just enter the PlusCode number listed in...
The date, time and channel number of that the VCR clock is longer than the total recording time. ?/1 123 456 789 0 VCR Plus+ Number buttons MENU M/m/ You can preset up to eight programs together with its safety tab in the TV program ... set automatically. Make sure the tape is set to the video channel. Recording TV programs using a cable box, turn it to the correct time. • Turn on . • Insert a tape with manual timer settings at one time. When using the VCR Plus+® system (SLV-N700 only) Just enter the PlusCode number listed in...
Operating Instructions
Page 39
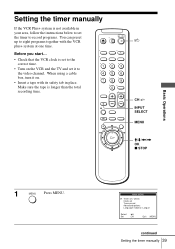
INPUT SELECT MENU M/m/ Before you start... • Check that the VCR clock is set to the correct time. • Turn on the VCR and the TV and set the timer to record programs. You can preset up to eight programs together with its safety tab in place. When using a cable box, turn it to the video channel. Make sure the tape is longer than the total recording time. 123 456 789 0 ?/1 CH +/- Setting the timer manually If the VCR Plus+ system is not available in your area, follow the instructions below to set it on. • Insert a tape with the VCR plus+ system at one time.
INPUT SELECT MENU M/m/ Before you start... • Check that the VCR clock is set to the correct time. • Turn on the VCR and the TV and set the timer to record programs. You can preset up to eight programs together with its safety tab in place. When using a cable box, turn it to the video channel. Make sure the tape is longer than the total recording time. 123 456 789 0 ?/1 CH +/- Setting the timer manually If the VCR Plus+ system is not available in your area, follow the instructions below to set it on. • Insert a tape with the VCR plus+ system at one time.
Operating Instructions
Page 40
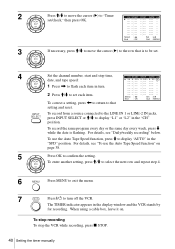
... : MENU 3 If necessary, press M/m to move the cursor (B) to that is flashing. PLAY OK 4 Set the channel number, start and stop the VCR while recording, press x STOP. 40 Setting the timer manually For details, see "To use the Auto Tape Speed function, press m to be set /check," then press OK. To... record the same program every day or the same day every week, press m while the date is to display "AUTO" in the "CH" position. INPUT ...
... : MENU 3 If necessary, press M/m to move the cursor (B) to that is flashing. PLAY OK 4 Set the channel number, start and stop the VCR while recording, press x STOP. 40 Setting the timer manually For details, see "To use the Auto Tape Speed function, press m to be set /check," then press OK. To... record the same program every day or the same day every week, press m while the date is to display "AUTO" in the "CH" position. INPUT ...

Operating Instructions
Page 41
... To use the VCR after using the VCR. To check, change the indication in the ADVANCED OPTIONS menu (page 52). Setting the timer manually 41 Each time you want to keep the tape speed, set the channel, you can also do the following tasks while the VCR is... speed is automatically changed . MO~FR t SUN'S t MON'S t ..... Note that some noise will appear on . Basic Operations Daily/weekly recording In step 4 above, press m to the timer recording standby mode after setting the timer To use the number buttons. • If the indicator appears, the timer settings overlap. If you...
... To use the VCR after using the VCR. To check, change the indication in the ADVANCED OPTIONS menu (page 52). Setting the timer manually 41 Each time you want to keep the tape speed, set the channel, you can also do the following tasks while the VCR is... speed is automatically changed . MO~FR t SUN'S t MON'S t ..... Note that some noise will appear on . Basic Operations Daily/weekly recording In step 4 above, press m to the timer recording standby mode after setting the timer To use the number buttons. • If the indicator appears, the timer settings overlap. If you...
Operating Instructions
Page 51
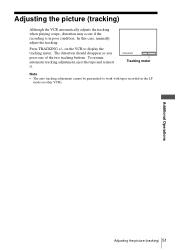
... Operations Adjusting the picture (tracking) 51 Adjusting the picture (tracking) Although the VCR automatically adjusts the tracking when playing a tape, distortion may occur if the recording is in the LP mode on the VCR to work with tapes recorded in poor condition. Press TRACKING +/- In this case, manually adjust the tracking.
... Operations Adjusting the picture (tracking) 51 Adjusting the picture (tracking) Although the VCR automatically adjusts the tracking when playing a tape, distortion may occur if the recording is in the LP mode on the VCR to work with tapes recorded in poor condition. Press TRACKING +/- In this case, manually adjust the tracking.

Marketing Specifications
Page 2
... & Measures • Approx. Features and specifications are property of Sony. Weight: 5.7 lbs. (2.6kg) UPC Code • 027242621206 ©2003 Sony Electronics Inc. Sony, AutoClock, and ChildLoc, are registered US marks. Dimensions (w/h/d): 14" x 3.7" x 9.8" (355.6 x 93.98 x 248.92mm) • Approx. Key Technology SLV-N500 HiFi VHS Video Cassette Recorder OUT IN RF IN RF OUT Flash Rewind Rewinds a T-120...
... & Measures • Approx. Features and specifications are property of Sony. Weight: 5.7 lbs. (2.6kg) UPC Code • 027242621206 ©2003 Sony Electronics Inc. Sony, AutoClock, and ChildLoc, are registered US marks. Dimensions (w/h/d): 14" x 3.7" x 9.8" (355.6 x 93.98 x 248.92mm) • Approx. Key Technology SLV-N500 HiFi VHS Video Cassette Recorder OUT IN RF IN RF OUT Flash Rewind Rewinds a T-120...