
Operating Instructions
Page 2
...into the outlet, contact your Sony dealer. • Unplug ... may condense inside the VCR and cause damage to the video head and tape. Caution Television programs, films, video tapes and other outlet unless...inserted to radio communications. Precautions Safety • For SLV-778HF/777HF operate the unit only on 110 to be operated ...in a horizontal position only. • Keep the unit and cassettes away from equipment with an extension cord, receptacle or other materials...fire or shock hazard, do not use of this recorder with cable television transmission may require authorization from the ...
...into the outlet, contact your Sony dealer. • Unplug ... may condense inside the VCR and cause damage to the video head and tape. Caution Television programs, films, video tapes and other outlet unless...inserted to radio communications. Precautions Safety • For SLV-778HF/777HF operate the unit only on 110 to be operated ...in a horizontal position only. • Keep the unit and cassettes away from equipment with an extension cord, receptacle or other materials...fire or shock hazard, do not use of this recorder with cable television transmission may require authorization from the ...

Operating Instructions
Page 3
... Setting the clock 38 Setting up cable box control 43 Presetting channels 49 Setting up VCR Plus+* Basic Operations 52 Playing a tape 54 Recording TV programs 58 Recording TV programs using VCR Plus+ 61 Setting the timer manually Additional Operations 63 Playing/searching at various speeds 66... tape 68 Skip searching automatically 69 Recording TV programs using the quick timer 70 Checking/changing/canceling timer settings 72 Recording stereo and bilingual programs 74 Adjusting the picture 75 Changing menu options 76 Editing with another VCR Additional Information 78 General setup information ...
... Setting the clock 38 Setting up cable box control 43 Presetting channels 49 Setting up VCR Plus+* Basic Operations 52 Playing a tape 54 Recording TV programs 58 Recording TV programs using VCR Plus+ 61 Setting the timer manually Additional Operations 63 Playing/searching at various speeds 66... tape 68 Skip searching automatically 69 Recording TV programs using the quick timer 70 Checking/changing/canceling timer settings 72 Recording stereo and bilingual programs 74 Adjusting the picture 75 Changing menu options 76 Editing with another VCR Additional Information 78 General setup information ...

Operating Instructions
Page 4
Getting Started Step 1 Unpacking Check that you have received the following items with the VCR: • Remote commander • 75-ohm coaxial cable with F-type connectors • Size AA (R6) batteries • Jack cover • Audio/video cable (3-phono to 3phono) • Plug adaptor (SLV-778HF PX only) 4 Getting Started
Getting Started Step 1 Unpacking Check that you have received the following items with the VCR: • Remote commander • 75-ohm coaxial cable with F-type connectors • Size AA (R6) batteries • Jack cover • Audio/video cable (3-phono to 3phono) • Plug adaptor (SLV-778HF PX only) 4 Getting Started

Operating Instructions
Page 5
Using the remote commander You can be used to operate this VCR and a Sony TV. continued Getting Started 5 Remote sensor TV / VIDEO To operate the VCR a Sony TV Set TV / VIDEO to VIDEO and point at the remote sensor on the VCR TV and point at the remote sensor on the remote commander marked with ...an old one. • Do not use this remote commander to operate your Sony TV. Insert the ...
Using the remote commander You can be used to operate this VCR and a Sony TV. continued Getting Started 5 Remote sensor TV / VIDEO To operate the VCR a Sony TV Set TV / VIDEO to VIDEO and point at the remote sensor on the VCR TV and point at the remote sensor on the remote commander marked with ...an old one. • Do not use this remote commander to operate your Sony TV. Insert the ...

Operating Instructions
Page 6
... one code number is preprogrammed to control non-Sony TVs. You can use the POWER, VOL +/-, CH +/-, and TV/VIDEO buttons to control your TV. Reset the appropriate code number. 6 Getting Started To control the VCR, reset TV / VIDEO to 01 (Sony). Step 2: Setting up the remote commander ...(continued) Controlling other TVs with a dot (•) to control a Sony TV. Code numbers of controllable TVs If more than one at the ...
... one code number is preprogrammed to control non-Sony TVs. You can use the POWER, VOL +/-, CH +/-, and TV/VIDEO buttons to control your TV. Reset the appropriate code number. 6 Getting Started To control the VCR, reset TV / VIDEO to 01 (Sony). Step 2: Setting up the remote commander ...(continued) Controlling other TVs with a dot (•) to control a Sony TV. Code numbers of controllable TVs If more than one at the ...

Operating Instructions
Page 7
...5 Pages 22 to 24 Incompatible cable box with only a few Hookup 6 scrambled channels, using the VCR" on the back cover. Then use your nearest Sony dealer or qualified technician. * DSS® is compatible with the VCR's cable box control feature Hookup 1 Pages 10 to 12 No cable box or incompatible cable box... Pages 13 to 15 Antenna only, no cable TV Hookup 3 Pages 16 to 18 Incompatible cable box with many ways in which your VCR so that has audio/video inputs Audio/video (A/V) hookup, then Pages 8 and 9 follow the instructions for you, first scan through the table below .
...5 Pages 22 to 24 Incompatible cable box with only a few Hookup 6 scrambled channels, using the VCR" on the back cover. Then use your nearest Sony dealer or qualified technician. * DSS® is compatible with the VCR's cable box control feature Hookup 1 Pages 10 to 12 No cable box or incompatible cable box... Pages 13 to 15 Antenna only, no cable TV Hookup 3 Pages 16 to 18 Incompatible cable box with many ways in which your VCR so that has audio/video inputs Audio/video (A/V) hookup, then Pages 8 and 9 follow the instructions for you, first scan through the table below .

Operating Instructions
Page 8
...system. If your TV doesn't have stereo jacks VCR AUDIO VIDEO LINE-1 IN LINE OUT TV IN VIDEO AUDIO Stereo receiver AUX IN Video cable (not supplied) Audio cable (not supplied) Note • To play a tape in stereo, you must use your VCR to record programs, you're finished setting up your TV ...doesn't have A/V inputs, see the following pages for antenna or cable hookups. A Use this hookup if your TV has stereo jacks VCR AUDIO VIDEO LINE-1 IN LINE OUT TV IN VIDEO AUDIO AUDIO OUT Stereo receiver...
...system. If your TV doesn't have stereo jacks VCR AUDIO VIDEO LINE-1 IN LINE OUT TV IN VIDEO AUDIO Stereo receiver AUX IN Video cable (not supplied) Audio cable (not supplied) Note • To play a tape in stereo, you must use your VCR to record programs, you're finished setting up your TV ...doesn't have A/V inputs, see the following pages for antenna or cable hookups. A Use this hookup if your TV has stereo jacks VCR AUDIO VIDEO LINE-1 IN LINE OUT TV IN VIDEO AUDIO AUDIO OUT Stereo receiver...
Operating Instructions
Page 9
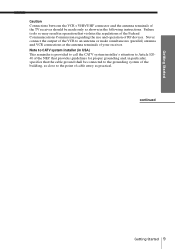
... cable ground shall be made only as practical. Never connect the output of the VCR to an antenna or make simultaneous (parallel) antenna and VCR connections at the antenna terminals of your receiver. Getting Started Caution Connections between the VCR's VHF/UHF connector and the antenna terminals of the TV receiver should be...
... cable ground shall be made only as practical. Never connect the output of the VCR to an antenna or make simultaneous (parallel) antenna and VCR connections at the antenna terminals of your receiver. Getting Started Caution Connections between the VCR's VHF/UHF connector and the antenna terminals of the TV receiver should be...

Operating Instructions
Page 10
... the cable box turned off • Record one channel while watching another channel Wall RM-CM101 Cable Mouse (not supplied) Cable box IN OUT or VCR CONTROL S OUT CABLE BOX CONTROL (PPLOUWGEIRN) VHF/UHF IN OUT or Rear of TV VHF/UHF A Match the type of compatible cable boxes is required.... What you can 't do with this hookup • Record any channel using the VCR's cable box control feature to control the channel on the cable box What you have a cable box, especially if your TV: A, B, or C. ...
... the cable box turned off • Record one channel while watching another channel Wall RM-CM101 Cable Mouse (not supplied) Cable box IN OUT or VCR CONTROL S OUT CABLE BOX CONTROL (PPLOUWGEIRN) VHF/UHF IN OUT or Rear of TV VHF/UHF A Match the type of compatible cable boxes is required.... What you can 't do with this hookup • Record any channel using the VCR's cable box control feature to control the channel on the cable box What you have a cable box, especially if your TV: A, B, or C. ...

Operating Instructions
Page 11
BOX OUTPUT CH CH3 4 Enter your cable box output channel and press OK. Change the on the VCR. 1 The LANGUAGE menu appears. BOX OUTPUT CH CH3 ENTER YOUR CABLE BOX CODE NO. For details, see page 38. For details, see page 31. 3 The ... OFF BOX CODE NO. --- USING 0-9 KEYS REFER TO THE OPERATING MANUAL FOR THE CODE 5 Select your cable box code number and press .. Getting Started Hookup 1: VCR setup 1 Set the RF UNIT switch to Spanish (ESPAÑOL) or French (FRANÇAIS) if desired, and press OK. If both are used...
BOX OUTPUT CH CH3 4 Enter your cable box output channel and press OK. Change the on the VCR. 1 The LANGUAGE menu appears. BOX OUTPUT CH CH3 ENTER YOUR CABLE BOX CODE NO. For details, see page 38. For details, see page 31. 3 The ... OFF BOX CODE NO. --- USING 0-9 KEYS REFER TO THE OPERATING MANUAL FOR THE CODE 5 Select your cable box code number and press .. Getting Started Hookup 1: VCR setup 1 Set the RF UNIT switch to Spanish (ESPAÑOL) or French (FRANÇAIS) if desired, and press OK. If both are used...

Operating Instructions
Page 12
... PUSH 0-9 KEYS TO SET PROGRAM TV CH THEN PUSH ENTER Program guide channel Your actual TV channel Automatic clock setting Once you turn off the VCR. Note • To use the timer to use the automatic clock setting feature, leave the cable box on your program guide. For details, see page... the program guide are different as follows. For details, see page 36. If you want to record right away, or if the channels in your TV, set the channels that , whenever you turn off the VCR, it automatically sets the clock the first time you 've set the clock manually. For details...
... PUSH 0-9 KEYS TO SET PROGRAM TV CH THEN PUSH ENTER Program guide channel Your actual TV channel Automatic clock setting Once you turn off the VCR. Note • To use the timer to use the automatic clock setting feature, leave the cable box on your program guide. For details, see page... the program guide are different as follows. For details, see page 36. If you want to record right away, or if the channels in your TV, set the channels that , whenever you turn off the VCR, it automatically sets the clock the first time you 've set the clock manually. For details...

Operating Instructions
Page 13
... box. B For connector types B and C, no UHF UHF connection or is compatible with only a few channels. What you can do • Record scrambled channels that is required. VHF C UHF continued Getting Started 13 Cable box IN OUT Rear of TV VHF/UHF A Match the type of connector...a few scrambled channels Recommended use Use this hookup if your cable company cannot supply a cable box that require a cable box Wall VCR VHF/UHF IN OUT Connect this hookup • Record any unscrambled channel by selecting the channel on or your TV if you don't have a cable box.
... box. B For connector types B and C, no UHF UHF connection or is compatible with only a few channels. What you can do • Record scrambled channels that is required. VHF C UHF continued Getting Started 13 Cable box IN OUT Rear of TV VHF/UHF A Match the type of connector...a few scrambled channels Recommended use Use this hookup if your cable company cannot supply a cable box that require a cable box Wall VCR VHF/UHF IN OUT Connect this hookup • Record any unscrambled channel by selecting the channel on or your TV if you don't have a cable box.

Operating Instructions
Page 14
For details, see page 31. 3 The CABLE BOX CONTROL menu appears. Change the on the VCR. 1 The LANGUAGE menu appears. SELECT : / CANCEL : EASY SET UP SET UP TUNER PRESET ANTENNA / CABLE ANT • CABLE 5 The AUTO PRESET starts. If both are ... : EASY SET UP SET UP SET UP IS DONE / 14 Getting Started PLEASE WAIT . Normal display Select AUTO and press OK. Step 3: Hookups (continued) Hookup 2: VCR setup 1 Set the RF UNIT switch to CH 3 or CH 4, whichever channel is not used , set the switch to either channel. For details, see page...
For details, see page 31. 3 The CABLE BOX CONTROL menu appears. Change the on the VCR. 1 The LANGUAGE menu appears. SELECT : / CANCEL : EASY SET UP SET UP TUNER PRESET ANTENNA / CABLE ANT • CABLE 5 The AUTO PRESET starts. If both are ... : EASY SET UP SET UP SET UP IS DONE / 14 Getting Started PLEASE WAIT . Normal display Select AUTO and press OK. Step 3: Hookups (continued) Hookup 2: VCR setup 1 Set the RF UNIT switch to CH 3 or CH 4, whichever channel is not used , set the switch to either channel. For details, see page...

Operating Instructions
Page 15
...the timer to use on your program guide. MENU TIMER SET / CHECK TUNER PRESET SET VCR PLUS+ CHANNELS CABLE BOX CONTROL CLOCK SET LANGUAGE ADVANCED OPTIONS 2 Enter the program guide channel, then the channel you want to record right away, or if the channels in your TV. 3 Press OK. After that, ...whenever you 've set the clock manually. continued Getting Started 15 SET VCR PLUS+ CHANNELS GUIDE CH TV CH 25 - 15 PUSH 0-9 KEYS TO ...
...the timer to use on your program guide. MENU TIMER SET / CHECK TUNER PRESET SET VCR PLUS+ CHANNELS CABLE BOX CONTROL CLOCK SET LANGUAGE ADVANCED OPTIONS 2 Enter the program guide channel, then the channel you want to record right away, or if the channels in your TV. 3 Press OK. After that, ...whenever you 've set the clock manually. continued Getting Started 15 SET VCR PLUS+ CHANNELS GUIDE CH TV CH 25 - 15 PUSH 0-9 KEYS TO ...

Operating Instructions
Page 16
VCR VHF/UHF IN OUT VHF B For connector types or UHF B and C, no UHF connection is a flat cable (300-ohm twin...the type of or connector on your VHF TV: A, B, or C. If you get channels 14 and higher) • Separate VHF and UHF antennas VCR VHF/UHF IN OUT Rear of TV VHF/UHF A Match the type of A connector on your or TV: A, B, or C. A Use this hookup...if you're using a VHF-only antenna (you have cable TV). VHF C UHF If you cannot connect your antenna cable to the VCR directly If your antenna cable is required. For details, see page 79. 16 Getting Started
VCR VHF/UHF IN OUT VHF B For connector types or UHF B and C, no UHF connection is a flat cable (300-ohm twin...the type of or connector on your VHF TV: A, B, or C. If you get channels 14 and higher) • Separate VHF and UHF antennas VCR VHF/UHF IN OUT Rear of TV VHF/UHF A Match the type of A connector on your or TV: A, B, or C. A Use this hookup...if you're using a VHF-only antenna (you have cable TV). VHF C UHF If you cannot connect your antenna cable to the VCR directly If your antenna cable is required. For details, see page 79. 16 Getting Started
Operating Instructions
Page 17
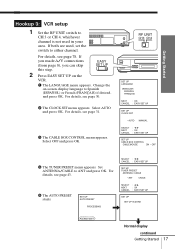
... : / NEXT : OK CANCEL : EASY SET UP SET UP CABLE BOX CONTROL CABLE MOUSE ON • OFF 4 The TUNER PRESET menu appears. Getting Started Hookup 3: VCR setup 1 Set the RF UNIT switch to ANT and press OK. SET UP AUTO PRESET PROCESSING SELECT : / NEXT : OK CANCEL : EASY SET UP SET UP... SET UP IS DONE / PLEASE WAIT . Normal display continued Getting Started 17 Change the on the VCR. 1 The LANGUAGE menu appears. For details, see page 30. 2 The CLOCK SET menu appears. If both are used in your area. Select AUTO and press...
... : / NEXT : OK CANCEL : EASY SET UP SET UP CABLE BOX CONTROL CABLE MOUSE ON • OFF 4 The TUNER PRESET menu appears. Getting Started Hookup 3: VCR setup 1 Set the RF UNIT switch to ANT and press OK. SET UP AUTO PRESET PROCESSING SELECT : / NEXT : OK CANCEL : EASY SET UP SET UP... SET UP IS DONE / PLEASE WAIT . Normal display continued Getting Started 17 Change the on the VCR. 1 The LANGUAGE menu appears. For details, see page 30. 2 The CLOCK SET menu appears. If both are used in your area. Select AUTO and press...

Operating Instructions
Page 18
...select SET VCR PLUS+ CHANNELS. For details, see page 36. 18 Getting Started If you actually use the timer to use on your TV. 3 Press OK. For details, see page 49. 2 If the channels in the program guide are different as follows. After that you want to record right away..., or if the channels in your program guide. Step 3: Hookups (continued) Hookup 3: VCR Plus+ channel setup 1 Find the VCR Plus+ Channel Listing in your area do not carry time signals, set the channels...
...select SET VCR PLUS+ CHANNELS. For details, see page 36. 18 Getting Started If you actually use the timer to use on your TV. 3 Press OK. For details, see page 49. 2 If the channels in the program guide are different as follows. After that you want to record right away..., or if the channels in your program guide. Step 3: Hookups (continued) Hookup 3: VCR Plus+ channel setup 1 Find the VCR Plus+ Channel Listing in your area do not carry time signals, set the channels...

Operating Instructions
Page 19
What you can do • Record with the cable box turned off • Record one channel while watching another channel • Select channels directly on the VCR Wall Cable box IN OUT VCR VHF/UHF IN OUT Rear of TV VHF/UHF A Match the type of connector on your or TV: A, B, or C. Getting Started Hookup...
What you can do • Record with the cable box turned off • Record one channel while watching another channel • Select channels directly on the VCR Wall Cable box IN OUT VCR VHF/UHF IN OUT Rear of TV VHF/UHF A Match the type of connector on your or TV: A, B, or C. Getting Started Hookup...

Operating Instructions
Page 20
...CABLE • ANT CABLE 5 The AUTO PRESET starts. Normal display If you made A/V connections (from page 8), you can skip this step. Change the on the VCR. 1 The LANGUAGE menu appears. SET UP AUTO PRESET PROCESSING SELECT : / NEXT : OK CANCEL : EASY SET UP SET UP SET UP IS DONE / 20 ... : OK CANCEL : EASY SET UP SET UP CABLE BOX CONTROL CABLE MOUSE ON • OFF 4 The TUNER PRESET menu appears. Step 3: Hookups (continued) Hookup 4: VCR setup 1 Set the RF UNIT switch to either channel. If both are used in your cable box. 3 Press EASY SET UP on -screen display language...
...CABLE • ANT CABLE 5 The AUTO PRESET starts. Normal display If you made A/V connections (from page 8), you can skip this step. Change the on the VCR. 1 The LANGUAGE menu appears. SET UP AUTO PRESET PROCESSING SELECT : / NEXT : OK CANCEL : EASY SET UP SET UP SET UP IS DONE / 20 ... : OK CANCEL : EASY SET UP SET UP CABLE BOX CONTROL CABLE MOUSE ON • OFF 4 The TUNER PRESET menu appears. Step 3: Hookups (continued) Hookup 4: VCR setup 1 Set the RF UNIT switch to either channel. If both are used in your cable box. 3 Press EASY SET UP on -screen display language...

Operating Instructions
Page 21
...+ channel setup 1 Find the VCR Plus+ Channel Listing in your program guide. It automatically sets the clock and adjusts for Daylight Saving Time by picking up the time signal. For details, see page 49. 2 Enter all the channels you want to record and the cable box output channel (usually 2, ...3, or 4). For details, see page 36. MENU TIMER SET / CHECK TUNER PRESET SET VCR PLUS+ CHANNELS CABLE BOX CONTROL CLOCK SET LANGUAGE ADVANCED OPTIONS 2 Enter the program ...
...+ channel setup 1 Find the VCR Plus+ Channel Listing in your program guide. It automatically sets the clock and adjusts for Daylight Saving Time by picking up the time signal. For details, see page 49. 2 Enter all the channels you want to record and the cable box output channel (usually 2, ...3, or 4). For details, see page 36. MENU TIMER SET / CHECK TUNER PRESET SET VCR PLUS+ CHANNELS CABLE BOX CONTROL CLOCK SET LANGUAGE ADVANCED OPTIONS 2 Enter the program ...

