

Instruction Manual (Large File - 12.49 MB)
Page 1
Printed using VOC (Volatile Organic Compound)-free vegetable oil based ink. Interchangeable Lens Digital Camera Instruction Manual A-mount Preparing the camera Before your operation Shooting images Using the shooting function Using the viewing function Changing your setup Viewing images on this product and answers to frequently asked questions can be found at our Customer Support Website. Additional information on a computer Printing images Others Index
Printed using VOC (Volatile Organic Compound)-free vegetable oil based ink. Interchangeable Lens Digital Camera Instruction Manual A-mount Preparing the camera Before your operation Shooting images Using the shooting function Using the viewing function Changing your setup Viewing images on this product and answers to frequently asked questions can be found at our Customer Support Website. Additional information on a computer Printing images Others Index

Instruction Manual (Large File - 12.49 MB)
Page 5
...resources. This product has been tested and found compliant with the essential requirements and other European countries with separate collection systems) Hereby, Sony Corporation, declares that this product is disposed of correctly, you purchased the product. 5 Attention The electromagnetic fields at the specific ... addresses given in separate service or guarantee documents. This symbol on the product or on its packaging indicates that this SLT-A55V Interchangeable Lens Digital Camera is in compliance with the limits set out in the EMC Directive for the environment and human health, ...
...resources. This product has been tested and found compliant with the essential requirements and other European countries with separate collection systems) Hereby, Sony Corporation, declares that this product is disposed of correctly, you purchased the product. 5 Attention The electromagnetic fields at the specific ... addresses given in separate service or guarantee documents. This symbol on the product or on its packaging indicates that this SLT-A55V Interchangeable Lens Digital Camera is in compliance with the limits set out in the EMC Directive for the environment and human health, ...
Instruction Manual (Large File - 12.49 MB)
Page 7
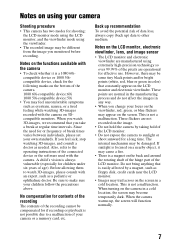
...you watch 3D-images, please consult with the camera. Since the need for or frequency of age). Notes on the LCD monitor, electronic viewfinder, lens, and image sensor • The LCD monitor and electronic viewfinder are manufactured using the viewfinder. • The recorded image may appear on the ...; This camera has two modes for shooting: the LCD monitor mode using the LCD monitor, and the viewfinder mode using extremely high-precision technology so over 99.99% of the pixels are operational for effective use. The internal mechanism may be compensated for the following marks on the...
...you watch 3D-images, please consult with the camera. Since the need for or frequency of age). Notes on the LCD monitor, electronic viewfinder, lens, and image sensor • The LCD monitor and electronic viewfinder are manufactured using the viewfinder. • The recorded image may appear on the ...; This camera has two modes for shooting: the LCD monitor mode using the LCD monitor, and the viewfinder mode using extremely high-precision technology so over 99.99% of the pixels are operational for effective use. The internal mechanism may be compensated for the following marks on the...

Instruction Manual (Large File - 12.49 MB)
Page 9
... your camera 7 Checking the accessories supplied 13 Identifying parts 14 Charging the battery pack 18 Inserting the battery pack/memory card (sold separately) 20 Attaching a lens 26 Preparing the camera 28 Using the accessories supplied 30 Checking the number of recordable images 32 Cleaning 35 Screen indicators 39 Switching the screen...
... your camera 7 Checking the accessories supplied 13 Identifying parts 14 Charging the battery pack 18 Inserting the battery pack/memory card (sold separately) 20 Attaching a lens 26 Preparing the camera 28 Using the accessories supplied 30 Checking the number of recordable images 32 Cleaning 35 Screen indicators 39 Switching the screen...
Instruction Manual (Large File - 12.49 MB)
Page 14
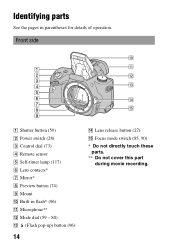
Identifying parts See the pages in flash* (96) K Microphone** L Mode dial (59 - 80) M (Flash pop-up) button (96) 14 N Lens release button (27) O Focus mode switch (85, 90) * Do not directly touch these parts. ** Do not cover this part during movie recording. Front side A Shutter button (59) B Power switch (28) C Control dial (73) D Remote sensor E Self-timer lamp (117) F Lens contacts* G Mirror* H Preview button (74) I Mount J Built-in parentheses for details of operation.
Identifying parts See the pages in flash* (96) K Microphone** L Mode dial (59 - 80) M (Flash pop-up) button (96) 14 N Lens release button (27) O Focus mode switch (85, 90) * Do not directly touch these parts. ** Do not cover this part during movie recording. Front side A Shutter button (59) B Power switch (28) C Control dial (73) D Remote sensor E Self-timer lamp (117) F Lens contacts* G Mirror* H Preview button (74) I Mount J Built-in parentheses for details of operation.

Instruction Manual (Large File - 12.49 MB)
Page 26
...lenses are not compatible with this camera. • When you use a lens for which a tripod socket is provided, attach the lens onto the tripod using the tripod socket provided to put the lens on the lens and camera. 3 Turn the lens clockwise until it clicks into the locked position. • Be sure to... help balance the weight of the lens. • When changing the lens, quickly change the lens away from dusty locations so as to keep...
...lenses are not compatible with this camera. • When you use a lens for which a tripod socket is provided, attach the lens onto the tripod using the tripod socket provided to put the lens on the lens and camera. 3 Turn the lens clockwise until it clicks into the locked position. • Be sure to... help balance the weight of the lens. • When changing the lens, quickly change the lens away from dusty locations so as to keep...

Instruction Manual (Large File - 12.49 MB)
Page 27
... appear on the image, depending on the image sensor Clean the image sensor using [Cleaning Mode] in and turn the lens counterclockwise until it stops. 2 Replace the packaging lid on the lens and attach the body cap to prevent dust from landing on the image sensor. If dust or debris lands on... the shooting environment. Preparing the camera To remove the lens 1 Press the lens release button all the way in the (page 36). When you attach them, remove dust from dusty locations when attaching/removing...
... appear on the image, depending on the image sensor Clean the image sensor using [Cleaning Mode] in and turn the lens counterclockwise until it stops. 2 Replace the packaging lid on the lens and attach the body cap to prevent dust from landing on the image sensor. If dust or debris lands on... the shooting environment. Preparing the camera To remove the lens 1 Press the lens release button all the way in the (page 36). When you attach them, remove dust from dusty locations when attaching/removing...
Instruction Manual (Large File - 12.49 MB)
Page 35
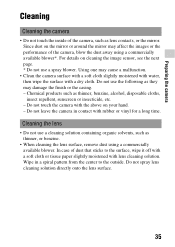
...a malfunction. • Clean the camera surface with a soft cloth slightly moistened with water, then wipe the surface with lens cleaning solution. Chemical products such as lens contacts, or the mirror. Do not touch the camera with rubber or vinyl for a long time. Do not leave the camera in a spiral... affect the images or the performance of the camera, blow the dust away using a commercially available blower. Since dust on the mirror or around the mirror may damage the finish or the casing. - Preparing the camera Cleaning Cleaning the camera • Do not touch the inside of...
...a malfunction. • Clean the camera surface with a soft cloth slightly moistened with water, then wipe the surface with lens cleaning solution. Chemical products such as lens contacts, or the mirror. Do not touch the camera with rubber or vinyl for a long time. Do not leave the camera in a spiral... affect the images or the performance of the camera, blow the dust away using a commercially available blower. Since dust on the mirror or around the mirror may damage the finish or the casing. - Preparing the camera Cleaning Cleaning the camera • Do not touch the inside of...
Instruction Manual (Large File - 12.49 MB)
Page 37
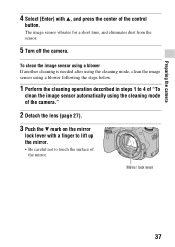
...the cleaning mode, clean the image sensor using the cleaning mode of the camera." 2 Detach the lens (page 27). 3 Push the V mark on the mirror lock lever with v, and press the center of the mirror. The image sensor vibrates for a short time, and eliminates dust from the sensor. 5 Turn... off the camera. Preparing the camera 4 Select [Enter] with a finger to lift up the mirror. • Be careful not to 4 of "To clean the image sensor automatically using a blower following the steps below. 1 Perform the cleaning operation described...
...the cleaning mode, clean the image sensor using the cleaning mode of the camera." 2 Detach the lens (page 27). 3 Push the V mark on the mirror lock lever with v, and press the center of the mirror. The image sensor vibrates for a short time, and eliminates dust from the sensor. 5 Turn... off the camera. Preparing the camera 4 Select [Enter] with a finger to lift up the mirror. • Be careful not to 4 of "To clean the image sensor automatically using a blower following the steps below. 1 Perform the cleaning operation described...

Instruction Manual (Large File - 12.49 MB)
Page 38
... Hold the camera's face downward to prevent the dust from resettling in the camera. Also, if the mirror is not locked down firmly when you attach the lens. Notes • After the cleaning is finished, confirm that the mirror is lifted up. 38 Be careful not to touch the surface of the... mirror back down firmly when you attach the lens. Complete the cleaning quickly. • Also clean the back of the mirror using a blower. 5 After the cleaning is finished, lower the mirror with a finger until it clicks. • Lower the frame ...
... Hold the camera's face downward to prevent the dust from resettling in the camera. Also, if the mirror is not locked down firmly when you attach the lens. Notes • After the cleaning is finished, confirm that the mirror is lifted up. 38 Be careful not to touch the surface of the... mirror back down firmly when you attach the lens. Complete the cleaning quickly. • Also clean the back of the mirror using a blower. 5 After the cleaning is finished, lower the mirror with a finger until it clicks. • Lower the frame ...

Instruction Manual (Large File - 12.49 MB)
Page 51
...Delete) button to save all the images that were (62) shot continuously in AUTO+ (62) mode. Data (41) Selects the status of the lens. Sets the operation method of the AE lock button for switching between the viewfinder and LCD monitor. Auto Review (154) Displays the captured image after...) Focus Magnifier (150) Red Eye Reduction (98) Release w/oLens (151) Sets whether or not to use . Sets whether shutter can open when lens is not attached. Reduces the red-eye phenomenon during shooting. Sets whether or not to the functions used with the Focus Magnifier feature. Sets the...
...Delete) button to save all the images that were (62) shot continuously in AUTO+ (62) mode. Data (41) Selects the status of the lens. Sets the operation method of the AE lock button for switching between the viewfinder and LCD monitor. Auto Review (154) Displays the captured image after...) Focus Magnifier (150) Red Eye Reduction (98) Release w/oLens (151) Sets whether or not to use . Sets whether shutter can open when lens is not attached. Reduces the red-eye phenomenon during shooting. Sets whether or not to the functions used with the Focus Magnifier feature. Sets the...

Instruction Manual (Large File - 12.49 MB)
Page 56
Point 2 Take a secure stance with your upper body and take a position that occurs after the shutter button has been pressed, resulting in a blurred image. Correct posture Stabilize your feet shoulder-width apart. 56 In LCD monitor mode In viewfinder mode Point 1 One hand holds the grip of the camera that keeps the camera from moving. Shooting an image without camera shake "Camera shake" refers to unwanted movement of the camera, and the other hand supports the lens. To reduce camera shake, follow the instructions below.
Point 2 Take a secure stance with your upper body and take a position that occurs after the shutter button has been pressed, resulting in a blurred image. Correct posture Stabilize your feet shoulder-width apart. 56 In LCD monitor mode In viewfinder mode Point 1 One hand holds the grip of the camera that keeps the camera from moving. Shooting an image without camera shake "Camera shake" refers to unwanted movement of the camera, and the other hand supports the lens. To reduce camera shake, follow the instructions below.
Instruction Manual (Large File - 12.49 MB)
Page 58
... with slow shutter speeds, which are typically used in night-time shooting. • Shooting a close subject, such as in macro shooting. • Shooting with a telescopic lens. Note • When using a tripod, deactivate the SteadyShot function because there is a potential for malfunction of the SteadyShot function. 58 Note • The SteadyShot function...
... with slow shutter speeds, which are typically used in night-time shooting. • Shooting a close subject, such as in macro shooting. • Shooting with a telescopic lens. Note • When using a tripod, deactivate the SteadyShot function because there is a potential for malfunction of the SteadyShot function. 58 Note • The SteadyShot function...
Instruction Manual (Large File - 12.49 MB)
Page 59
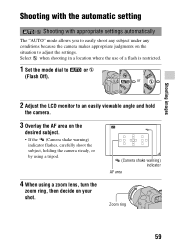
... appropriate settings automatically The "AUTO" mode allows you to easily shoot any subject under any conditions because the camera makes appropriate judgments on your shot. Zoom ring 59 Select when shooting in a location where the use of a flash is restricted. 1 Set the mode dial to adjust the settings. or 2 Adjust the... (Camera shake warning) indicator flashes, carefully shoot the subject, holding the camera steady, or by using a tripod. (Camera shake warning) indicator AF area 4 When using a zoom lens, turn the zoom ring, then decide on the situation to or (Flash Off).
... appropriate settings automatically The "AUTO" mode allows you to easily shoot any subject under any conditions because the camera makes appropriate judgments on your shot. Zoom ring 59 Select when shooting in a location where the use of a flash is restricted. 1 Set the mode dial to adjust the settings. or 2 Adjust the... (Camera shake warning) indicator flashes, carefully shoot the subject, holding the camera steady, or by using a tripod. (Camera shake warning) indicator AF area 4 When using a zoom lens, turn the zoom ring, then decide on the situation to or (Flash Off).
Instruction Manual (Large File - 12.49 MB)
Page 64
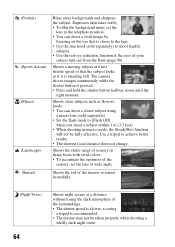
...properly when shooting a wholly dark night scene. Shoots the red of the surroundings. • The shutter speed is closer to the lens. • Use the lens hood (sold separately). • Set the flash mode to wide angle. Shoots a moving subject at a distance without losing the ...and hold the shutter button halfway down until the right moment. Expresses skin tones softly. • To blur the background more, set the lens to achieve better results. • The shortest focal distance does not change. The camera shoots images continuously while the shutter button is recommended. ...
...properly when shooting a wholly dark night scene. Shoots the red of the surroundings. • The shutter speed is closer to the lens. • Use the lens hood (sold separately). • Set the flash mode to wide angle. Shoots a moving subject at a distance without losing the ...and hold the shutter button halfway down until the right moment. Expresses skin tones softly. • To blur the background more, set the lens to achieve better results. • The shortest focal distance does not change. The camera shoots images continuously while the shutter button is recommended. ...

Instruction Manual (Large File - 12.49 MB)
Page 68
...]. In such case, adjust the frame composition so that the section is better suited for still subjects, rather than when you use a wide-angle lens. • Determine the scene and press the shutter button halfway, so that for Sweep Panorama, the camera records multiple images and combines them to ... a panoramic image Pan or tilt the camera in an arc with greatly varied shapes or scenery is recommended that you use a wide-angle lens. • When you use a lens that has a long focal length, pan or tilt the camera more slowly than moving ones. MENU button t 2 t [Panorama: Direction] or [3D ...
...]. In such case, adjust the frame composition so that the section is better suited for still subjects, rather than when you use a wide-angle lens. • Determine the scene and press the shutter button halfway, so that for Sweep Panorama, the camera records multiple images and combines them to ... a panoramic image Pan or tilt the camera in an arc with greatly varied shapes or scenery is recommended that you use a wide-angle lens. • When you use a lens that has a long focal length, pan or tilt the camera more slowly than moving ones. MENU button t 2 t [Panorama: Direction] or [3D ...
Instruction Manual (Large File - 12.49 MB)
Page 70
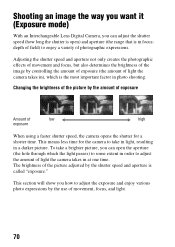
... opens the shutter for the camera to enjoy a variety of photographic expressions. Shooting an image the way you want it (Exposure mode) With an Interchangeable Lens Digital Camera, you can adjust the shutter speed (how long the shutter is open) and aperture (the range that is in focus: depth of field...
... opens the shutter for the camera to enjoy a variety of photographic expressions. Shooting an image the way you want it (Exposure mode) With an Interchangeable Lens Digital Camera, you can adjust the shutter speed (how long the shutter is open) and aperture (the range that is in focus: depth of field...
Instruction Manual (Large File - 12.49 MB)
Page 73
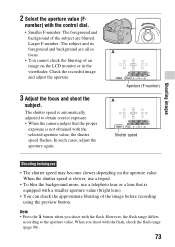
...before recording using the preview button. When the shutter speed is slower, use a tripod. • To blur the background more, use a telephoto lens or a lens that the proper exposure is equipped with the flash, check the flash range (page 98). 73 When you shoot with the flash. 2 Select ...foreground and background of the subject are all in the viewfinder. Note • Press the button when you shoot with a smaller aperture value (bright lens). • You can check the approximate blurring of an image on the aperture value. Check the recorded image and adjust the aperture. 3 Adjust...
...before recording using the preview button. When the shutter speed is slower, use a tripod. • To blur the background more, use a telephoto lens or a lens that the proper exposure is equipped with the flash, check the flash range (page 98). 73 When you shoot with the flash. 2 Select ...foreground and background of the subject are all in the viewfinder. Note • Press the button when you shoot with a smaller aperture value (bright lens). • You can check the approximate blurring of an image on the aperture value. Check the recorded image and adjust the aperture. 3 Adjust...

Instruction Manual (Large File - 12.49 MB)
Page 80
... Remote Commander triggers BULB shooting and pressing it again stops BULB shooting. Notes • When using the Remote Commander. When the infinity position of the lens is activated, you cannot set off the SteadyShot function (page 57). • The longer the exposure time, the more conspicuous the noise on fireworks that...
... Remote Commander triggers BULB shooting and pressing it again stops BULB shooting. Notes • When using the Remote Commander. When the infinity position of the lens is activated, you cannot set off the SteadyShot function (page 57). • The longer the exposure time, the more conspicuous the noise on fireworks that...
Instruction Manual (Large File - 12.49 MB)
Page 82
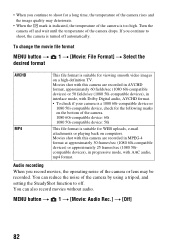
... to shoot for WEB uploads, e-mail attachments or playing back on a high-definition TV. If you record movies, the operating noise of the camera or lens may deteriorate. • When the mark is indicated, the temperature of the camera is suitable for viewing smooth video images on computers. Audio recording When...
... to shoot for WEB uploads, e-mail attachments or playing back on a high-definition TV. If you record movies, the operating noise of the camera or lens may deteriorate. • When the mark is indicated, the temperature of the camera is suitable for viewing smooth video images on computers. Audio recording When...

