
Instruction Manual (Large File - 12.49 MB)
Page 1
Printed using VOC (Volatile Organic Compound)-free vegetable oil based ink. Interchangeable Lens Digital Camera Instruction Manual A-mount Preparing the camera Before your operation Shooting images Using the shooting function Using the viewing function Changing your setup Viewing images on this product and answers to frequently asked questions can be found at our Customer Support Website. Additional information on a computer Printing images Others Index
Printed using VOC (Volatile Organic Compound)-free vegetable oil based ink. Interchangeable Lens Digital Camera Instruction Manual A-mount Preparing the camera Before your operation Shooting images Using the shooting function Using the viewing function Changing your setup Viewing images on this product and answers to frequently asked questions can be found at our Customer Support Website. Additional information on a computer Printing images Others Index

Instruction Manual (Large File - 12.49 MB)
Page 2
...as in direct sunlight or in a car parked in the sun. • Do not incinerate or dispose of the proper configuration for the power outlet. SLT-A55/A55V/A33 Serial No WARNING To reduce fire or shock hazard, do not allow metal objects to come into contact with the battery terminals...the serial number in fire. • Do not handle damaged or leaking lithium ion batteries. • Be sure to charge the battery pack using a genuine Sony battery charger or a device that can burst, cause a fire or even chemical burns. Owner's Record The model and serial numbers are located on it. •...
...as in direct sunlight or in a car parked in the sun. • Do not incinerate or dispose of the proper configuration for the power outlet. SLT-A55/A55V/A33 Serial No WARNING To reduce fire or shock hazard, do not allow metal objects to come into contact with the battery terminals...the serial number in fire. • Do not handle damaged or leaking lithium ion batteries. • Be sure to charge the battery pack using a genuine Sony battery charger or a device that can burst, cause a fire or even chemical burns. Owner's Record The model and serial numbers are located on it. •...

Instruction Manual (Large File - 12.49 MB)
Page 3
... charger Even if the CHARGE lamp is not lit, the battery charger is supplied, the power cord (mains lead) can help preserve our environment by Sony. • Dispose of rechargeable batteries, call toll free 1-800-822-8837, or visit http:// www.rbrc.org/ Caution: Do not handle damaged or leaking Lithium...
... charger Even if the CHARGE lamp is not lit, the battery charger is supplied, the power cord (mains lead) can help preserve our environment by Sony. • Dispose of rechargeable batteries, call toll free 1-800-822-8837, or visit http:// www.rbrc.org/ Caution: Do not handle damaged or leaking Lithium...
Instruction Manual (Large File - 12.49 MB)
Page 4
...of Part 15 of the FCC Rules. Reorient or relocate the receiving antenna. - Regulatory Information Declaration of Conformity Trade Name: SONY Model No.: SLT-A33 Responsible Party: Sony Electronics Inc. Operation is connected. - Connect the equipment into an outlet on , the user is for ...help. Declaration of Conformity Trade Name: SONY Model No.: SLT-A55V Responsible Party: Sony Electronics Inc. Increase the separation between the equipment and receiver. - Consult the dealer or an experienced radio...
...of Part 15 of the FCC Rules. Reorient or relocate the receiving antenna. - Regulatory Information Declaration of Conformity Trade Name: SONY Model No.: SLT-A33 Responsible Party: Sony Electronics Inc. Operation is connected. - Connect the equipment into an outlet on , the user is for ...help. Declaration of Conformity Trade Name: SONY Model No.: SLT-A55V Responsible Party: Sony Electronics Inc. Increase the separation between the equipment and receiver. - Consult the dealer or an experienced radio...

Instruction Manual (Large File - 12.49 MB)
Page 5
...electrical and electronic equipment. This product has been tested and found compliant with separate collection systems) Hereby, Sony Corporation, declares that this SLT-A55V Interchangeable Lens Digital Camera is in compliance with the essential requirements and other European countries with the limits set out...to the applicable collection point for the recycling of this product. For details, please access the following URL: http://www.compliance.sony.de/ Notice for the environment and human health, which could otherwise be handed over to discontinue midway (fail), restart the...
...electrical and electronic equipment. This product has been tested and found compliant with separate collection systems) Hereby, Sony Corporation, declares that this SLT-A55V Interchangeable Lens Digital Camera is in compliance with the essential requirements and other European countries with the limits set out...to the applicable collection point for the recycling of this product. For details, please access the following URL: http://www.compliance.sony.de/ Notice for the environment and human health, which could otherwise be handed over to discontinue midway (fail), restart the...

Instruction Manual (Large File - 12.49 MB)
Page 6
... for safety, performance or data integrity reasons require a permanent connection with an incorporated battery, this battery should lose the fuse cover, please contact your nearest Sony service station. 6 The chemical symbols for customers in the United Kingdom A moulded plug complying with a chemical symbol. On certain batteries this symbol might be treated...
... for safety, performance or data integrity reasons require a permanent connection with an incorporated battery, this battery should lose the fuse cover, please contact your nearest Sony service station. 6 The chemical symbols for customers in the United Kingdom A moulded plug complying with a chemical symbol. On certain batteries this symbol might be treated...
Instruction Manual (Large File - 12.49 MB)
Page 7
... nausea, or a tired feeling while watching 3D-images recorded with the camera on 3Dcompatible monitors. Notes on the LCD monitor, electronic viewfinder, lens, and image sensor • The LCD monitor and electronic viewfinder are manufactured using the viewfinder. • The recorded image may be compensated ...This camera has two modes for shooting: the LCD monitor mode using the LCD monitor, and the viewfinder mode using extremely high-precision technology so over 99.99% of the pixels are operational for effective use. However, there may be damaged. Notes on the functions available...
... nausea, or a tired feeling while watching 3D-images recorded with the camera on 3Dcompatible monitors. Notes on the LCD monitor, electronic viewfinder, lens, and image sensor • The LCD monitor and electronic viewfinder are manufactured using the viewfinder. • The recorded image may be compensated ...This camera has two modes for shooting: the LCD monitor mode using the LCD monitor, and the viewfinder mode using extremely high-precision technology so over 99.99% of the pixels are operational for effective use. However, there may be damaged. Notes on the functions available...
Instruction Manual (Large File - 12.49 MB)
Page 8
... where you use it. • If you continue to shoot for a long time, the temperature of the camera may get hot. GPS-compatible: SLT-A55V GPS-incompatible: SLT-A55/A33 • Use GPS in accordance with the AVCHD format This camera also uses MPEG-4 AVC/ H.264 Main Profile for AVCHD format recording...
... where you use it. • If you continue to shoot for a long time, the temperature of the camera may get hot. GPS-compatible: SLT-A55V GPS-incompatible: SLT-A55/A33 • Use GPS in accordance with the AVCHD format This camera also uses MPEG-4 AVC/ H.264 Main Profile for AVCHD format recording...

Instruction Manual (Large File - 12.49 MB)
Page 9
... your camera 7 Checking the accessories supplied 13 Identifying parts 14 Charging the battery pack 18 Inserting the battery pack/memory card (sold separately) 20 Attaching a lens 26 Preparing the camera 28 Using the accessories supplied 30 Checking the number of recordable images 32 Cleaning 35 Screen indicators 39 Switching the screen...
... your camera 7 Checking the accessories supplied 13 Identifying parts 14 Charging the battery pack 18 Inserting the battery pack/memory card (sold separately) 20 Attaching a lens 26 Preparing the camera 28 Using the accessories supplied 30 Checking the number of recordable images 32 Cleaning 35 Screen indicators 39 Switching the screen...

Instruction Manual (Large File - 12.49 MB)
Page 10
Shooting with a suitable setting for the subject 63 Shooting with preset settings according to the scene (Scene Selection 63 Shooting panoramic images (Sweep Shooting) . 66 Shooting continuously at high speed (Continuous Advance Priority AE 69 Shooting an image the way you want it (Exposure mode 70 Shooting with program auto 71 Shooting by controlling the blur of the background (Aperture priority 72 Shooting a moving subject with various expressions (Shutter speed priority 75 Shooting with the exposure adjusted manually (Manual exposure 77 Shooting trails with long ...
Shooting with a suitable setting for the subject 63 Shooting with preset settings according to the scene (Scene Selection 63 Shooting panoramic images (Sweep Shooting) . 66 Shooting continuously at high speed (Continuous Advance Priority AE 69 Shooting an image the way you want it (Exposure mode 70 Shooting with program auto 71 Shooting by controlling the blur of the background (Aperture priority 72 Shooting a moving subject with various expressions (Shutter speed priority 75 Shooting with the exposure adjusted manually (Manual exposure 77 Shooting trails with long ...

Instruction Manual (Large File - 12.49 MB)
Page 11
Using brightness compensation for the entire image (Exposure compensation 101 Adjusting the amount of flash light (Flash Compensation 103 Selecting the flash control mode to set the amount of flash light (Flash control 104 Selecting the method for measuring the brightness of a subject (Metering Mode 105 Setting ISO 106 Compensating for the brightness and contrast automatically (D-Range 107 Correcting the brightness of the image (D-Range Optimizer 107 Compensating automatically with rich gradation (Auto High Dynamic Range 108 Image processing 110 Selecting your desired image processing...
Using brightness compensation for the entire image (Exposure compensation 101 Adjusting the amount of flash light (Flash Compensation 103 Selecting the flash control mode to set the amount of flash light (Flash control 104 Selecting the method for measuring the brightness of a subject (Metering Mode 105 Setting ISO 106 Compensating for the brightness and contrast automatically (D-Range 107 Correcting the brightness of the image (D-Range Optimizer 107 Compensating automatically with rich gradation (Auto High Dynamic Range 108 Image processing 110 Selecting your desired image processing...
Instruction Manual (Large File - 12.49 MB)
Page 12
... the information of recorded images 127 Protecting images (Protect 131 Deleting images (Delete 132 Viewing images on a TV screen 134 Changing your setup GPS setting (SLT-A55V only 138 Setting image size and image quality 141 Setting the method for recording on a memory card ..... 145 Changing the noise reduction setting 149... computer 165 Creating a movie disc 168 Printing images Specifying DPOF 172 Others Specifications 174 Troubleshooting 179 Warning messages 189 Precautions 192 AVCHD format 195 GPS (SLT-A55V only 196 3D-shootings 198 Index 199 12
... the information of recorded images 127 Protecting images (Protect 131 Deleting images (Delete 132 Viewing images on a TV screen 134 Changing your setup GPS setting (SLT-A55V only 138 Setting image size and image quality 141 Setting the method for recording on a memory card ..... 145 Changing the noise reduction setting 149... computer 165 Creating a movie disc 168 Printing images Specifying DPOF 172 Others Specifications 174 Troubleshooting 179 Warning messages 189 Precautions 192 AVCHD format 195 GPS (SLT-A55V only 196 3D-shootings 198 Index 199 12

Instruction Manual (Large File - 12.49 MB)
Page 13
and Canada) • Eyecup (1) (Attached on the camera) • CD-ROM (Application Software for α camera) (1) • Instruction Manual (This manual) (1) • Rechargeable battery pack NPFW50 (1) • USB cable (1) • Shoulder strap (1) • Body cap (1) (Attached on the camera) 13 Preparing the camera Preparing the camera Checking the accessories supplied The number in parentheses indicates the number of pieces. • BC-VW1 Battery charger (1) • Power cord (mains lead) (1) (not supplied in the U.S.A.
and Canada) • Eyecup (1) (Attached on the camera) • CD-ROM (Application Software for α camera) (1) • Instruction Manual (This manual) (1) • Rechargeable battery pack NPFW50 (1) • USB cable (1) • Shoulder strap (1) • Body cap (1) (Attached on the camera) 13 Preparing the camera Preparing the camera Checking the accessories supplied The number in parentheses indicates the number of pieces. • BC-VW1 Battery charger (1) • Power cord (mains lead) (1) (not supplied in the U.S.A.
Instruction Manual (Large File - 12.49 MB)
Page 14
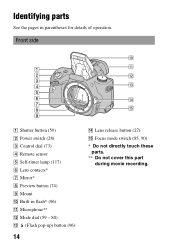
Identifying parts See the pages in flash* (96) K Microphone** L Mode dial (59 - 80) M (Flash pop-up) button (96) 14 N Lens release button (27) O Focus mode switch (85, 90) * Do not directly touch these parts. ** Do not cover this part during movie recording. Front side A Shutter button (59) B Power switch (28) C Control dial (73) D Remote sensor E Self-timer lamp (117) F Lens contacts* G Mirror* H Preview button (74) I Mount J Built-in parentheses for details of operation.
Identifying parts See the pages in flash* (96) K Microphone** L Mode dial (59 - 80) M (Flash pop-up) button (96) 14 N Lens release button (27) O Focus mode switch (85, 90) * Do not directly touch these parts. ** Do not cover this part during movie recording. Front side A Shutter button (59) B Power switch (28) C Control dial (73) D Remote sensor E Self-timer lamp (117) F Lens contacts* G Mirror* H Preview button (74) I Mount J Built-in parentheses for details of operation.

Instruction Manual (Large File - 12.49 MB)
Page 15
... sensor position mark (87) P D-RANGE (Dynamic range) button (107) Q For shooting: AEL (AE lock) button (78, 100) For viewing: (Zoom in) button (124) R For shooting: button (101) For viewing: button (124)/ button (125) (Exposure) (Zoom out) (Image index) S For shooting: Fn (Function) button (47, 48) For viewing: (Image rotation) button (123) 15
... sensor position mark (87) P D-RANGE (Dynamic range) button (107) Q For shooting: AEL (AE lock) button (78, 100) For viewing: (Zoom in) button (124) R For shooting: button (101) For viewing: button (124)/ button (125) (Exposure) (Zoom out) (Image index) S For shooting: Fn (Function) button (47, 48) For viewing: (Image rotation) button (123) 15

Instruction Manual (Large File - 12.49 MB)
Page 16
T Control button When the menu is turned on: v/ V/b/B button (46) When the menu is turned off: DISP (Display) (40, 121)/WB (White balance) (112)/ (Drive) (116)/ISO (106) U Control button (Enter) (46)/AF button (89) * Do not directly touch these parts. ** Do not cover this part during movie recording. 16
T Control button When the menu is turned on: v/ V/b/B button (46) When the menu is turned off: DISP (Display) (40, 121)/WB (White balance) (112)/ (Drive) (116)/ISO (106) U Control button (Enter) (46)/AF button (89) * Do not directly touch these parts. ** Do not cover this part during movie recording. 16
Instruction Manual (Large File - 12.49 MB)
Page 17
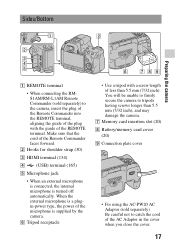
F Tripod receptacle • Use a tripod with the guide of the REMOTE terminal. G Memory card insertion slot (20) H Battery/memory card cover (20) I Connection plate cover • For using the AC-PW20 AC Adaptor (sold separately) to the camera, insert the plug of the Remote Commander into the REMOTE terminal, aligning the guide of the plug with a screw length of less than 5.5 mm (7/32 inch), and may damage the camera. Sides/Bottom Preparing the camera A REMOTE terminal • When connecting the RMS1AM/RM-L1AM Remote Commander (sold separately) Be careful not to catch the cord of ...
F Tripod receptacle • Use a tripod with the guide of the REMOTE terminal. G Memory card insertion slot (20) H Battery/memory card cover (20) I Connection plate cover • For using the AC-PW20 AC Adaptor (sold separately) to the camera, insert the plug of the Remote Commander into the REMOTE terminal, aligning the guide of the plug with a screw length of less than 5.5 mm (7/32 inch), and may damage the camera. Sides/Bottom Preparing the camera A REMOTE terminal • When connecting the RMS1AM/RM-L1AM Remote Commander (sold separately) Be careful not to catch the cord of ...

Instruction Manual (Large File - 12.49 MB)
Page 18
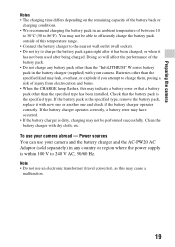
It can be charged even when it has not been fully depleted. Charging the battery pack When using the camera for the first time, be used when it has not been fully charged. 1 Insert the battery pack onto the battery charger. CHARGE lamp For countries/regions other than the U.S.A. Push the battery pack until it clicks. 2 Connect the battery charger to charge a fully depleted battery pack at a temperature of 25°C (77°F) is about 250 minutes. Plug Light on: Charging Light off: Charge completed • The CHARGE lamp turns off when charging is finished. • Time required to ...
It can be charged even when it has not been fully depleted. Charging the battery pack When using the camera for the first time, be used when it has not been fully charged. 1 Insert the battery pack onto the battery charger. CHARGE lamp For countries/regions other than the U.S.A. Push the battery pack until it clicks. 2 Connect the battery charger to charge a fully depleted battery pack at a temperature of 25°C (77°F) is about 250 minutes. Plug Light on: Charging Light off: Charge completed • The CHARGE lamp turns off when charging is finished. • Time required to ...
Instruction Manual (Large File - 12.49 MB)
Page 19
Note • Do not use your camera abroad - Doing so will affect the performance of injury from electrocution and burns. • When the CHARGE lamp flashes, this may indicate a battery error or that the battery pack is dirty, charging may cause a malfunction. 19 Batteries other than the specified kind may leak, overheat, or explode if you attempt to charge them, posing a risk of the battery pack. • Do not charge any country or region where the power supply is the specified type, remove the battery pack, replace it has not been used after being charged. Check that a ...
Note • Do not use your camera abroad - Doing so will affect the performance of injury from electrocution and burns. • When the CHARGE lamp flashes, this may indicate a battery error or that the battery pack is dirty, charging may cause a malfunction. 19 Batteries other than the specified kind may leak, overheat, or explode if you attempt to charge them, posing a risk of the battery pack. • Do not charge any country or region where the power supply is the specified type, remove the battery pack, replace it has not been used after being charged. Check that a ...

Instruction Manual (Large File - 12.49 MB)
Page 20
Inserting the battery pack/memory card (sold separately) 1 While sliding the cover open lever, open the cover. 2 Firmly insert the battery pack all the way while pressing the lock lever with the tip of the battery. 3 Insert a memory card. • With the notched corner facing as illustrated, insert the memory card until it clicks into place. 4 Close the cover. Lock lever Ensure the notched corner faces correctly. 20
Inserting the battery pack/memory card (sold separately) 1 While sliding the cover open lever, open the cover. 2 Firmly insert the battery pack all the way while pressing the lock lever with the tip of the battery. 3 Insert a memory card. • With the notched corner facing as illustrated, insert the memory card until it clicks into place. 4 Close the cover. Lock lever Ensure the notched corner faces correctly. 20
