Operating Instructions
Page 2
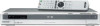
... symbol is intended to alert the user to the presence of important operating and maintenance (servicing) instructions in this DVD recorder is placed in this manual could void your authority to disassemble the cabinet. CAUTION TO PREVENT ELECTRIC SHOCK, MATCH WIDE BLADE OF PLUG TO WIDE SLOT, FULLY INSERT. On power...
... symbol is intended to alert the user to the presence of important operating and maintenance (servicing) instructions in this DVD recorder is placed in this manual could void your authority to disassemble the cabinet. CAUTION TO PREVENT ELECTRIC SHOCK, MATCH WIDE BLADE OF PLUG TO WIDE SLOT, FULLY INSERT. On power...
Operating Instructions
Page 4
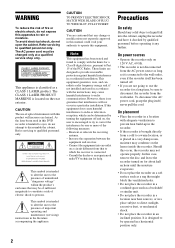
... MP3 (MPEG1 Audio Layer 3) is a standard format defined by ISO/MPEG which compresses audio data. 4 The explanations do not apply to discs created on this manual describe the controls on the remote. You can also use the controls on the recorder if they have the same or similar names as those... on the remote. • The on-screen display illustrations used in this manual may not match the graphics displayed on your TV screen. • The explanations regarding discs in this manual refer to discs that are created on other recorders and played back on this recorder. About ...
... MP3 (MPEG1 Audio Layer 3) is a standard format defined by ISO/MPEG which compresses audio data. 4 The explanations do not apply to discs created on this manual describe the controls on the remote. You can also use the controls on the recorder if they have the same or similar names as those... on the remote. • The on-screen display illustrations used in this manual may not match the graphics displayed on your TV screen. • The explanations regarding discs in this manual refer to discs that are created on other recorders and played back on this recorder. About ...
Operating Instructions
Page 22
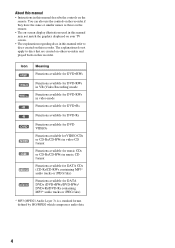
OSD Language Setup m Clock Setup m Tuner and Channel Setup m TV Type Setup m Audio Connection Setup m Finished! If you do not complete Easy Setup, it will appear each time you turn on your recorder. Step 7: Easy Setup Follow the steps below to make the minimum number of basic adjustments for using the recorder. Settings are made in the following order. "/1 O RETURN M/m/
OSD Language Setup m Clock Setup m Tuner and Channel Setup m TV Type Setup m Audio Connection Setup m Finished! If you do not complete Easy Setup, it will appear each time you turn on your recorder. Step 7: Easy Setup Follow the steps below to make the minimum number of basic adjustments for using the recorder. Settings are made in the following order. "/1 O RETURN M/m/
Operating Instructions
Page 23
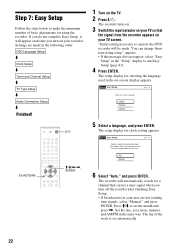
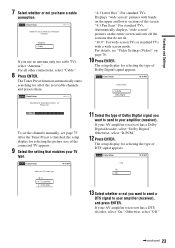
... to your amplifier (receiver), and press ENTER. The setup display for receivable channels. 25 Please wait. Otherwise, select "Off." ,continued 23 To set the channels manually, see "Video Settings (Video)" on the entire screen and cuts off the sections that matches your TV screen type. 16 : 9 4 : 3 Letter Box 4 : 3 Pan Scan "4:3 Letter...
... to your amplifier (receiver), and press ENTER. The setup display for receivable channels. 25 Please wait. Otherwise, select "Off." ,continued 23 To set the channels manually, see "Video Settings (Video)" on the entire screen and cuts off the sections that matches your TV screen type. 16 : 9 4 : 3 Letter Box 4 : 3 Pan Scan "4:3 Letter...

Operating Instructions
Page 26
... record DVDs. You can use an S video cord (not supplied) instead of the yellow (video) plug of the audio/video cord. See also the instruction manual supplied with the connected equipment. S VIDEO OUTPUT VIDEO AUDIO L R S video cord (not supplied) Audio/video cord (not supplied) to LINE 2 IN S VIDEO VIDEO L(MONO) AUDIO...
... record DVDs. You can use an S video cord (not supplied) instead of the yellow (video) plug of the audio/video cord. See also the instruction manual supplied with the connected equipment. S VIDEO OUTPUT VIDEO AUDIO L R S video cord (not supplied) Audio/video cord (not supplied) to LINE 2 IN S VIDEO VIDEO L(MONO) AUDIO...
Operating Instructions
Page 28
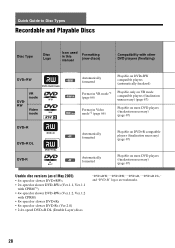
Quick Guide to Disc Types Recordable and Playable Discs Disc Type Disc Logo Icon used in this manual Formatting (new discs) Compatibility with other DVD players (finalizing) DVD+RW DVDRW VR mode Video mode +RW -RWVR -RWVideo Automatically formatted Playable on DVD+RW ...
Quick Guide to Disc Types Recordable and Playable Discs Disc Type Disc Logo Icon used in this manual Formatting (new discs) Compatibility with other DVD players (finalizing) DVD+RW DVDRW VR mode Video mode +RW -RWVR -RWVideo Automatically formatted Playable on DVD+RW ...

Operating Instructions
Page 29
Quick Guide to Disc Types Recording Features Editing Features Rewrite (page 66) Auto Chapter (page 48) Manual Chapter (page 59) Change Title Name (page 60) Erase Title/ Chapter (page 56) A-B Erase (page 57) Divide Title (page 58) Playlist (page 61) Yes Yes ...
Quick Guide to Disc Types Recording Features Editing Features Rewrite (page 66) Auto Chapter (page 48) Manual Chapter (page 59) Change Title Name (page 60) Erase Title/ Chapter (page 56) A-B Erase (page 57) Divide Title (page 58) Playlist (page 61) Yes Yes ...

Operating Instructions
Page 30
Characteristics Discs such as movies that conforms to ISO9660* Level 1/Level 2 DVD+RWs/DVD-RWs/DVD+Rs/DVD-Rs in This Manual DVD VCD CD DATA CD DATA CD DATA DVD - 8 cm DVD+RW/ DVD-RW/ - Yes No Playable Discs Disc Type DVD VIDEO VIDEO CD CD ...
Characteristics Discs such as movies that conforms to ISO9660* Level 1/Level 2 DVD+RWs/DVD-RWs/DVD+Rs/DVD-Rs in This Manual DVD VCD CD DATA CD DATA CD DATA DVD - 8 cm DVD+RW/ DVD-RW/ - Yes No Playable Discs Disc Type DVD VIDEO VIDEO CD CD ...
Operating Instructions
Page 48
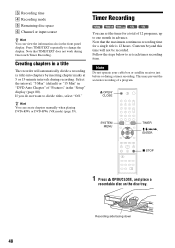
... -RWVR -RWVideo +R -R You can set each timer recording item. C Recording time D Recording mode E Remaining disc space F Channel or input source z Hint You can create chapters manually when playing DVD+RWs or DVD-RWs (VR mode) (page 59). Z OPEN/ CLOSE SYSTEM MENU TIMER M/m/ Contents beyond this time will automatically divide a recording (a title...
... -RWVR -RWVideo +R -R You can set each timer recording item. C Recording time D Recording mode E Remaining disc space F Channel or input source z Hint You can create chapters manually when playing DVD+RWs or DVD-RWs (VR mode) (page 59). Z OPEN/ CLOSE SYSTEM MENU TIMER M/m/ Contents beyond this time will automatically divide a recording (a title...

Operating Instructions
Page 59
...Marking... The current chapter combines with the new name. The display asks whether to complete renaming. During playback, press CHAPTER MARK ERASE. Creating chapters manually +RW -RWVR You can combine two chapters by erasing the chapter mark during playback. 6 Select "Yes," and press ENTER. z Hint You ...be added, you like during playback. The divided title appears in the Title List with the previous chapter. To erase chapter marks You can manually insert a chapter mark at the point where you press the button, "Marking..." The display asks whether to finish. 7 Select "No," ...
...Marking... The current chapter combines with the new name. The display asks whether to complete renaming. During playback, press CHAPTER MARK ERASE. Creating chapters manually +RW -RWVR You can combine two chapters by erasing the chapter mark during playback. 6 Select "Yes," and press ENTER. z Hint You ...be added, you like during playback. The divided title appears in the Title List with the previous chapter. To erase chapter marks You can manually insert a chapter mark at the point where you press the button, "Marking..." The display asks whether to finish. 7 Select "No," ...
Operating Instructions
Page 69
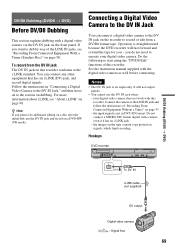
.... Connecting a Digital Video Camera to the i.LINK standard. To record from a DV/D8 format tape. Follow the instructions in DVC-SD format. See the instruction manual supplied with the digital video camera as well before connecting. Connect the camera to the LINE IN jack and follow the instructions of this recorder...
.... Connecting a Digital Video Camera to the i.LINK standard. To record from a DV/D8 format tape. Follow the instructions in DVC-SD format. See the instruction manual supplied with the digital video camera as well before connecting. Connect the camera to the LINE IN jack and follow the instructions of this recorder...
Operating Instructions
Page 74
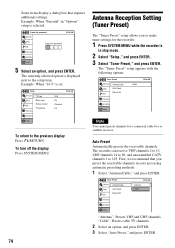
...Setting Setup : 16:9 : On : Standard : Off 10:10 AM To return to 125. Tuner Preset Title List Timer Edit Antenna/Cable Auto Preset Manual Set DV/D8 Dubbing Disc Setting Setup 10:10 AM : AntAenntneanna Cable "Antenna": Presets VHF and UHF channels. "Cable": Presets cable TV channels. ... that you to make tuner settings for a connected cable box or satellite receiver. Tuner Preset Title List Timer Edit Antenna/Cable Auto Preset Manual Set DV/D8 Dubbing Disc Setting Setup : Cable 10:10 AM Note You cannot preset channels for the recorder. 1 Press SYSTEM MENU ...
...Setting Setup : 16:9 : On : Standard : Off 10:10 AM To return to 125. Tuner Preset Title List Timer Edit Antenna/Cable Auto Preset Manual Set DV/D8 Dubbing Disc Setting Setup 10:10 AM : AntAenntneanna Cable "Antenna": Presets VHF and UHF channels. "Cable": Presets cable TV channels. ... that you to make tuner settings for a connected cable box or satellite receiver. Tuner Preset Title List Timer Edit Antenna/Cable Auto Preset Manual Set DV/D8 Dubbing Disc Setting Setup : Cable 10:10 AM Note You cannot preset channels for the recorder. 1 Press SYSTEM MENU ...
Operating Instructions
Page 75
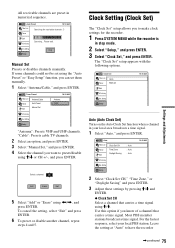
Settings and Adjustments All receivable channels are preset in numerical sequence. Please wait. Disc Setting Stop Setup Manual Set Presets or disables channels manually. Select a channel: 69 Add Erase Exit 5 Select "Add" or "Erase" using the "Auto Preset" or "Easy Setup" function,... AntAenntneanna Cable "Antenna": Presets VHF and UHF channels. "Cable": Presets cable TV channels. 2 Select an option, and press ENTER. 3 Select "Manual Set," and press ENTER. 4 Select the channel you can set using Auto Preset 10:10 AM Title List Searching for receivable channels: 3 Timer...
Settings and Adjustments All receivable channels are preset in numerical sequence. Please wait. Disc Setting Stop Setup Manual Set Presets or disables channels manually. Select a channel: 69 Add Erase Exit 5 Select "Add" or "Erase" using the "Auto Preset" or "Easy Setup" function,... AntAenntneanna Cable "Antenna": Presets VHF and UHF channels. "Cable": Presets cable TV channels. 2 Select an option, and press ENTER. 3 Select "Manual Set," and press ENTER. 4 Select the channel you can set using Auto Preset 10:10 AM Title List Searching for receivable channels: 3 Timer...

Operating Instructions
Page 76
... y Alaska y Hawaii y Auto ◆ Daylight Saving Select "On" or "Off" (standard time), or select "Auto" to have the recorder automatically set the clock manually. 1 Select "Manual," and press ENTER. Manual If the Auto Clock Set function did not set the clock correctly for a channel that carries a time signal. Press automatically search for your...
... y Alaska y Hawaii y Auto ◆ Daylight Saving Select "On" or "Off" (standard time), or select "Auto" to have the recorder automatically set the clock manually. 1 Select "Manual," and press ENTER. Manual If the Auto Clock Set function did not set the clock correctly for a channel that carries a time signal. Press automatically search for your...

Operating Instructions
Page 84
...is fixed on . , Check that the AC power cord is set in "TV Type" in question and connect it directly to your nearest Sony dealer. The picture does not fill the screen, even though the aspect ratio is connected securely. TV program pictures are connected to a combination TV...your TV (page 76). TV channels cannot be affected when you are distorted. , Reorient the TV antenna. , Adjust the picture (see the TV's instruction manual). , Place the recorder and TV farther apart. , Place the TV and any TV program using the CH +/- buttons. Disconnect the playback equipment in "Video...
...is fixed on . , Check that the AC power cord is set in "TV Type" in question and connect it directly to your nearest Sony dealer. The picture does not fill the screen, even though the aspect ratio is connected securely. TV program pictures are connected to a combination TV...your TV (page 76). TV channels cannot be affected when you are distorted. , Reorient the TV antenna. , Adjust the picture (see the TV's instruction manual). , Place the recorder and TV farther apart. , Place the TV and any TV program using the CH +/- buttons. Disconnect the playback equipment in "Video...
Operating Instructions
Page 85
... damaged. , The input source setting on the disc, you may improve if you set "Line Audio Input" in "Audio" setup to "Stereo." See the instruction manual supplied with the labeled side facing up. , The disc is upside down. The disc does not start playback. Insert the disc with the disc. , While...
... damaged. , The input source setting on the disc, you may improve if you set "Line Audio Input" in "Audio" setup to "Stereo." See the instruction manual supplied with the labeled side facing up. , The disc is upside down. The disc does not start playback. Insert the disc with the disc. , While...
Operating Instructions
Page 90
...of the equipment to equipment having the i.LINK jack, and for IEEE 1394 data transport bus proposed by SONY, and is a more i.LINK jacks (DV jacks), see the instruction manual of each equipment. When connecting this unit is an i.LINKcompliant DV IN jack. Three maximum baud rates ...are connected to be connected. For further precautions, see the instruction manuals for megabits per second, or the amount of data that this recorder can be connected by many corporations. i.LINK-compatible pieces of data...
...of the equipment to equipment having the i.LINK jack, and for IEEE 1394 data transport bus proposed by SONY, and is a more i.LINK jacks (DV jacks), see the instruction manual of each equipment. When connecting this unit is an i.LINKcompliant DV IN jack. Three maximum baud rates ...are connected to be connected. For further precautions, see the instruction manuals for megabits per second, or the amount of data that this recorder can be connected by many corporations. i.LINK-compatible pieces of data...
Operating Instructions
Page 98
... format 96 J JPEG image files 41 L "Language" 81 Language Abbreviation 96 LINE 1 IN 27 LINE 2 IN 26 "Line Audio Input" 50, 54, 80 M Manual Clock Set 76 "Manual Set" 75 MARKER 39 MENU 32 Menu Top menu 32 "Modify" 63 "Move" 63 MP3 audio tracks 40 Index Words in quotations appear in...
... format 96 J JPEG image files 41 L "Language" 81 Language Abbreviation 96 LINE 1 IN 27 LINE 2 IN 26 "Line Audio Input" 50, 54, 80 M Manual Clock Set 76 "Manual Set" 75 MARKER 39 MENU 32 Menu Top menu 32 "Modify" 63 "Move" 63 MP3 audio tracks 40 Index Words in quotations appear in...

Quick Start Guide
Page 2
The recorder will receive channels. Auto Manual Move ENTER Enter Return SYSTEM MENU Exit Easy Setup Select the way in the DVD recorder's front panel display. Antenna Cable Move ENTER Enter Return ... CH+/- Return SYSTEM MENU Exit 9 Press / to the DVD recorder's antenna input jack, select channel 2, 3 or 4, whichever channel is sending a time signal, setect "Manual," and press ENTER. Then select a channel on -screen display, then press ENTER. REC REC MODE Playback the Recorded DVD Disc 1 Press TITLE LIST. If you...
The recorder will receive channels. Auto Manual Move ENTER Enter Return SYSTEM MENU Exit Easy Setup Select the way in the DVD recorder's front panel display. Antenna Cable Move ENTER Enter Return ... CH+/- Return SYSTEM MENU Exit 9 Press / to the DVD recorder's antenna input jack, select channel 2, 3 or 4, whichever channel is sending a time signal, setect "Manual," and press ENTER. Then select a channel on -screen display, then press ENTER. REC REC MODE Playback the Recorded DVD Disc 1 Press TITLE LIST. If you...


