

Operating Instructions
Page 2
.... Refer servicing to qualified personnel only. On power sources • The recorder is a registered trademark of optical instruments with the limits set out in this manual could void your authority to the wall outlet, even if the recorder itself ; As the laser beam used in this DVD recorder is connected to...
.... Refer servicing to qualified personnel only. On power sources • The recorder is a registered trademark of optical instruments with the limits set out in this manual could void your authority to the wall outlet, even if the recorder itself ; As the laser beam used in this DVD recorder is connected to...

Operating Instructions
Page 3
... contrary to the provisions of this copyright protection technology must be recordable, depending on the type of this manual describe the controls on the remote. If you risk permanent damage to your nearest Sony dealer. On placement • Place the recorder in a location with adequate ventilation to prevent heat build-up in...
... contrary to the provisions of this copyright protection technology must be recordable, depending on the type of this manual describe the controls on the remote. If you risk permanent damage to your nearest Sony dealer. On placement • Place the recorder in a location with adequate ventilation to prevent heat build-up in...

Operating Instructions
Page 5
...Before Recording 40 Recording mode 40 Recording a stereo/SAP program 41 Unrecordable pictures 41 Timer Recording (Standard/G-Code 41 Setting the timer manually (Standard 41 Recording TV programs using the G-Code system 43 Using the Quick Timer function 44 Adjusting the recording picture quality and... titles (Erase Titles 66 Erasing all titles on the disc 66 Erasing titles to open up disc space (Disc Map 66 Creating chapters manually 67 Creating and Editing a Playlist 67 Moving a Playlist title (Change Order 68 Combining multiple Playlist titles (Combine Titles 69 Dividing a ...
...Before Recording 40 Recording mode 40 Recording a stereo/SAP program 41 Unrecordable pictures 41 Timer Recording (Standard/G-Code 41 Setting the timer manually (Standard 41 Recording TV programs using the G-Code system 43 Using the Quick Timer function 44 Adjusting the recording picture quality and... titles (Erase Titles 66 Erasing all titles on the disc 66 Erasing titles to open up disc space (Disc Map 66 Creating chapters manually 67 Creating and Editing a Playlist 67 Moving a Playlist title (Change Order 68 Combining multiple Playlist titles (Combine Titles 69 Dividing a ...

Operating Instructions
Page 8
Quick Guide to Disc Types Recordable and playable discs Type Disc Logo Icon used in Formatting this manual (new discs) Compatibility with other DVD players (finalizing) DVD+RW +RW Automatically formatted in +VR mode Playable on DVD+RW compatible players (automatically finalized) DVDRW ...
Quick Guide to Disc Types Recordable and playable discs Type Disc Logo Icon used in Formatting this manual (new discs) Compatibility with other DVD players (finalizing) DVD+RW +RW Automatically formatted in +VR mode Playable on DVD+RW compatible players (automatically finalized) DVDRW ...

Operating Instructions
Page 9
Picture Size" is LSP, SP, HSP, or HQ, and "DVD Rec. Recording Features Editing Features Rewrite (page 40) Auto Chapter (page 80) Manual Chapter (page 67) Record Change Delete 16:9 sizes title name title (page 44) (page 64) (page 66) A-B Erase (page 65) Playlist (page 67) Yes Yes ...
Picture Size" is LSP, SP, HSP, or HQ, and "DVD Rec. Recording Features Editing Features Rewrite (page 40) Auto Chapter (page 80) Manual Chapter (page 67) Record Change Delete 16:9 sizes title name title (page 44) (page 64) (page 66) A-B Erase (page 65) Playlist (page 67) Yes Yes ...

Operating Instructions
Page 10
.../ DVD-ROMs containing JPEG image files DATA CD - 8 cm DVD+RW/ DVD-RW/DVD-R - Playable discs Type DVD VIDEO Disc Logo Icon used in this manual Characteristics DVD Discs such as movies that can be purchased or rented VIDEO CD VCD VIDEO CDs or CD-Rs/CD-RWs in VIDEO CD...
.../ DVD-ROMs containing JPEG image files DATA CD - 8 cm DVD+RW/ DVD-RW/DVD-R - Playable discs Type DVD VIDEO Disc Logo Icon used in this manual Characteristics DVD Discs such as movies that can be purchased or rented VIDEO CD VCD VIDEO CDs or CD-Rs/CD-RWs in VIDEO CD...

Operating Instructions
Page 23
Step 7: Easy Setup Make the basic adjustments by following the onscreen instructions in "Easy Setup." 123 456 789 0 [/1 CH +/- Check that the command mode switch on the remote so it matches the mode you selected above. SETUP Settings Video Audio Features Options Easy Setup Format DVD-RW : Dimmer : Power Save : Auto Display : Auto Stereo : Tuner Audio : Command Mode : Factory Setup VR Normal Off On Off DVODn1 DVDDV2D3 DVD3 5 Select the Command mode (DVD1, DVD2, or DVD3), and press ENTER. 6 Slide the COMMAND MODE switch on the remote is changed to DVD1 or DVD2, you ...
Step 7: Easy Setup Make the basic adjustments by following the onscreen instructions in "Easy Setup." 123 456 789 0 [/1 CH +/- Check that the command mode switch on the remote so it matches the mode you selected above. SETUP Settings Video Audio Features Options Easy Setup Format DVD-RW : Dimmer : Power Save : Auto Display : Auto Stereo : Tuner Audio : Command Mode : Factory Setup VR Normal Off On Off DVODn1 DVDDV2D3 DVD3 5 Select the Command mode (DVD1, DVD2, or DVD3), and press ENTER. 6 Slide the COMMAND MODE switch on the remote is changed to DVD1 or DVD2, you ...

Operating Instructions
Page 26
... protection signals that prohibit any copying cannot be able to view the signals from connected equipment without a timer" on page 50. See also the instruction manual supplied with the connected equipment. If the equipment has an S-video jack, you may not receive a clear image on this recorder. DVD recorder VCR TV...
... protection signals that prohibit any copying cannot be able to view the signals from connected equipment without a timer" on page 50. See also the instruction manual supplied with the connected equipment. If the equipment has an S-video jack, you may not receive a clear image on this recorder. DVD recorder VCR TV...

Operating Instructions
Page 29
... are formatted automatically. For DVD-RWs, you can select a recording format (VR mode or Video mode) according to make a blank disc. If necessary, you can manually re-format a DVD+RW or DVD-RW disc to your needs (page 8). 123 456 789 0 Getting to Know Your DVD Recorder Seven Basic Operations - Wait...
... are formatted automatically. For DVD-RWs, you can select a recording format (VR mode or Video mode) according to make a blank disc. If necessary, you can manually re-format a DVD+RW or DVD-RW disc to your needs (page 8). 123 456 789 0 Getting to Know Your DVD Recorder Seven Basic Operations - Wait...

Operating Instructions
Page 41
...SAP sound, set the timer: the standard method and G-Code method. • Standard: Set the date, time, and program position of the program manually. • G-Code: Enter the G-Code number designated for a total of a program. SAP (Second Audio Program) When a SAP (Second Audio ...the front panel display. b Note Do not operate your cable box or satellite receiver just before or during a timer recording. Setting the timer manually (Standard) Unrecordable pictures Pictures with less noise. Copy control signals Copy-Free Recordable discs +RW +R -RWVR -RWVideo -R Copy-Once -RWVR...
...SAP sound, set the timer: the standard method and G-Code method. • Standard: Set the date, time, and program position of the program manually. • G-Code: Enter the G-Code number designated for a total of a program. SAP (Second Audio Program) When a SAP (Second Audio ...the front panel display. b Note Do not operate your cable box or satellite receiver just before or during a timer recording. Setting the timer manually (Standard) Unrecordable pictures Pictures with less noise. Copy control signals Copy-Free Recordable discs +RW +R -RWVR -RWVideo -R Copy-Once -RWVR...

Operating Instructions
Page 42
Timer - Date Today Start : Stop : OK Cancel CH Mode G-Code • If the "Timer - G-Code" display appears, press < to switch the display to "Standard". 2 Select an item using Standard Set the timer manually. 1 Press [TIMER].
Timer - Date Today Start : Stop : OK Cancel CH Mode G-Code • If the "Timer - G-Code" display appears, press < to switch the display to "Standard". 2 Select an item using Standard Set the timer manually. 1 Press [TIMER].

Operating Instructions
Page 45
The adjustment display appears. For more information, see "Recording mode" on page 40. Picture Size": Sets the picture size of the setting. "DVD Rec. For all other recording modes, the screen size is set to HQ, HSP, SP, or LSP. For example, if a 16:9 size picture is recorded regardless of the program to be recorded. • 4:3 (default): Sets the picture size to 4:3. • 16:9: Sets the picture size to "4:3." Picture Size" is fixed at "4:3." For DVD+RWs/DVD+Rs, the screen size is set to 16:9 (wide mode). "Rec NR" (noise reduction): Reduces noise contained in greater ...
The adjustment display appears. For more information, see "Recording mode" on page 40. Picture Size": Sets the picture size of the setting. "DVD Rec. For all other recording modes, the screen size is set to HQ, HSP, SP, or LSP. For example, if a 16:9 size picture is recorded regardless of the program to be recorded. • 4:3 (default): Sets the picture size to 4:3. • 16:9: Sets the picture size to "4:3." Picture Size" is fixed at "4:3." For DVD+RWs/DVD+Rs, the screen size is set to 16:9 (wide mode). "Rec NR" (noise reduction): Reduces noise contained in greater ...

Operating Instructions
Page 67
Create Playlist Select a title to start point (IN) appears. b Note To insert a chapter mark manually during recording, set "Auto Chapter" in the background. • To return to the beginning of the title to the Playlist title as one scene. Creating ...
Create Playlist Select a title to start point (IN) appears. b Note To insert a chapter mark manually during recording, set "Auto Chapter" in the background. • To return to the beginning of the title to the Playlist title as one scene. Creating ...

Operating Instructions
Page 70
... the instructions in DVC-SD format. Do not connect a MICRO MV format digital video camera even if it has an i.LINK jack. - See the instruction manual supplied with a digital video camera via the DV IN jack on page 92. Do the following to dub by way of this recorder. your digital...
... the instructions in DVC-SD format. Do not connect a MICRO MV format digital video camera even if it has an i.LINK jack. - See the instruction manual supplied with a digital video camera via the DV IN jack on page 92. Do the following to dub by way of this recorder. your digital...
Operating Instructions
Page 74
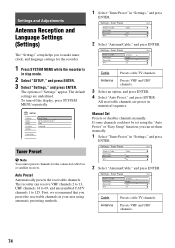
... AFT : Cable Add On 2 Select "Antenna/Cable," and press ENTER. Settings - The options of "Settings" appear. The recorder can set them manually. 1 Select "Tuner Preset" in stop mode. 2 Select "SETUP," and press ENTER. 3 Select "Settings," and press ENTER. Settings - Antenna Presets... not be set using automatic presetting methods. 1 Select "Tuner Preset" in numerical sequence. Tuner Preset Ch1 Antenna / Cable : Auto Preset Manual Set : AFT : CAanbtelenna Cable Add On Cable Antenna Presets cable TV channels. The default settings are preset in "Settings," and press ENTER...
... AFT : Cable Add On 2 Select "Antenna/Cable," and press ENTER. Settings - The options of "Settings" appear. The recorder can set them manually. 1 Select "Tuner Preset" in stop mode. 2 Select "SETUP," and press ENTER. 3 Select "Settings," and press ENTER. Settings - Antenna Presets... not be set using automatic presetting methods. 1 Select "Tuner Preset" in numerical sequence. Tuner Preset Ch1 Antenna / Cable : Auto Preset Manual Set : AFT : CAanbtelenna Cable Add On Cable Antenna Presets cable TV channels. The default settings are preset in "Settings," and press ENTER...

Operating Instructions
Page 75
... : AFT : Cable Add OOnn Off Ch34 On Turns on AFT, and press ENTER. 3 Select the channel you to adjust the picture manually. 7 Select "On" to turn on the Auto Fine Tuning function. Erase Disables the channels. 5 Select "Add" to be preset/disabled Settings - Normally, select this. When ...
... : AFT : Cable Add OOnn Off Ch34 On Turns on AFT, and press ENTER. 3 Select the channel you to adjust the picture manually. 7 Select "On" to turn on the Auto Fine Tuning function. Erase Disables the channels. 5 Select "Add" to be preset/disabled Settings - Normally, select this. When ...

Operating Instructions
Page 81
...following One Touch Dubbing (page 71). The screen saver image helps prevent your password, then change the Parental Control level while playing the disc. Manual Allows you to change the level. Parental Control Level : Off Standard : 8 Password 7 6 5 4 The lower the value, the stricter...ENTER. b Notes • If you forget your TV screen. On Turns on your password, you will be asked to finalize the disc manually. Features - The selection items for registering a password appears, enter a new four-digit password using the number buttons, then select "OK" ...
...following One Touch Dubbing (page 71). The screen saver image helps prevent your password, then change the Parental Control level while playing the disc. Manual Allows you to change the level. Parental Control Level : Off Standard : 8 Password 7 6 5 4 The lower the value, the stricter...ENTER. b Notes • If you forget your TV screen. On Turns on your password, you will be asked to finalize the disc manually. Features - The selection items for registering a password appears, enter a new four-digit password using the number buttons, then select "OK" ...
Operating Instructions
Page 84
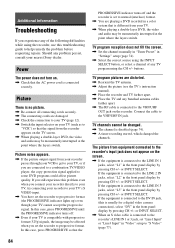
... Re-connect all connecting cords securely. , The connecting cords are distorted. , Reorient the TV antenna. , Adjust the picture (see the TV's instruction manual). , Place the recorder and TV farther apart. , Place the TV and any bunched antenna cables farther apart. , The RF cable is compatible with ... still experience this is connected to progressive format (the PROGRESSIVE indicator lights up) even though your nearest Sony dealer. TV program reception does not fill the screen. , Set the channel manually in "Tuner Preset" in "Video" setup to "VCR") so that the AC power cord is ...
... Re-connect all connecting cords securely. , The connecting cords are distorted. , Reorient the TV antenna. , Adjust the picture (see the TV's instruction manual). , Place the recorder and TV farther apart. , Place the TV and any bunched antenna cables farther apart. , The RF cable is compatible with ... still experience this is connected to progressive format (the PROGRESSIVE indicator lights up) even though your nearest Sony dealer. TV program reception does not fill the screen. , Set the channel manually in "Tuner Preset" in "Video" setup to "VCR") so that the AC power cord is ...

Operating Instructions
Page 86
See the instruction manual supplied with the labeled side facing up. , The disc is not correctly inserted. , Moisture has condensed inside the recorder. The JPEG image files do not ...
See the instruction manual supplied with the labeled side facing up. , The disc is not correctly inserted. , Moisture has condensed inside the recorder. The JPEG image files do not ...

Operating Instructions
Page 92
... recorder is a digital serial interface for controlling other devices via the directly connected equipment. When two or more i.LINK jacks (DV jacks), see the instruction manual of equipment can be connected. 92 projecting parts Mass (approx.): 4.1 kg Operating temperature: 5ºC to 35ºC Operating humidity: 25% to 80% Supplied accessories: Audio...
... recorder is a digital serial interface for controlling other devices via the directly connected equipment. When two or more i.LINK jacks (DV jacks), see the instruction manual of equipment can be connected. 92 projecting parts Mass (approx.): 4.1 kg Operating temperature: 5ºC to 35ºC Operating humidity: 25% to 80% Supplied accessories: Audio...


