
Operating Instructions
Page 1
3-878-039-11(1) Solid-State Memory Camcorder PMW-EX3 PMW-EX3 Operating Instructions © 2008 Sony Corporation
3-878-039-11(1) Solid-State Memory Camcorder PMW-EX3 PMW-EX3 Operating Instructions © 2008 Sony Corporation

Operating Instructions
Page 4
... 11 Using the CD-ROM 14 Reading the CD-ROM Manuals 14 System Requirements for Using the Applications ....... 14 Software Installation 15 Parts Identifications 16 Camcorder 16 Zoom Lens VCL-614B2X (Supplied 20 IR Remote Commander (Supplied 21 On-Screen Indications 23 Indications in Camera Mode 23 Direct Menu Operation 24...
... 11 Using the CD-ROM 14 Reading the CD-ROM Manuals 14 System Requirements for Using the Applications ....... 14 Software Installation 15 Parts Identifications 16 Camcorder 16 Zoom Lens VCL-614B2X (Supplied 20 IR Remote Commander (Supplied 21 On-Screen Indications 23 Indications in Camera Mode 23 Direct Menu Operation 24...

Operating Instructions
Page 8
... Devices Connecting External Monitors 128 Operating Clips With a Computer 130 Connecting an External Device (i.LINK Connection) ....... 132 Recording the Camcorder Picture on an External Device 132 Nonlinear Editing 133 Recording External Input Signals 133 External Synchronization 134 Operating From the RM-B750.../B150 136 Operating the Menus of the Camcorder 136 Functions Operable From the RM-B750/B150 (Camera Mode 138 Appendixes 8 Important Notes on Operation 140 Formats and Limitations...
... Devices Connecting External Monitors 128 Operating Clips With a Computer 130 Connecting an External Device (i.LINK Connection) ....... 132 Recording the Camcorder Picture on an External Device 132 Nonlinear Editing 133 Recording External Input Signals 133 External Synchronization 134 Operating From the RM-B750.../B150 136 Operating the Menus of the Camcorder 136 Functions Operable From the RM-B750/B150 (Camera Mode 138 Appendixes 8 Important Notes on Operation 140 Formats and Limitations...

Operating Instructions
Page 10
... M REC z REC PAUSE X STOP x PUSH AF Eyepiece (1) Eyecup (1) DC OUT CHARGE 0% BBCA-TUT1ERY 80 CHARGER 100 Shoulder strap (1) Cheek pad (1) It is attached to the camcorder at the factory. VCL-614B2X exclusive standard zoom lens (1) Component video cable (1) C 16 8 5.6 4 2.8 1.9 FMulFl AF ft 7 10 23 15 5 30 10 mm STESAHDOYT IRIS MANU...
... M REC z REC PAUSE X STOP x PUSH AF Eyepiece (1) Eyecup (1) DC OUT CHARGE 0% BBCA-TUT1ERY 80 CHARGER 100 Shoulder strap (1) Cheek pad (1) It is attached to the camcorder at the factory. VCL-614B2X exclusive standard zoom lens (1) Component video cable (1) C 16 8 5.6 4 2.8 1.9 FMulFl AF ft 7 10 23 15 5 30 10 mm STESAHDOYT IRIS MANU...

Operating Instructions
Page 11
...of approx. 100 minutes in HQ mode (35 Mbps VBR) or approx. 140 minutes in full HD resolution. The imaging devices used in the PMW-EX3 camcorder are included. Lens mount cap (1) Lens cap for the supplied lens (1) Fixing screws for the cheek pad (3) DC cable clamp and fixing ...frame loss, when recording is switchable among 1920 × 1080, 1280 × 720, and 1440 × Features 11 Overview Multiple-format recording The PMW-EX3 camcorder offers a wide array of recording formats for the IR Remote Commander) (1) It is mounted in PDF format are three 1/2-inch type CMOS sensors, ...
...of approx. 100 minutes in HQ mode (35 Mbps VBR) or approx. 140 minutes in full HD resolution. The imaging devices used in the PMW-EX3 camcorder are included. Lens mount cap (1) Lens cap for the supplied lens (1) Fixing screws for the cheek pad (3) DC cable clamp and fixing ...frame loss, when recording is switchable among 1920 × 1080, 1280 × 720, and 1440 × Features 11 Overview Multiple-format recording The PMW-EX3 camcorder offers a wide array of recording formats for the IR Remote Commander) (1) It is mounted in PDF format are three 1/2-inch type CMOS sensors, ...

Operating Instructions
Page 12
...quick motion. VCL-614B2X high-performance zoom lens (supplied) The PMW-EX3 is started and stopped on the XDCAM EX camcorder, the video and audio signals are automatically generated for flexible use of a conventional Sony 1/2-inch Bayonet Mount lenses, a lens adaptor is equipped with...) Creative Recording Modes and Settings 23.98P native recording The PMW-EX3 camcorder, a new member of 64-frame accumulation period. Selectable gamma curves The PMW-EX3 provides various types of gamma identical to a maximum of Sony's legendary CineAlta1) family, though compact offers native 23.98P ...
...quick motion. VCL-614B2X high-performance zoom lens (supplied) The PMW-EX3 is started and stopped on the XDCAM EX camcorder, the video and audio signals are automatically generated for flexible use of a conventional Sony 1/2-inch Bayonet Mount lenses, a lens adaptor is equipped with...) Creative Recording Modes and Settings 23.98P native recording The PMW-EX3 camcorder, a new member of 64-frame accumulation period. Selectable gamma curves The PMW-EX3 provides various types of gamma identical to a maximum of Sony's legendary CineAlta1) family, though compact offers native 23.98P ...

Operating Instructions
Page 13
... Frame Recording is a unique feature of the PMWEX3 camcorder that is especially useful for pre-determined frame are trademarks of Sony Corporation. 2) HDV is a trademark of Sony Corporation and Victor Company of Japan, Limited. Shutter-angle settings In addition to the electric shutter speed controls, the PMW-EX3 also has a "shutter angle" control, which is...
... Frame Recording is a unique feature of the PMWEX3 camcorder that is especially useful for pre-determined frame are trademarks of Sony Corporation. 2) HDV is a trademark of Sony Corporation and Victor Company of Japan, Limited. Shutter-angle settings In addition to the electric shutter speed controls, the PMW-EX3 also has a "shutter angle" control, which is...
Operating Instructions
Page 16
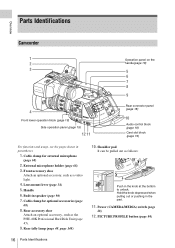
...) 3. Lens mount lever (page 34) 5. Power (CAMERA/MEDIA) switch (page 28) 12. PICTURE PROFILE button (page 84) 16 Parts Identifications Overview Parts Identifications Camcorder 1 2 3 R L MONITVOORL THUMNAIL SEL/SEFTREVCAPNLj CAEY/LPAUSEGPFR/SFEWV D J STOP l NEXT L s SRTEACRT/STOP HOLD H L OFF 16:9 WIDE SCREEN 1.9 ...PPIRCOTFUIRLEE CAMERA OFF MEDIA SDI OUT HDV SLOT SELECT IN CAHUL-E1DVIOELCH-2ASAUUEMDTLAIOEONCUTALAUMTAAONUUDEAIINXLOT IN EXT GENLOCK IN TC IN TC OUT PMW-EX3 OPEN REMOTE Side operation panel (page 19) 12 11 Operation panel on the handle(page 18) 5 6 7...
...) 3. Lens mount lever (page 34) 5. Power (CAMERA/MEDIA) switch (page 28) 12. PICTURE PROFILE button (page 84) 16 Parts Identifications Overview Parts Identifications Camcorder 1 2 3 R L MONITVOORL THUMNAIL SEL/SEFTREVCAPNLj CAEY/LPAUSEGPFR/SFEWV D J STOP l NEXT L s SRTEACRT/STOP HOLD H L OFF 16:9 WIDE SCREEN 1.9 ...PPIRCOTFUIRLEE CAMERA OFF MEDIA SDI OUT HDV SLOT SELECT IN CAHUL-E1DVIOELCH-2ASAUUEMDTLAIOEONCUTALAUMTAAONUUDEAIINXLOT IN EXT GENLOCK IN TC IN TC OUT PMW-EX3 OPEN REMOTE Side operation panel (page 19) 12 11 Operation panel on the handle(page 18) 5 6 7...
Operating Instructions
Page 20
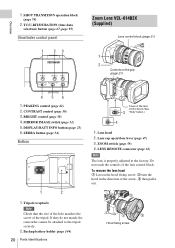
... screw of the lens control block. CONTRAST control (page 30) 3. ZEBRA button (page 54) Bottom 1 2 1. PEAKING control (page 62) 2. If they do not match, the camcorder cannot be attached to the tripod securely. 2. ZOOM switch (page 59) 4. To remove the lens hood 1 Loosen the hood fixing screw, 2 turn the hood in...
... screw of the lens control block. CONTRAST control (page 30) 3. ZEBRA button (page 54) Bottom 1 2 1. PEAKING control (page 62) 2. If they do not match, the camcorder cannot be attached to the tripod securely. 2. ZOOM switch (page 59) 4. To remove the lens hood 1 Loosen the hood fixing screw, 2 turn the hood in...
Operating Instructions
Page 21
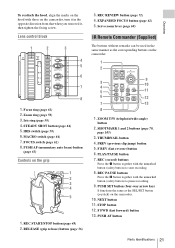
...) button 13. Zoom ring (page 59) 3. Iris ring (page 58) 4. PUSH AF (momentary auto focus) button (page 63) Controls on the camcorder. 10. Servo zoom lever (page 60) IR Remote Commander (Supplied) The buttons without remarks can be used in the opposite direction from that when you... button 7. NEXT button 11. PUSH AF button Parts Identifications 21 Overview To reattach the hood, align the marks on the hood with those on the camcorder, turn it , then tighten the fixing screw. FOCUS switch (page 62) 8. THUMBNAIL button 4. F REV (fast reverse) button 6. RELEASE (grip release) ...
...) button 13. Zoom ring (page 59) 3. Iris ring (page 58) 4. PUSH AF (momentary auto focus) button (page 63) Controls on the camcorder. 10. Servo zoom lever (page 60) IR Remote Commander (Supplied) The buttons without remarks can be used in the opposite direction from that when you... button 7. NEXT button 11. PUSH AF button Parts Identifications 21 Overview To reattach the hood, align the marks on the hood with those on the camcorder, turn it , then tighten the fixing screw. FOCUS switch (page 62) 8. THUMBNAIL button 4. F REV (fast reverse) button 6. RELEASE (grip release) ...

Operating Instructions
Page 22
When you use the remote commander, see "Using the IR Remote Commander" on page 39. 22 Parts Identifications Overview Note The SUB CLIP button does not function with this camcorder.
When you use the remote commander, see "Using the IR Remote Commander" on page 39. 22 Parts Identifications Overview Note The SUB CLIP button does not function with this camcorder.

Operating Instructions
Page 26
... OUCTH-2 COMOPUOTNENT Battery pack receptacle Power switch: OFF Note If a battery pack that cannot be fully recharged. One BP-U30 is supplied with this camcorder is mounted, an error message is appears in the viewfinder screen. 120min A: 25min B: 50min Z99 STBY S&Q REC T Icon Remaining 100% to ...BP-U30 or BP-U60 Lithium-ion battery pack. Preparations Power Supply Preparations You can use may not be able to be used with this camcorder. Notes • Before use, charge the battery pack with the supplied BC-U1 Battery Charger. • A warm battery pack immediately after...
... OUCTH-2 COMOPUOTNENT Battery pack receptacle Power switch: OFF Note If a battery pack that cannot be fully recharged. One BP-U30 is supplied with this camcorder is mounted, an error message is appears in the viewfinder screen. 120min A: 25min B: 50min Z99 STBY S&Q REC T Icon Remaining 100% to ...BP-U30 or BP-U60 Lithium-ion battery pack. Preparations Power Supply Preparations You can use may not be able to be used with this camcorder. Notes • Before use, charge the battery pack with the supplied BC-U1 Battery Charger. • A warm battery pack immediately after...

Operating Instructions
Page 27
...input voltage is displayed in the viewfinder when you hold the DISPLAY/BATT INFO button pressed even if the camcorder is set the power switch to a level at the current rate of the tally lamps, and a beep... sound will warn you. These settings can connect an AC power source to this camcorder by using the supplied BC-U1 Battery Charger for BP-U30/U60 as an AC adaptor, as shown below: ...BC-U1 1 Connect the DC power output cable of the BC-U1 to the DC IN connector of the camcorder. 2 Connect the power cord supplied with the BC-U1 to the AC input connector of the BC-U1 ...
...input voltage is displayed in the viewfinder when you hold the DISPLAY/BATT INFO button pressed even if the camcorder is set the power switch to a level at the current rate of the tally lamps, and a beep... sound will warn you. These settings can connect an AC power source to this camcorder by using the supplied BC-U1 Battery Charger for BP-U30/U60 as an AC adaptor, as shown below: ...BC-U1 1 Connect the DC power output cable of the BC-U1 to the DC IN connector of the camcorder. 2 Connect the power cord supplied with the BC-U1 to the AC input connector of the BC-U1 ...

Operating Instructions
Page 28
...IN power, be sure to set the switch to the CAMERA position. Remove the battery pack if the camcorder will not be used for playback. power without first setting the power switch to OFF may cause damage...Turning Power Off Set the power switch to OFF. The mode is set the mode switch of the BC-U1 to the camcorder or SxS memory cards. 16:9 WIDE SCREEN 10 15 30 3 5 10 ft mm R L MONITVOORL THUMNAIL SEL/SEFTREVCAPNLj CAEY...-2ASAUUEMDTLAIOEONCUTALAUMTAAONUUDEAIINXLOT IN EXT GENLOCK IN TC IN TC OUT PMW-EX3 OPEN REMOTE Power switch CAMERA OFF MEDIA To operate in advance.
...IN power, be sure to set the switch to the CAMERA position. Remove the battery pack if the camcorder will not be used for playback. power without first setting the power switch to OFF may cause damage...Turning Power Off Set the power switch to OFF. The mode is set the mode switch of the BC-U1 to the camcorder or SxS memory cards. 16:9 WIDE SCREEN 10 15 30 3 5 10 ft mm R L MONITVOORL THUMNAIL SEL/SEFTREVCAPNLj CAEY...-2ASAUUEMDTLAIOEONCUTALAUMTAAONUUDEAIINXLOT IN EXT GENLOCK IN TC IN TC OUT PMW-EX3 OPEN REMOTE Power switch CAMERA OFF MEDIA To operate in advance.

Operating Instructions
Page 29
... MENU SEL/SET CANCEL PPIRCOTFUIRLEE CAMERA OFF MEDIA SDI OUT HDV SLOT SELECT IN CAHUL-E1DVIOELCH-2ASAUUEMDTLAIOEONCUTALAUMTAAONUUDEAIINXLOT IN EXT GENLOCK IN TC IN TC OUT PMW-EX3 OPEN REMOTE INITIAL SETTING Time Zone: UTC +09:00 TOKYO Date / Time: 20098/01/01 00:00:00 SET F i n i sh 2 Tilt the ... Notes • If the clock setting is cleared because of exhaustion of the OTHERS menu. Preparations Setting the Clock When you turn the camcorder on for the first time after the Initial Setting display disappears, the time zone and date/time settings can be displayed when you turn ...
... MENU SEL/SET CANCEL PPIRCOTFUIRLEE CAMERA OFF MEDIA SDI OUT HDV SLOT SELECT IN CAHUL-E1DVIOELCH-2ASAUUEMDTLAIOEONCUTALAUMTAAONUUDEAIINXLOT IN EXT GENLOCK IN TC IN TC OUT PMW-EX3 OPEN REMOTE INITIAL SETTING Time Zone: UTC +09:00 TOKYO Date / Time: 20098/01/01 00:00:00 SET F i n i sh 2 Tilt the ... Notes • If the clock setting is cleared because of exhaustion of the OTHERS menu. Preparations Setting the Clock When you turn the camcorder on for the first time after the Initial Setting display disappears, the time zone and date/time settings can be displayed when you turn ...
Operating Instructions
Page 30
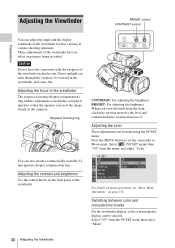
... rotation decreases it. Direct sunlight can enter through the eyepiece, be made using the VF SET menu. Caution Do not leave the camcorder with the eyepiece of the viewfinder. VIDEO S MONOITUOTR IN DC Preparations Adjusting the Viewfinder BRIGHT control CONTRAST control You can adjust the ... focus in the viewfinder The eyepiece focusing (diopter compensation) ring enables adjustment to Menu mode. Press the MENU button to set the camcorder to match the eyesight of the viewfinder have no effect on page 111. Switching between color and monochrome modes For the viewfinder display,...
... rotation decreases it. Direct sunlight can enter through the eyepiece, be made using the VF SET menu. Caution Do not leave the camcorder with the eyepiece of the viewfinder. VIDEO S MONOITUOTR IN DC Preparations Adjusting the Viewfinder BRIGHT control CONTRAST control You can adjust the ... focus in the viewfinder The eyepiece focusing (diopter compensation) ring enables adjustment to Menu mode. Press the MENU button to set the camcorder to match the eyesight of the viewfinder have no effect on page 111. Switching between color and monochrome modes For the viewfinder display,...
Operating Instructions
Page 31
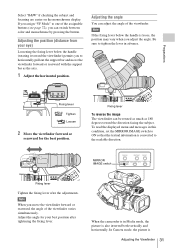
.../SET F REV j PREV l s PLAY/PAUSEG/S J F FWD CANCEL R CH-1 AUDIO IN CH-2 LINE MIC MIC+48V LINE MIC MIC+48V VIDEO S MONOITUOTR IN DC When the camcorder is also inverted both vertically and horizontally. Preparations Select "B&W" if checking the subject and focusing are easier on the monochrome display. Adjusting the position (distance...
.../SET F REV j PREV l s PLAY/PAUSEG/S J F FWD CANCEL R CH-1 AUDIO IN CH-2 LINE MIC MIC+48V LINE MIC MIC+48V VIDEO S MONOITUOTR IN DC When the camcorder is also inverted both vertically and horizontally. Preparations Select "B&W" if checking the subject and focusing are easier on the monochrome display. Adjusting the position (distance...
Operating Instructions
Page 33
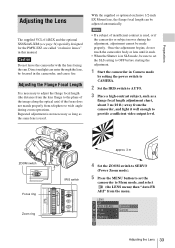
... page 34) specially designed for the PMW-EX3 are called "exclusive lenses" in Camera mode by setting the power switch to CAMERA. 2 Set the IRIS switch to AUTO. 3 Place a high-contrast subject, such as the same lens is used , or if the camcorder or subject moves during zoom operations. ...the ZOOM switch to SERVO (Power Zoom mode). 5 Press the MENU button to set the SLS setting to OFF before starting the adjustment. 1 Start the camcorder in this manual. Direct sunlight can be made properly. Repeated adjustment is used . LENS Auto FB ADJ File Flare 00:00 Shad i n g Execute B...
... page 34) specially designed for the PMW-EX3 are called "exclusive lenses" in Camera mode by setting the power switch to CAMERA. 2 Set the IRIS switch to AUTO. 3 Place a high-contrast subject, such as the same lens is used , or if the camcorder or subject moves during zoom operations. ...the ZOOM switch to SERVO (Power Zoom mode). 5 Press the MENU button to set the SLS setting to OFF before starting the adjustment. 1 Start the camcorder in this manual. Direct sunlight can be made properly. Repeated adjustment is used . LENS Auto FB ADJ File Flare 00:00 Shad i n g Execute B...

Operating Instructions
Page 34
...for the first time, it may be mounted in -progress message is used, adjust the flange focal length manually. Note Turn off the camcorder before replacing the lens. If the adjustment fails Check the conditions of the subject and lighting then perform the adjustment again. For details ...until it by turning the lens mount lever downward. • When a non-exclusive lens is mounted for the PMW-EX3 is displayed. For non-exclusive but usable lenses, consult your Sony service representative. Attaching an exclusive lens To attach the optional 1/2-inch EX Mount lens, proceed as follows: The ...
...for the first time, it may be mounted in -progress message is used, adjust the flange focal length manually. Note Turn off the camcorder before replacing the lens. If the adjustment fails Check the conditions of the subject and lighting then perform the adjustment again. For details ...until it by turning the lens mount lever downward. • When a non-exclusive lens is mounted for the PMW-EX3 is displayed. For non-exclusive but usable lenses, consult your Sony service representative. Attaching an exclusive lens To attach the optional 1/2-inch EX Mount lens, proceed as follows: The ...

Operating Instructions
Page 35
...M H STATUS MENU SEL/SET CANCEL 3 1 Align the alignment pin of the lens with the camcorder. 1 Attach the lens adaptor to the LOCK position. To detach the lens, reverse the above procedure. Attaching a Sony 1/2-inch Bayonet Mount lens Use the lens adaptor supplied with the recess at the top of the... HOLD OFFL H mount section and set the adaptor in place. 2 Turn the lens mount lever of the camcorder downward. (Keep the lens mount lever ...
...M H STATUS MENU SEL/SET CANCEL 3 1 Align the alignment pin of the lens with the camcorder. 1 Attach the lens adaptor to the LOCK position. To detach the lens, reverse the above procedure. Attaching a Sony 1/2-inch Bayonet Mount lens Use the lens adaptor supplied with the recess at the top of the... HOLD OFFL H mount section and set the adaptor in place. 2 Turn the lens mount lever of the camcorder downward. (Keep the lens mount lever ...


