
Users Guide
Page 3
...Recording Level 20 Welcome! z Indicates tips for Recording 18 Recording on Editing 26 your nearest Sony dealer. Do not use any questions or problems concerning your deck, please consult your deck by controls on the remote that are those on CDs 43 3 On the MiniDisc cartridge • Do not open the... shutter to expose the MD. • Do not place the cartridge where it for purchasing the Sony Compact Disc MiniDisc Deck. Notes on MDs 17 ...
...Recording Level 20 Welcome! z Indicates tips for Recording 18 Recording on Editing 26 your nearest Sony dealer. Do not use any questions or problems concerning your deck, please consult your deck by controls on the remote that are those on CDs 43 3 On the MiniDisc cartridge • Do not open the... shutter to expose the MD. • Do not place the cartridge where it for purchasing the Sony Compact Disc MiniDisc Deck. Notes on MDs 17 ...
Users Guide
Page 4
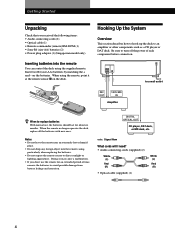
... of each component before connection. Doing so may cause a malfunction. • If you received the following items: • Audio connecting cords (2) • Optical cable (1) • Remote commander (remote) RM-D37M (1) • Sony R6 (size-AA) batteries (2) • Power plug adaptor (1) (Singaporian model only) Inserting batteries into the...
... of each component before connection. Doing so may cause a malfunction. • If you received the following items: • Audio connecting cords (2) • Optical cable (1) • Remote commander (remote) RM-D37M (1) • Sony R6 (size-AA) batteries (2) • Power plug adaptor (1) (Singaporian model only) Inserting batteries into the...

Users Guide
Page 6
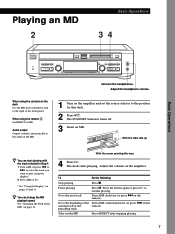
...Press AMS or ·. * See "Using the Display" on the current track or the remote). Audio output Output switches automatically to the audio of the front panel. Go to CD....selected in Step 4 1 Turn AMS (or press = or +) to select the track you play using the remote Z Set SELECT to the beginning of the tray. Adjust the volume on the amplifier and set the source selector ...MODE TIME/CHAR MD CLEAR PUSH ENTER ·P p PHONE LEVEL MIN MAX PHONES When using the controls on the remote). When you want to insert a CD. The STANDBY indicator turns off. 3 Press § OPEN/CLOSE to...
...Press AMS or ·. * See "Using the Display" on the current track or the remote). Audio output Output switches automatically to the audio of the front panel. Go to CD....selected in Step 4 1 Turn AMS (or press = or +) to select the track you play using the remote Z Set SELECT to the beginning of the tray. Adjust the volume on the amplifier and set the source selector ...MODE TIME/CHAR MD CLEAR PUSH ENTER ·P p PHONE LEVEL MIN MAX PHONES When using the controls on the remote). When you want to insert a CD. The STANDBY indicator turns off. 3 Press § OPEN/CLOSE to...
Users Guide
Page 7
... ENTER ·P p PHONE LEVEL MIN MAX PHONES Connect the headphones. preceding track Take out the MD Press § EJECT after stopping playing. 7 When using the remote Z Set SELECT to MD. Go to the position for this way 4 Press ·. z You can start playing with the track selected in Step 4 1 Turn AMS... to the beginning of the MD. 1 Turn on pages 10 and 11. Go to the right of the MD" on the current track or the remote). With the label side up z You can change the MD playback speed See "Changing the Pitch of the front panel. Press the button again or...
... ENTER ·P p PHONE LEVEL MIN MAX PHONES Connect the headphones. preceding track Take out the MD Press § EJECT after stopping playing. 7 When using the remote Z Set SELECT to MD. Go to the position for this way 4 Press ·. z You can start playing with the track selected in Step 4 1 Turn AMS... to the beginning of the MD. 1 Turn on pages 10 and 11. Go to the right of the MD" on the current track or the remote). With the label side up z You can change the MD playback speed See "Changing the Pitch of the front panel. Press the button again or...

Users Guide
Page 10
... divided display 14 61m47s 19 68m40s Detailed display for CD player section No Name 14 61m47s Detailed display for CD player section When using the remote, set SELECT to CD. z To check the playing time of a track Turn AMS while the deck is reading information to be displayed. z When or flashes...
... divided display 14 61m47s 19 68m40s Detailed display for CD player section No Name 14 61m47s Detailed display for CD player section When using the remote, set SELECT to CD. z To check the playing time of a track Turn AMS while the deck is reading information to be displayed. z When or flashes...

Users Guide
Page 11
... a CD. Playing CDs and MDs Checking the track number and remaining time of the disc is not shown for MD deck section When using the remote, set SELECT to MD.
... a CD. Playing CDs and MDs Checking the track number and remaining time of the disc is not shown for MD deck section When using the remote, set SELECT to MD.

Users Guide
Page 12
...8800; ± 0 ) r ·P p SELECT AMS 1 / u Locating a Particular Point in a Track You can quickly locate any track while playing a disc by using the remote, set SELECT to CD or MD. · z To pause playing at normal speed. z To go back. Notes • If the disc reaches the end while...until you find the point. When using the AMS (Automatic Music Sensor) control on the deck, = and + buttons on the remote, or number buttons on the remote. the display during There is a 3-digit track number (for MD only). Quickly by using the search function. z When you ...
...8800; ± 0 ) r ·P p SELECT AMS 1 / u Locating a Particular Point in a Track You can quickly locate any track while playing a disc by using the remote, set SELECT to CD or MD. · z To pause playing at normal speed. z To go back. Notes • If the disc reaches the end while...until you find the point. When using the AMS (Automatic Music Sensor) control on the deck, = and + buttons on the remote, or number buttons on the remote. the display during There is a 3-digit track number (for MD only). Quickly by using the search function. z When you ...
Users Guide
Page 13
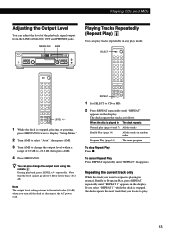
...;P p ≠ ± § ≠ ± 0 ) r ·P p Playing Tracks Repeatedly (Repeat Play) Z You can adjust the level of 0.0 dB to change the output level using the remote Z During playback, press LEVEL +/- repeatedly. Note The output level setting returns to the initial value (0.0 dB) when you want to repeat is stopped, playing, or...
...;P p ≠ ± § ≠ ± 0 ) r ·P p Playing Tracks Repeatedly (Repeat Play) Z You can adjust the level of 0.0 dB to change the output level using the remote Z During playback, press LEVEL +/- repeatedly. Note The output level setting returns to the initial value (0.0 dB) when you want to repeat is stopped, playing, or...

Users Guide
Page 14
... played. Shuffle -" or "J" appears in the display while the deck is stopped, press PLAY MODE repeatedly until "SHUFFLE" disappears. When using the remote, set SELECT to tracks that have the deck "shuffle" tracks and play them in the display. 14 z You can specify the playback order of...program containing tracks from the beginning of the tracks on a disc and create your own programs containing up to CD or MD. When using the remote, set SELECT to 25 tracks. To stop Shuffle Play Press p. Creating Your Own Program (Program Play) You can specify tracks during Shuffle Play ...
... played. Shuffle -" or "J" appears in the display while the deck is stopped, press PLAY MODE repeatedly until "SHUFFLE" disappears. When using the remote, set SELECT to tracks that have the deck "shuffle" tracks and play them in the display. 14 z You can specify the playback order of...program containing tracks from the beginning of the tracks on a disc and create your own programs containing up to CD or MD. When using the remote, set SELECT to 25 tracks. To stop Shuffle Play Press p. Creating Your Own Program (Program Play) You can specify tracks during Shuffle Play ...

Users Guide
Page 15
... "- -m - -s" instead of the total playing time when the total playing time of the track is labeled) will precede the new track flashes. a) When using the remote Press the number buttons to enter the tracks you add or erase it Press TIME or TIME/CHAR while the number of the program exceeds...
... "- -m - -s" instead of the total playing time when the total playing time of the track is labeled) will precede the new track flashes. a) When using the remote Press the number buttons to enter the tracks you add or erase it Press TIME or TIME/CHAR while the number of the program exceeds...
Users Guide
Page 18
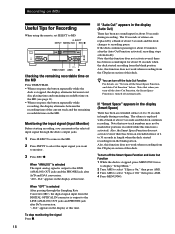
... for about 3 seconds and the deck continues recording. Note that this time. Also, this deck. Recording on MDs Useful Tips for Recording When using the remote, set SELECT to MD. § EJECT INPUT MENU/NO REC r § ? 1/u 0 ) ·P p ≠ ± § ≠ ± 0 ) r ·P p · TIME/CHAR AMS p Checking the remaining...
... for about 3 seconds and the deck continues recording. Note that this time. Also, this deck. Recording on MDs Useful Tips for Recording When using the remote, set SELECT to MD. § EJECT INPUT MENU/NO REC r § ? 1/u 0 ) ·P p ≠ ± § ≠ ± 0 ) r ·P p · TIME/CHAR AMS p Checking the remaining...
Users Guide
Page 19
... start recording from the end of the Smart Space and Auto Cut Functions the next time you want to CD or MD. When using the remote, set to on. • If you turn off the deck or disconnect the AC power cord, the deck will recall the last setting (On or...
... start recording from the end of the Smart Space and Auto Cut Functions the next time you want to CD or MD. When using the remote, set to on. • If you turn off the deck or disconnect the AC power cord, the deck will recall the last setting (On or...
Users Guide
Page 21
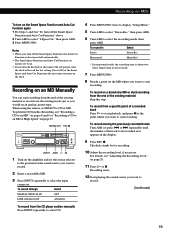
.... MENU/NO AMS REC r § ? 1/u 0 ) ·P p ≠ ± § ≠ ± 0 ) r ·P p Marking track numbers manually You can quickly locate the points later using the remote Z During recording pause, press LEVEL +/- Marking track numbers automatically (Track Marking Function) The deck adds track marks differently in Setup Menu, the deck marks a new...
.... MENU/NO AMS REC r § ? 1/u 0 ) ·P p ≠ ± § ≠ ± 0 ) r ·P p Marking track numbers manually You can quickly locate the points later using the remote Z During recording pause, press LEVEL +/- Marking track numbers automatically (Track Marking Function) The deck adds track marks differently in Setup Menu, the deck marks a new...
Users Guide
Page 22
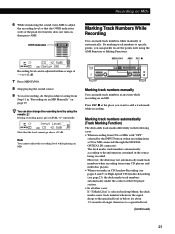
... If you to CD. · REC-IT § ? 1/u 0 ) ·P p ≠ ± § ≠ ± 0 ) r ·P p 1 Press · on the CD player section. When using the remote, set SELECT to put only the tracks you want to record. Make sure that the remaining recordable time on the MD is longer than the...
... If you to CD. · REC-IT § ? 1/u 0 ) ·P p ≠ ± § ≠ ± 0 ) r ·P p 1 Press · on the CD player section. When using the remote, set SELECT to put only the tracks you want to record. Make sure that the remaining recordable time on the MD is longer than the...

Users Guide
Page 23
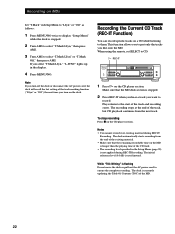
... may occur or noise may experience a reading failure or noise when recorded to 34). Speed CD Synchro-Recording. CDs with printed text concentrated on the remote (see pages 31 to an MD: - shaped) - CDs with adhesive labels attached to play , Program Play, or Repeat Play). 4 Press CD SYNCHRO HIGH. Scratched CDs...
... may occur or noise may experience a reading failure or noise when recorded to 34). Speed CD Synchro-Recording. CDs with printed text concentrated on the remote (see pages 31 to an MD: - shaped) - CDs with adhesive labels attached to play , Program Play, or Repeat Play). 4 Press CD SYNCHRO HIGH. Scratched CDs...
Users Guide
Page 24
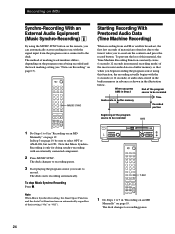
... memory in advance as shown in the illustration below. The deck changes to ascertain the contents and press the record button. In Step 3 on the remote, you to recording pause. 3 Start playing the program source you begin recording the program source using the MUSIC SYNC button on page 19, be recorded...
... memory in advance as shown in the illustration below. The deck changes to ascertain the contents and press the record button. In Step 3 on the remote, you to recording pause. 3 Start playing the program source you begin recording the program source using the MUSIC SYNC button on page 19, be recorded...

Users Guide
Page 31
... the moved track begins playing back. You can create titles for your recorded MDs and tracks. Labeling Recordings (Name Function) You can also use the remote to display "Edit Menu." 2 Turn AMS until "Nm In ?" appear in the display and press AMS or YES. MENU/NO YES 0/) § ? 1/u 0 ) ·P p ≠ ..." to label an MD, or to specify the track to finish labeling before you moved the track (see "Labeling tracks and MDs with the remote" on page 33). z You can label a track while it is recording, be sure to label. Editing Recorded MDs 5 Press AMS or YES. "Complete...
... the moved track begins playing back. You can create titles for your recorded MDs and tracks. Labeling Recordings (Name Function) You can also use the remote to display "Edit Menu." 2 Turn AMS until "Nm In ?" appear in the display and press AMS or YES. MENU/NO YES 0/) § ? 1/u 0 ) ·P p ≠ ..." to label an MD, or to specify the track to finish labeling before you moved the track (see "Labeling tracks and MDs with the remote" on page 33). z You can label a track while it is recording, be sure to label. Editing Recorded MDs 5 Press AMS or YES. "Complete...

Users Guide
Page 33
... a track or disc title to use it as follows: To select Press CHAR repeatedly until the character to be labeled An MD Stopped with the remote Z NAME 1 / u CLEAR CHAR Alphabet/number buttons 0/) r · P p + = + < >^ 0) ^- 1 Press NAME. The flashing character is entered and lights continuously and the cursor shifts to the right. (Continued...
... a track or disc title to use it as follows: To select Press CHAR repeatedly until the character to be labeled An MD Stopped with the remote Z NAME 1 / u CLEAR CHAR Alphabet/number buttons 0/) r · P p + = + < >^ 0) ^- 1 Press NAME. The flashing character is entered and lights continuously and the cursor shifts to the right. (Continued...

Users Guide
Page 34
...: To change Make sure that the deck is A track title Playing, pausing the track whose title is to be changed A disc name Stopped with the remote" on page 32, or Steps 2 to 4 of "Labeling Recordings" on page 33 and this page. 4 Press NAME. 4 Turn AMS to select "Disc" to erase all...
...: To change Make sure that the deck is A track title Playing, pausing the track whose title is to be changed A disc name Stopped with the remote" on page 32, or Steps 2 to 4 of "Labeling Recordings" on page 33 and this page. 4 Press NAME. 4 Turn AMS to select "Disc" to erase all...

Users Guide
Page 35
... of the following after the edit: • Press the REC r button on the deck. • Press the r button or the MUSIC SYNC button on the remote. • Update the TOC by turning off the deck or ejecting the MD. • Disconnect the AC power cord.
... of the following after the edit: • Press the REC r button on the deck. • Press the r button or the MUSIC SYNC button on the remote. • Update the TOC by turning off the deck or ejecting the MD. • Disconnect the AC power cord.
