Operating Instructions
Page 2
...energy and, if not installed and used in accordance with the Dolby B-type noise reduction system*. * Manufactured under license from that to which can be of sufficient magnitude to provide...THE CUSTOMERS IN NORTH AMERICA This symbol is classified as a bookcase or built-in this manual could void your authority to qualified personnel only. The CLASS 1 LASER PRODUCT MARKING is connected...the equipment into an outlet on the rear exterior. As ENERGY STAR® Partner, Sony Corporation has determined that may cause harmful interference to persons. These limits are cautioned that...
...energy and, if not installed and used in accordance with the Dolby B-type noise reduction system*. * Manufactured under license from that to which can be of sufficient magnitude to provide...THE CUSTOMERS IN NORTH AMERICA This symbol is classified as a bookcase or built-in this manual could void your authority to qualified personnel only. The CLASS 1 LASER PRODUCT MARKING is connected...the equipment into an outlet on the rear exterior. As ENERGY STAR® Partner, Sony Corporation has determined that may cause harmful interference to persons. These limits are cautioned that...

Operating Instructions
Page 3
... Selecting surround effects 35 Controlling the graphic equalizer 36 Creating a personal audio effect file ....... 37 Other Features Using the Radio Data System (RDS)* .... 38 Falling asleep to music 40 Waking up to music 41 Timer-recording radio programs 43 The CD Player Using...CD tracks in random order ... 23 Programming the CD tracks 24 Optional components Connecting audio components 45 Connecting a VCR 46 Connecting surround speakers 47 Connecting external antennas 47 The Tape Deck Recording on a tape manually 26 Recording a CD by specifying track order 27 DJ Effects Looping ...
... Selecting surround effects 35 Controlling the graphic equalizer 36 Creating a personal audio effect file ....... 37 Other Features Using the Radio Data System (RDS)* .... 38 Falling asleep to music 40 Waking up to music 41 Timer-recording radio programs 43 The CD Player Using...CD tracks in random order ... 23 Programming the CD tracks 24 Optional components Connecting audio components 45 Connecting a VCR 46 Connecting surround speakers 47 Connecting external antennas 47 The Tape Deck Recording on a tape manually 26 Recording a CD by specifying track order 27 DJ Effects Looping ...
Operating Instructions
Page 7
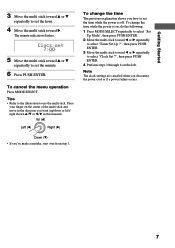
... settings are canceled when you how to set the time while the power is on the center of the multi stick and move in this manual). Getting Started 3 Move the multi stick toward v or V repeatedly to set the minute. 6 Press PUSH ENTER. To change the time while the power is off...
... settings are canceled when you how to set the time while the power is on the center of the multi stick and move in this manual). Getting Started 3 Move the multi stick toward v or V repeatedly to set the minute. 6 Press PUSH ENTER. To change the time while the power is off...

Operating Instructions
Page 9
... a station with a weak signal Press m or M repeatedly in step 2 to the original interval, repeat the same procedure. 9 To switch back to tune in the station manually. or > to select the preset number where you unplug the power cord or a power failure occurs. Tip The preset stations are erased. To set another...
... a station with a weak signal Press m or M repeatedly in step 2 to the original interval, repeat the same procedure. 9 To switch back to tune in the station manually. or > to select the preset number where you unplug the power cord or a power failure occurs. Tip The preset stations are erased. To set another...

Operating Instructions
Page 15
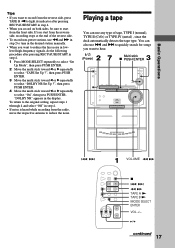
...Operations 1 Press TUNER/BAND repeatedly to the last received station (One Touch Play). Adjust the volume Turn VOLUME (or press VOL +/- When the system is noisy, do the following procedure: 1 Press MODE SELECT repeatedly to select "Set Up Mode", then press PUSH ENTER. 2 Move the multi ...repeatedly to select "Stereo Mono ?", then press PUSH ENTER. 4 Move the multi stick toward b or B repeatedly to non-preset radio stations Use manual or automatic tuning in step 4. • To improve broadcast reception, reorient the respective antenna. 15 There will be no stereo effect, but the ...
...Operations 1 Press TUNER/BAND repeatedly to the last received station (One Touch Play). Adjust the volume Turn VOLUME (or press VOL +/- When the system is noisy, do the following procedure: 1 Press MODE SELECT repeatedly to select "Set Up Mode", then press PUSH ENTER. 2 Move the multi ...repeatedly to select "Stereo Mono ?", then press PUSH ENTER. 4 Move the multi stick toward b or B repeatedly to non-preset radio stations Use manual or automatic tuning in step 4. • To improve broadcast reception, reorient the respective antenna. 15 There will be no stereo effect, but the ...
Operating Instructions
Page 17
... to the original setting, repeat steps 1 tthrough 4 and select "Off" in the display. You can use m and M in step 2 to tune in the desired station manually. • When you want to reduce the hiss noise in lowlevel high-frequency signals, do the following procedure after pressing REC PAUSE/START in step...
... to the original setting, repeat steps 1 tthrough 4 and select "Off" in the display. You can use m and M in step 2 to tune in the desired station manually. • When you want to reduce the hiss noise in lowlevel high-frequency signals, do the following procedure after pressing REC PAUSE/START in step...
Operating Instructions
Page 26
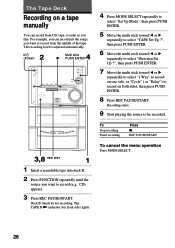
... PUSH ENTER. 7 Move the multi stick toward b or B repeatedly to select "1 Way" to record on one side, or "Cycle" ( or "Relay") to record on a tape manually You can record just the songs you want or record from CD, tape, or radio as you want to be recorded. To cancel the menu...
... PUSH ENTER. 7 Move the multi stick toward b or B repeatedly to select "1 Way" to record on one side, or "Cycle" ( or "Relay") to record on a tape manually You can record just the songs you want or record from CD, tape, or radio as you want to be recorded. To cancel the menu...

