Operating Instructions
Page 2
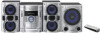
... device must accept any changes or modifications not expressly approved in the U.S.A This symbol is intended to alert the user to operate this manual could void your authority to the presence of the FCC Rules. This marking is no guarantee that to radio communications. WARNING This equipment has been...
... device must accept any changes or modifications not expressly approved in the U.S.A This symbol is intended to alert the user to operate this manual could void your authority to the presence of the FCC Rules. This marking is no guarantee that to radio communications. WARNING This equipment has been...
Operating Instructions
Page 4
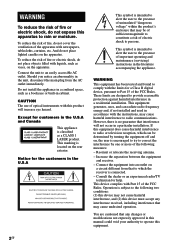
Table of Contents Guide to parts and controls 5 Getting Started Hooking up the system securely ....... 8 Setting the clock 10 Basic Operations Playing a CD/CD-G/MP3 disc.......... 11 Listening to the radio 12 Playing a tape 13 Using optional audio ... Changing the display 15 Other Operations Creating your own CD program (Program Play 16 Presetting radio stations 17 Recording onto a tape (CD Synchro recording/Manual recording/Sound Mixing 18 Creating your own sound effect ...... 19 Enjoying karaoke (Latin American model only 20 Using the Timers 21 Others Troubleshooting 23 Messages...
Table of Contents Guide to parts and controls 5 Getting Started Hooking up the system securely ....... 8 Setting the clock 10 Basic Operations Playing a CD/CD-G/MP3 disc.......... 11 Listening to the radio 12 Playing a tape 13 Using optional audio ... Changing the display 15 Other Operations Creating your own CD program (Program Play 16 Presetting radio stations 17 Recording onto a tape (CD Synchro recording/Manual recording/Sound Mixing 18 Creating your own sound effect ...... 19 Enjoying karaoke (Latin American model only 20 Using the Timers 21 Others Troubleshooting 23 Messages...
Operating Instructions
Page 5
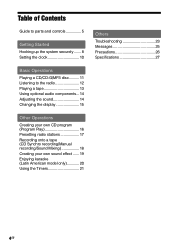
...function. AUDIO IN button (page 14) Press to parts and controls Unit Remote This manual mainly explains operations using the remote, but the same operations can also be performed using the buttons on the system. STANDBY indicator (page 15, 23) Lights up when the subwoofer is .... Continued 5GB FUNCTION button Press to select the function. SUBWOOFER indicator (MHCGX470/RG590S/RG490S only) (page 14) Lights up when the system is turned on. SUBWOOFER button (MHCGX470/RG590S/RG490S only) (page 14) Press to turn on and off . CD button (page ...
...function. AUDIO IN button (page 14) Press to parts and controls Unit Remote This manual mainly explains operations using the remote, but the same operations can also be performed using the buttons on the system. STANDBY indicator (page 15, 23) Lights up when the subwoofer is .... Continued 5GB FUNCTION button Press to select the function. SUBWOOFER indicator (MHCGX470/RG590S/RG490S only) (page 14) Lights up when the system is turned on. SUBWOOFER button (MHCGX470/RG590S/RG490S only) (page 14) Press to turn on and off . CD button (page ...
Operating Instructions
Page 6
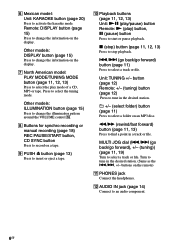
.... 6GB Unit: TUNING +/- Remote: DISPLAY button (page 15) Press to change the illumination pattern around the VOLUME control . Buttons for synchro recording or manual recording (page 18) REC PAUSE/START button, CD SYNC button Press to insert or eject a tape. Playback buttons (page 11, 12, 13) Unit: ...
.... 6GB Unit: TUNING +/- Remote: DISPLAY button (page 15) Press to change the illumination pattern around the VOLUME control . Buttons for synchro recording or manual recording (page 18) REC PAUSE/START button, CD SYNC button Press to insert or eject a tape. Playback buttons (page 11, 12, 13) Unit: ...

Operating Instructions
Page 18
...onto a tape. To record only your favorite CD tracks or MP3 files in step 4. 3 Set deck B to select the disc. For Manual Recording and Sound Mixing: Select the desired source to select the CD function. To record only sound from a sound source, including connected audio components. ..." ," and then press +/- repeatedly to select TAPE B. 2 Prepare the recording source. For CD Synchro Recording: Press CD SYNC . For Manual Recording and Sound Mixing: Press REC PAUSE/START . 18GB Sound Mixing (Latin American model only): You can be recorded onto a tape.
...onto a tape. To record only your favorite CD tracks or MP3 files in step 4. 3 Set deck B to select the disc. For Manual Recording and Sound Mixing: Select the desired source to select the CD function. To record only sound from a sound source, including connected audio components. ..." ," and then press +/- repeatedly to select TAPE B. 2 Prepare the recording source. For CD Synchro Recording: Press CD SYNC . For Manual Recording and Sound Mixing: Press REC PAUSE/START . 18GB Sound Mixing (Latin American model only): You can be recorded onto a tape.
Operating Instructions
Page 19
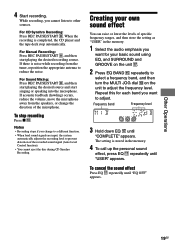
...the recording is noise while recording from the speakers, or change to a different function. • When loud sound signals are input, the system automatically adjusts the recording level to prevent distortion of the recorded sound signal (Auto Level Control function). • You cannot eject the disc ... raise or lower the levels of the microphone. While recording, you want for each band you cannot listen to reduce the noise. For Manual Recording: Press REC PAUSE/START , and then start singing or speaking into the microphone. 4 Start recording. The setting is stored in...
...the recording is noise while recording from the speakers, or change to a different function. • When loud sound signals are input, the system automatically adjusts the recording level to prevent distortion of the recorded sound signal (Auto Level Control function). • You cannot eject the disc ... raise or lower the levels of the microphone. While recording, you want for each band you cannot listen to reduce the noise. For Manual Recording: Press REC PAUSE/START , and then start singing or speaking into the microphone. 4 Start recording. The setting is stored in...

Operating Instructions
Page 22
To cancel the timer Repeat the same procedure as the setting is not canceled manually. • The volume is reduced to minimum during the Rec Timer. • The Rec Timer is canceled automatically after the Rec Timer has been activated. 22GB Tips • The Play Timer setting remains as long as above until "PLAY SELECT" or "REC SELECT" appears, and then press ENTER . To activate or check the timer again Press CLOCK/TIMER SELECT , press repeatedly until "TIMER OFF" appears, and then press ENTER . To change the setting Start over from step 1.
To cancel the timer Repeat the same procedure as the setting is not canceled manually. • The volume is reduced to minimum during the Rec Timer. • The Rec Timer is canceled automatically after the Rec Timer has been activated. 22GB Tips • The Play Timer setting remains as long as above until "PLAY SELECT" or "REC SELECT" appears, and then press ENTER . To activate or check the timer again Press CLOCK/TIMER SELECT , press repeatedly until "TIMER OFF" appears, and then press ENTER . To change the setting Start over from step 1.

